Electric rail: Difference between revisions
m (→Appearances: Fixing problems) |
|||
| (2 intermediate revisions by one other user not shown) | |||
| Line 24: | Line 24: | ||
=====Appearances===== | =====Appearances===== | ||
<div class="contentbox mw-collapsible mw-collapsed"data-expandtext="Show appearances"data-collapsetext="appearances"> | <div class="contentbox mw-collapsible mw-collapsed"data-expandtext="Show appearances"data-collapsetext="Hide appearances"> | ||
*[[File:SMG Asset Sprite Star Cursor.png]] marks missions where they are completely absent. | |||
{|class="wikitable | *[[File:Galaxy StarP.png]] marks missions where they are loaded and may be visible, but cannot be encountered directly. | ||
{|class="wikitable" style="text-align:center" | |||
|-style="color:white;background:red" | |-style="color:white;background:red" | ||
!colspan= | !colspan=9|'''Green, platform''' | ||
|-style="color:white;background:red" | |-style="color:white;background:red" | ||
!Domes | !Domes | ||
!Galaxies | !Galaxies | ||
!Missions | !colspan=7|Missions | ||
|- | |- | ||
|[[Gate (Super Mario Galaxy)|Gate]] | |[[Gate (Super Mario Galaxy)|Gate]] | ||
|[[Gateway Galaxy]] | |[[Gateway Galaxy]] | ||
|[[File:Smg icon grandstar.png|link=Grand Star Rescue]]||[[File:SMG Asset Sprite Star Cursor.png|link=Gateway's Purple Coins]] | |||
|- | |- | ||
|-style="color:white;background:red" | |-style="color:white;background:red" | ||
!colspan= | !colspan=9|'''Green, immobile''' | ||
|-style="color:white;background:red" | |-style="color:white;background:red" | ||
!Domes | !Domes | ||
!Galaxies | !Galaxies | ||
!Missions | !colspan=7|Missions | ||
|- | |- | ||
|[[Terrace (Super Mario Galaxy)|Terrace]] | |[[Terrace (Super Mario Galaxy)|Terrace]] | ||
|[[Good Egg Galaxy]] | |[[Good Egg Galaxy]] | ||
|[[File:SMG Asset Sprite Star Cursor.png|link=Dino Piranha (mission)]]||[[File:SMG Asset Sprite Star Cursor.png|link=A Snack of Cosmic Proportions]]||[[File:Smg icon powerstar.png|link=King Kaliente's Battle Fleet]]||[[File:SMG Asset Sprite Star Cursor.png|link=Dino Piranha Speed Run]]||[[File:SMG Asset Sprite Star Cursor.png|link=Purple Coin Omelet]]||[[File:SMG Asset Sprite Star Cursor.png|link=Luigi on the Roof]] | |||
|- | |- | ||
|[[Fountain]] | |[[Fountain]] | ||
|[[Battlerock Galaxy]] | |[[Battlerock Galaxy]] | ||
|[[File:Smg icon powerstar.png|link=Battlerock Barrage]]||[[File:Smg icon powerstar.png|link=Breaking into the Battlerock]]||[[File:Smg icon powerstar.png|link=Topmaniac and the Topman Tribe]]||[[File:Smg icon daredevilcomet.png|link=Topmaniac's Daredevil Run]]||[[File:Smg icon purplecomet.png|link=Purple Coins on the Battlerock]]||[[File:Galaxy StarP.png|link=Battlerock's Garbage Dump]]||[[File:Smg icon greenstar.png|link=Luigi under the Saucer]] | |||
|- | |- | ||
|rowspan=2|[[Kitchen (Super Mario Galaxy)|Kitchen]] | |rowspan=2|[[Kitchen (Super Mario Galaxy)|Kitchen]] | ||
|[[Ghostly Galaxy]] | |[[Ghostly Galaxy]] | ||
|[[File:Galaxy StarP.png|link=Luigi and the Haunted Mansion]]||[[File:Galaxy StarP.png|link=A Very Spooky Sprint]]||[[File:Smg icon powerstar.png|link=Beware of Bouldergeist]]||[[File:Galaxy StarP.png|link=Bouldergeist's Daredevil Run]]||[[File:Galaxy StarP.png|link=Purple Coins in the Bone Pen]]||[[File:Galaxy StarP.png|link=Matter Splatter Mansion]] | |||
|- | |- | ||
|[[Bowser Jr.'s Airship Armada]] | |[[Bowser Jr.'s Airship Armada]] | ||
|[[File:Smg icon grandstar.png|link=Sinking the Airships]] | |||
|- | |- | ||
|rowspan=2|[[Engine Room]] | |rowspan=2|[[Engine Room]] | ||
|[[Toy Time Galaxy]] | |[[Toy Time Galaxy]] | ||
|[[File:SMG Asset Sprite Star Cursor.png|link=Heavy Metal Mecha-Bowser]]||[[File:Smg icon powerstar.png|link=Mario Meets Mario]]||[[File:SMG Asset Sprite Star Cursor.png|link=Bouncing Down Cake Lane]]||[[File:SMG Asset Sprite Star Cursor.png|link=Fast Foes of Toy Time]]||[[File:SMG Asset Sprite Star Cursor.png|link=Luigi's Purple Coins]]||[[File:Smg icon powerstar.png|link=The Flipswitch Chain]] | |||
|- | |- | ||
|[[Sand Spiral Galaxy]] | |[[Sand Spiral Galaxy]] | ||
|[[File:Smg icon powerstar.png|link=Choosing a Favorite Snack]] | |||
|- | |- | ||
|[[Garden (Super Mario Galaxy)|Garden]] | |[[Garden (Super Mario Galaxy)|Garden]] | ||
|[[Dreadnought Galaxy]] | |[[Dreadnought Galaxy]] | ||
|[[File:Smg icon powerstar.png|link=Infiltrating the Dreadnought]]||[[File:Smg icon powerstar.png|link=Dreadnought's Colossal Cannons]]||[[File:Smg icon powerstar.png|link=Revenge of the Topman Tribe]]||[[File:Smg icon speedycomet.png|link=Topman Tribe Speed Run]]||[[File:Smg icon purplecomet.png|link=Battlestation's Purple Coins]]||[[File:Smg icon powerstar.png|link=Dreadnought's Garbage Dump]] | |||
|- | |- | ||
|[[Comet Observatory]] | |[[Comet Observatory]] | ||
|[[Bubble Blast Galaxy]] | |[[Bubble Blast Galaxy]] | ||
|[[File:Smg icon powerstar.png|link=The Electric Labyrinth]] | |||
|- | |- | ||
|-style="color:white;background:red" | |-style="color:white;background:red" | ||
!colspan= | !colspan=9|'''Green, mobile''' | ||
|-style="color:white;background:red" | |-style="color:white;background:red" | ||
!Domes | !Domes | ||
!Galaxies | !Galaxies | ||
!Missions | !colspan=7|Missions | ||
|- | |- | ||
|[[Fountain]] | |[[Fountain]] | ||
|[[Battlerock Galaxy]] | |[[Battlerock Galaxy]] | ||
|[[File:SMG Asset Sprite Star Cursor.png|link=Battlerock Barrage]]||[[File:Smg icon powerstar.png|link=Breaking into the Battlerock]]||[[File:SMG Asset Sprite Star Cursor.png|link=Topmaniac and the Topman Tribe]]||[[File:SMG Asset Sprite Star Cursor.png|link=Topmaniac's Daredevil Run]]||[[File:SMG Asset Sprite Star Cursor.png|link=Purple Coins on the Battlerock]]||[[File:Galaxy StarP.png|link=Battlerock's Garbage Dump]]||[[File:SMG Asset Sprite Star Cursor.png|link=Luigi under the Saucer]] | |||
|- | |- | ||
|[[Engine Room]] | |[[Engine Room]] | ||
|[[Toy Time Galaxy]] | |[[Toy Time Galaxy]] | ||
|[[File:SMG Asset Sprite Star Cursor.png|link=Heavy Metal Mecha-Bowser]]||[[File:Smg icon powerstar.png|link=Mario Meets Mario]]||[[File:SMG Asset Sprite Star Cursor.png|link=Bouncing Down Cake Lane]]||[[File:SMG Asset Sprite Star Cursor.png|link=Fast Foes of Toy Time]]||[[File:SMG Asset Sprite Star Cursor.png|link=Luigi's Purple Coins]]||[[File:Smg icon powerstar.png|link=The Flipswitch Chain]] | |||
|- | |- | ||
|[[Comet Observatory]] | |[[Comet Observatory]] | ||
|[[Bubble Blast Galaxy]] | |[[Bubble Blast Galaxy]] | ||
|[[File:Smg icon powerstar.png|link=The Electric Labyrinth]] | |||
|- | |- | ||
|-style="color:white;background:red" | |-style="color:white;background:red" | ||
!colspan= | !colspan=9|'''Red, immobile''' | ||
|-style="color:white;background:red" | |-style="color:white;background:red" | ||
!Domes | !Domes | ||
!Galaxies | !Galaxies | ||
!Missions | !colspan=7|Missions | ||
|- | |- | ||
|[[Terrace (Super Mario Galaxy)|Terrace]] | |[[Terrace (Super Mario Galaxy)|Terrace]] | ||
|[[Sweet Sweet Galaxy]] | |[[Sweet Sweet Galaxy]] | ||
|[[File:Smg icon powerstar.png|link=Rocky Road (mission)]] | |||
|- | |- | ||
|[[Fountain]] | |[[Fountain]] | ||
|[[Battlerock Galaxy]] | |[[Battlerock Galaxy]] | ||
|[[File:Smg icon powerstar.png|link=Battlerock Barrage]]||[[File:SMG Asset Sprite Star Cursor.png|link=Breaking into the Battlerock]]||[[File:Smg icon powerstar.png|link=Topmaniac and the Topman Tribe]]||[[File:SMG Asset Sprite Star Cursor.png|link=Topmaniac's Daredevil Run]]||[[File:Smg icon purplecomet.png|link=Purple Coins on the Battlerock]]||[[File:SMG Asset Sprite Star Cursor.png|link=Battlerock's Garbage Dump]]||[[File:Smg icon greenstar.png|link=Luigi under the Saucer]] | |||
|- | |- | ||
|rowspan=2|[[Garden (Super Mario Galaxy)|Garden]] | |rowspan=2|[[Garden (Super Mario Galaxy)|Garden]] | ||
|[[Deep Dark Galaxy]] | |[[Deep Dark Galaxy]] | ||
|[[File:SMG Asset Sprite Star Cursor.png|link=The Underground Ghost Ship]]||[[File:Smg icon powerstar.png|link=Bubble Blastoff]]||[[File:SMG Asset Sprite Star Cursor.png|link=Guppy and the Underground Lake]]||[[File:SMG Asset Sprite Star Cursor.png|link=Ghost Ship Daredevil Run]]||[[File:SMG Asset Sprite Star Cursor.png|link=Plunder the Purple Coins]]||[[File:SMG Asset Sprite Star Cursor.png|link=Boo in a Box]] | |||
|- | |- | ||
|[[Dreadnought Galaxy]] | |[[Dreadnought Galaxy]] | ||
|[[File:SMG Asset Sprite Star Cursor.png|link=Infiltrating the Dreadnought]]||[[File:Smg icon powerstar.png|link=Dreadnought's Colossal Cannons]]||[[File:Smg icon powerstar.png|link=Revenge of the Topman Tribe]]||[[File:Smg icon speedycomet.png|link=Topman Tribe Speed Run]]||[[File:Smg icon purplecomet.png|link=Battlestation's Purple Coins]]||[[File:Smg icon powerstar.png|link=Dreadnought's Garbage Dump]] | |||
|- | |- | ||
|-style="color:white;background:red" | |-style="color:white;background:red" | ||
!colspan= | !colspan=9|'''Red, mobile''' | ||
|-style="color:white;background:red" | |-style="color:white;background:red" | ||
!Domes | !Domes | ||
!Galaxies | !Galaxies | ||
!Missions | !colspan=7|Missions | ||
|- | |- | ||
|[[Terrace (Super Mario Galaxy)|Terrace]] | |[[Terrace (Super Mario Galaxy)|Terrace]] | ||
|[[Flipswitch Galaxy]] | |[[Flipswitch Galaxy]] | ||
|[[File:Smg icon powerstar.png|link=Painting the Planet Yellow]] | |||
|- | |- | ||
|[[Garden (Super Mario Galaxy)|Garden]] | |[[Garden (Super Mario Galaxy)|Garden]] | ||
|[[Dreadnought Galaxy]] | |[[Dreadnought Galaxy]] | ||
|[[File:SMG Asset Sprite Star Cursor.png|link=Infiltrating the Dreadnought]]||[[File:SMG Asset Sprite Star Cursor.png|link=Dreadnought's Colossal Cannons]]||[[File:Smg icon powerstar.png|link=Revenge of the Topman Tribe]]||[[File:Smg icon speedycomet.png|link=Topman Tribe Speed Run]]||[[File:SMG Asset Sprite Star Cursor.png|link=Battlestation's Purple Coins]]||[[File:SMG Asset Sprite Star Cursor.png|link=Dreadnought's Garbage Dump]] | |||
|} | |} | ||
</div> | </div> | ||
| Line 141: | Line 142: | ||
=====Appearances===== | =====Appearances===== | ||
<div class="contentbox mw-collapsible mw-collapsed"data-expandtext="Show appearances"data-collapsetext="appearances"> | <div class="contentbox mw-collapsible mw-collapsed"data-expandtext="Show appearances"data-collapsetext="Hide appearances"> | ||
*[[File:SMG Asset Sprite Star Cursor.png]] marks missions where they are completely absent. | |||
{|class="wikitable | *[[File:Galaxy StarP.png]] marks missions where they are loaded and may be visible, but cannot be encountered directly. | ||
{|class="wikitable" style="text-align:center" | |||
|-style="color:white;background:red" | |-style="color:white;background:red" | ||
!colspan= | !colspan=5|'''Green, immobile''' | ||
|-style="color:white;background:red" | |-style="color:white;background:red" | ||
!Worlds | !Worlds | ||
!Galaxies | !Galaxies | ||
!Missions | !colspan=3|Missions | ||
|- | |- | ||
|[[World 2 (Super Mario Galaxy 2)|World 2]] | |[[World 2 (Super Mario Galaxy 2)|World 2]] | ||
|[[Bowser's Lava Lair]] | |[[Bowser's Lava Lair]] | ||
|[[File:Smg2 icon grandstar.png|link=Bowser's Big Lava Power Party]]||[[File:Smg2 icon prankstercomet.png|link=Lava Lair Speed Run]] | |||
|- | |- | ||
|rowspan=3|[[World 5 (Super Mario Galaxy 2)|World 5]] | |rowspan=3|[[World 5 (Super Mario Galaxy 2)|World 5]] | ||
|[[Space Storm Galaxy]] | |[[Space Storm Galaxy]] | ||
|[[File:Smg2 icon powerstar.png|link=Follow Me, Bob-omb]]||[[File:Smg2 icon powerstar.png|link=To the Top of Topman's Tower]]||[[File:Smg2 icon powerstar.png|link=C'mere, Topman]] | |||
|- | |- | ||
|[[Upside Dizzy Galaxy]] | |[[Upside Dizzy Galaxy]] | ||
|[[File:Smg2 icon powerstar.png|link=A Walk on the Weird Side]]||[[File:Smg2 icon powerstar.png|link=Burning Upside Dizzy]] | |||
|- | |- | ||
|[[Bowser Jr.'s Boom Bunker]] | |[[Bowser Jr.'s Boom Bunker]] | ||
|[[File:Smg2 icon grandstar.png|link=Bowser Jr.'s Boomsday Machine]]||[[File:Smg2 icon prankstercomet.png|link=Boomsday Machine Daredevil Run]] | |||
|- | |- | ||
|rowspan=2|[[World 6 (Super Mario Galaxy 2)|World 6]] | |rowspan=2|[[World 6 (Super Mario Galaxy 2)|World 6]] | ||
|[[Clockwork Ruins Galaxy]] | |[[Clockwork Ruins Galaxy]] | ||
|[[File:Galaxy StarP.png|link=Time for Adventure]]||[[File:SMG Asset Sprite Star Cursor.png|link=The Adventure of the Purple Coins]]||[[File:Smg2 icon powerstar.png|link=The Ledge Hammer Trap]] | |||
|- | |- | ||
|[[Bowser's Galaxy Generator]] | |[[Bowser's Galaxy Generator]] | ||
|[[File:Smg2 icon grandstar.png|link=Bowser's Fortified Fortress]]||[[File:Smg2 icon prankstercomet.png|link=Bowser's Big Bad Speed Run]] | |||
|- | |- | ||
|[[World S]] | |[[World S]] | ||
|[[Grandmaster Galaxy]] | |[[Grandmaster Galaxy]] | ||
|[[File:Smg2 icon powerstar.png|link=The Ultimate Test]]||[[File:Smg2 icon prankstercomet.png|link=The Perfect Run]] | |||
|- | |- | ||
|-style="color:white;background:red" | |-style="color:white;background:red" | ||
!colspan= | !colspan=5|'''Green, mobile''' | ||
|-style="color:white;background:red" | |-style="color:white;background:red" | ||
!Worlds | !Worlds | ||
!Galaxies | !Galaxies | ||
!Missions | !colspan=3|Missions | ||
|- | |- | ||
|[[World 1 (Super Mario Galaxy 2)|World 1]] | |[[World 1 (Super Mario Galaxy 2)|World 1]] | ||
|[[Flip-Swap Galaxy]] | |[[Flip-Swap Galaxy]] | ||
|[[File:Smg2 icon powerstar.png|link=Think Before You Shake]]||[[File:Smg2 icon prankstercomet.png|link=Purple Coin Flip 'n' Sprint]] | |||
|- | |- | ||
|[[World 5 (Super Mario Galaxy 2)|World 5]] | |[[World 5 (Super Mario Galaxy 2)|World 5]] | ||
|[[Space Storm Galaxy]] | |[[Space Storm Galaxy]] | ||
|[[File:Smg2 icon powerstar.png|link=Follow Me, Bob-omb]]||[[File:SMG Asset Sprite Star Cursor.png|link=To the Top of Topman's Tower]]||[[File:Smg2 icon powerstar.png|link=C'mere, Topman]] | |||
|- | |- | ||
|[[World S]] | |[[World S]] | ||
|[[Grandmaster Galaxy]] | |[[Grandmaster Galaxy]] | ||
|[[File:Smg2 icon powerstar.png|link=The Ultimate Test]]||[[File:Smg2 icon prankstercomet.png|link=The Perfect Run]] | |||
|- | |- | ||
|-style="color:white;background:red" | |-style="color:white;background:red" | ||
!colspan= | !colspan=5|'''Red, immobile''' | ||
|-style="color:white;background:red" | |-style="color:white;background:red" | ||
!Worlds | !Worlds | ||
!Galaxies | !Galaxies | ||
!Missions | !colspan=3|Missions | ||
|- | |- | ||
|[[World 3 (Super Mario Galaxy 2)|World 3]] | |[[World 3 (Super Mario Galaxy 2)|World 3]] | ||
|[[Bowser Jr.'s Fearsome Fleet]] | |[[Bowser Jr.'s Fearsome Fleet]] | ||
|[[File:Smg2 icon grandstar.png|link=Bowser Jr.'s Mighty Megahammer]]||[[File:Galaxy StarP.png|link=Megahammer's Daredevil Bash]] | |||
|} | |} | ||
</div> | </div> | ||
| Line 229: | Line 231: | ||
|Jpn2R=Densen | |Jpn2R=Densen | ||
|Jpn2M=Electric line | |Jpn2M=Electric line | ||
|Fre=Barrière électrique<ref>''Super Mario Galaxy, Le Guide Officiel. Prima Games'', page 105</ref> | |||
|FreM=Electric barrier | |||
|Ita=Filo elettrico | |||
|ItaC=<ref>{{cite|quote=I {{color|red|fili elettrici}} sono d'ostacolo e non riesco a salvare il mio amico!|author=Luma|location="[[Revenge of the Topman Tribe]]"|title=''Super Mario Galaxy''|date=2007|language=en|publisher=Nintendo}}</ref> | |||
|ItaM=Electric wire | |||
|Ita2=Elettrorotaia | |||
|Ita2C=<ref>{{cite|date=November 15, 2018|title=''[[Super Mario Bros. Encyclopedia|Super Mario Bros. Enciclopedia]]''|publisher=Magazzini Salani|language=it|isbn=889367436X|page=137}}</ref> | |||
|Ita2M=Electric-rail | |||
|Spa=Raíl eléctrico | |Spa=Raíl eléctrico | ||
|SpaM=Electric rail | |SpaM=Electric rail | ||
}} | }} | ||
Latest revision as of 21:21, January 24, 2025
| Electric rail | |
|---|---|
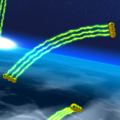
 A close-up of an electric rail in the Flip-Swap Galaxy in Super Mario Galaxy 2 | |
| First appearance | Super Mario Strikers (2005) |
| Latest appearance | Mario Strikers: Battle League (2022) |
Electric rails[1] or power lines[2] are barriers of electrical energy in the Super Mario franchise.
History[edit]
Mario Strikers series[edit]

In Super Mario Strikers, Mario Strikers Charged, and Mario Strikers: Battle League, electric rails appear around all of the soccer fields except for Thunder Island, in which they only appear at the corners. If players get tackled into the fence, they will be shocked temporarily. The fence cannot be seen; it is transparent until players run into it. Some options allow for either electric rails to be disabled or it to shock the player if they even go near the fence.
Mario Party series[edit]
Mario Party 8[edit]

An electric rail grid is seen underneath the main platform in Power Trip, a minigame in Mario Party 8.
Mario Party 9[edit]
An electric rail surrounds the ring in Bumper Sparks, a minigame in Mario Party 9.
Super Mario series[edit]
Super Mario Galaxy[edit]

Electric rails with small yellow spheres on either end appear in Super Mario Galaxy in several galaxies, where they occasionally move horizontally throughout the galaxy and shock Mario and Luigi if contact is made. They appear in green and red. They are used to defeat Spiky Topmen and Spring Topmen. If Mario or Luigi lose a life from an electric rail, they will turn into a skeleton, but there is a small chance of staying as normal. This effect is also seen briefly, if the player looks closely, when Mario and Luigi take damage after hitting one. In some galaxies, they can be deactivated by stepping on Flipswitch Panels, hitting a Spiky Topman with a spin attack into them, defeating it as well, or defeating an Undergrunt Gunner. No matter which way the camera faces, the reflection on the spheres that make them up shown is always exactly the same. A different type appears in the very first mission, Grand Star Rescue, at each end of slow-moving platforms that circle round areas, with the electricity flowing between two prongs resembling the tip of an electric cattle prod; green platforms appear outside the planet, while orange ones appear inside, though the electricity itself is green in both cases.
Appearances[edit]
 marks missions where they are completely absent.
 marks missions where they are loaded and may be visible, but cannot be encountered directly.
| Green, platform | ||||||||
|---|---|---|---|---|---|---|---|---|
| Domes | Galaxies | Missions | ||||||
| Gate | Gateway Galaxy | |||||||
| Green, immobile | ||||||||
| Domes | Galaxies | Missions | ||||||
| Terrace | Good Egg Galaxy | |||||||
| Fountain | Battlerock Galaxy | |||||||
| Kitchen | Ghostly Galaxy | |||||||
| Bowser Jr.'s Airship Armada | ||||||||
| Engine Room | Toy Time Galaxy | |||||||
| Sand Spiral Galaxy | ||||||||
| Garden | Dreadnought Galaxy | |||||||
| Comet Observatory | Bubble Blast Galaxy | |||||||
| Green, mobile | ||||||||
| Domes | Galaxies | Missions | ||||||
| Fountain | Battlerock Galaxy | |||||||
| Engine Room | Toy Time Galaxy | |||||||
| Comet Observatory | Bubble Blast Galaxy | |||||||
| Red, immobile | ||||||||
| Domes | Galaxies | Missions | ||||||
| Terrace | Sweet Sweet Galaxy | |||||||
| Fountain | Battlerock Galaxy | |||||||
| Garden | Deep Dark Galaxy | |||||||
| Dreadnought Galaxy | ||||||||
| Red, mobile | ||||||||
| Domes | Galaxies | Missions | ||||||
| Terrace | Flipswitch Galaxy | |||||||
| Garden | Dreadnought Galaxy | |||||||
New Super Mario Bros. Wii[edit]

Electric rails are found in World 6-![]() Airship in New Super Mario Bros. Wii, where they are used in the second airship battle against Bowser Jr. The player must knock Bowser Jr. into the fence three times in order to win. However, if Mario and his friends are pushed into the rail, they will take damage.
Airship in New Super Mario Bros. Wii, where they are used in the second airship battle against Bowser Jr. The player must knock Bowser Jr. into the fence three times in order to win. However, if Mario and his friends are pushed into the rail, they will take damage.
Super Mario Galaxy 2[edit]
In Super Mario Galaxy 2, electric rails return with the same function and effect from the predecessor, but Mario will no longer turn into a skeleton if he loses a life from an electric rail.
Appearances[edit]
- marks missions where they are completely absent.
- marks missions where they are loaded and may be visible, but cannot be encountered directly.
| Green, immobile | ||||
|---|---|---|---|---|
| Worlds | Galaxies | Missions | ||
| World 2 | Bowser's Lava Lair | |||
| World 5 | Space Storm Galaxy | |||
| Upside Dizzy Galaxy | ||||
| Bowser Jr.'s Boom Bunker | ||||
| World 6 | Clockwork Ruins Galaxy | |||
| Bowser's Galaxy Generator | ||||
| World S | Grandmaster Galaxy | |||
| Green, mobile | ||||
| Worlds | Galaxies | Missions | ||
| World 1 | Flip-Swap Galaxy | |||
| World 5 | Space Storm Galaxy | |||
| World S | Grandmaster Galaxy | |||
| Red, immobile | ||||
| Worlds | Galaxies | Missions | ||
| World 3 | Bowser Jr.'s Fearsome Fleet | |||
Donkey Kong Country: Tropical Freeze[edit]
In Donkey Kong Country: Tropical Freeze, a single electric rail can be found among some pendulums in Precarious Pendulums.
Gallery[edit]
Screenshot from Super Mario Galaxy
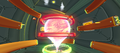
The platform type surrounding a room in Super Mario Galaxy
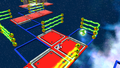
Electric rails in Super Mario Galaxy 2
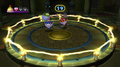
Electric rails in Bumper Sparks in Mario Party 9
Luigi being electrocuted in Mario Strikers: Battle League's opening cutscene
.png)


Names in other languages[edit]
| Language | Name | Meaning | Notes |
|---|---|---|---|
| Japanese | ビリビリレール[?] Biribiri rēru |
Shocking rail | |
Densen |
Electric line | ||
| French | Barrière électrique[3] | Electric barrier | |
| Italian | Filo elettrico[4] | Electric wire | |
| Elettrorotaia[5] | Electric-rail | ||
| Spanish | Raíl eléctrico[?] | Electric rail |
See also[edit]
References[edit]
- ^ "So try and remember how to control a bubble! Just watch out for those electric rails." – Phil Board (2007). Super Mario Galaxy. "The Electric Labyrinth": Nintendo (English).
- ^ "The power lines are keeping me from helping my friend!" – Luma (2007). Super Mario Galaxy. "Revenge of the Topman Tribe": Nintendo (English).
- ^ Super Mario Galaxy, Le Guide Officiel. Prima Games, page 105
- ^ "I fili elettrici sono d'ostacolo e non riesco a salvare il mio amico!" – Luma (2007). Super Mario Galaxy. "Revenge of the Topman Tribe": Nintendo (English).
- ^ November 15, 2018. Super Mario Bros. Enciclopedia. Magazzini Salani (Italian). ISBN 889367436X. Page 137.
| Super Mario Strikers | ||
|---|---|---|
| Players | Team captains | Daisy • Donkey Kong • Luigi • Mario • Peach • Super Team • Waluigi • Wario • Yoshi |
| Sidekicks | Birdo • Hammer Bro • Koopa • Toad | |
| Goalies | Kritter • Robo-Kritter | |
| Fields | Bowser Stadium • Crater Field • Konga Coliseum • The Battle Dome • The Palace • The Underground • Pipeline Central | |
| Cups | Bowser Cup • Flower Cup • Mushroom Cup • Star Cup • Super Bowser Cup • Super Flower Cup • Super Mushroom Cup • Super Star Cup | |
| Items | Banana • Blue Shell • Bob-omb • Chain Chomp • Giant Shells • Green Shell • Mega Bob-omb • Mushroom • Red Shell • Spiny Shell • Star | |
| Miscellaneous | Gallery • Heads-Up • Pre-release and unused content • Staff • Strike • Super Mario Strikers (Flash game) | |
| Mario Strikers: Battle League | ||
|---|---|---|
| Players | Playable characters | Birdoc • Bowser • Bowser Jr.c • Daisya • Diddy Kongb • Donkey Kong • Luigi • Mario • Paulineb • Peach • Rosalina • Shy Guya • Toad • Waluigi • Wario • Yoshi |
| Goalie | Boom Boom | |
| Non-playable | Fly Guy • Fútbot • Koopa Troopa • Shy Guys • Toads • Yoshis | |
| Hyper Strikes | Banana Blast • Barrel Boom • Dance of Hearts • Drill Smash • Egg Stomp • Electric Ricochet • Fire Cyclone • Flame Cannon • Flower Spiral • Jewel Dance • Orbital Burst • Propeller Dive • Spin Tornado • Swing Solo • Thorn Barrier • Twisting Knuckleball | |
| Fields | Desert Ruina • Jungle Retreat • Lava Castle • Mushroom Hill • Planetoidb • Royal Castle • Spooky Mansion • Urban Rooftopc | |
| Cups | Cannon Cup • Chain Cup • Turbo Cup • Muscle Cup • Trick Cup • Championship Cup | |
| Items | Banana • Bob-omb • Green Shell • Mushroom • Red Shell • Strike Orb • Star | |
| Miscellaneous | Gallery • Staff • Strike | |