Flipside Pit of 100 Trials: Difference between revisions
(Added images.) |
(→Rooms and Enemies: Adding the exact number of enemies in each room since it is a fixed value) |
||
| Line 12: | Line 12: | ||
The enemies start off fairly easy, gradually getting stronger as the player progresses. The list below details the enemies in the Pit and where they appear. | The enemies start off fairly easy, gradually getting stronger as the player progresses. The list below details the enemies in the Pit and where they appear. | ||
===Rooms 1-9=== | ===Rooms 1-9=== | ||
*[[Squiglet]] | *Room 1: 4 [[Squiglet|Squiglets]] | ||
*[[Goomba]] | *Room 2: 5 [[Goomba|Goombas]] | ||
*[[Squig]] | *Room 3: 2 [[Squig|Squigs]]; 2 [[Squiglet|Squiglets]] | ||
*[[Sproing-Oing]] | *Room 4: 4 [[Sproing-Oing|Sproing-Oings]] | ||
*[[Gloomba]] | *Room 5: 2 [[Gloomba|Gloombas]]; 4 [[Goomba|Goombas]] | ||
*[[Cherbil]] | *Room 6: 3 [[Cherbil|Cherbils]] | ||
*[[Poison Cherbil]] | *Room 7: 2 [[Sproing-Oing|Sproing-Oings]]; 2 [[Squig|Squigs]] | ||
*Room 8: 3 [[Squiglet|Squiglets]]; 3 [[Squig|Squigs]] | |||
*Room 9: 2 [[Poison Cherbil|Poison Cherbils]]; 4 [[Gloomba|Gloombas]] | |||
===Rooms 11-19=== | ===Rooms 11-19=== | ||
*[[Koopa Paratroopa]] | *Room 11: 2 [[Koopa Paratroopa|Koopa Paratroopas]]; 2 [[Koopa Troopa|Koopa Troopas]] | ||
*Room 12: 2 [[Spiked Goomba|Spiked Goombas]]; 4 [[Paragoomba|Paragoombas]] | |||
*[[ | *Room 13: 3 [[Shlurp|Shlurps]]; 4 [[Bald Cleft|Bald Clefts]] | ||
*Room 14: 5 [[Goomba|Flip Goomba]]; 2 [[Koopa Troopa|Koopa Troopas]] | |||
*[[Shlurp]] | *Room 15: 2 [[Shlurp|Shlurps]]; 4 [[Boomboxer|Boomboxers]] | ||
*Room 16: 3 [[Koopa Troopa|Koopa Troopas]]; 5 [[Tileoid G]] | |||
*[[Goomba|Flip Goomba]] | *Room 17: 4 [[Koopa Troopa|Flip Koopa Troopas]] | ||
*[[Boomboxer]] | *Room 18: 4 [[Buzzy Beetle|Buzzy Beetles]]; 3 [[Squig|Squigs]] | ||
*[[Tileoid G]] | *Room 19: 1 [[Koopatrol]]; 2 [[Koopa Troopa|Koopa Troopas]]; 2 [[Squiglet|Squiglets]] | ||
*[[Koopa Troopa|Flip Koopa | |||
*[[Buzzy Beetle]] | |||
*[[Koopatrol]] | |||
===Rooms 21-29=== | ===Rooms 21-29=== | ||
*[[Spiny]] | *Room 21: 5 [[Spiny|Spinies]] | ||
*[[ | *Room 22: 1 [[Gloomba]], 6 [[Boo|Boos]] | ||
*Room 23: 3 [[Cherbil|Cherbils]]; 4 [[Fuzzy|Fuzzies]] | |||
*[[ | *Room 24: 2 [[Sproing-Oing|Sproing-Oings]]; 3 [[Boing-Oing|Boing-Oings]] | ||
*Room 25: 1 [[Chain Chomp]] | |||
*[[ | *Room 26: 4 [[Paragoomba|Paragoombas]]; 3 [[Crazee Dayzee|Crazee Dayzees]] | ||
*Room 27: 10 [[Squiglet|Squiglets]] | |||
*[[Chain Chomp]] | *Room 28: 4 [[Koopa Troopa|Koopa Troopas]]; 2 [[Hammer Bro|Hammer Bros]] | ||
*[[Crazee Dayzee]] | *Room 29: 2 [[Rawbus]] | ||
*[[ | |||
*[[ | |||
* | |||
===Rooms 31-39=== | ===Rooms 31-39=== | ||
*[[Tileoid B]] | *Room 31: 4 [[Tileoid B]]; 4 [[Tileoid G]] | ||
*Room 32: 8 [[Longator|Longators]] | |||
*[[Longator]] | *Room 33: 1 [[Growmeba]]; 2 [[Squig|Squigs]]; 1 [[Cursya|Cursyas]] | ||
*[[Growmeba]] | *Room 34: 4 [[Stone Buzzy|Stone Buzzies]]; 5 [[Bald Cleft|Bald Cleft]] | ||
*Room 35: 4 [[Choppa|Choppa]]; 4 [[Squig|Squigs]] | |||
*Room 36: 6 [[Ninjoe|Ninjoe]] | |||
*[[Stone Buzzy]] | *Room 37: 2 [[Spike Top|Spike Top]]; 2 [[Buzzy Beetle|Buzzy Beetle]]; 4 [[Squig|Squigs]] | ||
*Room 38: 4 [[Magikoopa|Magikoopas]]; 4 [[Spiked Goomba|Spiked Goombas]] | |||
*[[Choppa]] | *Room 39: 2 [[Fire Bro|Fire Bros]]; 4 [[Tileoid G]] | ||
*[[Ninjoe]] | |||
*[[Spike Top]] | |||
*[[Magikoopa]] | |||
*[[Fire Bro]] | |||
===Rooms 41-49=== | ===Rooms 41-49=== | ||
*[[Clubba]] | *Room 41: 4 [[Clubba|Clubbas]]; 4 [[Squiglet|Squiglets]] | ||
*Room 42: 4 [[Pokey|Pokeys]]; 4 [[Gloomba|Gloombas]] | |||
*[[Pokey]] | *Room 43: 4 [[Koopa Striker|Koopa Strikers]] | ||
*Room 44: 4 [[Squog|Squogs]]; 4 [[Squig|Squigs]]; 1 [[Cursya]] | |||
*[[Koopa Striker]] | *Room 45: 4 [[Tileoid R]]; 4 [[Tileoid B]] | ||
*[[Squog]] | *Room 46: 4 [[Koopa Paratroopa|Flip Paratroopas]]; 4 [[Goomba|Flip Goombas]] | ||
*Room 47: 2 [[Ice Cherbil|Ice Cherbils]]; 2 [[Poison Cherbil|Poison Cherbils]]; 2 [[Cherbil|Cherbils]] | |||
*Room 48: 4 [[Magikoopa|Magikoopas]]; 4 [[Clubba|Clubbas]] | |||
*[[Tileoid R]] | *Room 49: 10 [[Squog|Squogs]] | ||
*[[Koopa Paratroopa|Flip | |||
*[[Ice Cherbil]] | |||
*[[Magikoopa]] | |||
===Rooms 51-59=== | ===Rooms 51-59=== | ||
*[[Spiny|Flip | *Room 51: 3 [[Spiny|Flip Spinies]]; 3 [[Spiny|Spinies]]; 2 [[Buzzy Beetle|Buzzy Beetles]] | ||
*Room 52: 4 [[Pigarithm|Pigarithms]] | |||
*Room 53: 5 [[Spania|Spanias]]; 4 [[Tileoid B]] | |||
*[[Pigarithm]] | *Room 54: 4 [[Dry Bones]]; 4 [[Clubba|Clubbas]] | ||
*[[Spania]] | *Room 55: 3 [[Hooligon|Hooligons]] | ||
*Room 56: 4 [[Dark Boo|Dark Boos]]; 1 [[Tech Cursya]] | |||
*[[Dry Bones]] | *Room 57: 3 [[Zoing-Oing|Zoing-Oings]]; 3 [[Ice Cherbil|Ice Cherbils]] | ||
*Room 58: 1 [[Amazy Dayzee]]; 8 [[Crazee Dayzee|Crazee Dayzees]] | |||
*[[Hooligon]] | *Room 59: 3 [[Yellow Magiblot|Yellow Magiblots]]; 4 [[Squig|Squigs]] | ||
*[[Dark Boo]] | |||
*[[Zoing-Oing]] | |||
*[[Amazy Dayzee]] | |||
*[[Yellow Magiblot]] | |||
===Rooms 61-69=== | ===Rooms 61-69=== | ||
*[[Beepboxer]] | *Room 61: 5 [[Beepboxer|Beepboxers]]; 1 [[Heavy Cursya]]; 1 [[Cursya]] | ||
*Room 62: 4 [[Dull Bones]]; 4 [[Dark Boo]] | |||
*Room 63: 3 [[Boomerang Bro|Boomerang Bros]]; 4 [[Clubba|Clubbas]] | |||
*[[Dull Bones]] | *Room 64: 4 [[Tileoid Y]]; 4 [[Tileoid R]] | ||
*Room 65: 1 [[Blomeba]]; 1 [[Growmeba]] | |||
*[[Boomerang Bro]] | *Room 66: 4 [[Skellobit|Skellobits]]; 3 [[Ninjoe|Ninjoes]] | ||
*Room 67: 6 [[Longadile|Longadiles]]; 4 [[Longator|Longators]] | |||
*[[Tileoid Y]] | *Room 68: 2 [[Hammer Bro|Flip Hammer Bros]]; 3 [[Squoinker|Squoinkers]]; 4 [[Squog|Squogs]] | ||
*Room 69: 7 [[Soopa Striker|Soopa Strikers]] | |||
*[[Blomeba]] | |||
*[[Skellobit]] | |||
*[[Longadile]] | |||
*[[Hammer Bro|Flip Hammer | |||
*[[Soopa Striker]] | |||
===Rooms 71-79=== | ===Rooms 71-79=== | ||
*[[Cleft#Super Paper Mario|Moon | *Room 71: 5 [[Cleft#Super Paper Mario|Moon Clefts]]; 4 [[Bald Cleft|Bald Clefts]] | ||
*Room 72: 2 [[Jawbus]] | |||
*[[Jawbus]] | *Room 73: 2 [[Cursya|Cursyas]]; 2 [[Reversya Cursya|Reversya Cursyas]]; 2 [[Tech Cursya|Tech Cursyas]]; 2 [[Heavy Cursya|Heavy Cursyas]] | ||
*[[Cursya]] | *Room 74: 5 [[Copta|Coptas]] | ||
*Room 75: 10 [[Ruff Puff|Ruff Puffs]] | |||
*Room 76: 3 [[Blastboxer|Blastboxers]]; 3 [[Beepboxer|Beepboxers]]; 3 [[Boomboxer|Boomboxers]] | |||
*Room 77: 4 [[Blue Magiblot|Blue Magiblots]]; 3 [[Squog|Squogs]] | |||
*[[Copta]] | *Room 78: 1 [[Chromeba]]; 1 [[Blomeba]] | ||
*[[Ruff Puff]] | *Room 79: 2 [[Spiky Skellobit|Flip Spiky Skellobits]]; 5 [[Skellobit|Flip Skellobits]] | ||
*[[Blastboxer]] | |||
*[[Blue Magiblot]] | |||
*[[Chromeba]] | |||
*[[Skellobit|Flip | |||
===Rooms 81-89=== | ===Rooms 81-89=== | ||
*[[Hogarithm]] | *Room 81: 3 [[Hogarithm|Hogarithms]]; 4 [[Tileoid Y]] | ||
*Room 82: 4 [[Red Magiblot|Red Magiblots]]; 2 [[Squoinker|Squoinkers]] | |||
*[[Red Magiblot]] | *Room 83: 5 [[Pink Fuzzy|Pink Fuzzies]]; 2 [[Cherbil|Cherbils]] | ||
*Room 84: 3 [[Shlorp|Shlorps]]; 4 [[Spania|Spanias]] | |||
*[[Pink Fuzzy]] | *Room 85: 4 [[Poison Pokey|Poison Pokeys]]; 5 [[Dark Boo|Dark Boos]] | ||
*Room 86: 5 [[Koopatrol|Koopatrols]]; 4 [[Magikoopa|Magikoopas]] | |||
*[[Shlorp]] | *Room 87: 4 [[Copta|Coptas]]; 1 [[Chromeba]]; 2 [[Reversya Cursya|Reversya Cursyas]] | ||
*Room 88: 3 [[Ninjohn|Ninjohns]]; 4 [[Ninjoe|Ninjoes]] | |||
*[[Poison Pokey]] | *Room 89: 28 [[Headbonk Goomba|Headbonk Goombas]] | ||
*[[Koopatrol]] | |||
*[[Chromeba]] | |||
*[[ | |||
* | |||
===Rooms 91-99=== | ===Rooms 91-99=== | ||
*[[Gawbus]] | *Room 91: 2 [[Gawbus]] | ||
*[[Ninjerry]] | *Room 92: 1 [[Ninjerry]]; 3 [[Ninjohn|Ninjohns]]; 3 [[Ninjoe|Ninjoes]] | ||
*Room 93: 3 [[Ninjerry|Ninjerries]]; 5 [[Skellobit|Skellobits]]; 2 [[Cursya|Cursyas]] | |||
*Room 94: 4 [[Fire Bro|Flip Fire Bros]]; 3 [[Squoinker|Squoinkers]] | |||
*[[Skellobit]] | *Room 95: 4 [[Spiky Skellobit|Spiky Skellobits]]; 9 [[Skellobit|Skellobits]] | ||
*Room 96: 2 [[Boomerang Bro|Flip Boomerang Bro]]; 2 [[Fire Bro|Flip Fire Bros]] | |||
*[[Fire Bro|Flip Fire | *Room 97: 1 [[Squiglet]] | ||
*Room 98: 4 [[Red Chomp|Red Chomps]] | |||
*[[Spiky Skellobit]] | *Room 99: 3 [[Red Magiblot|Red Magiblots]]; 3 [[Blue Magiblot|Blue Magiblots]]; 3 [[Yellow Magiblot|Yellow Magiblots]] | ||
*[[Boomerang Bro|Flip Boomerang Bro]] | |||
*[[Squiglet]] | |||
*[[Red Chomp]] | |||
*[[ | |||
===Room 100=== | ===Room 100=== | ||
Revision as of 05:13, April 15, 2025
- “DANGER! Do not enter! -Flipside City Hall-”
- —Sign, Super Paper Mario

The Flipside Pit of 100 Trials is a 100-room labyrinth in Super Paper Mario, similar to the Pit of 100 Trials seen in Paper Mario: The Thousand-Year Door. However, in this game, there are two pits – one in Flipside and one in Flopside, the latter of which is called the Flopside Pit of 100 Trials. The switch that opens the Flipside Pit is located above the entrance, which is sealed by blocks. After gaining Boomer, one can go to the lowest level on the outskirts of Flipside. After looking around with Tippi, the player can reveal a route to a bunch of blocks. They can then have Mario flip on the blocks and a secret passage will appear, which will lead to the ledge with the blue block to open the way to the Pit. (The location is also hinted at by Garson.) Alternatively, Luigi can simply hit the switch by doing a super jump.
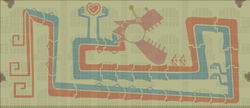
Most rooms of the Pit are randomly generated, containing an assortment of lines of solid blocks, one entrance door that immediately disappears, one locked door, and possibly pairs of Warp Pipes on opposite sides of the room. The possible locations of each of these elements appear in each room as faint, transparent images; this, as well as the solid black appearance of the objects, is a reference to segmented liquid-crystal displays like that of the Game & Watch series. Even when solid, these objects are flat, so flipping will make Mario fall to the bottom of the room. Each room is populated with enemies, a random one of which will be holding the Pit Key that unlocks the door to the next room. The player has five minutes on each floor; if they run out of time, they will receive an instant Game Over.
Every tenth room is instead a smaller rest area with no enemies nor a time limit. In addition to the door to the next room, they contain a pipe back up out of the Pit and a large treasure chest containing a gold Catch Card of a Pixl. Flimm also has a chance to appear in these rooms, selling items for 75% of their normal cost.
The final room, Room 100, is also different, instead being a wide, windy area with abstract patterned ground that resembles sand when viewed from a side-on perspective. Wracktail is fought in this room as the final challenge of the Pit, after which another large chest containing Dashell appears. Opening this chest, in turn, will unveil the Warp Pipe leading out of the Pit.
Rooms and Enemies
The enemies start off fairly easy, gradually getting stronger as the player progresses. The list below details the enemies in the Pit and where they appear.
Rooms 1-9
- Room 1: 4 Squiglets
- Room 2: 5 Goombas
- Room 3: 2 Squigs; 2 Squiglets
- Room 4: 4 Sproing-Oings
- Room 5: 2 Gloombas; 4 Goombas
- Room 6: 3 Cherbils
- Room 7: 2 Sproing-Oings; 2 Squigs
- Room 8: 3 Squiglets; 3 Squigs
- Room 9: 2 Poison Cherbils; 4 Gloombas
Rooms 11-19
- Room 11: 2 Koopa Paratroopas; 2 Koopa Troopas
- Room 12: 2 Spiked Goombas; 4 Paragoombas
- Room 13: 3 Shlurps; 4 Bald Clefts
- Room 14: 5 Flip Goomba; 2 Koopa Troopas
- Room 15: 2 Shlurps; 4 Boomboxers
- Room 16: 3 Koopa Troopas; 5 Tileoid G
- Room 17: 4 Flip Koopa Troopas
- Room 18: 4 Buzzy Beetles; 3 Squigs
- Room 19: 1 Koopatrol; 2 Koopa Troopas; 2 Squiglets
Rooms 21-29
- Room 21: 5 Spinies
- Room 22: 1 Gloomba, 6 Boos
- Room 23: 3 Cherbils; 4 Fuzzies
- Room 24: 2 Sproing-Oings; 3 Boing-Oings
- Room 25: 1 Chain Chomp
- Room 26: 4 Paragoombas; 3 Crazee Dayzees
- Room 27: 10 Squiglets
- Room 28: 4 Koopa Troopas; 2 Hammer Bros
- Room 29: 2 Rawbus
Rooms 31-39
- Room 31: 4 Tileoid B; 4 Tileoid G
- Room 32: 8 Longators
- Room 33: 1 Growmeba; 2 Squigs; 1 Cursyas
- Room 34: 4 Stone Buzzies; 5 Bald Cleft
- Room 35: 4 Choppa; 4 Squigs
- Room 36: 6 Ninjoe
- Room 37: 2 Spike Top; 2 Buzzy Beetle; 4 Squigs
- Room 38: 4 Magikoopas; 4 Spiked Goombas
- Room 39: 2 Fire Bros; 4 Tileoid G
Rooms 41-49
- Room 41: 4 Clubbas; 4 Squiglets
- Room 42: 4 Pokeys; 4 Gloombas
- Room 43: 4 Koopa Strikers
- Room 44: 4 Squogs; 4 Squigs; 1 Cursya
- Room 45: 4 Tileoid R; 4 Tileoid B
- Room 46: 4 Flip Paratroopas; 4 Flip Goombas
- Room 47: 2 Ice Cherbils; 2 Poison Cherbils; 2 Cherbils
- Room 48: 4 Magikoopas; 4 Clubbas
- Room 49: 10 Squogs
Rooms 51-59
- Room 51: 3 Flip Spinies; 3 Spinies; 2 Buzzy Beetles
- Room 52: 4 Pigarithms
- Room 53: 5 Spanias; 4 Tileoid B
- Room 54: 4 Dry Bones; 4 Clubbas
- Room 55: 3 Hooligons
- Room 56: 4 Dark Boos; 1 Tech Cursya
- Room 57: 3 Zoing-Oings; 3 Ice Cherbils
- Room 58: 1 Amazy Dayzee; 8 Crazee Dayzees
- Room 59: 3 Yellow Magiblots; 4 Squigs
Rooms 61-69
- Room 61: 5 Beepboxers; 1 Heavy Cursya; 1 Cursya
- Room 62: 4 Dull Bones; 4 Dark Boo
- Room 63: 3 Boomerang Bros; 4 Clubbas
- Room 64: 4 Tileoid Y; 4 Tileoid R
- Room 65: 1 Blomeba; 1 Growmeba
- Room 66: 4 Skellobits; 3 Ninjoes
- Room 67: 6 Longadiles; 4 Longators
- Room 68: 2 Flip Hammer Bros; 3 Squoinkers; 4 Squogs
- Room 69: 7 Soopa Strikers
Rooms 71-79
- Room 71: 5 Moon Clefts; 4 Bald Clefts
- Room 72: 2 Jawbus
- Room 73: 2 Cursyas; 2 Reversya Cursyas; 2 Tech Cursyas; 2 Heavy Cursyas
- Room 74: 5 Coptas
- Room 75: 10 Ruff Puffs
- Room 76: 3 Blastboxers; 3 Beepboxers; 3 Boomboxers
- Room 77: 4 Blue Magiblots; 3 Squogs
- Room 78: 1 Chromeba; 1 Blomeba
- Room 79: 2 Flip Spiky Skellobits; 5 Flip Skellobits
Rooms 81-89
- Room 81: 3 Hogarithms; 4 Tileoid Y
- Room 82: 4 Red Magiblots; 2 Squoinkers
- Room 83: 5 Pink Fuzzies; 2 Cherbils
- Room 84: 3 Shlorps; 4 Spanias
- Room 85: 4 Poison Pokeys; 5 Dark Boos
- Room 86: 5 Koopatrols; 4 Magikoopas
- Room 87: 4 Coptas; 1 Chromeba; 2 Reversya Cursyas
- Room 88: 3 Ninjohns; 4 Ninjoes
- Room 89: 28 Headbonk Goombas
Rooms 91-99
- Room 91: 2 Gawbus
- Room 92: 1 Ninjerry; 3 Ninjohns; 3 Ninjoes
- Room 93: 3 Ninjerries; 5 Skellobits; 2 Cursyas
- Room 94: 4 Flip Fire Bros; 3 Squoinkers
- Room 95: 4 Spiky Skellobits; 9 Skellobits
- Room 96: 2 Flip Boomerang Bro; 2 Flip Fire Bros
- Room 97: 1 Squiglet
- Room 98: 4 Red Chomps
- Room 99: 3 Red Magiblots; 3 Blue Magiblots; 3 Yellow Magiblots
Room 100
Prizes
| Item | Icon | Location | Image |
|---|---|---|---|
| Special Card (x9) |    
| ||
| Dashell | In a chest revealed after defeating Wracktail; note that his collection is necessary to activate the pipe leading out of the pit. | 
|
Backgrounds
It has been requested that more images be uploaded for this section. Remove this notice only after the additional images have been added. Specifics: Narrower mural versions
The background of the Flipside and Flopside Pits changes every 25 rooms. Each background has a mural depicting one of the Pure Hearts and a location or character associated with it, with a narrower version on one of the other walls of the room. The Flipside Pit has murals of the first four Pure Hearts, and their narrower versions can be seen by flipping.
The rest areas of the Pit do not contain either version of that section of the Pit's mural, but do change to reflect each background's differently colored bricks.
The background mural of Fracktail seen in rooms 26-50
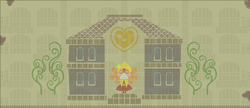
The background mural of Merlee's Mansion seen in rooms 51-75
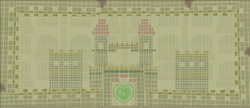
The background mural of Fort Francis seen in rooms 76-99


Names in other languages
| Language | Name | Meaning | Notes |
|---|---|---|---|
| Japanese | 100部屋ダンジョン[?] Hyaku-heya Danjon |
100-Room Dungeon | |
| French | Puits des 100 épreuves de Recto[?] | Flipside's Well of 100 Trials | |
| German | Grube der 100 Prüfungen[?] | Pit of 100 Trials | |
| Italian | Labirinto dei 100 livelli[?] | Labyrinth of the 100 levels | |
| Korean | 방 100개의 던전[?] Bang Baekgae-ui Deonjeon |
Dungeon of 100 Rooms | |
| Spanish | Cien Mazmorras de Villacara[?] | Flipside 100 Dungeons |