Flopside Pit of 100 Trials: Difference between revisions
m (maintenance; category stuff) |
Spencer PK (talk | contribs) (→Backgrounds: The Flopside narrow murals can be seen in-game. Flipping in Flipside moves the camera to the left, while in Flopside it moves to the right. This rule even applies in their Pits, and the narrow murals were correctly placed so they can be seen in the Flopside Pit.) |
||
| (67 intermediate revisions by 41 users not shown) | |||
| Line 1: | Line 1: | ||
[[ | {{quote|EXTREME DANGER! Stay out! -Flopside City Hall-|[[Sign]]|[[Super Paper Mario]]}} | ||
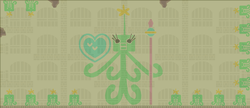
The '''Flopside Pit of 100 Trials''' is a 100-room labyrinth in ''[[Super Paper Mario]]'' | [[File:SPM Flopside Pit of 100 Trials.png|300px|thumb|Flopside Pit of 100 Trials]] | ||
The '''Flopside Pit of 100 Trials''' is a 100-room labyrinth in ''[[Super Paper Mario]]'', similar to the [[Pit of 100 Trials (Paper Mario: The Thousand-Year Door)|Pit of 100 Trials]] in ''[[Paper Mario: The Thousand-Year Door]]''. However, in this game there are two pits - one in [[Flopside]], and one in [[Flipside]], the latter pit being called the [[Flipside Pit of 100 Trials]]. Both were created to test the forces that guard the [[Pure Heart]]s. The Flopside version was used to study the powers of darkness. | |||
Accessing the Flopside Pit is done in a manner similar to its Flipside counterpart, except the switch that opens the entrance does not appear until the Flipside Pit is cleared. Once the Flipside pit is cleared, a rift will appear above the sealed pipe leading to the pit. A [[! Switch|blue switch]] appears when [[Fleep]] activates the rift and the block opens the way to the pit. | |||
Most rooms of the Pit are randomly generated, containing an assortment of lines of solid blocks, one entrance door that immediately disappears, one locked door, and possibly pairs of [[Warp Pipe]]s on opposite sides of the room. The possible locations of each of these elements appear in each room as faint, transparent images; this, as well as the solid black appearance of the objects, is a reference to segmented {{wp|liquid-crystal display}}s like that of the [[Game & Watch]] series. Even when solid, these objects are flat, so [[flip]]ping will make [[Mario]] fall to the bottom of the room. Each room is populated with enemies, a random one of which will be holding the [[Pit Key]] that unlocks the door to the next room. The player has five minutes on each floor; if they run out of time, they will receive an instant [[Game Over]]. | |||
Every tenth room is instead a smaller rest area with no enemies nor a time limit. In addition to the door to the next room, they contain a pipe back up out of the Pit and a large [[treasure chest]] containing a gold [[Catch Card]] (of [[Dashell]] in Room 10 and of a [[party member|partner]] from ''[[Paper Mario]]'' every tenth room thereafter). [[Flimm]] also has a chance to appear on these rooms, selling items for different prices than they can normally be obtained for. Usually, this is 75% of its usual price, but unlike the Flipside Pit of 100 Trials, there is a chance items will cost double their typical price instead. | |||
== | The final room, Room 100, is also different, instead simply being the inside of the black outline of a cube in a completely gray void. The first time the player arrives here, [[Shadoo]] speaks to them. However, Shadoo cannot be fought until the player reaches Room 100 for the second time. Upon winning the fight, eight small treasure chests will rise from the ground, containing Catch Cards of Shadoo's four forms, Mario, [[Princess Peach|Peach]], [[Bowser]], and [[Luigi]]. The latter four Catch Cards are special in that they double all damage the character does, with the Mario card also providing infinite [[Flip Meter]]. | ||
*[[Dark Goomba]] (Rooms 1, 2, 3 and 8) | ==Rooms and Enemies== | ||
*[[Dark Koopa (Super Paper Mario)|Dark Koopa]] (Rooms 2, 5 and 9) | ===Room 1-9=== | ||
*[[Dark Goomba]] (Rooms 1, 2, 3, and 8) | |||
*[[Dark Koopa (Super Paper Mario)|Dark Koopa]] (Rooms 2, 5, and 9) | |||
*[[Dark Paragoomba]] (Rooms 3 and 4) | *[[Dark Paragoomba]] (Rooms 3 and 4) | ||
*[[Dark Tech Cursya]] (Room 3) | *[[Dark Tech Cursya]] (Room 3) | ||
| Line 21: | Line 24: | ||
*[[Dark Spike Top]] (Room 9) | *[[Dark Spike Top]] (Room 9) | ||
===Room 11-19=== | |||
*[[Dark Fuzzy]] ( | *[[Dark Fuzzy]] (Rooms 11 and 18) | ||
*[[Dark Squiglet]] (Room 11) | *[[Dark Squiglet]] (Room 11) | ||
*[[Dark Stone Buzzy]] (Rooms 12 and 17) | *[[Dark Stone Buzzy]] (Rooms 12 and 17) | ||
| Line 35: | Line 38: | ||
*[[Dark Tech Cursya]] (Room 16) | *[[Dark Tech Cursya]] (Room 16) | ||
*[[Dark Spike Top]] (Room 17) | *[[Dark Spike Top]] (Room 17) | ||
*[[Dark Spiked Goomba]] (Room 18) | *[[Dark Spiked Goomba]] (Room 18) | ||
===Room 21-29=== | |||
*[[Dark Pokey]] (Rooms 21 and 24) | *[[Dark Pokey]] (Rooms 21 and 24) | ||
*[[Dark Reversya Cursya]] (Room 21) | *[[Dark Reversya Cursya]] (Room 21) | ||
| Line 54: | Line 56: | ||
*[[Dark Goomba]] (Room 29) | *[[Dark Goomba]] (Room 29) | ||
===Room 31-39=== | |||
*[[Dark Shlurp]] (Room 31) | *[[Dark Shlurp]] (Room 31) | ||
*[[Dark Ruff Puff]] (Room 31) | *[[Dark Ruff Puff]] (Room 31) | ||
| Line 69: | Line 71: | ||
*[[Dark Megabite]] (Room 39) | *[[Dark Megabite]] (Room 39) | ||
===Room 41-49=== | |||
*[[Dark Striker]] (Rooms 41 and 49) | *[[Dark Striker]] (Rooms 41 and 49) | ||
*[[Dark Shlurp]] (Rooms 42 and 45) | *[[Dark Shlurp]] (Rooms 42 and 45) | ||
| Line 79: | Line 81: | ||
*[[Dark Tech Cursya]] (Room 44) | *[[Dark Tech Cursya]] (Room 44) | ||
*[[Dark Reversya Cursya]] (Room 44) | *[[Dark Reversya Cursya]] (Room 44) | ||
*[[Dark Hammer Bro | *[[Dark Hammer Bro]] (Room 46) | ||
*[[Dark Goomba]] (Room 46) | *[[Dark Goomba]] (Room 46) | ||
*[[Dark Boomerang Bro | *[[Dark Boomerang Bro]] (Room 47) | ||
*[[Dark Paragoomba]] (Room 47) | *[[Dark Paragoomba]] (Room 47) | ||
*[[Dark Fire Bro | *[[Dark Fire Bro]] (Room 48) | ||
*[[Dark Spiked Goomba]] (Room 48) | *[[Dark Spiked Goomba]] (Room 48) | ||
*[[Dark Magikoopa]] (Room 49) | *[[Dark Magikoopa]] (Room 49) | ||
*[[Dark Squiglet]] (Room 49) | *[[Dark Squiglet]] (Room 49) | ||
===Room 51-59=== | |||
*[[Dark Muth]] (Room 51) | *[[Dark Muth]] (Room 51) | ||
*[[Dark Chomp]] (Room 52) | *[[Dark Chomp]] (Room 52) | ||
*[[Dark Clubba]] (Room 53) | *[[Dark Clubba]] (Room 53) | ||
*[[Dark Squiglet]] (Rooms 54 | *[[Dark Squiglet]] (Rooms 54 and 55) | ||
*[[Dark Spania]] (Room 55) | *[[Dark Spania]] (Room 55) | ||
*[[Dark Boomerang Bro | *[[Dark Goomba]] (Room 56) | ||
*[[Dark Boomerang Bro]] (Room 56) | |||
*[[Dark Tech Cursya]] (Room 56) | *[[Dark Tech Cursya]] (Room 56) | ||
*[[Dark Tileoid]] (Room 57) | *[[Dark Tileoid]] (Room 57) | ||
*[[Dark Hammer Bro | *[[Dark Hammer Bro]] (Room 58) | ||
*[[Dark Cursya]] (Room 58) | *[[Dark Cursya]] (Room 58) | ||
*[[Dark Striker]] (Room 59) | *[[Dark Striker]] (Room 59) | ||
*[[Dark Magikoopa]] (Room 59) | *[[Dark Magikoopa]] (Room 59) | ||
===Room 61-69=== | |||
*[[Dark Magikoopa]] (Rooms 61, 62 and 63) | *[[Dark Magikoopa]] (Rooms 61, 62, and 63) | ||
*[[Dark Chomp]] (Rooms 61 and 65) | *[[Dark Chomp]] (Rooms 61 and 65) | ||
*[[Dark Pigarithm]] (Room 62) | *[[Dark Pigarithm]] (Room 62) | ||
| Line 110: | Line 113: | ||
*[[Dark Tileoid]] (Room 63) | *[[Dark Tileoid]] (Room 63) | ||
*[[Dark Ninjoe]] (Rooms 64 and 69) | *[[Dark Ninjoe]] (Rooms 64 and 69) | ||
*[[Dark Fire Bro | *[[Dark Fire Bro]] (Room 65) | ||
*[[Dark Hammer Bro | *[[Dark Hammer Bro]] (Room 66) | ||
*[[Dark Clubba]] (Rooms 67 and 68) | *[[Dark Clubba]] (Rooms 67 and 68) | ||
*[[Dark Tech Cursya]] (Room 67) | *[[Dark Tech Cursya]] (Room 67) | ||
*[[Dark Koopatrol]] (Room 68) | *[[Dark Koopatrol (Super Paper Mario)|Dark Koopatrol]] (Room 68) | ||
*[[Dark Megabite]] (Room 69) | *[[Dark Megabite]] (Room 69) | ||
*[[Dark Cherbil]] (Room 69) | *[[Dark Cherbil]] (Room 69) | ||
===Room 71-79=== | |||
*[[Dark Jawbus]] (Room 71) | *[[Dark Jawbus]] (Room 71) | ||
*[[Dark Koopa]] (Room 72) | *[[Dark Koopa]] (Room 72) | ||
*[[Dark Koopatrol]] (Rooms 72 and 76) | *[[Dark Koopatrol (Super Paper Mario)|Dark Koopatrol]] (Rooms 72 and 76) | ||
*[[Dark Barribad]] (Room 73) | *[[Dark Barribad]] (Room 73) | ||
*[[Dark Choppa]] (Room 74) | *[[Dark Choppa]] (Room 74) | ||
| Line 132: | Line 135: | ||
*[[Dark Spiky Skellobit]] (Room 79) | *[[Dark Spiky Skellobit]] (Room 79) | ||
===Room 81-89=== | |||
*[[Dark Spiky Skellobit]] (Rooms 81 and 83) | *[[Dark Spiky Skellobit]] (Rooms 81 and 83) | ||
*[[Dark Cursya]] (Room 81) | *[[Dark Cursya]] (Room 81) | ||
| Line 140: | Line 143: | ||
*[[Dark Jawbus]] (Room 84) | *[[Dark Jawbus]] (Room 84) | ||
*[[Dark Magiblot]] (Rooms 85 and 89) | *[[Dark Magiblot]] (Rooms 85 and 89) | ||
*[[Dark Koopatrol]] (Room 86) | *[[Dark Koopatrol (Super Paper Mario)|Dark Koopatrol]] (Room 86) | ||
*[[Dark Reversya Cursya]] (Room 86) | *[[Dark Reversya Cursya]] (Room 86) | ||
*[[Dark Striker]] (Room 87) | *[[Dark Striker]] (Room 87) | ||
| Line 147: | Line 150: | ||
*[[Dark Tileoid]] (Room 89) | *[[Dark Tileoid]] (Room 89) | ||
===Room 91-99=== | |||
*[[Dark Cursya]] (Room 91) | *[[Dark Cursya]] (Room 91) | ||
*[[Dark Tech Cursya]] (Room 91) | *[[Dark Tech Cursya]] (Room 91) | ||
| Line 154: | Line 157: | ||
*[[Dark Magikoopa]] (Room 92) | *[[Dark Magikoopa]] (Room 92) | ||
*[[Dark Squiglet]] (Room 92) | *[[Dark Squiglet]] (Room 92) | ||
*[[Dark Hammer Bro | *[[Dark Hammer Bro]] (Rooms 93 and 99) | ||
*[[Dark Boomerang Bro | *[[Dark Boomerang Bro]] (Rooms 93 and 99) | ||
*[[Dark Fire Bro | *[[Dark Fire Bro]] (Rooms 93 and 99) | ||
*[[Dark Magiblot]] (Room 94) | *[[Dark Magiblot]] (Room 94) | ||
*[[Dark Dayzee]] (Room 94) | *[[Dark Dayzee]] (Room 94) | ||
| Line 168: | Line 171: | ||
*[[Dark Koopatrol (Super Paper Mario)|Dark Koopatrol]] (Room 99) | *[[Dark Koopatrol (Super Paper Mario)|Dark Koopatrol]] (Room 99) | ||
===Room 100=== | |||
*[[Shadoo]] (Appears the second time [[Mario]]'s group makes it to Level 100. On the first visit, it does not reveal itself, and requests for the party to make a return trip before they can be fought.) | *[[Shadoo]] (Appears the second time [[Mario]]'s group makes it to Level 100. On the first visit, it does not reveal itself, and requests for the party to make a return trip before they can be fought.) | ||
==Prizes== | |||
* | {{RPG item locations | ||
* | |item1=Special Card (x17) | ||
* | |image1=[[File:CatchCardGoldSPM.png]] | ||
* | |location1=<nowiki/> | ||
* | *[[Dashell]], Room 10. | ||
* | *[[Goombario]], Room 20. | ||
* | *[[Kooper]], Room 30. | ||
* | *[[Bombette]], Room 40. | ||
* | *[[Parakarry]], Room 50. | ||
* | *[[Bow]], Room 60. | ||
*[[Watt]], Room 70. | |||
*[[Sushie]], Room 80. | |||
*[[Lakilester]], Room 90. | |||
*'''[[Mario]], Room 100 after defeating Shadoo.''' | |||
*'''Dark Mario, " " " " "''' | |||
*'''Peach (1), " " " " "''' | |||
*'''Dark Peach, " " " " "''' | |||
*'''Bowser (1), " " " " "''' | |||
*'''Dark Bowser, " " " " "''' | |||
*'''[[Luigi]], " " " " "''' | |||
*'''Dark Luigi, " " " " "''' | |||
}} | |||
==Names in | ==Backgrounds== | ||
{{ | {{image|more=yes|section=yes|Narrower mural versions}} | ||
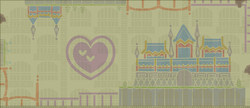
The background of the Flipside and Flopside Pits changes every 25 rooms. Each background has a mural depicting one of the Pure Hearts and a location or character associated with it, with a narrower version on one of the other walls of the room. The Flopside Pit has murals of the last four Pure Hearts, and their narrower versions can be seen by flipping. | |||
The rest areas of the Pit do not contain either version of that section of the Pit's mural, but do change to reflect each background's differently colored bricks. | |||
<gallery widths="250"> | |||
SPM Flopside Pit of 100 Trials Mural 1.png|The background mural of [[Squirpina XIV]] and the [[List of implied locations#Squirpia|Squirpians]] seen in rooms 1-25 | |||
SPM Flopside Pit of 100 Trials Mural 2.png|The background mural of [[Flora Kingdom royalty#King Croacus I|King Croacus I]] and the [[Floro Sapien]]s seen in rooms 26-50 | |||
SPM Flopside Pit of 100 Trials Mural 3.png|The background mural of [[Sammer's Kingdom]] seen in rooms 51-75 | |||
SPM Flopside Pit of 100 Trials Mural 4.png|The background mural of [[Queen Jaydes]] and [[Grambi]] seen in rooms 76-99 | |||
</gallery> | |||
==Names in other languages== | |||
{{foreign names | |||
|Jpn=ウラ100部屋ダンジョン | |||
|JpnR=Ura Hyaku-heya Danjon | |||
|JpnM=Opposite-side 100-Room Dungeon | |||
|Fre=Puits des 100 épreuves de Verso | |||
|FreM=Flopside's Well of 100 Trials | |||
|Spa=Cien mazmorras de Villacruz | |Spa=Cien mazmorras de Villacruz | ||
|SpaM=Flopside 100 Dungeons | |SpaM=Flopside 100 Dungeons | ||
|Ita=Labirinto dei 100 livelli | |||
|ItaM=Labyrinth of the 100 levels | |||
|Kor=반대방 100개의 던전 | |||
|KorR=Bandaebang Baekgae-ui Deonjeon | |||
|KorM=Opposite Pit of 100 Trials | |||
}} | }} | ||
{{SPM}} | {{SPM}} | ||
[[Category:Dungeons]] | [[Category:Dungeons]] | ||
[[Category:Mazes]] | [[Category:Mazes]] | ||
[[Category: | [[Category:Underground areas]] | ||
[[Category:Super Paper Mario | [[Category:Super Paper Mario locations]] | ||
[[de:Grube der 100 Prüfungen in Flopstadt]] | |||
[[it:Labirinto dei 100 livelli (Svoltadiqua)]] | |||
Latest revision as of 21:00, January 28, 2025
- “EXTREME DANGER! Stay out! -Flopside City Hall-”
- —Sign, Super Paper Mario

The Flopside Pit of 100 Trials is a 100-room labyrinth in Super Paper Mario, similar to the Pit of 100 Trials in Paper Mario: The Thousand-Year Door. However, in this game there are two pits - one in Flopside, and one in Flipside, the latter pit being called the Flipside Pit of 100 Trials. Both were created to test the forces that guard the Pure Hearts. The Flopside version was used to study the powers of darkness.
Accessing the Flopside Pit is done in a manner similar to its Flipside counterpart, except the switch that opens the entrance does not appear until the Flipside Pit is cleared. Once the Flipside pit is cleared, a rift will appear above the sealed pipe leading to the pit. A blue switch appears when Fleep activates the rift and the block opens the way to the pit.
Most rooms of the Pit are randomly generated, containing an assortment of lines of solid blocks, one entrance door that immediately disappears, one locked door, and possibly pairs of Warp Pipes on opposite sides of the room. The possible locations of each of these elements appear in each room as faint, transparent images; this, as well as the solid black appearance of the objects, is a reference to segmented liquid-crystal displays like that of the Game & Watch series. Even when solid, these objects are flat, so flipping will make Mario fall to the bottom of the room. Each room is populated with enemies, a random one of which will be holding the Pit Key that unlocks the door to the next room. The player has five minutes on each floor; if they run out of time, they will receive an instant Game Over.
Every tenth room is instead a smaller rest area with no enemies nor a time limit. In addition to the door to the next room, they contain a pipe back up out of the Pit and a large treasure chest containing a gold Catch Card (of Dashell in Room 10 and of a partner from Paper Mario every tenth room thereafter). Flimm also has a chance to appear on these rooms, selling items for different prices than they can normally be obtained for. Usually, this is 75% of its usual price, but unlike the Flipside Pit of 100 Trials, there is a chance items will cost double their typical price instead.
The final room, Room 100, is also different, instead simply being the inside of the black outline of a cube in a completely gray void. The first time the player arrives here, Shadoo speaks to them. However, Shadoo cannot be fought until the player reaches Room 100 for the second time. Upon winning the fight, eight small treasure chests will rise from the ground, containing Catch Cards of Shadoo's four forms, Mario, Peach, Bowser, and Luigi. The latter four Catch Cards are special in that they double all damage the character does, with the Mario card also providing infinite Flip Meter.
Rooms and Enemies[edit]
Room 1-9[edit]
- Dark Goomba (Rooms 1, 2, 3, and 8)
- Dark Koopa (Rooms 2, 5, and 9)
- Dark Paragoomba (Rooms 3 and 4)
- Dark Tech Cursya (Room 3)
- Dark Spiked Goomba (Room 5)
- Dark Squiglet (Rooms 6 and 7)
- Dark Cherbil (Room 6)
- Dark Spiny (Rooms 7 and 8)
- Dark Cursya (Room 8)
- Dark Spike Top (Room 9)
Room 11-19[edit]
- Dark Fuzzy (Rooms 11 and 18)
- Dark Squiglet (Room 11)
- Dark Stone Buzzy (Rooms 12 and 17)
- Dark Cleft (Rooms 13 and 14)
- Dark Paratroopa (Room 13)
- Dark Heavy Cursya (Room 13)
- Dark Paragoomba (Room 14)
- Dark Spania (Room 15)
- Dark Goomba (Rooms 15 and 19)
- Dark Dull Bones (Rooms 16 and 19)
- Dark Spiny (Room 16)
- Dark Tech Cursya (Room 16)
- Dark Spike Top (Room 17)
- Dark Spiked Goomba (Room 18)
Room 21-29[edit]
- Dark Pokey (Rooms 21 and 24)
- Dark Reversya Cursya (Room 21)
- Dark Fuzzy (Rooms 21 and 23)
- Dark Spania (Rooms 22 and 28)
- Dark Longator (Room 23)
- Dark Dull Bones (Room 24)
- Dark Paragoomba (Room 24)
- Dark Cleft (Room 25)
- Dark Ruff Puff (Rooms 25 and 27)
- Dark Dark Boo (Rooms 26 and 29)
- Dark Heavy Cursya (Room 27)
- Dark Squiglet (Room 27)
- Dark Stone Buzzy (Room 28)
- Dark Goomba (Room 29)
Room 31-39[edit]
- Dark Shlurp (Room 31)
- Dark Ruff Puff (Room 31)
- Dark Sproing-Oing (Room 32)
- Dark Squiglet (Rooms 32 and 35)
- Dark Choppa (Room 33)
- Dark Pokey (Room 33)
- Dark Boomboxer (Rooms 34 and 36)
- Dark Growmeba (Rooms 35 and 37)
- Dark Reversya Cursya (Room 35)
- Dark Cursya (Room 36)
- Dark Cherbil (Room 38)
- Dark Dark Boo (Room 39)
- Dark Megabite (Room 39)
Room 41-49[edit]
- Dark Striker (Rooms 41 and 49)
- Dark Shlurp (Rooms 42 and 45)
- Dark Cursya (Room 42)
- Dark Heavy Cursya (Room 42)
- Dark Boomboxer (Room 43)
- Dark Choppa (Room 43)
- Dark Sproing-Oing (Room 44)
- Dark Tech Cursya (Room 44)
- Dark Reversya Cursya (Room 44)
- Dark Hammer Bro (Room 46)
- Dark Goomba (Room 46)
- Dark Boomerang Bro (Room 47)
- Dark Paragoomba (Room 47)
- Dark Fire Bro (Room 48)
- Dark Spiked Goomba (Room 48)
- Dark Magikoopa (Room 49)
- Dark Squiglet (Room 49)
Room 51-59[edit]
- Dark Muth (Room 51)
- Dark Chomp (Room 52)
- Dark Clubba (Room 53)
- Dark Squiglet (Rooms 54 and 55)
- Dark Spania (Room 55)
- Dark Goomba (Room 56)
- Dark Boomerang Bro (Room 56)
- Dark Tech Cursya (Room 56)
- Dark Tileoid (Room 57)
- Dark Hammer Bro (Room 58)
- Dark Cursya (Room 58)
- Dark Striker (Room 59)
- Dark Magikoopa (Room 59)
Room 61-69[edit]
- Dark Magikoopa (Rooms 61, 62, and 63)
- Dark Chomp (Rooms 61 and 65)
- Dark Pigarithm (Room 62)
- Dark Eeligon (Room 62)
- Dark Heavy Cursya (Room 63)
- Dark Tileoid (Room 63)
- Dark Ninjoe (Rooms 64 and 69)
- Dark Fire Bro (Room 65)
- Dark Hammer Bro (Room 66)
- Dark Clubba (Rooms 67 and 68)
- Dark Tech Cursya (Room 67)
- Dark Koopatrol (Room 68)
- Dark Megabite (Room 69)
- Dark Cherbil (Room 69)
Room 71-79[edit]
- Dark Jawbus (Room 71)
- Dark Koopa (Room 72)
- Dark Koopatrol (Rooms 72 and 76)
- Dark Barribad (Room 73)
- Dark Choppa (Room 74)
- Dark Eeligon (Room 74)
- Dark Dayzee (Room 75)
- Dark Pigarithm (Room 75)
- Dark Ninjoe (Rooms 77 and 78)
- Dark Tileoid (Room 77)
- Dark Skellobit (Rooms 78 and 79)
- Dark Spiky Skellobit (Room 79)
Room 81-89[edit]
- Dark Spiky Skellobit (Rooms 81 and 83)
- Dark Cursya (Room 81)
- Dark Magikoopa (Room 82)
- Dark Cherbil (Room 82)
- Dark Skellobit (Room 83)
- Dark Jawbus (Room 84)
- Dark Magiblot (Rooms 85 and 89)
- Dark Koopatrol (Room 86)
- Dark Reversya Cursya (Room 86)
- Dark Striker (Room 87)
- Dark Squiglet (Room 87)
- Dark Longator (Room 88)
- Dark Tileoid (Room 89)
Room 91-99[edit]
- Dark Cursya (Room 91)
- Dark Tech Cursya (Room 91)
- Dark Heavy Cursya (Room 91)
- Dark Reversya Cursya (Room 91)
- Dark Magikoopa (Room 92)
- Dark Squiglet (Room 92)
- Dark Hammer Bro (Rooms 93 and 99)
- Dark Boomerang Bro (Rooms 93 and 99)
- Dark Fire Bro (Rooms 93 and 99)
- Dark Magiblot (Room 94)
- Dark Dayzee (Room 94)
- Dark Cherbil (Room 94)
- Dark Headbonk Goomba (Room 95)
- Dark Jawbus (Room 96)
- Dark Megabite (Room 96)
- Dark Skellobit (Room 97)
- Dark Spiky Skellobit (Room 97)
- Dark Muth (Room 98)
- Dark Koopatrol (Room 99)
Room 100[edit]
- Shadoo (Appears the second time Mario's group makes it to Level 100. On the first visit, it does not reveal itself, and requests for the party to make a return trip before they can be fought.)
Prizes[edit]
| Item | Image | Location
|
|---|---|---|
| Special Card (x17) |
|
Backgrounds[edit]
It has been requested that more images be uploaded for this section. Remove this notice only after the additional images have been added. Specifics: Narrower mural versions
The background of the Flipside and Flopside Pits changes every 25 rooms. Each background has a mural depicting one of the Pure Hearts and a location or character associated with it, with a narrower version on one of the other walls of the room. The Flopside Pit has murals of the last four Pure Hearts, and their narrower versions can be seen by flipping.
The rest areas of the Pit do not contain either version of that section of the Pit's mural, but do change to reflect each background's differently colored bricks.
The background mural of Squirpina XIV and the Squirpians seen in rooms 1-25
The background mural of King Croacus I and the Floro Sapiens seen in rooms 26-50
The background mural of Sammer's Kingdom seen in rooms 51-75
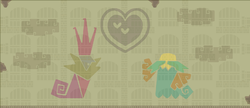
The background mural of Queen Jaydes and Grambi seen in rooms 76-99


Names in other languages[edit]
| Language | Name | Meaning | Notes |
|---|---|---|---|
| Japanese | ウラ100部屋ダンジョン[?] Ura Hyaku-heya Danjon |
Opposite-side 100-Room Dungeon | |
| French | Puits des 100 épreuves de Verso[?] | Flopside's Well of 100 Trials | |
| Italian | Labirinto dei 100 livelli[?] | Labyrinth of the 100 levels | |
| Korean | 반대방 100개의 던전[?] Bandaebang Baekgae-ui Deonjeon |
Opposite Pit of 100 Trials | |
| Spanish | Cien mazmorras de Villacruz[?] | Flopside 100 Dungeons |