Animal Barrel: Difference between revisions
(→Gallery: split) |
LinkTheLefty (talk | contribs) No edit summary |
||
| Line 6: | Line 6: | ||
|latest_appearance=''[[Donkey Kong Country 3]]'' ([[Game Boy Advance|GBA]]) ([[List of games by date#2005|2005]]) | |latest_appearance=''[[Donkey Kong Country 3]]'' ([[Game Boy Advance|GBA]]) ([[List of games by date#2005|2005]]) | ||
}} | }} | ||
An '''Animal Barrel'''<ref>''Donkey Kong Country 2: Diddy's Kong Quest'' instruction booklet, [[Media:DKC2 Manual 18-19.jpg|page 18]].</ref>, also known as a '''Goodie Barrel'''<ref>''Donkey Kong Country 3: Dixie Kong's Double Trouble | An '''Animal Barrel'''<ref>''Donkey Kong Country 2: Diddy's Kong Quest'' instruction booklet, [[Media:DKC2 Manual 18-19.jpg|page 18]].</ref>, also known as a '''Goodie Barrel'''<ref>M. Arakawa. ''Donkey Kong Country 3: Dixie Kong's Double Trouble'' Player's Guide. Page 15.</ref>, is a [[Barrel]] with a picture of an [[Animal Friend]] painted on the side. Unlike [[Animal Crate]]s, which contains an Animal Friend, Animal Barrels transform the [[Kong]]s into its depicted Animal Friend. These Barrels first appear in ''[[Donkey Kong Country 2: Diddy's Kong Quest|Donkey Kong Country 2]]'' and return in ''[[Donkey Kong Country 3: Dixie Kong's Double Trouble!|Donkey Kong Country 3]]''. They also appear in their handheld counterparts, ''[[Donkey Kong Land 2]]'' and ''[[Donkey Kong Land III|III]]''. | ||
If two Kongs enter an Animal Barrel, the resulting Animal Friend has two [[Hit Point]]s, with an icon of that Animal Friend the bottom-left of the screen, or bottom-right in the ''[[Donkey Kong Land (series)|Donkey Kong Land]]'' titles. This icon indicates the second Hit Point. The Animal Friend loses a Hit Point if injured, and its icon disappears. The Animal Friend loses a life if it loses its second and last Hit Point. It can touch a [[DK Barrel]] for another Hit Point, which represents the missing Kong. The Animal Friend transforms back into the Kongs if it crosses the [[No Animal Sign]]. | If two Kongs enter an Animal Barrel, the resulting Animal Friend has two [[Hit Point]]s, with an icon of that Animal Friend the bottom-left of the screen, or bottom-right in the ''[[Donkey Kong Land (series)|Donkey Kong Land]]'' titles. This icon indicates the second Hit Point. The Animal Friend loses a Hit Point if injured, and its icon disappears. The Animal Friend loses a life if it loses its second and last Hit Point. It can touch a [[DK Barrel]] for another Hit Point, which represents the missing Kong. The Animal Friend transforms back into the Kongs if it crosses the [[No Animal Sign]]. | ||
[[Clapper the Seal|Clapper]] and [[Parry the Parallel Bird|Parry]] are the only two Animal | [[Clapper the Seal|Clapper]] and [[Parry the Parallel Bird|Parry]] are the only two Animal Friends in the featured games who do not have their own Animal Barrel. In ''Donkey Kong Land 2'', Quawks' and Squawks' Animal Barrels look identical because of the [[Game Boy]]'s monochrome palette. | ||
While Animal Barrels do not appear in ''[[Donkey Kong 64]]'', the Animal Crates behave like them as they transform a Kong into an Animal | While Animal Barrels do not appear in ''[[Donkey Kong 64]]'', the Animal Crates behave like them as they transform a Kong into an Animal Friend. This behavior was also recycled for the [[Game Boy Color]] remake of ''[[Donkey Kong Country]]''. | ||
==Types== | ==Types== | ||
| Line 18: | Line 18: | ||
|- | |- | ||
!Name | !Name | ||
!Animal | !Animal Friend | ||
!Games | !Games | ||
|- | |- | ||
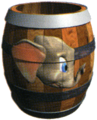
| align="center" |[[File:Ellie Barrel sprite.png]]<br>Ellie Barrel | | align="center" |[[File:Ellie Barrel sprite.png]]<br>{{conjectural|Ellie Barrel}} | ||
|style="text-align:center"|[[Ellie the Elephant]] | |style="text-align:center"|[[Ellie the Elephant]] | ||
|''Donkey Kong Country 3''<br>''Donkey Kong Land III'' | |''Donkey Kong Country 3''<br>''Donkey Kong Land III'' | ||
|- | |- | ||
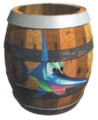
| align="center" |[[File:Enguarde Barrel sprite.png]]<br>Enguarde Barrel | | align="center" |[[File:Enguarde Barrel sprite.png]]<br>{{conjectural|Enguarde Barrel}} | ||
|style="text-align:center"|[[Enguarde the Swordfish]] | |style="text-align:center"|[[Enguarde the Swordfish]] | ||
|''Donkey Kong Country 2''<br>''Donkey Kong Land 2''<br>''Donkey Kong Country 3''<br>''Donkey Kong Land III'' | |''Donkey Kong Country 2''<br>''Donkey Kong Land 2''<br>''Donkey Kong Country 3''<br>''Donkey Kong Land III'' | ||
|- | |- | ||
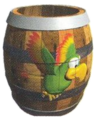
| align="center" |[[File:Quawks Barrel Sprite.png]]<br>Quawks Barrel | | align="center" |[[File:Quawks Barrel Sprite.png]]<br>{{conjectural|Quawks Barrel}} | ||
|style="text-align:center"|[[Quawks|Quawks the Parrot]] | |style="text-align:center"|[[Quawks|Quawks the Parrot]] | ||
|''Donkey Kong Land 2''<br>''Donkey Kong Country 3'' | |''Donkey Kong Land 2''<br>''Donkey Kong Country 3'' | ||
|- | |- | ||
| align="center" |[[File:Rambi Barrel sprite.png]]<br>Rambi Barrel | | align="center" |[[File:Rambi Barrel sprite.png]]<br>Rambi Animal Barrel<ref>M. Arakawa. ''Donkey Kong Country 2: Diddy's Kong Quest'' Player's Guide. Page 80.</ref> | ||
|style="text-align:center"|[[Rambi the Rhino]] | |style="text-align:center"|[[Rambi the Rhino]] | ||
|''Donkey Kong Country 2''<br>''Donkey Kong Land 2'' | |''Donkey Kong Country 2''<br>''Donkey Kong Land 2'' | ||
|- | |- | ||
| align="center" |[[File:Rattly Barrel sprite.png]]<br>Rattly Barrel | | align="center" |[[File:Rattly Barrel sprite.png]]<br>{{conjectural|Rattly Animal Barrel}} | ||
|style="text-align:center"|[[Rattly the Rattlesnake]] | |style="text-align:center"|[[Rattly the Rattlesnake]] | ||
|''Donkey Kong Country 2''<br>''Donkey Kong Land 2'' | |''Donkey Kong Country 2''<br>''Donkey Kong Land 2'' | ||
|- | |- | ||
| align="center" |[[File:Squawks Barrel sprite.png]]<br>Squawks Barrel | | align="center" |[[File:Squawks Barrel sprite.png]]<br>{{conjectural|Squawks Barrel}} | ||
|style="text-align:center"|[[Squawks the Parrot]] | |style="text-align:center"|[[Squawks the Parrot]] | ||
|''Donkey Kong Country 2''<br>''Donkey Kong Land 2''<br>''Donkey Kong Country 3''<br>''Donkey Kong Land III'' | |''Donkey Kong Country 2''<br>''Donkey Kong Land 2''<br>''Donkey Kong Country 3''<br>''Donkey Kong Land III'' | ||
|- | |- | ||
| align="center" |[[File:Squitter Barrel sprite.png]]<br>Squitter Barrel | | align="center" |[[File:Squitter Barrel sprite.png]]<br>Squitter Barrel<ref>M. Arakawa. ''Donkey Kong Country 3: Dixie Kong's Double Trouble'' Player's Guide. Page 62.</ref> | ||
|style="text-align:center"|[[Squitter the Spider]] | |style="text-align:center"|[[Squitter the Spider]] | ||
|''Donkey Kong Country 2''<br>''Donkey Kong Land 2''<br>''Donkey Kong Country 3''<br>''Donkey Kong Land III'' | |''Donkey Kong Country 2''<br>''Donkey Kong Land 2''<br>''Donkey Kong Country 3''<br>''Donkey Kong Land III'' | ||
| Line 76: | Line 76: | ||
==References== | ==References== | ||
<references/> | <references/> | ||
{{Barrels}} | {{Barrels}} | ||
{{DKC2}} | {{DKC2}} | ||
Revision as of 01:04, August 10, 2020
Template:Item-infobox An Animal Barrel[1], also known as a Goodie Barrel[2], is a Barrel with a picture of an Animal Friend painted on the side. Unlike Animal Crates, which contains an Animal Friend, Animal Barrels transform the Kongs into its depicted Animal Friend. These Barrels first appear in Donkey Kong Country 2 and return in Donkey Kong Country 3. They also appear in their handheld counterparts, Donkey Kong Land 2 and III.
If two Kongs enter an Animal Barrel, the resulting Animal Friend has two Hit Points, with an icon of that Animal Friend the bottom-left of the screen, or bottom-right in the Donkey Kong Land titles. This icon indicates the second Hit Point. The Animal Friend loses a Hit Point if injured, and its icon disappears. The Animal Friend loses a life if it loses its second and last Hit Point. It can touch a DK Barrel for another Hit Point, which represents the missing Kong. The Animal Friend transforms back into the Kongs if it crosses the No Animal Sign.
Clapper and Parry are the only two Animal Friends in the featured games who do not have their own Animal Barrel. In Donkey Kong Land 2, Quawks' and Squawks' Animal Barrels look identical because of the Game Boy's monochrome palette.
While Animal Barrels do not appear in Donkey Kong 64, the Animal Crates behave like them as they transform a Kong into an Animal Friend. This behavior was also recycled for the Game Boy Color remake of Donkey Kong Country.
Types
| Name | Animal Friend | Games |
|---|---|---|
Ellie Barrel |
Ellie the Elephant | Donkey Kong Country 3 Donkey Kong Land III |
Enguarde Barrel |
Enguarde the Swordfish | Donkey Kong Country 2 Donkey Kong Land 2 Donkey Kong Country 3 Donkey Kong Land III |
Quawks Barrel |
Quawks the Parrot | Donkey Kong Land 2 Donkey Kong Country 3 |
Rambi Animal Barrel[3] |
Rambi the Rhino | Donkey Kong Country 2 Donkey Kong Land 2 |
Rattly Animal Barrel |
Rattly the Rattlesnake | Donkey Kong Country 2 Donkey Kong Land 2 |
Squawks Barrel |
Squawks the Parrot | Donkey Kong Country 2 Donkey Kong Land 2 Donkey Kong Country 3 Donkey Kong Land III |
Squitter Barrel[4] |
Squitter the Spider | Donkey Kong Country 2 Donkey Kong Land 2 Donkey Kong Country 3 Donkey Kong Land III |
Gallery
Artwork
Ellie Barrel
Enguarde Barrel
Squawks Barrel
Squitter Barrel


Sprites

Enguarde Barrel in Donkey Kong Land 2

Rambi Barrel in Donkey Kong Land 2

Rattly Barrel in Donkey Kong Land 2

Squawks Barrel in Donkey Kong Land 2

Squitter Barrel in Donkey Kong Land 2
Names in other languages
| Language | Name | Meaning | Notes |
|---|
References
- ^ Donkey Kong Country 2: Diddy's Kong Quest instruction booklet, page 18.
- ^ M. Arakawa. Donkey Kong Country 3: Dixie Kong's Double Trouble Player's Guide. Page 15.
- ^ M. Arakawa. Donkey Kong Country 2: Diddy's Kong Quest Player's Guide. Page 80.
- ^ M. Arakawa. Donkey Kong Country 3: Dixie Kong's Double Trouble Player's Guide. Page 62.