Tour Sydney Sprint: Difference between revisions
(→Course layout: Do not assume/speculate) |
(It's pretty much confirmed to be used in 3, since they never reserve special routes just for 4.) Tag: Undo |
||
| Line 21: | Line 21: | ||
The first lap follows the layout of the first [[Sydney Sprint]]. The course begins within an area in {{wp|Port Jackson}}. Unlike in ''Tour'', the fountain next to the starting line is now surrounded by grass, is much smaller, and is level with the track instead of slightly raised up, acting as an offroad shortcut. An arrow field will point to the right, followed by another arrow field that points the player into the [[Sydney Opera]]. They will make a slight left amidst a cheering crowd to a [[Glide Ramp]] across the water. After passing under the {{wp|Bradfield Highway (Sydney)|Bradfield Highway}}, the player will make a 270-degree loop right amidst some of the {{wp|Luna Park Sydney|Luna Park}} fairgrounds on the left to join the highway and cross the {{wp|Sydney Harbour Bridge}}. Unlike the ''Mario Kart Tour'' version, large metal ramps are featured on the bridge for players to perform [[trick]]s off of, though they are inaccessible on the first lap due to them facing the other way. While on the bridge, passengers from the {{wp|Sydney Trains T set|Tangara}} train car operating on the {{wp|North Shore railway line|North Shore line}} will throw [[coin]]s onto the central span (replacing the [[Dash Mushroom|Mushroom]]s, [[Banana]]s and [[Bob-omb]]s that could be thrown from them in the ''Tour'' version). The player then takes a long winding left through downtown Sydney before reaching the finish line. | The first lap follows the layout of the first [[Sydney Sprint]]. The course begins within an area in {{wp|Port Jackson}}. Unlike in ''Tour'', the fountain next to the starting line is now surrounded by grass, is much smaller, and is level with the track instead of slightly raised up, acting as an offroad shortcut. An arrow field will point to the right, followed by another arrow field that points the player into the [[Sydney Opera]]. They will make a slight left amidst a cheering crowd to a [[Glide Ramp]] across the water. After passing under the {{wp|Bradfield Highway (Sydney)|Bradfield Highway}}, the player will make a 270-degree loop right amidst some of the {{wp|Luna Park Sydney|Luna Park}} fairgrounds on the left to join the highway and cross the {{wp|Sydney Harbour Bridge}}. Unlike the ''Mario Kart Tour'' version, large metal ramps are featured on the bridge for players to perform [[trick]]s off of, though they are inaccessible on the first lap due to them facing the other way. While on the bridge, passengers from the {{wp|Sydney Trains T set|Tangara}} train car operating on the {{wp|North Shore railway line|North Shore line}} will throw [[coin]]s onto the central span (replacing the [[Dash Mushroom|Mushroom]]s, [[Banana]]s and [[Bob-omb]]s that could be thrown from them in the ''Tour'' version). The player then takes a long winding left through downtown Sydney before reaching the finish line. | ||
The second lap follows a route not seen before along with [[Sydney Sprint 2]]. This time, the arrow field will point to the left, where the player will jump into a ferry (based on the one seen in ''Tour''{{'}}s [[Glider Challenge]] set in {{classic-link|SNES|Koopa Troopa Beach 2}}) before jumping out and onto a dock. The path afterwards will continue through a park with very narrow paths that have sharp turns. After getting back on the road, they will start approaching the Sydney Harbor Bridge again, but this time from the opposite direction as the first lap, allowing them to perform tricks off the ramps in the middle. At the end of the bridge, the path will begin following Sydney Sprint 2's layout, where an arrow field will point to the right, which leads to the {{wp|Mary Booth Lookout Reserve}}. After another turn to the left, there is a Glide Ramp which takes the player across some water onto a small street in between two buildings of the Sydney Opera with a single ramp at the end. After the ramp, the player turns right to return back to the Port Jackson area. After another turn to the left, the player reaches the finish line. | The second lap follows a route not seen before (likely for a currently unreleased Sydney Sprint 3) along with [[Sydney Sprint 2]]. This time, the arrow field will point to the left, where the player will jump into a ferry (based on the one seen in ''Tour''{{'}}s [[Glider Challenge]] set in {{classic-link|SNES|Koopa Troopa Beach 2}}) before jumping out and onto a dock. The path afterwards will continue through a park with very narrow paths that have sharp turns. After getting back on the road, they will start approaching the Sydney Harbor Bridge again, but this time from the opposite direction as the first lap, allowing them to perform tricks off the ramps in the middle. At the end of the bridge, the path will begin following Sydney Sprint 2's layout, where an arrow field will point to the right, which leads to the {{wp|Mary Booth Lookout Reserve}}. After another turn to the left, there is a Glide Ramp which takes the player across some water onto a small street in between two buildings of the Sydney Opera with a single ramp at the end. After the ramp, the player turns right to return back to the Port Jackson area. After another turn to the left, the player reaches the finish line. | ||
The third lap now starts in the opposite direction as the last two (currently making this the only city track to do so), and has the player follow the same layout as the first lap, but in reverse (in a similar vein to Sydney Sprint R from ''Tour''). As such, the player will first cross the Sydney Harbor Bridge (which again allows players to use the ramps), followed by taking a large turn past Luna Park, then glide into the Sydney Opera, and come back to the Port Jackson area where the race ends. | The third lap now starts in the opposite direction as the last two (currently making this the only city track to do so), and has the player follow the same layout as the first lap, but in reverse (in a similar vein to Sydney Sprint R from ''Tour''). As such, the player will first cross the Sydney Harbor Bridge (which again allows players to use the ramps), followed by taking a large turn past Luna Park, then glide into the Sydney Opera, and come back to the Port Jackson area where the race ends. | ||
Revision as of 20:11, August 4, 2022
This article is about a subject in an upcoming or recently released DLC Pack. When the DLC Pack is released, or more information about this subject is found, this article may need major rewriting.
This notice should be removed after a month has passed since the DLC Pack was first released.
- This article is about the combined race course in Mario Kart 8 Deluxe – Booster Course Pass. For each Mario Kart Tour layout of the course, see Sydney Sprint and Sydney Sprint 2.
| Sydney Sprint | |||
|---|---|---|---|

| |||
| Information | |||
| Appears in | Mario Kart 8 Deluxe (Booster Course Pass) (2022) | ||
| Cup(s) | Propeller Cup | ||
| Based on | Sydney, Australia Sydney Sprint and Sydney Sprint 2 | ||
| |||
| |||
| |||
Sydney Sprint is a race course that appears in the Booster Course Pass for Mario Kart 8 Deluxe. It is an expanded and combined version of Sydney Sprint and Sydney Sprint 2 from Mario Kart Tour. It is the first course of the Propeller Cup.[1]
It is one of two courses from Mario Kart Tour to appear in the second wave, alongside Template:Classic-link.
Course layout
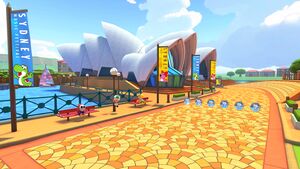
The first lap follows the layout of the first Sydney Sprint. The course begins within an area in Port Jackson. Unlike in Tour, the fountain next to the starting line is now surrounded by grass, is much smaller, and is level with the track instead of slightly raised up, acting as an offroad shortcut. An arrow field will point to the right, followed by another arrow field that points the player into the Sydney Opera. They will make a slight left amidst a cheering crowd to a Glide Ramp across the water. After passing under the Bradfield Highway, the player will make a 270-degree loop right amidst some of the Luna Park fairgrounds on the left to join the highway and cross the Sydney Harbour Bridge. Unlike the Mario Kart Tour version, large metal ramps are featured on the bridge for players to perform tricks off of, though they are inaccessible on the first lap due to them facing the other way. While on the bridge, passengers from the Tangara train car operating on the North Shore line will throw coins onto the central span (replacing the Mushrooms, Bananas and Bob-ombs that could be thrown from them in the Tour version). The player then takes a long winding left through downtown Sydney before reaching the finish line.
The second lap follows a route not seen before (likely for a currently unreleased Sydney Sprint 3) along with Sydney Sprint 2. This time, the arrow field will point to the left, where the player will jump into a ferry (based on the one seen in Tour's Glider Challenge set in Template:Classic-link) before jumping out and onto a dock. The path afterwards will continue through a park with very narrow paths that have sharp turns. After getting back on the road, they will start approaching the Sydney Harbor Bridge again, but this time from the opposite direction as the first lap, allowing them to perform tricks off the ramps in the middle. At the end of the bridge, the path will begin following Sydney Sprint 2's layout, where an arrow field will point to the right, which leads to the Mary Booth Lookout Reserve. After another turn to the left, there is a Glide Ramp which takes the player across some water onto a small street in between two buildings of the Sydney Opera with a single ramp at the end. After the ramp, the player turns right to return back to the Port Jackson area. After another turn to the left, the player reaches the finish line.
The third lap now starts in the opposite direction as the last two (currently making this the only city track to do so), and has the player follow the same layout as the first lap, but in reverse (in a similar vein to Sydney Sprint R from Tour). As such, the player will first cross the Sydney Harbor Bridge (which again allows players to use the ramps), followed by taking a large turn past Luna Park, then glide into the Sydney Opera, and come back to the Port Jackson area where the race ends.
Gallery
View of the Sydney Harbour Bridge and Luna Park
Names in other languages
| Language | Name | Meaning | Notes |
|---|---|---|---|
| Chinese (simplified) | 悉尼冲刺[?] Xīní Chōngcì |
Sydney Sprint | |
| Chinese (traditional) | 雪梨衝刺[?] Xuělí Chōngcì |
Sydney Sprint | |
| Dutch | Sydney-Sprint[?] | Sydney Sprint | |
| French | Sprint à Sydney[?] | Sprint in Sydney | |
| German | Sydney-Spritztour[?] | Sydney Joyride | |
| Italian | Sprint a Sydney[?] | Sprint in Sydney | |
| Korean | 시드니 스프린트[?] Sideuni Seupeulinteu |
Sydney Sprint | |
| Portuguese (NOA) | Volta em Sydney[?] | Lap in Sydney | |
| Portuguese (NOE) | Acelerações em Sydney[?] | Acceleration in Sydney | |
| Russian | Сиднейский спринт[?] Sidneyskiy sprint |
Sydney Sprint | |
| Spanish | Sídney sin Pausa[?] | Sydney without Pause |


