Precarious Plateau: Difference between revisions
mNo edit summary |
m (Text replacement - "(\| *)Jap([RMCN\d]* *=)" to "$1Jpn$2") |
||
| (47 intermediate revisions by 32 users not shown) | |||
| Line 1: | Line 1: | ||
{{level | {{level infobox | ||
|title=Precarious Plateau | |title=Precarious Plateau | ||
|image=[[File: | |image=[[File:DKCR Precarious Plateau.png|250px]] | ||
|code=6 - 5 | |code=6-5 | ||
|game=''[[Donkey Kong Country Returns]] | |world=[[Cliff (world)|Cliff]] | ||
| | |game=''[[Donkey Kong Country Returns]]'' (''[[Donkey Kong Country Returns 3D|3D]]''/''[[Donkey Kong Country Returns HD|HD]]'') | ||
|before=[[ | |before=[[Weighty Way|<<]] | ||
|after=[[Crumble Canyon|>>]] | |after=[[Crumble Canyon|>>]] | ||
|track=Boulder Roller | |||
}} | }} | ||
'''Precarious Plateau''' is the forty-second level in | '''Precarious Plateau''' is the forty-second level in ''[[Donkey Kong Country Returns]]'' and its [[Donkey Kong Country Returns 3D|Nintendo 3DS]] and [[Donkey Kong Country Returns HD|Nintendo Switch]] ports, as well as the fifth level in the [[Cliff (world)|Cliff]] world. The [[Kong]]s can only access the level by buying a [[Map Key]] from [[Cranky Kong's Shop]]. | ||
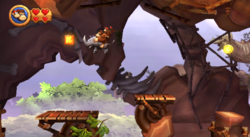
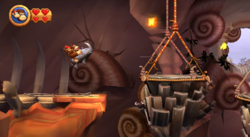
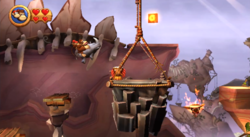
With [[Rambi]], [[Donkey Kong|Donkey]] and [[Diddy Kong]] must travel across many falling platforms and dodge swinging boulders. Additionally, the level includes wooden bridges, which fall with the weight of the heroes, and big stone platforms and walls. Many of these stone platforms are held by ropes and slowly swing over gaps. The [[Kong]]s can ride on the stones to progress of the many abysses in this level. Like other cliff-themed levels, the primates can find many dinosaur bones lying all over the stage in Precarious Plateau. Enemies in this level include [[Tiki Goon]]s, [[Tiki Tank]]s, [[ | With [[Rambi]], [[Donkey Kong|Donkey]] and [[Diddy Kong]] must travel across many falling platforms and dodge swinging boulders. Additionally, the level includes wooden bridges, which fall with the weight of the heroes, and big stone platforms and walls. Many of these stone platforms are held by ropes and slowly swing over gaps. The [[Kong]]s can ride on the stones to progress of the many abysses in this level. Like other cliff-themed levels, the primates can find many dinosaur bones lying all over the stage in Precarious Plateau. Enemies in this level include [[Tiki Goon]]s, [[Tiki Tank]]s, [[Tiki Buzz]]es, [[Flaming Tiki Buzz]]es, [[Tiki Zing]]s, and [[fireball (Tiki)|fireball]]s. | ||
In the [[Donkey Kong Country Returns#Time Attack|Time Attack]] mode of the game, a time of 1:00:00 is needed to get a gold medal, a time of 1:13:00 for silver, and a time of 1:59:00 for bronze. | |||
==Overview== | ==Overview== | ||
The level begins in a canyon-like background area, where Donkey Kong or Diddy Kong can find a cactus holding a [[Banana Coin]]. There is a high place with a [[Rambi]] crate on it above this, accessible by jumping on a nearby Tiki Buzz's head. After this a blue plant hiding a [[Puzzle Piece]] is found. Several rock platforms are ahead with wooden board on them. When the group stands on these, they crumble and fall, so they must cross them quickly. After the three platforms in a solid piece of ground. A boulder is hung here, swinging around the K letter. Another wooden platform is found near here, being protected by another boulder. A [[DK Barrel]] is here as well. The Kongs need to pass on other platforms, most of which are solid and have a single boulder swinging around them, to arrive in a ground part with a [[Tutorial Pig]] and a boulder | The level begins in a canyon-like background area, where Donkey Kong or Diddy Kong can find a cactus holding a [[Banana Coin]]. There is a high place with a [[Rambi]] [[animal crate|Crate]] on it above this, accessible by jumping on a nearby Tiki Buzz's head. After this a blue plant hiding a [[Puzzle Piece (Donkey Kong Country Returns)|Puzzle Piece]] is found. Several rock platforms are ahead with wooden board on them. When the group stands on these, they crumble and fall, so they must cross them quickly. After the three platforms in a solid piece of ground. A boulder is hung here, swinging around the K letter. Another wooden platform is found near here, being protected by another boulder. A [[DK Barrel]] is here as well. The Kongs need to pass on other platforms, most of which are solid and have a single boulder swinging around them, to arrive in a ground part with a [[Professor Chops|Tutorial Pig]] and a boulder the Tutorial Pig marks the checkpoint. | ||
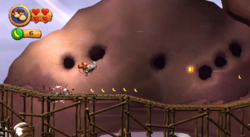
Farther ahead, the Kongs can find a slightly lower area of land with a cactus on it. Above the cactus is a swing boulder. After the Kongs climb a small ledge, they can find a bridge covered in Tiki Goons. The Kongs can find a switch that can destroy a wall immediately after this bridge, causing the wooden wall to fall. A [[Barrel Cannon]] is revealed when it is gone to let them access a background area of the level. The letter O is placed here, where there is a long set of falling bridge platforms. Tiki Tanks run all over this area, coming from holes in the rock wall from behind. Two platforms made of wood take the primates to a group of rock platforms set up like an energy transporter and a Barrel Cannon. This cannon shoots them to a piece of land with some Tiki Goons on it. The N letter is here, along with another two stone platforms, one of which falls with the Kongs' weight. Another Tutorial Pig is after these stone platforms to mark the checkpoint. | |||
Farther ahead, the Kongs can find a slightly lower area of land with a cactus on it. Above the cactus is a swing boulder. After the Kongs climb a small ledge, they can find a bridge covered in Tiki Goons. The | |||
Many other stone and wood platforms are ahead. The first platform swings across a gap and takes the Kongs to a large, solid platform. Just ahead of this is a group of stone platforms, followed by wooden platforms. One last stone platform is after all of these, which is guarded by a Tiki Goon and a | Many other stone and wood platforms are ahead. The first platform swings across a gap and takes the Kongs to a large, solid platform. Just ahead of this is a group of stone platforms, followed by wooden platforms. One last stone platform is after all of these, which is guarded by a Tiki Goon and a fireball. On the other side of the gap next to this platform is a large area of land with a large switch on it. When the switch is hit a few times, a Barrel Cannon appears, along with a wall that Rambi can charge through to find a secret area full of collectibles. The Barrel Cannon takes the group to a place in the background with a lot of bananas and Tiki Zings orbiting around the area. Rambi can take out the normal Tiki Zings, but the fireball variants are immune to Rambi's attacks. After passing six groups of circling bananas and enemies, the Kongs can find the [[Slot Machine Barrel]]. | ||
== | ==Enemies== | ||
{| class="wikitable dk" | |||
!Image | |||
!Name | |||
!Count | |||
|- | |||
|align="center"|[[File:FlamingTikiZing.png|50px]] | |||
|align="center"|[[Fireball (Tiki)|Fireball]] | |||
|4 | |||
|- | |||
|align="center"|[[File:Flaming_Tiki_Buzz_DKCR.png|50px]] | |||
|align="center"|[[Flaming Tiki Buzz]] | |||
|3 | |||
|- | |||
|align="center"|[[File:TikiBuzz.png|50px]] | |||
|align="center"|[[Tiki Buzz]] | |||
|2 | |||
|- | |||
|align="center"|[[File:TikiGoon.png|50px]] | |||
|align="center"|[[Tiki Goon]] | |||
|8 | |||
|- | |||
|align="center"|[[File:DKCR_Tiki_Tank_Artwork.png|50px]] | |||
|align="center"|[[Tiki Tank]] | |||
|5 | |||
|- | |||
|align="center"|[[File:Tiki_Zing.png|50px]] | |||
|align="center"|[[Tiki Zing]] | |||
|4 | |||
|} | |||
==Items== | |||
{|class="wikitable dk" width=15% | |||
|- | |||
!Image | |||
!Name | |||
!Count | |||
|- | |||
|align="center"|[[File:BananacoinDKCR.png|x50px]] | |||
|align="center"|[[Banana Coin]] | |||
|11 | |||
|- | |||
|align="center"|[[File:DKBarrelDKCR.png|x50px]] | |||
|align="center"|[[DK Barrel]] | |||
|1 | |||
|- | |||
|align="center"|[[File:Heart.png|x50px]] | |||
|align="center"|[[Heart (item)|Heart]] | |||
|2 | |||
|- | |||
|align="center"|[[File:Rambi_crate.png|x50px]] | |||
|align="center"|[[Animal crate|Rambi Crate]] | |||
|1 | |||
|- | |||
|align="center"|[[File:BalloonDKCR.png|x50px]] | |||
|align="center"|[[Red Balloon]] | |||
|2 | |||
|} | |||
===K-O-N-G Letters=== | ===K-O-N-G Letters=== | ||
[[File: | {|class="wikitable dk" width=70% | ||
|- | |||
!Image | |||
!Letter | |||
!Location | |||
|- | |||
|align="center"|[[File:DKCR Precarious Plateau Letter K.png|250px]] | |||
|align="center"|K | |||
|Immediately before the first DK Barrel is the letter K underneath a swinging boulder. | |||
|- | |||
|align="center"|[[File:DKCR Precarious Plateau O Letter.png|250px]] | |||
|align="center"|O | |||
|On the wooden bridge in the background area, which is located after the first switch, the Kongs can find the letter O in the air. They can collect it by simply jumping. | |||
|- | |||
|align="center"|[[File:DKCR Precarious Plateau N Letter.png|250px]] | |||
|align="center"|N | |||
|The letter N is located on the fourth stone platform after the bridge where the letter O is found. | |||
|- | |||
|align="center"|[[File:DKCR Precarious Plateau Letter G.png|250px]] | |||
|align="center"|G | |||
|On the stone platform before the last switch, the Kongs can find the letter G. | |||
|} | |||
===Puzzle Pieces=== | |||
{|class="wikitable dk" width=70% | |||
|- | |||
!Image | |||
!Number | |||
!Location | |||
|- | |||
|align="center"|[[File:DKCR Precarious Plateau Puzzle Piece 1.png|250px]] | |||
|align="center"|1 | |||
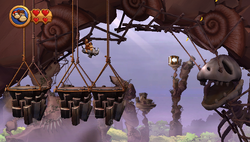
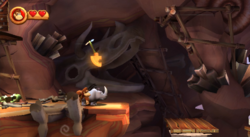
|At the start of the level, if Donkey Kong blows on the blue plant that is located at the edge of the first cliff, a Puzzle Piece comes out. | |||
|- | |||
|align="center"|[[File:DKCR Precarious Plateau Bonus Room.png|250px]] | |||
|align="center"|2 | |||
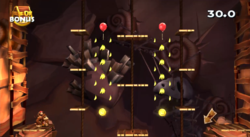
|Shortly after the checkpoint, the Kongs should use Rambi to smash through a wall with a block that has the rhinoceros's face on it. Behind this block is the entrance to a [[Bonus Level]], where the Kongs must collect many bananas, two [[Banana Coin]]s, and two [[Extra Life Balloon]]s around many moving platforms that travel in a vertical path. Once everything is collected, a Puzzle Piece appears. | |||
|- | |||
|align="center"|[[File:DKCR Precarious Plateau Puzzle Piece 3.png|250px]] | |||
|align="center"|3 | |||
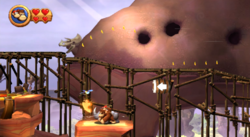
|Immediately after the first switch the makes a Barrel Cannon appear, one of the primates should blow on another blue plant that is located on a small, solid platform to reveal a Puzzle Piece. | |||
|- | |||
|align="center"|[[File:DKCR Precarious Plateau Puzzle Piece 4.png|250px]] | |||
|align="center"|4 | |||
|When the Kongs hit the final switch in the level, they should ignore the Barrel Cannon that appears and use Rambi to smash through a wall of blocks. On the other side of this wall, they can find many collectibles, including the fourth Puzzle Piece. | |||
|- | |||
|align="center"|[[File:DKCR Precarious Plateau Puzzle Piece 5.png|250px]] | |||
|align="center"|5 | |||
|At the end of the level, the Kongs can find many bananas and Tiki Zings orbiting around the area. If they collect all of the bananas, the fifth and final Puzzle Piece appears. | |||
|} | |||
==Names in other languages== | |||
{{foreign names | |||
|Jpn=かくれんぼランビ | |||
|JpnR=Kakurenbo Ranbi | |||
|JpnM=Hide-and-Seek Rambi | |||
|Spa=Péndulos Precarios | |||
|SpaM=Precarious Pendulums | |||
|FreA=Plateau du Rhino | |||
|FreAM=Rhino's Plateau | |||
|Ger=Gefahr auf dem Plateau | |||
|GerM=Danger on the Plateau | |||
|Ita=Altopiano viadiqua | |||
|ItaM=Away From Here Plateau | |||
}} | |||
{{DKCR}} | {{DKCR}} | ||
[[Category:Mountains]] | [[Category:Mountains]] | ||
[[Category: | [[Category:Secret levels]] | ||
[[Category:Donkey Kong Country Returns levels]] | |||
Latest revision as of 15:38, January 7, 2025
| Level | |
|---|---|
| Precarious Plateau | |
| |
| Level code | 6-5 |
| World | Cliff |
| Game | Donkey Kong Country Returns (3D/HD) |
| Music track | Boulder Roller |
| << Directory of levels >> | |
Precarious Plateau is the forty-second level in Donkey Kong Country Returns and its Nintendo 3DS and Nintendo Switch ports, as well as the fifth level in the Cliff world. The Kongs can only access the level by buying a Map Key from Cranky Kong's Shop.
With Rambi, Donkey and Diddy Kong must travel across many falling platforms and dodge swinging boulders. Additionally, the level includes wooden bridges, which fall with the weight of the heroes, and big stone platforms and walls. Many of these stone platforms are held by ropes and slowly swing over gaps. The Kongs can ride on the stones to progress of the many abysses in this level. Like other cliff-themed levels, the primates can find many dinosaur bones lying all over the stage in Precarious Plateau. Enemies in this level include Tiki Goons, Tiki Tanks, Tiki Buzzes, Flaming Tiki Buzzes, Tiki Zings, and fireballs.
In the Time Attack mode of the game, a time of 1:00:00 is needed to get a gold medal, a time of 1:13:00 for silver, and a time of 1:59:00 for bronze.
Overview[edit]
The level begins in a canyon-like background area, where Donkey Kong or Diddy Kong can find a cactus holding a Banana Coin. There is a high place with a Rambi Crate on it above this, accessible by jumping on a nearby Tiki Buzz's head. After this a blue plant hiding a Puzzle Piece is found. Several rock platforms are ahead with wooden board on them. When the group stands on these, they crumble and fall, so they must cross them quickly. After the three platforms in a solid piece of ground. A boulder is hung here, swinging around the K letter. Another wooden platform is found near here, being protected by another boulder. A DK Barrel is here as well. The Kongs need to pass on other platforms, most of which are solid and have a single boulder swinging around them, to arrive in a ground part with a Tutorial Pig and a boulder the Tutorial Pig marks the checkpoint.
Farther ahead, the Kongs can find a slightly lower area of land with a cactus on it. Above the cactus is a swing boulder. After the Kongs climb a small ledge, they can find a bridge covered in Tiki Goons. The Kongs can find a switch that can destroy a wall immediately after this bridge, causing the wooden wall to fall. A Barrel Cannon is revealed when it is gone to let them access a background area of the level. The letter O is placed here, where there is a long set of falling bridge platforms. Tiki Tanks run all over this area, coming from holes in the rock wall from behind. Two platforms made of wood take the primates to a group of rock platforms set up like an energy transporter and a Barrel Cannon. This cannon shoots them to a piece of land with some Tiki Goons on it. The N letter is here, along with another two stone platforms, one of which falls with the Kongs' weight. Another Tutorial Pig is after these stone platforms to mark the checkpoint.
Many other stone and wood platforms are ahead. The first platform swings across a gap and takes the Kongs to a large, solid platform. Just ahead of this is a group of stone platforms, followed by wooden platforms. One last stone platform is after all of these, which is guarded by a Tiki Goon and a fireball. On the other side of the gap next to this platform is a large area of land with a large switch on it. When the switch is hit a few times, a Barrel Cannon appears, along with a wall that Rambi can charge through to find a secret area full of collectibles. The Barrel Cannon takes the group to a place in the background with a lot of bananas and Tiki Zings orbiting around the area. Rambi can take out the normal Tiki Zings, but the fireball variants are immune to Rambi's attacks. After passing six groups of circling bananas and enemies, the Kongs can find the Slot Machine Barrel.
Enemies[edit]
| Image | Name | Count |
|---|---|---|
| Fireball | 4 | |
| Flaming Tiki Buzz | 3 | |
| Tiki Buzz | 2 | |

|
Tiki Goon | 8 |
| Tiki Tank | 5 | |

|
Tiki Zing | 4 |
Items[edit]
| Image | Name | Count |
|---|---|---|
| Banana Coin | 11 | |
| DK Barrel | 1 | |

|
Heart | 2 |

|
Rambi Crate | 1 |
| Red Balloon | 2 |
K-O-N-G Letters[edit]
Puzzle Pieces[edit]
| Image | Number | Location |
|---|---|---|
|
1 | At the start of the level, if Donkey Kong blows on the blue plant that is located at the edge of the first cliff, a Puzzle Piece comes out. |
|
2 | Shortly after the checkpoint, the Kongs should use Rambi to smash through a wall with a block that has the rhinoceros's face on it. Behind this block is the entrance to a Bonus Level, where the Kongs must collect many bananas, two Banana Coins, and two Extra Life Balloons around many moving platforms that travel in a vertical path. Once everything is collected, a Puzzle Piece appears. |
|
3 | Immediately after the first switch the makes a Barrel Cannon appear, one of the primates should blow on another blue plant that is located on a small, solid platform to reveal a Puzzle Piece. |
|
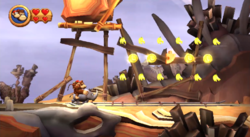
4 | When the Kongs hit the final switch in the level, they should ignore the Barrel Cannon that appears and use Rambi to smash through a wall of blocks. On the other side of this wall, they can find many collectibles, including the fourth Puzzle Piece. |
|
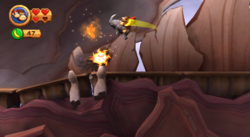
5 | At the end of the level, the Kongs can find many bananas and Tiki Zings orbiting around the area. If they collect all of the bananas, the fifth and final Puzzle Piece appears. |
Names in other languages[edit]
| Language | Name | Meaning | Notes |
|---|---|---|---|
| Japanese | かくれんぼランビ[?] Kakurenbo Ranbi |
Hide-and-Seek Rambi | |
| French (NOA) | Plateau du Rhino[?] | Rhino's Plateau | |
| German | Gefahr auf dem Plateau[?] | Danger on the Plateau | |
| Italian | Altopiano viadiqua[?] | Away From Here Plateau | |
| Spanish | Péndulos Precarios[?] | Precarious Pendulums |
