Platform Panic: Difference between revisions
No edit summary |
No edit summary Tag: Mobile edit |
||
| (73 intermediate revisions by 42 users not shown) | |||
| Line 1: | Line 1: | ||
{{ | {{about|the level from ''Donkey Kong Country Returns''|the Coin Rush pack from ''[[New Super Mario Bros. 2]]''|[[Platform Panic Pack]]}} | ||
{{level | {{level infobox | ||
|title=Platform Panic | |title=Platform Panic | ||
|image=[[File:PlatformPanic.png|250px]] | |image=[[File:PlatformPanic.png|250px]] | ||
|code=1 - K | |code=1-K | ||
|game=''[[Donkey Kong Country Returns]] | |world=[[Jungle (Donkey Kong Country Returns)|Jungle]] | ||
| | |game=''[[Donkey Kong Country Returns]]'' (''[[Donkey Kong Country Returns 3D|3D]]''/''[[Donkey Kong Country Returns HD|HD]]'') | ||
|before=[[ | |before=[[King of Cling|<<]] | ||
|after= | |after= | ||
}} | }} | ||
'''Platform Panic''' is the seventh level in ''[[Donkey Kong Country Returns]]'', as well as the seventh level in the [[Jungle (Donkey Kong Country Returns)|Jungle]] world. It is the first | '''Platform Panic''' is the seventh level in ''[[Donkey Kong Country Returns]]'' and its [[Donkey Kong Country Returns 3D|Nintendo 3DS]] and [[Donkey Kong Country Returns HD|Nintendo Switch]] ports, as well as the seventh level in the [[Jungle (Donkey Kong Country Returns)|Jungle]] world. It is the first Key Temple in the game, and all of the first world's [[KONG Letters|K-O-N-G Letters]] must be collected to unlock it. | ||
Each of the temple's platforms do not appear until the [[Kong]]s approach the area where it will appear. These platforms disappear shortly after the Kongs step on them, so [[Donkey Kong|Donkey]] and [[Diddy Kong]] must constantly be moving. As the primates progress, many spikes begin to appear all around the level, and the Kongs also have to start bouncing on the heads of many [[Tiki Buzz]]es. Other enemies in this level include [[Tiki Zing]]s, [[Tiki Goon]]s, and [[Tiki Doom]]s. The player can earn many [[Banana Coin]]s and some [[Red Balloon]]s in this level by consecutively jumping on Tiki enemies without touching the ground. | |||
In the [[Donkey Kong Country Returns#Time Attack|Time Attack]] mode of the game, a time of 1:13:00 is needed to get a gold medal, a time of 1:30:00 for silver, and a time of 1:47:00 for bronze. | |||
==Overview== | ==Overview== | ||
The Kongs start the level heading straight towards three collapsible platforms. Then there is another three collapsible platforms, yet with a Tiki Goon is on the second one. After those, four platforms pop up, with two Tiki Goons and a Tiki Doom. Past that are two platforms separated by a Tiki Zing, with three higher platforms that have three Tiki Zings at different levels above it. Once Donkey and Diddy Kong get past all of that, there are four thin platforms, with a Tiki Goon on the second and a Tiki Doom on the fourth. Next there are three platforms with the middle being slightly higher than the others and holding a Tiki Goon, with four Tiki Buzzes hovering over all three of them. Donkey Kong and Diddy Kong need to get past that to get to the three platforms separated by two Tiki Zings between the first and second. The Kongs need to jump in between them and continue low as two giant Tiki Zings lie above them, and head over to the tire. The Kongs need to bounce high off the tire to jump safely over the three vertical Tiki Zings onto the next tire leading to three descending platforms, each holding a Tiki Goon, which lead to a safe platform. | |||
[[File:DKCR Platform Panic 2.png|thumb|left|250px|The Kongs prepare to jump to a platform with a [[Banana Bunch]] on it.]] | |||
Following the resting platform are three collapsing platforms with a Tiki Zing in between the second and third and another above the third platform. After safely jumping between them, the Kongs need to continue and drop to the low platform below three vertical Tiki Zings and back up to the next few platforms. Then Donkey and Diddy Kong will need to jump to the next two platforms to reach the tall platforms which follow by a lower platform to another tall platform. At that last platform, the Kongs need to wait to have the platform to start falling before they can reach the lower platforms that were blocked off by the immobile wall. Continuing on, they need to hop towards the platform with spikes right above it, to a taller platform that has four leaning sides towards a tire. The Kongs then need to bounce high off that tire onto five Tiki Buzzes with the last one needed to drop onto another Tiki Buzz leading to a short platform. After that, they need to bounce high off the tire over the spikes onto another tire which leads to a few platforms that lead to eight low Tiki Buzzes with spikes high above them. After Donkey and Diddy Kong hop low over the Tiki Buzzes, they land on the second resting platform. | |||
After the resting platform are two collapsing platforms with a Tiki Buzz after it. Using that Tiki Buzz, the Kongs need to bounce well off of it to safely make it over the spikes to the next Tiki Buzz to another collapsing platform. Next lies three platforms with a Tiki Buzz in between the first and second along with spikes immediately above them. The Kongs need to bounce light on the Tiki Buzz to avoid contact with the spikes, and then wait on the last platform to move on to the lower platforms blocked by another immobile wall. After that are two platforms and then two spikes facing each other, which the Kongs must hop between, followed by four thin platforms that have some spikes above it. Then the Kongs need to jump onto the four uphill platforms to the three Tiki Buzzes followed by two Tiki Buzzes separated by spikes. After landing on the following platform, they need to bounce high off the tire to two Tiki Buzzes down four downhill platforms towards the Tiki Buzz. Then Donkey and Diddy Kong must bounce high to get across the following spike platform onto three Tiki Buzzes with spikes above the second Tiki Buzz, with the last one having them bounce high to get to the last Tiki Buzz. After that, Donkey and Diddy Kong need to land and shoot out of the barrel to reach the final area where the first [[Rare Orb]] lies. | |||
== | ==Enemies== | ||
{|class="wikitable dk" width=25% | |||
|- | |||
!Image | |||
!Name | |||
!Amount | |||
|- | |||
|align="center"|[[File:TikiBuzz.png|x50px]] | |||
|align="center"|[[Tiki Buzz]] | |||
|35 | |||
|- | |||
|align="center"|[[File:TikiDoom.png|x50px]] | |||
|align="center"|[[Tiki Doom]] | |||
|2 | |||
|- | |||
|align="center"|[[File:TikiGoon.png|x50px]] | |||
|align="center"|[[Tiki Goon]] | |||
|7 | |||
|- | |||
|align="center"|[[File:Tiki_Zing.png|x50px]] | |||
|align="center"|[[Tiki Zing]] | |||
|14 | |||
|- | |||
|align="center"|[[File:Big_Zing.png|x50px]] | |||
|align="center"|[[Tiki Zing (big)]] | |||
|2 | |||
|} | |||
==Items== | |||
{|class="wikitable dk" width=25% | |||
|- | |||
!Image | |||
!Name | |||
!Amount | |||
|- | |||
|align="center"|[[File:BananacoinDKCR.png|x50px]] | |||
|align="center"|[[Banana Coin]] | |||
|1 | |||
|} | |||
===Puzzle Pieces=== | |||
{|class="wikitable dk" width=70% | |||
|- | |||
!Image | |||
!Number | |||
!Location | |||
|- | |||
|align="center"|[[File:DKCR Platform Panic Puzzle Piece 1.png|250px]] | |||
|align="center"|1 | |||
|After traveling over a few of the collapsing platforms, one pops up with a Tiki Goon. Donkey Kong needs to hop onto the Tiki Goon and rise with a boost to the four Tiki Buzzes. The [[Puzzle Piece (Donkey Kong Country series)|Puzzle Piece]] is between the second and third one, and he has to hop on them to reach it. | |||
|- | |||
|align="center"|[[File:DKCR Platform Panic Puzzle Piece 2.png|250px]] | |||
|align="center"|2 | |||
|At the first stable platform, there is a pot containing the second Puzzle Piece that can be broken with the hand-slap. | |||
|- | |||
|align="center"|[[File:DKCR Platform Panic Puzzle Piece 3.png|250px]] | |||
|align="center"|3 | |||
|The third Puzzle Piece is a little past the second piece. There are three platforms, one being very tall, and the other two holding two platforms - one being very tall and the other shorter. The player must stand on the first platform and wait for it to fall. Then they have to jump to the shorter platform to grab the third piece. | |||
|- | |||
|align="center"|[[File:DKCR Platform Panic Puzzle Piece 4.png|250px]] | |||
|align="center"|4 | |||
|The next Puzzle Piece is farther into the level. The player can find it high up near a hanging platform. They need to hop onto the tire to the right of it and lean to the left to grab it. But to survive, they quickly need to bounce back onto the tire before it falls in order to get across the spiky platform to the right of it. | |||
|- | |||
|align="center"|[[File:DKCR Platform Panic Puzzle Piece 5.png|250px]] | |||
|align="center"|5 | |||
|The last Puzzle Piece is similar to the fourth puzzle piece, yet now there are three Tiki Buzzes near it. The player must have DK hop onto the tire and spring off it to the left Tiki Buzz to grab the piece. They need to either hop to the second two, or spring off the tire to continue on with the level. | |||
|} | |||
==Names in | ==Names in other languages== | ||
{{ | {{foreign names | ||
|Jap=グラグララビリンス | |||
|JapR=Guragura Rabirinsu | |||
|JapM=Wobbling Labyrinth | |||
|Spa=Plataformas Pérfidas | |Spa=Plataformas Pérfidas | ||
|SpaM=Treacherous Platforms}} | |SpaM=Treacherous Platforms | ||
|Fre=Sol Insolent | |||
|FreM=Insolent Ground | |||
|Ger=Plattform-Panik | |||
|GerM=Platform Panic | |||
|Ita=Tratto trematutto | |||
|ItaM=All-Shaking Stretch | |||
}} | |||
{{DKCR}} | {{DKCR}} | ||
[[Category: | [[Category:Temples]] | ||
[[Category: | [[Category:Secret levels]] | ||
[[Category:Donkey Kong Country Returns]] | [[Category:Donkey Kong Country Returns levels]] | ||
Latest revision as of 00:27, January 5, 2025
- This article is about the level from Donkey Kong Country Returns. For the Coin Rush pack from New Super Mario Bros. 2, see Platform Panic Pack.
| Level | |
|---|---|
| Platform Panic | |
| |
| Level code | 1-K |
| World | Jungle |
| Game | Donkey Kong Country Returns (3D/HD) |
| << Directory of levels >> | |
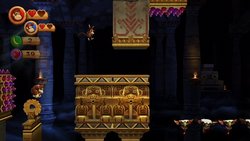
Platform Panic is the seventh level in Donkey Kong Country Returns and its Nintendo 3DS and Nintendo Switch ports, as well as the seventh level in the Jungle world. It is the first Key Temple in the game, and all of the first world's K-O-N-G Letters must be collected to unlock it.
Each of the temple's platforms do not appear until the Kongs approach the area where it will appear. These platforms disappear shortly after the Kongs step on them, so Donkey and Diddy Kong must constantly be moving. As the primates progress, many spikes begin to appear all around the level, and the Kongs also have to start bouncing on the heads of many Tiki Buzzes. Other enemies in this level include Tiki Zings, Tiki Goons, and Tiki Dooms. The player can earn many Banana Coins and some Red Balloons in this level by consecutively jumping on Tiki enemies without touching the ground.
In the Time Attack mode of the game, a time of 1:13:00 is needed to get a gold medal, a time of 1:30:00 for silver, and a time of 1:47:00 for bronze.
Overview[edit]
The Kongs start the level heading straight towards three collapsible platforms. Then there is another three collapsible platforms, yet with a Tiki Goon is on the second one. After those, four platforms pop up, with two Tiki Goons and a Tiki Doom. Past that are two platforms separated by a Tiki Zing, with three higher platforms that have three Tiki Zings at different levels above it. Once Donkey and Diddy Kong get past all of that, there are four thin platforms, with a Tiki Goon on the second and a Tiki Doom on the fourth. Next there are three platforms with the middle being slightly higher than the others and holding a Tiki Goon, with four Tiki Buzzes hovering over all three of them. Donkey Kong and Diddy Kong need to get past that to get to the three platforms separated by two Tiki Zings between the first and second. The Kongs need to jump in between them and continue low as two giant Tiki Zings lie above them, and head over to the tire. The Kongs need to bounce high off the tire to jump safely over the three vertical Tiki Zings onto the next tire leading to three descending platforms, each holding a Tiki Goon, which lead to a safe platform.
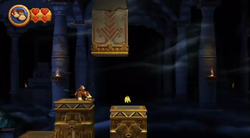
Following the resting platform are three collapsing platforms with a Tiki Zing in between the second and third and another above the third platform. After safely jumping between them, the Kongs need to continue and drop to the low platform below three vertical Tiki Zings and back up to the next few platforms. Then Donkey and Diddy Kong will need to jump to the next two platforms to reach the tall platforms which follow by a lower platform to another tall platform. At that last platform, the Kongs need to wait to have the platform to start falling before they can reach the lower platforms that were blocked off by the immobile wall. Continuing on, they need to hop towards the platform with spikes right above it, to a taller platform that has four leaning sides towards a tire. The Kongs then need to bounce high off that tire onto five Tiki Buzzes with the last one needed to drop onto another Tiki Buzz leading to a short platform. After that, they need to bounce high off the tire over the spikes onto another tire which leads to a few platforms that lead to eight low Tiki Buzzes with spikes high above them. After Donkey and Diddy Kong hop low over the Tiki Buzzes, they land on the second resting platform.
After the resting platform are two collapsing platforms with a Tiki Buzz after it. Using that Tiki Buzz, the Kongs need to bounce well off of it to safely make it over the spikes to the next Tiki Buzz to another collapsing platform. Next lies three platforms with a Tiki Buzz in between the first and second along with spikes immediately above them. The Kongs need to bounce light on the Tiki Buzz to avoid contact with the spikes, and then wait on the last platform to move on to the lower platforms blocked by another immobile wall. After that are two platforms and then two spikes facing each other, which the Kongs must hop between, followed by four thin platforms that have some spikes above it. Then the Kongs need to jump onto the four uphill platforms to the three Tiki Buzzes followed by two Tiki Buzzes separated by spikes. After landing on the following platform, they need to bounce high off the tire to two Tiki Buzzes down four downhill platforms towards the Tiki Buzz. Then Donkey and Diddy Kong must bounce high to get across the following spike platform onto three Tiki Buzzes with spikes above the second Tiki Buzz, with the last one having them bounce high to get to the last Tiki Buzz. After that, Donkey and Diddy Kong need to land and shoot out of the barrel to reach the final area where the first Rare Orb lies.
Enemies[edit]
| Image | Name | Amount |
|---|---|---|

|
Tiki Buzz | 35 |

|
Tiki Doom | 2 |
| Tiki Goon | 7 | |
| Tiki Zing | 14 | |

|
Tiki Zing (big) | 2 |
Items[edit]
| Image | Name | Amount |
|---|---|---|
| Banana Coin | 1 |
Puzzle Pieces[edit]
| Image | Number | Location |
|---|---|---|
|
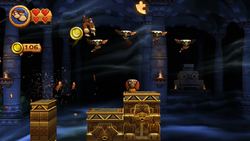
1 | After traveling over a few of the collapsing platforms, one pops up with a Tiki Goon. Donkey Kong needs to hop onto the Tiki Goon and rise with a boost to the four Tiki Buzzes. The Puzzle Piece is between the second and third one, and he has to hop on them to reach it. |
|
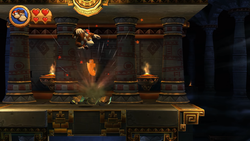
2 | At the first stable platform, there is a pot containing the second Puzzle Piece that can be broken with the hand-slap. |
|
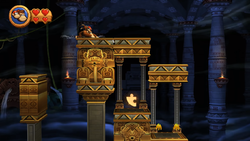
3 | The third Puzzle Piece is a little past the second piece. There are three platforms, one being very tall, and the other two holding two platforms - one being very tall and the other shorter. The player must stand on the first platform and wait for it to fall. Then they have to jump to the shorter platform to grab the third piece. |
|
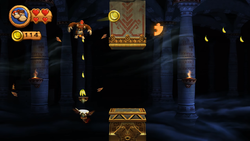
4 | The next Puzzle Piece is farther into the level. The player can find it high up near a hanging platform. They need to hop onto the tire to the right of it and lean to the left to grab it. But to survive, they quickly need to bounce back onto the tire before it falls in order to get across the spiky platform to the right of it. |
|
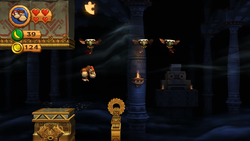
5 | The last Puzzle Piece is similar to the fourth puzzle piece, yet now there are three Tiki Buzzes near it. The player must have DK hop onto the tire and spring off it to the left Tiki Buzz to grab the piece. They need to either hop to the second two, or spring off the tire to continue on with the level. |
Names in other languages[edit]
| Language | Name | Meaning | Notes |
|---|---|---|---|
| Japanese | グラグララビリンス[?] Guragura Rabirinsu |
Wobbling Labyrinth | |
| French | Sol Insolent[?] | Insolent Ground | |
| German | Plattform-Panik[?] | Platform Panic | |
| Italian | Tratto trematutto[?] | All-Shaking Stretch | |
| Spanish | Plataformas Pérfidas[?] | Treacherous Platforms |