Spiky Surprise: Difference between revisions
m (Text replacement - "(\| *)Jap([RMCN\d]* *=)" to "$1Jpn$2") |
No edit summary |
||
| (2 intermediate revisions by 2 users not shown) | |||
| Line 12: | Line 12: | ||
As the main hazard, this level features many [[Spike (obstacle)|spike]] traps, which the Kongs must flee from. It also contains switches that cause platforms to pop out of grooves, enabling the player to reach higher or farther platforms. A small portion of the level is based on blasting through [[Barrel Cannon]]s. | As the main hazard, this level features many [[Spike (obstacle)|spike]] traps, which the Kongs must flee from. It also contains switches that cause platforms to pop out of grooves, enabling the player to reach higher or farther platforms. A small portion of the level is based on blasting through [[Barrel Cannon]]s. | ||
In the [[Donkey Kong Country Returns | In the [[Donkey Kong Country Returns#Time Attack|Time Attack]] mode, a time of 1:19:00 is needed for a shiny gold medal, a time of 1:27:00 for gold, a time of 1:40:00 for silver, and a time of 2:10:00 for bronze. | ||
==Overview== | ==Overview== | ||
Donkey Kong and [[Diddy Kong|Diddy]] land near a slope. Moving backwards, there is a wall with turf and a plant holding a [[Puzzle Piece (Donkey Kong Country series)|Puzzle Piece]]. Walking to the right, they encounter two [[Tiki Goon]]s, a [[Stilts (enemy)|Stilts]] and a spiked plank. A switch activates a platform to another Tiki Goon and a Barrel Cannon. It blasts the Kongs upwards. On the next floor, they must press more switches to traverse a walk full of spikes, while avoiding [[Tiki Bomber]]s. A [[Tiki Tank]] and a [[Flaming Tiki Buzz]] are found before the checkpoint. | Donkey Kong and [[Diddy Kong|Diddy]] land near a slope. Moving backwards, there is a wall with turf and a plant holding a [[Puzzle Piece (Donkey Kong Country series)|Puzzle Piece]]. Walking to the right, they encounter two [[Tiki Goon]]s, a [[Stilts (enemy)|Stilts]] and a spiked plank. A switch activates a platform to another Tiki Goon and a Barrel Cannon. It blasts the Kongs upwards. On the next floor, they must press more switches to traverse a walk full of spikes, while avoiding [[Tiki Bomber]]s. A [[Tiki Tank]] and a [[Flaming Tiki Buzz]] are found before the checkpoint. | ||
| Line 64: | Line 63: | ||
==Puzzle Pieces== | ==Puzzle Pieces== | ||
===Puzzle Pieces=== | |||
{|class="wikitable dk" width=70% | |||
|- | |||
!Image | |||
!Number | |||
!Location | |||
|- | |||
|align="center"|[[File:DKCR Spiky Surprise Puzzle Piece 1.png|250px]] | |||
|align="center"|1 | |||
|Immediately at the start of the stage, the player must walk to their left and climb a grassy wall and then pound a plant on the ceiling, releasing the first Puzzle Piece. | |||
|- | |||
|align="center"|[[File:DKCR Spiky Surprise Bonus Room.png|250px]] | |||
|align="center"|2 | |||
|After pressing the last switch before the checkpoint, the Kongs must wait until the second platform disappear, falling into a secret Barrel Cannon that blasts them to a [[bonus room]]. Here, they must collect every [[banana]] and [[Banana Coin]] to get the Puzzle Piece. | |||
|- | |||
|align="center"|[[File:DKCR Spiky Surprise Puzzle Piece 3.png|250px]] | |||
|align="center"|3 | |||
|While in the vertical corridor, the Kongs must pound a vase to reveal the third Puzzle Piece. | |||
|- | |||
|align="center"|[[File:DKCR Spiky Surprise Puzzle Piece 4.png|250px]] | |||
|align="center"|4 | |||
|The player must pound another vase, this time after activating the first moving wall of spikes. | |||
|- | |||
|align="center"|[[File:DKCR Spiky Surprise Puzzle Piece 5.png|250px]] | |||
|align="center"|5 | |||
|During the second portion with a wall of spikes moving to the right, there is a grassy pillar with a plant, where the last Puzzle Piece is hidden. | |||
|} | |||
==Names in other languages== | ==Names in other languages== | ||
| Line 75: | Line 96: | ||
|JpnR=Togetoge Iseki | |JpnR=Togetoge Iseki | ||
|JpnM=Spiky Ruins | |JpnM=Spiky Ruins | ||
|ChiS= | |||
|ChiSR= | |||
|ChiSM= | |||
|ChiT=尖刺刺遺跡 | |||
|ChiTR=Jiān Cìcì Yíjī | |||
|ChiTM=Spiked Thorn Ruins | |||
|Fre=Parois à Pics | |Fre=Parois à Pics | ||
|FreM=Spiky Walls | |FreM=Spiky Walls | ||
Latest revision as of 20:44, April 6, 2025
| Level | |
|---|---|
| Spiky Surprise | |
| |
| Level code | 9-3 |
| World | Cloud |
| Game | Donkey Kong Country Returns 3D/Donkey Kong Country Returns HD |
| Music track | Ruin Rhapsody |
| << Directory of levels >> | |
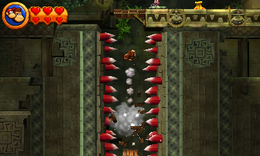
Spiky Surprise is the third level of the secret Cloud world from Donkey Kong Country Returns 3D and Donkey Kong Country Returns HD. It represents the third world of the game, the Ruins.
As the main hazard, this level features many spike traps, which the Kongs must flee from. It also contains switches that cause platforms to pop out of grooves, enabling the player to reach higher or farther platforms. A small portion of the level is based on blasting through Barrel Cannons.
In the Time Attack mode, a time of 1:19:00 is needed for a shiny gold medal, a time of 1:27:00 for gold, a time of 1:40:00 for silver, and a time of 2:10:00 for bronze.
Overview
Donkey Kong and Diddy land near a slope. Moving backwards, there is a wall with turf and a plant holding a Puzzle Piece. Walking to the right, they encounter two Tiki Goons, a Stilts and a spiked plank. A switch activates a platform to another Tiki Goon and a Barrel Cannon. It blasts the Kongs upwards. On the next floor, they must press more switches to traverse a walk full of spikes, while avoiding Tiki Bombers. A Tiki Tank and a Flaming Tiki Buzz are found before the checkpoint.
Another Barrel Cannon blasts the player to a vertical corridor where its spiked walls slowly close, forcing them to climb the platforms quickly while dealing with Tiki Goons and a switch. The next area features more switches, a Tiki Bomber and Stilts. A big switch makes a wall of appear spikes move to the right. The Kongs must run through a narrow passage to avoid being hit by the spikes. Following it there is a short area out of the ruins where they must blast through Barrel Cannons avoiding Tiki Zings. Returning to the ruins, Donkey Kong must again avoid a wall of spikes until he reaches a Blast Barrel that launches him to the Slot Machine Barrel.
Enemies
| Image | Name | Amount |
|---|---|---|

|
Flaming Tiki Buzz | 5 |

|
Stilts | 5 |
 
|
Tiki Bomber | 1 (normal) 3 (dropping) 4 (total) |

|
Tiki Buzz | 3 |
| Tiki Goon | 6 | |

|
Tiki Tank | 2 |
| Tiki Torch | 1 | |
| Tiki Zing | 2 | |

|
Tiki Zing (big) | 2 |
Puzzle Pieces
Puzzle Pieces
| Image | Number | Location |
|---|---|---|
|
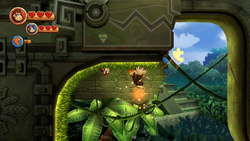
1 | Immediately at the start of the stage, the player must walk to their left and climb a grassy wall and then pound a plant on the ceiling, releasing the first Puzzle Piece. |
|
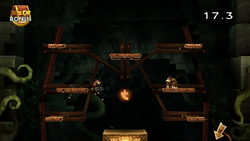
2 | After pressing the last switch before the checkpoint, the Kongs must wait until the second platform disappear, falling into a secret Barrel Cannon that blasts them to a bonus room. Here, they must collect every banana and Banana Coin to get the Puzzle Piece. |
|
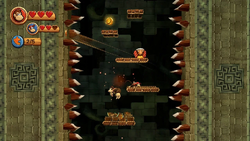
3 | While in the vertical corridor, the Kongs must pound a vase to reveal the third Puzzle Piece. |
|
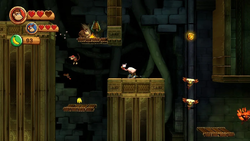
4 | The player must pound another vase, this time after activating the first moving wall of spikes. |
|
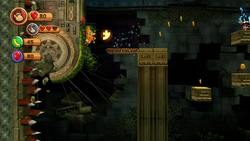
5 | During the second portion with a wall of spikes moving to the right, there is a grassy pillar with a plant, where the last Puzzle Piece is hidden. |
Names in other languages
| Language | Name | Meaning | Notes |
|---|---|---|---|
| Japanese | トゲトゲいせき[?] Togetoge Iseki |
Spiky Ruins | |
| Chinese (traditional) | 尖刺刺遺跡[?] Jiān Cìcì Yíjī |
Spiked Thorn Ruins | |
| French | Parois à Pics[?] | Spiky Walls | |
| German | Stachelrache[?] | Sting Revenge | |
| Italian | Sorpresa appuntita[?] | Spiky Surprise | |
| Spanish | Estacas bellacas[?] | Deceitful Stakes |