Tokyo Tour: Difference between revisions
MatiasNTRM (talk | contribs) mNo edit summary |
m (→Cups: Added links to bonus challenges.) |
||
| Line 51: | Line 51: | ||
|R2=[[Mario Circuit (3DS)|3DS Mario Circuit]]||R2.I=MarioCircuit3DS||R2.1=1,300||R2.2=1,500||R2.3=1,700||R2.4=2,000||R2.5=2,300 | |R2=[[Mario Circuit (3DS)|3DS Mario Circuit]]||R2.I=MarioCircuit3DS||R2.1=1,300||R2.2=1,500||R2.3=1,700||R2.4=2,000||R2.5=2,300 | ||
|R3=[[Rainbow Road (SNES)|SNES Rainbow Road]]||R3.I=RainbowRoadSNES||R3.1=1,600||R3.2=1,800||R3.3=2,000||R3.4=2,300||R3.5=2,600 | |R3=[[Rainbow Road (SNES)|SNES Rainbow Road]]||R3.I=RainbowRoadSNES||R3.1=1,600||R3.2=1,800||R3.3=2,000||R3.4=2,300||R3.5=2,600 | ||
|CN=Ready, Set, | |CN=[[Ready, Set, Rocket Start]]||C.I=Tour2 RosalinaCupChallenge||CC=Toad||CT=3DS Mario Circuit||C.1=5||C.2=10||C.3=15 | ||
}} | }} | ||
{{MKTCup | {{MKTCup | ||
| Line 58: | Line 58: | ||
|R2=[[Mario Circuit 2|SNES Mario Circuit 2]]||R2.I=MarioCircuit2SNES||R2.1=1,100||R2.2=1,400||R2.3=1,700||R2.4=2,300||R2.5=2,900 | |R2=[[Mario Circuit 2|SNES Mario Circuit 2]]||R2.I=MarioCircuit2SNES||R2.1=1,100||R2.2=1,400||R2.3=1,700||R2.4=2,300||R2.5=2,900 | ||
|R3=[[Yoshi Circuit|GCN Yoshi Circuit]]||R3.I=YoshiCircuitGCN||R3.1=1,300||R3.2=1,600||R3.3=1,900||R3.4=2,500||R3.5=3,100 | |R3=[[Yoshi Circuit|GCN Yoshi Circuit]]||R3.I=YoshiCircuitGCN||R3.1=1,300||R3.2=1,600||R3.3=1,900||R3.4=2,500||R3.5=3,100 | ||
|CN=Ring Race||C.I=Tour2 LakituCupChallenge||CC=Lakitu||CT=Tokyo Blur||C.1=15||C.2=20||C.3=25 | |CN=[[Ring Race]]||C.I=Tour2 LakituCupChallenge||CC=Lakitu||CT=Tokyo Blur||C.1=15||C.2=20||C.3=25 | ||
}} | }} | ||
{{MKTCup | {{MKTCup | ||
| Line 65: | Line 65: | ||
|R2=[[Toad Circuit|3DS Toad Circuit]]||R2.I=ToadCircuit3DS||R2.1=1,000||R2.2=1,400||R2.3=1,800||R2.4=2,600||R2.5=3,300 | |R2=[[Toad Circuit|3DS Toad Circuit]]||R2.I=ToadCircuit3DS||R2.1=1,000||R2.2=1,400||R2.3=1,800||R2.4=2,600||R2.5=3,300 | ||
|R3=[[Choco Island 2|SNES Choco Island 2]]||R3.I=ChocoIsland2SNES||R3.1=1,400||R3.2=1,800||R3.3=2,200||R3.4=3,000||R3.5=3,700 | |R3=[[Choco Island 2|SNES Choco Island 2]]||R3.I=ChocoIsland2SNES||R3.1=1,400||R3.2=1,800||R3.3=2,200||R3.4=3,000||R3.5=3,700 | ||
|CN=Do Jump Boosts||C.I=Tour2 ToadCupChallenge||CC=Baby Rosalina||CT=SNES Rainbow Road||C.1=5||C.2=10||C.3=15 | |CN=[[Do Jump Boosts]]||C.I=Tour2 ToadCupChallenge||CC=Baby Rosalina||CT=SNES Rainbow Road||C.1=5||C.2=10||C.3=15 | ||
}} | }} | ||
{{MKTCup | {{MKTCup | ||
| Line 72: | Line 72: | ||
|R2=SNES Rainbow Road||R2.I=RainbowRoadSNES||R2.1=1,400||R2.2=1,900||R2.3=2,400||R2.4=3,300||R2.5=4,200 | |R2=SNES Rainbow Road||R2.I=RainbowRoadSNES||R2.1=1,400||R2.2=1,900||R2.3=2,400||R2.4=3,300||R2.5=4,200 | ||
|R3=3DS Mario Circuit||R3.I=MarioCircuit3DS||R3.1=1,500||R3.2=2,000||R3.3=2,500||R3.4=3,400||R3.5=4,300 | |R3=3DS Mario Circuit||R3.I=MarioCircuit3DS||R3.1=1,500||R3.2=2,000||R3.3=2,500||R3.4=3,400||R3.5=4,300 | ||
|CN=Break Item Boxes||C.I=Tour2 PeachCupChallenge||CC=Donkey Kong||CT=SNES Mario Circuit 2||C.1=10||C.2=15||C.3=20 | |CN=[[Break Item Boxes]]||C.I=Tour2 PeachCupChallenge||CC=Donkey Kong||CT=SNES Mario Circuit 2||C.1=10||C.2=15||C.3=20 | ||
}} | }} | ||
{{MKTCup | {{MKTCup | ||
| Line 79: | Line 79: | ||
|R2=Tokyo Blur||R2.I=TokyoBlur||R2.1=900||R2.2=1,500||R2.3=2,100||R2.4=3,100||R2.5=4,000 | |R2=Tokyo Blur||R2.I=TokyoBlur||R2.1=900||R2.2=1,500||R2.3=2,100||R2.4=3,100||R2.5=4,000 | ||
|R3=3DS Neo Bowser City R||R3.I=NeoBowserCityR3DS||R3.1=1,300||R3.2=1,900||R3.3=2,500||R3.4=3,500||R3.5=4,400 | |R3=3DS Neo Bowser City R||R3.I=NeoBowserCityR3DS||R3.1=1,300||R3.2=1,900||R3.3=2,500||R3.4=3,500||R3.5=4,400 | ||
|CN=Big Reverse Race||C.I=Tour2 BowserJrCupChallenge||CC=Any character||CT=3DS Mario Circuit||C.1=50cc||C.2=100cc||C.3=150cc | |CN=[[Big Reverse Race]]||C.I=Tour2 BowserJrCupChallenge||CC=Any character||CT=3DS Mario Circuit||C.1=50cc||C.2=100cc||C.3=150cc | ||
}} | }} | ||
{{MKTCup | {{MKTCup | ||
| Line 86: | Line 86: | ||
|R2=GCN Yoshi Circuit||R2.I=YoshiCircuitGCN||R2.1=1,100||R2.2=1,800||R2.3=2,500||R2.4=3,500||R2.5=4,400 | |R2=GCN Yoshi Circuit||R2.I=YoshiCircuitGCN||R2.1=1,100||R2.2=1,800||R2.3=2,500||R2.4=3,500||R2.5=4,400 | ||
|R3=Tokyo Blur R||R3.I=TokyoBlurR||R3.1=1,400||R3.2=2,100||R3.3=2,800||R3.4=3,800||R3.5=4,700 | |R3=Tokyo Blur R||R3.I=TokyoBlurR||R3.1=1,400||R3.2=2,100||R3.3=2,800||R3.4=3,800||R3.5=4,700 | ||
|CN=Goomba Takedown||C.I=Tour2 MarioCupChallenge||CC=Bowser Jr.||CT=3DS Neo Bowser City||C.1=15||C.2=25||C.3=35 | |CN=[[Goomba Takedown]]||C.I=Tour2 MarioCupChallenge||CC=Bowser Jr.||CT=3DS Neo Bowser City||C.1=15||C.2=25||C.3=35 | ||
}} | }} | ||
{{MKTCup | {{MKTCup | ||
| Line 100: | Line 100: | ||
|R2=3DS Neo Bowser City||R2.I=NeoBowserCity3DS||R2.1=1,300||R2.2=2,200||R2.3=3,100||R2.4=4,100||R2.5=4,900 | |R2=3DS Neo Bowser City||R2.I=NeoBowserCity3DS||R2.1=1,300||R2.2=2,200||R2.3=3,100||R2.4=4,100||R2.5=4,900 | ||
|R3=N64 Kalimari Desert R||R3.I=KalimariDesertRN64||R3.1=1,300||R3.2=2,200||R3.3=3,100||R3.4=4,100||R3.5=4,900 | |R3=N64 Kalimari Desert R||R3.I=KalimariDesertRN64||R3.1=1,300||R3.2=2,200||R3.3=3,100||R3.4=4,100||R3.5=4,900 | ||
|CN=vs. Mega Ludwig||C.I=Tour2 LudwigCupChallenge||CC=Any character||CT=SNES Choco Island 2||C.1=50cc||C.2=100cc||C.3=150cc | |CN=[[vs. Mega]] [[Ludwig von Koopa|Ludwig]]||C.I=Tour2 LudwigCupChallenge||CC=Any character||CT=SNES Choco Island 2||C.1=50cc||C.2=100cc||C.3=150cc | ||
}} | }} | ||
{{MKTCup | {{MKTCup | ||
| Line 114: | Line 114: | ||
|R2=N64 Kalimari Desert||R2.I=KalimariDesertN64||R2.1=1,100||R2.2=2,200||R2.3=3,300||R2.4=4,100||R2.5=4,900 | |R2=N64 Kalimari Desert||R2.I=KalimariDesertN64||R2.1=1,100||R2.2=2,200||R2.3=3,300||R2.4=4,100||R2.5=4,900 | ||
|R3=SNES Choco Island 2R||R3.I=ChocoIsland2RSNES||R3.1=1,500||R3.2=2,600||R3.3=3,700||R3.4=4,500||R3.5=5,300 | |R3=SNES Choco Island 2R||R3.I=ChocoIsland2RSNES||R3.1=1,500||R3.2=2,600||R3.3=3,700||R3.4=4,500||R3.5=5,300 | ||
|CN=Steer Clear of Obstacles||C.I=Tour2 LarryCupChallenge||CC=Larry||CT=3DS Neo Bowser City||C.1=1||C.2=2||C.3=3 | |CN=[[Steer Clear of Obstacles]]||C.I=Tour2 LarryCupChallenge||CC=Larry||CT=3DS Neo Bowser City||C.1=1||C.2=2||C.3=3 | ||
}} | }} | ||
{{MKTCup | {{MKTCup | ||
| Line 121: | Line 121: | ||
|R2=SNES Mario Circuit 2||R2.I=MarioCircuit2SNES||R2.1=1,100||R2.2=2,300||R2.3=3,500||R2.4=4,300||R2.5=5,100 | |R2=SNES Mario Circuit 2||R2.I=MarioCircuit2SNES||R2.1=1,100||R2.2=2,300||R2.3=3,500||R2.4=4,300||R2.5=5,100 | ||
|R3=Tokyo Blur||R3.I=TokyoBlur||R3.1=1,100||R3.2=2,300||R3.3=3,500||R3.4=4,300||R3.5=5,100 | |R3=Tokyo Blur||R3.I=TokyoBlur||R3.1=1,100||R3.2=2,300||R3.3=3,500||R3.4=4,300||R3.5=5,100 | ||
|CN=Smash Small Dry Bones||C.I=Tour2 BabyRosalinaCupChallenge||CC=Morton||CT=N64 Kalimari Desert||C.1=5||C.2=10||C.3=15 | |CN=[[Smash Small Dry Bones]]||C.I=Tour2 BabyRosalinaCupChallenge||CC=Morton||CT=N64 Kalimari Desert||C.1=5||C.2=10||C.3=15 | ||
}} | }} | ||
{{MKTCup | {{MKTCup | ||
| Line 135: | Line 135: | ||
|R2=Tokyo Blur R/T||R2.I=TokyoBlurRT||R2.1=1,400||R2.2=2,800||R2.3=4,200||R2.4=5,200||R2.5=6,100 | |R2=Tokyo Blur R/T||R2.I=TokyoBlurRT||R2.1=1,400||R2.2=2,800||R2.3=4,200||R2.4=5,200||R2.5=6,100 | ||
|R3=3DS Shy Guy Bazaar||R3.I=ShyGuyBazaar3DS||R3.1=1,700||R3.2=3,100||R3.3=4,500||R3.4=5,500||R3.5=6,400 | |R3=3DS Shy Guy Bazaar||R3.I=ShyGuyBazaar3DS||R3.1=1,700||R3.2=3,100||R3.3=4,500||R3.4=5,500||R3.5=6,400 | ||
|CN=Glider Challenge||C.I=Tour2 WarioCupChallenge||CC=Rosalina||CT=SNES Rainbow Road||C.1=200||C.2=400||C.3=500 | |CN=[[Glider Challenge]]||C.I=Tour2 WarioCupChallenge||CC=Rosalina||CT=SNES Rainbow Road||C.1=200||C.2=400||C.3=500 | ||
}} | }} | ||
{{MKTCup | {{MKTCup | ||
| Line 149: | Line 149: | ||
|R2=Tokyo Blur T||R2.I=TokyoBlurT||R2.1=1,600||R2.2=3,200||R2.3=4,900||R2.4=6,300||R2.5=7,600 | |R2=Tokyo Blur T||R2.I=TokyoBlurT||R2.1=1,600||R2.2=3,200||R2.3=4,900||R2.4=6,300||R2.5=7,600 | ||
|R3=3DS Rock Rock Mountain R||R3.I=RockRockMountainR3DS||R3.1=1,600||R3.2=3,200||R3.3=4,900||R3.4=6,300||R3.5=7,600 | |R3=3DS Rock Rock Mountain R||R3.I=RockRockMountainR3DS||R3.1=1,600||R3.2=3,200||R3.3=4,900||R3.4=6,300||R3.5=7,600 | ||
|CN=Vs. Mega Dry Bowser||C.I=Tour2 DryBowserCupChallenge||CC=Any character||CT=N64 Kalimari Desert||C.1=50cc||C.2=100cc||C.3=150cc | |CN=Vs. Mega [[Dry Bowser]]||C.I=Tour2 DryBowserCupChallenge||CC=Any character||CT=N64 Kalimari Desert||C.1=50cc||C.2=100cc||C.3=150cc | ||
}} | }} | ||
{{MKTCup | {{MKTCup | ||
Revision as of 16:32, May 14, 2021
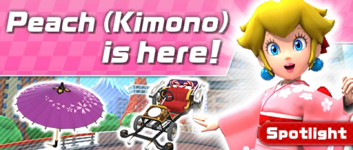
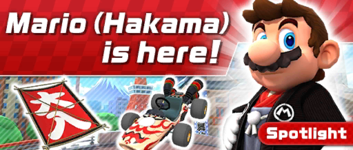
The Tokyo Tour was the second tour of Mario Kart Tour, which began on October 9, 2019 and ended on October 22, 2019. Reflecting its theme, it introduced a new course, Tokyo Blur (temporarily retitled "Tokyo Blur 1"), as well as variants of Mario and Peach in traditional Japanese attire, with Mario's being his hakama from Super Mario Odyssey. The menu's background featured Mount Fuji as the landmark for this tour.
Spotlights
| Tokyo Pipe 1 October 8, 2019, 11:00 p.m. (PT) – October 15, 2019, 10:59 p.m. (PT) |
Tokyo Pipe 2 October 15, 2019, 11:00 p.m. (PT) – October 22, 2019, 10:59 p.m. (PT) | ||||
|
| ||||
| Driver | Kart | Glider | Driver | Kart | Glider |
|---|---|---|---|---|---|
| Peach (Kimono) | Quickshaw | Purple Oilpaper Umbrella | Mario (Hakama) | Kabuki Dasher | Full Flight |
Cups
Template:MKTCupTemplate:MKTCupTemplate:MKTCupTemplate:MKTCupTemplate:MKTCupTemplate:MKTCupTemplate:MKTCupTemplate:MKTCupTemplate:MKTCupTemplate:MKTCupTemplate:MKTCupTemplate:MKTCupTemplate:MKTCupTemplate:MKTCupTemplate:MKTCupTemplate:MKTCupSignature kart sets
Drivers with a corresponding cup in the tour were bumped one rank up in every course of their cup. Each one had a specific kart and glider pair that were also bumped one rank up, though these sometimes changed between tours.
| Cup | Character | Kart | Glider |
|---|---|---|---|
| Second course of every cup | |||
| Third course of every cup | |||
Rewards
Gold cells indicate rewards exclusive to Gold Pass members.

|
||||||
| Paper Glider | Chrome DK Jumbo | Blue Biddybuggy | Landship | Dry Bowser | Peach | Black Circuit |
| Grand Stars | 48 | 64 | 80 | 100 | 118 | 132 | 152 | 170 | 192 | 210 | 230 | 250 | 270 | 295 | 305 | 310 | 315 | 320 | 325 | 330 | 335 | 340 | 345 | Total | Grand total | |
|---|---|---|---|---|---|---|---|---|---|---|---|---|---|---|---|---|---|---|---|---|---|---|---|---|---|---|
| Coin | 100 | 100 | 100 | 100 | 100 | 100 | 100 | 100 | 800 | 2300 | ||||||||||||||||
| 300 | 300 | 300 | 300 | 300 | 1500 | |||||||||||||||||||||
| Rubies | 5 | 3 | 3 | 3 | 3 | 3 | 3 | 3 | 26 | 58 | ||||||||||||||||
| 5 | 3 | 3 | 3 | 3 | 3 | 3 | 3 | 3 | 3 | 32 | ||||||||||||||||
| Item tickets | 3 | 3 | 3 | 9 | 59 | |||||||||||||||||||||
| 5 | 5 | 5 | 5 | 10 | 10 | 10 | 50 | |||||||||||||||||||
| Star tickets | 2 | 1 | 2 | 6 | ||||||||||||||||||||||
| 3 | 3 | |||||||||||||||||||||||||
| Quick tickets | 0 | 2 | ||||||||||||||||||||||||
| 1 | 1 | 2 | ||||||||||||||||||||||||
| Point-boost tickets | 3 | 3 | 3 | 9 | 12 | |||||||||||||||||||||
| 3 | 3 | |||||||||||||||||||||||||
| 3 | 3 | 3 | 9 | 12 | ||||||||||||||||||||||
| 3 | 3 | |||||||||||||||||||||||||
| 3 | 3 | 3 | 9 | 12 | ||||||||||||||||||||||
| 3 | 3 | |||||||||||||||||||||||||
| Level-boost ticket | 3 | 12 | ||||||||||||||||||||||||
| 9 | ||||||||||||||||||||||||||
New content
Cups
Drivers
Karts
Gliders
Courses
Tokyo Blur (N, R, T, R/T)
3DS Mario Circuit (N, R, T)
SNES Rainbow Road (N, R, T)
3DS Neo Bowser City (N, R, T)
SNES Mario Circuit 2 (N, R, T)
SNES Choco Island 2 (N, R, T)
N64 Kalimari Desert (N, R, T)
Paid banners
| Name | Availability | Cost | Contents | Banner image |
|---|---|---|---|---|
| Value Pack | October 9, 2019 – October 22, 2019 | US$1.99 |
|

|
| Rosalina Pack | October 9, 2019 – October 22, 2019 | US$19.99 |
|
|
| Diddy Kong Pack | October 9, 2019 – October 22, 2019 | US$39.99 |
|
|
Challenges
Initial pipe appearance rates
Tokyo Pipe 1
Tokyo Pipe 2
Profiles
- Mario Kart Tour Twitter:
- "A new tour is coming to blue!
"Tokyo Tour" starts at 11pm on October 8th (PT), with additional new and nostalgic courses. Of course, new characters will be added too!
Race your way through the Tokyo metropolis!"[1] - "The two-week Tokyo tour starts today! Plus, the starting line is near for those who want to race on additional classic blue courses. Are you excited to race throughout Tokyo? Start racing now!"[2]
- "The Tokyo tour is here! Mario and Peach had fun exploring Tokyo and getting into the classic Japanese style before the start of the tour! They even snapped a pic at a location that appears in the Tokyo Blur course! The Tokyo tour lasts until 10:59 PM PT on Oct 22."[3]
- "A new tour is coming to blue!
Gallery
Names in other languages
| Language | Name | Meaning | Notes |
|---|---|---|---|
| Chinese (simplified) | 东京巡回赛[?] Dōngjīng Xúnhuísài |
Tokyo Tour | |
| Chinese (traditional) | 東京巡迴賽[?] Dōngjīng Xúnhuísài |
Tokyo Tour | |
| French | Saison de Tokyo[?] | Tokyo Season | |
| German | Tour-Saison Tokio[?] | Tokyo Tour Season | |
| Italian | Tour di Tokyo[?] | Tokyo's Tour | |
| Korean | 도쿄 투어[?] Dokyo Tueo |
Tokyo Tour | |
| Portuguese | Temporada de Tóquio[?] | Tokyo Season | |
| Spanish | Temporada de Tokio[?] | Tokyo Season |
Trivia
- This tour's Coin Rush was reused from the game's closed beta test.
- This was the first tour in which the final cup did not feature a Vs. Mega (opponent) bonus challenge.
- Without counting the base game content added in the New York Tour, this was the tour that added the biggest amount of new content to the game, with 14 new drivers, 13 new karts, 9 new gliders, 7 new tracks and 10 new cups.
- In the Baby Rosalina and Daisy Cups, SNES Mario Circuit 2 depicted Lakitu and GCN Yoshi Circuit T depicted Metal Mario on the icons despite them not being favorite courses. This was the first tour that had this oddity.

