Amsterdam Tour: Difference between revisions
Ku Zheng Kai (talk | contribs) |
m (Text replacement - "(\| *)Jap([RMCN\d]* *=)" to "$1Jpn$2") |
||
| (57 intermediate revisions by 29 users not shown) | |||
| Line 1: | Line 1: | ||
{{tour infobox | {{tour infobox | ||
|image=[[File:MKT Amsterdam Tour.png|200px]] | |image=[[File:MKT Amsterdam Tour.png|200px]] | ||
| Line 5: | Line 4: | ||
|end=May 3, 2022<br>10:59 p.m. (PT) | |end=May 3, 2022<br>10:59 p.m. (PT) | ||
|cups=12 | |cups=12 | ||
|rank=[[Rosalina Cup]] (week 1) | |rank=[[Rosalina Cup]] (week 1)<br>[[Dry Bowser Cup]] (week 2) | ||
|coin=[[Amsterdam Drift]] | |coin=[[Tour Amsterdam Drift|Amsterdam Drift]] | ||
|before=[[Yoshi Tour (2022)|<<]] | |before=[[Yoshi Tour (2022)|<<]] | ||
|after=>> | |after=[[Doctor Tour (2022)|>>]] | ||
}} | }} | ||
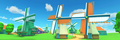
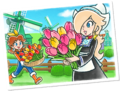
The '''Amsterdam Tour''' | The '''Amsterdam Tour''' was the sixty-eighth tour of ''[[Mario Kart Tour]]'', which began on April 20, 2022, and ended on May 3, 2022. The tour featured a new city course themed after [[Amsterdam]], the {{wp|Netherlands}}, aptly named [[Tour Amsterdam Drift|Amsterdam Drift]]. Thirty-one tours prior to this tour, Amsterdam was first referenced through [[:File:MKT 377GB.png|a gold badge]] released in the [[Peach vs. Daisy Tour]] in 2021. The tour ran through ''{{wp|Koningsdag}}'' ("King's Day"), a national Dutch holiday. With its main theme around flowers and gardening, the Amsterdam Tour introduced [[Rosalina]] in a traditional Volendam outfit and [[Princess Daisy|Daisy]] in a farmer's outfit as drivers, while also introducing a flower wagon-themed kart called the [[Flower Kart]] and the [[Dragonfly]] from ''[[Mario Kart DS]]''. Additionally, the High-End [[Firefly]] kart, a yellow variant of the Dragonfly, was introduced as a reward for placing high in ranked cups. | ||
This tour released Wave 4 of Mii Racing Suits, which, for the first time, consisted of only one suit. The menu's background featured some windmills from Amsterdam Drift as the landmark for this tour. This tour's [[Coin Rush (Mario Kart Tour)|Coin Rush]] course was Amsterdam Drift. This was the first tour since the [[New Year's 2022 Tour]] to not add any items to regular tour pipes and the All-Clear Pipe. This was also the only tour to not feature the [[Mii Cup]] after Miis were introduced. | |||
This tour's trailer featured tulips during its opening splash screen. | |||
==Spotlights== | ==Spotlights== | ||
{| align=center width=75% cellspacing=0 border=1 cellpadding=3 style="border-collapse:collapse; font-family:Arial; text-align:center" | {|align=center width=75% cellspacing=0 border=1 cellpadding=3 style="border-collapse:collapse;font-family:Arial;text-align:center" | ||
|-style="background: #89A" | |-style="background:#89A" | ||
|colspan=3|'''Amsterdam Pipe 1'''<br>April 19, 2022, 11:00 p.m. (PT) – <br>May 3, 2022, 10:59 p.m. (PT) | |colspan=3|'''Amsterdam Pipe 1'''<br>April 19, 2022, 11:00 p.m. (PT) – <br>May 3, 2022, 10:59 p.m. (PT) | ||
|colspan=3|'''Amsterdam Pipe 2'''<br>April 26, 2022, 11:00 p.m. (PT) – <br>May 3, 2022, 10:59 p.m. (PT) | |colspan=3|'''Amsterdam Pipe 2'''<br>April 26, 2022, 11:00 p.m. (PT) – <br>May 3, 2022, 10:59 p.m. (PT) | ||
| Line 20: | Line 22: | ||
|colspan=3|[[File:MKT Tour68 AmsterdamPipe1.png|x150px]] | |colspan=3|[[File:MKT Tour68 AmsterdamPipe1.png|x150px]] | ||
|colspan=3|[[File:MKT Tour68 AmsterdamPipe2.png|x150px]] | |colspan=3|[[File:MKT Tour68 AmsterdamPipe2.png|x150px]] | ||
|-style="background: #ABC" | |-style="background:#ABC" | ||
! style="width: 15%;"|Driver | !style="width:15%;"|Driver | ||
! style="width: 15%;"|Kart | !style="width:15%;"|Kart | ||
! style="width: 15%;"|Glider | !style="width:15%;"|Glider | ||
! style="width: 20%;"|Drivers | !style="width:20%;"|Drivers | ||
! style="width: 20%;"|Karts | !style="width:20%;"|Karts | ||
! style="width: 20%;"|Gliders | !style="width:20%;"|Gliders | ||
|- | |- | ||
|[[File:MKT Artwork RosalinaVolendam.png|120x120px]] | |[[File:MKT Artwork RosalinaVolendam.png|120x120px]] | ||
| Line 44: | Line 46: | ||
==Special pipe== | ==Special pipe== | ||
{| align=center width=75% cellspacing=0 border=1 cellpadding=3 style="border-collapse:collapse; font-family:Arial; text-align:center" | {|align=center width=75% cellspacing=0 border=1 cellpadding=3 style="border-collapse:collapse;font-family:Arial;text-align:center" | ||
|-style="background: #89A" | |-style="background:#89A" | ||
|colspan=2|'''Green Luigi Pipe'''<br>April 23, 2022, 10:00 p.m. (PT) – <br>April 28, 2022, 10:59 p.m. (PT) | |colspan=2|'''Green Luigi Pipe'''<br>April 23, 2022, 10:00 p.m. (PT) – <br>April 28, 2022, 10:59 p.m. (PT) | ||
|- | |- | ||
|colspan=2|[[File:MKT Tour68 GreenLuigiPipe.png|x150px]] | |colspan=2|[[File:MKT Tour68 GreenLuigiPipe.png|x150px]] | ||
|-style="background: #ABC" | |-style="background:#ABC" | ||
! style="width: 25%;"|Drivers | !style="width:25%;"|Drivers | ||
! style="width: 25%;"|Karts | !style="width:25%;"|Karts | ||
|- | |- | ||
|[[File:MKT Artwork LuigiGolf.png|110x110px]][[File:MKT Artwork LuigiVacation.png|110x110px]][[File:MKT Artwork LuigiClassic.png|115x115px]][[File:MKT Artwork LuigiPainter.png|110x110px]][[File:MKT Artwork LuigiLederhosen.png|110x110px]] | |[[File:MKT Artwork LuigiGolf.png|110x110px]][[File:MKT Artwork LuigiVacation.png|110x110px]][[File:MKT Artwork LuigiClassic.png|115x115px]][[File:MKT Artwork LuigiPainter.png|110x110px]][[File:MKT Artwork LuigiLederhosen.png|110x110px]] | ||
| Line 59: | Line 61: | ||
|[[Green Lightning]], [[Green B Dasher Mk. 2]], [[Green Circuit]], [[Lime Tea Coupe]] and [[Green Apple Kart]] | |[[Green Lightning]], [[Green B Dasher Mk. 2]], [[Green Circuit]], [[Lime Tea Coupe]] and [[Green Apple Kart]] | ||
|} | |} | ||
;Names in other languages | |||
{{foreign names | |||
|Jpn=緑のルイージドカン | |||
|JpnR=Midori no Ruīji Dokan | |||
|JpnM=Green Luigi Pipe | |||
|ChiS=绿色的路易吉水 | |||
|ChiSR=Lǜsè de Lùyìjí Shuǐguǎn | |||
|ChiSM=Green Luigi Pipe | |||
|ChiT=綠色的路易吉管 | |||
|ChiTR=Lǜsè de Lùyìjí Shuǐguǎn | |||
|ChiTM=Green Luigi Pipe | |||
|Fre=Tuyau Luigi vert | |||
|FreM=Green Luigi Pipe | |||
|Ger=Grün-Luigi-Röhre | |||
|GerM=Green Luigi Pipe | |||
|Ita=Tubo Luigi verdi | |||
|ItaM=Green Luigi Pipe | |||
|Kor=초록 루이지 토관 | |||
|KorR=Chorok Ru'iji Togwan | |||
|KorM=Green Luigi Pipe | |||
|Por=Cano Luigi verde | |||
|PorM=Green Luigi pipe | |||
|Spa=Tubería de Luigi verde | |||
|SpaM=Green Luigi Pipe | |||
}} | |||
==Cups== | ==Cups== | ||
{| align=center width=90% cellspacing=0 border=1 cellpadding=3 style="border-collapse:collapse; font-family:Arial; text-align:center" | {|align=center width=90% cellspacing=0 border=1 cellpadding=3 style="border-collapse:collapse;font-family:Arial;text-align:center" | ||
{{ | {{MKT cup table row | ||
|C=Rosalina||Ra=1 | |C=Rosalina||Ra=1 | ||
|R1=[[Amsterdam Drift]]||R1.I=AmsterdamDrift||R1.1=1,600||R1.2=2,400||R1.3=2,800||R1.4=3,200||R1.5=7,900 | |R1=[[Tour Amsterdam Drift|Amsterdam Drift]]||R1.I=AmsterdamDrift||R1.1=1,600||R1.2=2,400||R1.3=2,800||R1.4=3,200||R1.5=7,900 | ||
|R2=[[3DS Rosalina's Ice World|3DS Rosalina's Ice World R/T]]||R2.I=RosalinasIceWorldRT3DS Rosalina||R2.1=2,000||R2.2=3,000||R2.3=3,500||R2.4=4,000||R2.5=9,900 | |R2=[[3DS Rosalina's Ice World|3DS Rosalina's Ice World R/T]]||R2.I=RosalinasIceWorldRT3DS Rosalina||R2.1=2,000||R2.2=3,000||R2.3=3,500||R2.4=4,000||R2.5=9,900 | ||
|R3=Amsterdam Drift R/T||R3.I=AmsterdamDriftRT||R3.1=2,000||R3.2=3,000||R3.3=3,500||R3.4=4,000||R3.5=10,000 | |R3=Amsterdam Drift R/T||R3.I=AmsterdamDriftRT||R3.1=2,000||R3.2=3,000||R3.3=3,500||R3.4=4,000||R3.5=10,000 | ||
|CN=[[Ring Race]]||C.I=Tour30 ToadCupChallenge||CC=[[Birdo|Birdo (Yellow)]]||CT=[[GBA Sunset Wilds]]||C.1=10||C.2=17||C.3=22 | |CN=[[Ring Race]]||C.I=Tour30 ToadCupChallenge||CC=[[Birdo|Birdo (Yellow)]]||CT=[[GBA Sunset Wilds]]||C.1=10||C.2=17||C.3=22 | ||
}} | }} | ||
{{ | {{MKT cup table row | ||
|C=Monty Mole||Ra= | |C=Monty Mole||Ra= | ||
|R1=[[RMX Rainbow Road 2]]||R1.I=RMXRainbowRoad2 CatPeach||R1.1=2,000||R1.2=3,100||R1.3=3,600||R1.4=4,100||R1.5=9,900 | |R1=[[RMX Rainbow Road 2]]||R1.I=RMXRainbowRoad2 CatPeach||R1.1=2,000||R1.2=3,100||R1.3=3,600||R1.4=4,100||R1.5=9,900 | ||
| Line 76: | Line 103: | ||
|CN=[[Glider Challenge]]||C.I=Tour2 WarioCupChallenge||CC=[[Rosalina]]||CT=[[SNES Rainbow Road]]||C.1=300||C.2=450||C.3=580 | |CN=[[Glider Challenge]]||C.I=Tour2 WarioCupChallenge||CC=[[Rosalina]]||CT=[[SNES Rainbow Road]]||C.1=300||C.2=450||C.3=580 | ||
}} | }} | ||
{{ | {{MKT cup table row | ||
|C=Dry Bowser||Ra= | |C=Dry Bowser||Ra=2 | ||
|R1=Amsterdam Drift R||R1.I=AmsterdamDriftR||R1.1=1,800||R1.2=2,800||R1.3=3,300||R1.4=3,800||R1.5=8,800 | |R1=Amsterdam Drift R||R1.I=AmsterdamDriftR||R1.1=1,800||R1.2=2,800||R1.3=3,300||R1.4=3,800||R1.5=8,800 | ||
|R2=GBA Sunset Wilds R/T||R2.I=SunsetWildsRTGBA DryBowser||R2.1=2,100||R2.2=3,400||R2.3=3,900||R2.4=4,500||R2.5=10,500 | |R2=GBA Sunset Wilds R/T||R2.I=SunsetWildsRTGBA DryBowser||R2.1=2,100||R2.2=3,400||R2.3=3,900||R2.4=4,500||R2.5=10,500 | ||
| Line 83: | Line 110: | ||
|CN=[[Goomba Takedown]]||C.I=Tour22 BabyRosalinaCupChallenge||CC=[[Lakitu]]||CT=[[N64 Choco Mountain]]||C.1=15||C.2=30||C.3=45 | |CN=[[Goomba Takedown]]||C.I=Tour22 BabyRosalinaCupChallenge||CC=[[Lakitu]]||CT=[[N64 Choco Mountain]]||C.1=15||C.2=30||C.3=45 | ||
}} | }} | ||
{{ | {{MKT cup table row | ||
|C=Luigi||Ra= | |C=Luigi||Ra= | ||
|R1=N64 Yoshi Valley T||R1.I=YoshiValleyTN64 Luigi||R1.1=2,400||R1.2=4,000||R1.3=4,600||R1.4=5,300||R1.5=12,000 | |R1=N64 Yoshi Valley T||R1.I=YoshiValleyTN64 Luigi||R1.1=2,400||R1.2=4,000||R1.3=4,600||R1.4=5,300||R1.5=12,000 | ||
| Line 90: | Line 117: | ||
|CN=[[Snap a Photo]]||C.I=Tour68 LuigiCupChallenge||CC=Rosalina (Volendam)||CT=Amsterdam Drift T||C.1=1||C.2=2||C.3=3 | |CN=[[Snap a Photo]]||C.I=Tour68 LuigiCupChallenge||CC=Rosalina (Volendam)||CT=Amsterdam Drift T||C.1=1||C.2=2||C.3=3 | ||
}} | }} | ||
{{ | {{MKT cup table row | ||
|C=Dixie Kong||Ra= | |C=Dixie Kong||Ra= | ||
|R1=[[Wii Maple Treeway]]||R1.I=MapleTreewayWii DixieKong||R1.1=1,900||R1.2=3,200||R1.3=3,600||R1.4=4,300||R1.5=9,300 | |R1=[[Wii Maple Treeway]]||R1.I=MapleTreewayWii DixieKong||R1.1=1,900||R1.2=3,200||R1.3=3,600||R1.4=4,300||R1.5=9,300 | ||
| Line 97: | Line 124: | ||
|CN=[[Break Item Boxes]]||C.I=Tour8 IggyCupChallenge||CC=[[Dry Bowser]]||CT=[[GCN Yoshi Circuit]]||C.1=6||C.2=12||C.3=20 | |CN=[[Break Item Boxes]]||C.I=Tour8 IggyCupChallenge||CC=[[Dry Bowser]]||CT=[[GCN Yoshi Circuit]]||C.1=6||C.2=12||C.3=20 | ||
}} | }} | ||
{{ | {{MKT cup table row | ||
|C=Bowser||Ra= | |C=Bowser||Ra= | ||
|R1=SNES Choco Island 1||R1.I=ChocoIsland1SNES Pauline||R1.1=1,700||R1.2=3,000||R1.3=3,400||R1.4=4,000||R1.5=8,500 | |R1=SNES Choco Island 1||R1.I=ChocoIsland1SNES Pauline||R1.1=1,700||R1.2=3,000||R1.3=3,400||R1.4=4,000||R1.5=8,500 | ||
| Line 104: | Line 131: | ||
|CN=[[Steer Clear of Obstacles]]||C.I=Tour25 BirdoCupChallenge||CC=Rosalina||CT=DS Airship Fortress||C.1=1||C.2=2||C.3=3 | |CN=[[Steer Clear of Obstacles]]||C.I=Tour25 BirdoCupChallenge||CC=Rosalina||CT=DS Airship Fortress||C.1=1||C.2=2||C.3=3 | ||
}} | }} | ||
{{ | {{MKT cup table row | ||
|C=Toadette||Ra= | |C=Toadette||Ra= | ||
|R1=3DS Rosalina's Ice World T||R1.I=RosalinasIceWorldT3DS PenguinLuigi||R1.1=2,200||R1.2=4,000||R1.3=4,600||R1.4=5,400||R1.5=11,100 | |R1=3DS Rosalina's Ice World T||R1.I=RosalinasIceWorldT3DS PenguinLuigi||R1.1=2,200||R1.2=4,000||R1.3=4,600||R1.4=5,400||R1.5=11,100 | ||
| Line 111: | Line 138: | ||
|CN=[[Time Trial (Mario Kart Tour)|Time Trial]]|C.I=Tour45 FireBroCupChallenge||CC=[[Luigi]]||CT=RMX Rainbow Road 2||C.1=1:50.00||C.2=1:42.00||C.3=1:34.00 | |CN=[[Time Trial (Mario Kart Tour)|Time Trial]]|C.I=Tour45 FireBroCupChallenge||CC=[[Luigi]]||CT=RMX Rainbow Road 2||C.1=1:50.00||C.2=1:42.00||C.3=1:34.00 | ||
}} | }} | ||
{{ | {{MKT cup table row | ||
|C=Daisy||Ra= | |C=Daisy||Ra= | ||
|R1=SNES Rainbow Road||R1.I=RainbowRoadSNES MetalMario||R1.1=1,400||R1.2=2,600||R1.3=2,900||R1.4=3,500||R1.5=6,900 | |R1=SNES Rainbow Road||R1.I=RainbowRoadSNES MetalMario||R1.1=1,400||R1.2=2,600||R1.3=2,900||R1.4=3,500||R1.5=6,900 | ||
| Line 118: | Line 145: | ||
|CN=[[Combo Attack]]||C.I=Tour33 BirdoCupChallenge||CC=[[Princess Peach|Peach]]||CT=Wii Maple Treeway T||C.1=10||C.2=18||C.3=25 | |CN=[[Combo Attack]]||C.I=Tour33 BirdoCupChallenge||CC=[[Princess Peach|Peach]]||CT=Wii Maple Treeway T||C.1=10||C.2=18||C.3=25 | ||
}} | }} | ||
{{ | {{MKT cup table row | ||
|C=Ludwig||Ra= | |C=Ludwig||Ra= | ||
|R1=N64 Choco Mountain R||R1.I=ChocoMountainRN64 Ludwig||R1.1=1,700||R1.2=3,300||R1.3=3,700||R1.4=4,500||R1.5=8,600 | |R1=N64 Choco Mountain R||R1.I=ChocoMountainRN64 Ludwig||R1.1=1,700||R1.2=3,300||R1.3=3,700||R1.4=4,500||R1.5=8,600 | ||
| Line 125: | Line 152: | ||
|CN=[[vs. Mega]] [[Ice Bro]]||C.I=Tour33 WendyCupChallenge||CC=Any character||CT=3DS Rosalina's Ice World||C.1=50cc||C.2=100cc||C.3=150cc | |CN=[[vs. Mega]] [[Ice Bro]]||C.I=Tour33 WendyCupChallenge||CC=Any character||CT=3DS Rosalina's Ice World||C.1=50cc||C.2=100cc||C.3=150cc | ||
}} | }} | ||
{{ | {{MKT cup table row | ||
|C=Toad||Ra= | |C=Toad||Ra= | ||
|R1=SNES Rainbow Road R||R1.I=RainbowRoadRSNES IceMario||R1.1=1,500||R1.2=3,000||R1.3=3,400||R1.4=4,100||R1.5=7, | |R1=SNES Rainbow Road R||R1.I=RainbowRoadRSNES IceMario||R1.1=1,500||R1.2=3,000||R1.3=3,400||R1.4=4,100||R1.5=7,700 | ||
|R2=3DS Rosalina's Ice World||R2.I=RosalinasIceWorld3DS Toad||R2.1=1,900||R2.2=3,700||R2.3=4,100||R2.4=5,000||R2.5=9,400 | |R2=3DS Rosalina's Ice World||R2.I=RosalinasIceWorld3DS Toad||R2.1=1,900||R2.2=3,700||R2.3=4,100||R2.4=5,000||R2.5=9,400 | ||
|R3=GCN Yoshi Circuit||R3.I=YoshiCircuitGCN PeachWintertime||R3.1=1,400||R3.2=2,700||R3.3=3,100||R3.4=3,700||R3.5=7,000 | |R3=GCN Yoshi Circuit||R3.I=YoshiCircuitGCN PeachWintertime||R3.1=1,400||R3.2=2,700||R3.3=3,100||R3.4=3,700||R3.5=7,000 | ||
|CN=[[Do Jump Boosts]]||C.I=Tour68 ToadCupChallenge||CC=[[Princess Daisy|Daisy]]||CT=Amsterdam Drift||C.1=6||C.2=12||C.3=15 | |CN=[[Do Jump Boosts]]||C.I=Tour68 ToadCupChallenge||CC=[[Princess Daisy|Daisy]]||CT=Amsterdam Drift||C.1=6||C.2=12||C.3=15 | ||
}} | }} | ||
{{ | {{MKT cup table row | ||
|C=Donkey Kong||Ra= | |C=Donkey Kong||Ra= | ||
|R1=SNES Choco Island 1T||R1.I=ChocoIsland1TSNES Nabbit||R1.1=2,200||R1.2=4,400||R1.3=4,900||R1.4=6,100||R1.5=11,000 | |R1=SNES Choco Island 1T||R1.I=ChocoIsland1TSNES Nabbit||R1.1=2,200||R1.2=4,400||R1.3=4,900||R1.4=6,100||R1.5=11,000 | ||
| Line 139: | Line 166: | ||
|CN=[[Smash Small Dry Bones]]||C.I=Tour26 YoshiCupChallenge||CC=[[Toad]]||CT=N64 Choco Mountain||C.1=5||C.2=10||C.3=15 | |CN=[[Smash Small Dry Bones]]||C.I=Tour26 YoshiCupChallenge||CC=[[Toad]]||CT=N64 Choco Mountain||C.1=5||C.2=10||C.3=15 | ||
}} | }} | ||
{{ | {{MKT cup table row | ||
|C=Kamek||Ra= | |C=Kamek||Ra= | ||
|R1=3DS Rosalina's Ice World R||R1.I=RosalinasIceWorldR3DS CatToad||R1.1=2,300||R1.2=4,600||R1.3=5,200||R1.4=6,400||R1.5=11,300 | |R1=3DS Rosalina's Ice World R||R1.I=RosalinasIceWorldR3DS CatToad||R1.1=2,300||R1.2=4,600||R1.3=5,200||R1.4=6,400||R1.5=11,300 | ||
| Line 147: | Line 174: | ||
}} | }} | ||
|} | |} | ||
===Signature kart sets=== | ===Signature kart sets=== | ||
Drivers with a corresponding cup are bumped one rank up in every course of their cup. | Drivers with a corresponding cup are bumped one rank up in every course of their cup. | ||
{| class="wikitable" style="text-align: center" width=50% | {|class="wikitable"style="text-align:center"width=50% | ||
!width=10%|Cup | !width=10%|Cup | ||
!width=20%|Driver | !width=20%|Driver | ||
| Line 157: | Line 183: | ||
|- | |- | ||
|First course of every cup | |First course of every cup | ||
|[[File:MKT Icon | |[[File:MKT Icon Mii Emblem.png|x50px|link=Mii]] | ||
|[[File:MKT Icon DaikonRocket.png|50px|link=Daikon Rocket]] | |[[File:MKT Icon DaikonRocket.png|50px|link=Daikon Rocket]] | ||
|— | |— | ||
| Line 236: | Line 262: | ||
==Today's Challenge== | ==Today's Challenge== | ||
Players' most recently used kart and glider are chosen, and favorite and favored ones have extra priority. Opponents are arranged randomly. On day 1 of this tour, players finish a race in [[RMX Rainbow Road 2]] in the [[Monty Mole Cup]] using [[Cat Peach]] for a free pipe launch. Starting from day 2, players have to finish a race in the earliest incomplete course that is not in any of the ranked cups using the driver shown on the course's thumbnail every day to obtain the corresponding reward in the table below. Once all of the courses are completed, the courses are selected at random. | Players' most recently used kart and glider are chosen, and favorite and favored ones have extra priority. Opponents are arranged randomly. On day 1 of this tour, players finish a race in [[RMX Rainbow Road 2]] in the [[Monty Mole Cup]] using [[Cat Peach]] for a free pipe launch. Starting from day 2, players have to finish a race in the earliest incomplete course that is not in any of the ranked cups using the driver shown on the course's thumbnail every day to obtain the corresponding reward in the table below. Once all of the courses are completed, the courses are selected at random. | ||
{|align=center width=40% cellspacing=0 border=1 cellpadding=3 style="border-collapse:collapse;font-family:Arial;text-align:center" | |||
{| align=center width=40% cellspacing=0 border=1 cellpadding=3 style="border-collapse:collapse; font-family:Arial; text-align:center" | |-style="background:#89A" | ||
|-style="background: #89A" | |||
|'''Day(s)''' | |'''Day(s)''' | ||
|'''Reward''' | |'''Reward''' | ||
| Line 262: | Line 287: | ||
==Rewards== | ==Rewards== | ||
Gold cells indicate rewards that are exclusive to Gold Pass members. | Gold cells indicate rewards that are exclusive to Gold Pass members. | ||
{|class="wikitable" style="margin:auto; text-align:center" | {|class="wikitable"style="margin:auto;text-align:center" | ||
|- | |- | ||
!colspan=2|[[File:MKT Icon GrandStar.png|20x20px]] 15 | !colspan=2|[[File:MKT Icon GrandStar.png|20x20px]] 15 | ||
| Line 281: | Line 306: | ||
|style=background:silver|[[Cheep Charger]] | |style=background:silver|[[Cheep Charger]] | ||
|style=background:gold|[[Plaid Ribbon]] | |style=background:gold|[[Plaid Ribbon]] | ||
|style=background:silver|[[Ludwig von Koopa]] | |style=background:silver|[[Ludwig|Ludwig von Koopa]] | ||
|style=background:gold|[[Peachette]] | |style=background:gold|[[Peachette]] | ||
|style=background:gold|[[Macharon]] | |style=background:gold|[[Macharon]] | ||
|} | |} | ||
<br> | <br> | ||
{|class="wikitable" style="margin:auto; text-align:center" | {|class="wikitable"style="margin:auto;text-align:center" | ||
|- | |- | ||
!Grand Stars!![[File:MKT Icon GrandStar.png|20x20px]]!!15!!20!!25!!30!!35!!40!!50!!60!!70!!75!!80!!85!!90!!100!!110!!125!!145!!165!!185!!205!!225!!245!!255!!265!!Total!!Grand total | !Grand Stars!![[File:MKT Icon GrandStar.png|20x20px]]!!15!!20!!25!!30!!35!!40!!50!!60!!70!!75!!80!!85!!90!!100!!110!!125!!145!!165!!185!!205!!225!!245!!255!!265!!Total!!Grand total | ||
| Line 347: | Line 372: | ||
|-style=background:gold | |-style=background:gold | ||
|||||[[File:MKT Icon Level-boostticket3.png|30px]]<br>(3)||[[File:MKT Icon Level-boostticket2.png|30px]]<br>(3)||[[File:MKT Icon Level-boostticket1.png|30px]]<br>(3)||||||||[[File:MKT Icon Level-boostticket6.png|30px]]||[[File:MKT Icon Level-boostticket5.png|30px]]||[[File:MKT Icon Level-boostticket4.png|30px]]<br>(5)||||[[File:MKT Icon Level-boostticket9.png|30px]]||[[File:MKT Icon Level-boostticket8.png|30px]]||[[File:MKT Icon Level-boostticket7.png|30px]]||||||||||||[[File:MKT Icon Level-boostticket7.png|30px]]||||||||20 | |||||[[File:MKT Icon Level-boostticket3.png|30px]]<br>(3)||[[File:MKT Icon Level-boostticket2.png|30px]]<br>(3)||[[File:MKT Icon Level-boostticket1.png|30px]]<br>(3)||||||||[[File:MKT Icon Level-boostticket6.png|30px]]||[[File:MKT Icon Level-boostticket5.png|30px]]||[[File:MKT Icon Level-boostticket4.png|30px]]<br>(5)||||[[File:MKT Icon Level-boostticket9.png|30px]]||[[File:MKT Icon Level-boostticket8.png|30px]]||[[File:MKT Icon Level-boostticket7.png|30px]]||||||||||||[[File:MKT Icon Level-boostticket7.png|30px]]||||||||20 | ||
|} | |||
<br> | |||
===Gold Log-In Bonus=== | |||
To commemorate {{wp|Golden Week (Japan)|Golden Week}} in [[Japan]], a 10-day "Gold Log-In Bonus" began on April 29, 2022 and ended several days after this tour on May 9, 2022. | |||
{|class="wikitable"style="margin:auto;text-align:center"width=25% | |||
|- | |||
!Day | |||
!Reward | |||
|- | |||
!1 | |||
|[[Coins]] ×1,000 | |||
|- | |||
!2 | |||
|Coins ×1,000 | |||
|- | |||
!3 | |||
|Coins ×1,000 | |||
|- | |||
!4 | |||
|Coins ×1,000 | |||
|- | |||
!5 | |||
|[[Ruby|Rubies]] ×10 | |||
|- | |||
!6 | |||
|Coins ×2,000 | |||
|- | |||
!7 | |||
|Coins ×2,000 | |||
|- | |||
!8 | |||
|Coins ×2,000 | |||
|- | |||
!9 | |||
|Coins ×2,000 | |||
|- | |||
!10 | |||
|Rubies ×20 | |||
|} | |} | ||
| Line 375: | Line 439: | ||
===Courses=== | ===Courses=== | ||
<gallery> | <gallery heights=50px> | ||
MKT Icon Amsterdam Drift.png|[[Amsterdam Drift]] (N, R, T, R/T) | MKT Icon Amsterdam Drift.png|[[Amsterdam Drift]] (N, R, T, R/T) | ||
</gallery> | </gallery> | ||
==Paid banners== | ==Paid banners== | ||
{| align=center width=960px cellspacing=0 border=1 cellpadding=3 style="border-collapse:collapse; font-family:Arial; text-align:center" | {|align=center width=960px cellspacing=0 border=1 cellpadding=3 style="border-collapse:collapse;font-family:Arial;text-align:center" | ||
|-style="background: #ABC" | |-style="background:#ABC" | ||
!Name | !Name | ||
!Availability | !Availability | ||
| Line 445: | Line 509: | ||
==Challenges== | ==Challenges== | ||
{{ | {{MKT challenge table | ||
|TCR1=[[File:MKT Icon CoinRushTicket.png|70px]] [[Coin Rush ticket]] ×1 | |TCR1=[[File:MKT Icon CoinRushTicket.png|70px]] [[Coin Rush ticket]] ×1 | ||
|T1.1=115 | |T1.1=115 | ||
|T1.1E=Do 5 {{Color | |T1.1E=Do 5 {{Color link|#A1A1FF|Rocket Start|Rocket Starts}}. | ||
|T1.1S=1 | |T1.1S=1 | ||
|T1.2=004 | |T1.2=004 | ||
|T1.2E=Land 3 hits with {{Color | |T1.2E=Land 3 hits with {{Color link|#A1A1FF|Bob-omb|Bob-ombs}}. | ||
|T1.2S=1 | |T1.2S=1 | ||
|T1.3=003 | |T1.3=003 | ||
| Line 466: | Line 530: | ||
|T1.6S=2 | |T1.6S=2 | ||
|T1.7=133 | |T1.7=133 | ||
|T1.7E=Do 30 {{Color | |T1.7E=Do 30 {{Color link|#A1A1FF|Jump Boost|Jump Boosts}} on a city course. | ||
|T1.7S=2 | |T1.7S=2 | ||
|T1.8=040 | |T1.8=040 | ||
|T1.8E=Cause opponents to crash using a {{Color | |T1.8E=Cause opponents to crash using a {{Color link|#A1A1FF|Mega Mushroom}}. | ||
|T1.9=329 | |T1.9=329 | ||
|T1.9E=Race in every course of every cup, including bonus challenges. | |T1.9E=Race in every course of every cup, including bonus challenges. | ||
|T1.9S=2 | |T1.9S=2 | ||
|TCR2=[[File:MKT Icon QuickTicket.png|70px]] [[Quick ticket]] ×1 | |TCR2=[[File:MKT Icon QuickTicket.png|70px]] [[Quick ticket]] ×1 | ||
|T2.1= | |T2.1=104 | ||
|T2.1E= | |T2.1E=Use 10 {{Color link|#A1A1FF|Mushroom|Mushrooms}}. | ||
|T2.1S=1 | |T2.1S=1 | ||
|T2.2= | |T2.2=086 | ||
|T2.2E= | |T2.2E=Land 5 hits with {{Color link|#A1A1FF|Banana|Bananas}}. | ||
|T2.2S=1 | |T2.2S=1 | ||
|T2.3= | |T2.3=099 | ||
|T2.3E= | |T2.3E=Get 1st place in a 100cc or higher race 2 times in a row. | ||
|T2.3S=1 | |T2.3S=1 | ||
|T2.4= | |T2.4=126 | ||
|T2.4E= | |T2.4E=Use {{Color link|#A1A1FF|point-boost ticket|point-boost tickets}} 3 times. | ||
|T2.4S=2 | |T2.4S=2 | ||
|T2.5= | |T2.5=378 | ||
|T2.5E= | |T2.5E=Drive a distance of 15,000 or more using a driver wearing earrings. | ||
|T2.5S=2 | |T2.5S=2 | ||
|T2.6= | |T2.6=023 | ||
|T2.6E= | |T2.6E=Earn a score of 7,000 or higher on 3 T or R/T courses. | ||
|T2.6S=2 | |T2.6S=2 | ||
|T2.7= | |T2.7=379-1 | ||
|T2.7E= | |T2.7E=Race on 5 city courses. | ||
|T2.7S=2 | |T2.7S=2 | ||
|T2.8= | |T2.8=194 | ||
|T2.8E= | |T2.8E=Earn a total score of 15,000 or higher in the {{Color link|#A1A1FF|Ludwig Cup}}. | ||
|T2.8S=2 | |T2.8S=2 | ||
|T2.9= | |T2.9=331 | ||
|T2.9E= | |T2.9E=Take out 5 {{Color link|#A1A1FF|Penguin|penguins}}. | ||
|T2.9S=2 | |T2.9S=2 | ||
|GCR=[[File:MKT Icon 1Ruby.png|70px]] [[Ruby|Rubies]] ×5 | |GCR=[[File:MKT Icon 1Ruby.png|70px]] [[Ruby|Rubies]] ×5 | ||
|G.1=041 | |G.1=041 | ||
|G.1E=Land 10 hits with {{Color | |G.1E=Land 10 hits with {{Color link|#A1A1FF|Red Shell|Red Shells}}. | ||
|G1.S=1 | |G1.S=1 | ||
|G.2=111 | |G.2=111 | ||
|G.2E=Use {{Color | |G.2E=Use {{Color link|#A1A1FF|Lightning}}. | ||
|G.2S=1 | |G.2S=1 | ||
|G.3=329 | |G.3=329 | ||
| Line 512: | Line 576: | ||
|G.3S=1 | |G.3S=1 | ||
|G.4=019 | |G.4=019 | ||
|G.4E=Use a {{Color | |G.4E=Use a {{Color link|#A1A1FF|level-boost ticket}}. | ||
|G.4S=2 | |G.4S=2 | ||
|G.5=141 | |G.5=141 | ||
|G.5E=Activate {{Color | |G.5E=Activate {{Color link|#A1A1FF|Frenzy|Frenzy mode}} 5 times using a driver with a hat. | ||
|G.5S=2 | |G.5S=2 | ||
|G.6=134 | |G.6=134 | ||
|G.6E=Do 100 {{Color | |G.6E=Do 100 {{Color link|#A1A1FF|Jump Boost|Jump Boosts}}. | ||
|G.6S=2 | |G.6S=2 | ||
|G.7=147 | |G.7=147 | ||
| Line 524: | Line 588: | ||
|G.7S=2 | |G.7S=2 | ||
|G.8=167 | |G.8=167 | ||
|G.8E=Earn a total score of 25,000 or higher in the {{Color | |G.8E=Earn a total score of 25,000 or higher in the {{Color link|#A1A1FF|Kamek Cup}}. | ||
|G.8S=2 | |G.8S=2 | ||
|G.9=246 | |G.9=246 | ||
|G.9E=Complete {{Color | |G.9E=Complete {{Color link|#A1A1FF|Coin Rush (Mario Kart Tour)|Coin Rush}} 1 time. | ||
}} | }} | ||
<br> | <br> | ||
{| align=center width=30% cellspacing=0 border=1 cellpadding=3 style="border-collapse:collapse; font-family:Arial; text-align:center" | {|align=center width=30% cellspacing=0 border=1 cellpadding=3 style="border-collapse:collapse;font-family:Arial;text-align:center" | ||
|- | |- | ||
!colspan=3 style="background: #EEEEFF"|'''Premium Challenges''' | !colspan=3 style="background:#EEEEFF"|'''Premium Challenges''' | ||
|- | |- | ||
|colspan=3 style="background: #EEEEFF"|'''Cost:''' US$4.99 | |colspan=3 style="background:#EEEEFF"|'''Cost:''' US$4.99 | ||
|- | |- | ||
|colspan=3 style="background: #EEEEFF"|'''Three in a row reward:''' [[File:MKT Icon Coins 2.png|60px]] [[Coin|Coins]] ×100 | |colspan=3 style="background:#EEEEFF"|'''Three in a row reward:''' [[File:MKT Icon Coins 2.png|60px]] [[Coin|Coins]] ×100 | ||
|- | |- | ||
|colspan=3 style="background: #EEEEFF"|'''Completion reward:''' [[File:Dixie Kong - Donkey Kong Country Tropical Freeze.png|x80px]] [[Dixie Kong]] ×1 | |colspan=3 style="background:#EEEEFF"|'''Completion reward:''' [[File:Dixie Kong - Donkey Kong Country Tropical Freeze.png|x80px]] [[Dixie Kong]] ×1 | ||
|-style="height: 80px" | |-style="height:80px" | ||
|width=10% style="background:linear-gradient(#F2E18F,#B9800F)"|[[File:MKT Artwork Mario.png|50x75px]] | |width=10% style="background:linear-gradient(#F2E18F,#B9800F)"|[[File:MKT Artwork Mario.png|50x75px]] | ||
|width=10% style="background:linear-gradient(#F2E18F,#B9800F)"|[[File:MKT Icon Royale.png|50x75px]] | |width=10% style="background:linear-gradient(#F2E18F,#B9800F)"|[[File:MKT Icon Royale.png|50x75px]] | ||
|width=10% style="background:linear-gradient(#F2E18F,#B9800F)"|[[File:MKT Icon ShellParachute.png|50x75px]] | |width=10% style="background:linear-gradient(#F2E18F,#B9800F)"|[[File:MKT Icon ShellParachute.png|50x75px]] | ||
|-style="color: #FFF" | |-style="color:#FFF" | ||
|style="background:linear-gradient(#864D00,#A26000); border-top:1px solid #B9800F;"|{{Color | |style="background:linear-gradient(#864D00,#A26000);border-top:1px solid #B9800F;"|{{Color link|#A1A1FF|Mario}} ×1 | ||
|style="background:linear-gradient(#864D00,#A26000); border-top:1px solid #B9800F;"|{{Color | |style="background:linear-gradient(#864D00,#A26000);border-top:1px solid #B9800F;"|{{Color link|#A1A1FF|Royale}} ×1 | ||
|style="background:linear-gradient(#864D00,#A26000); border-top:1px solid #B9800F;"|{{Color | |style="background:linear-gradient(#864D00,#A26000);border-top:1px solid #B9800F;"|{{Color link|#A1A1FF|Shell Parachute}} ×1 | ||
|-style="color: #FFF" | |-style="color:#FFF" | ||
|style="background:linear-gradient(#A26000,#C88512); border-top:1px solid #A26000;"|''Land 5 hits with Green Shells.'' | |style="background:linear-gradient(#A26000,#C88512); border-top:1px solid #A26000;"|''Land 5 hits with Green Shells.'' | ||
|style="background:linear-gradient(#A26000,#C88512); border-top:1px solid #A26000;"|''Land 10 hits with Bananas.'' | |style="background:linear-gradient(#A26000,#C88512); border-top:1px solid #A26000;"|''Land 10 hits with Bananas.'' | ||
|style="background:linear-gradient(#A26000,#C88512); border-top:1px solid #A26000;"|''Land 10 hits with Bob-ombs.'' | |style="background:linear-gradient(#A26000,#C88512); border-top:1px solid #A26000;"|''Land 10 hits with Bob-ombs.'' | ||
|-style="height: 80px" | |-style="height:80px" | ||
|width=10% style="background:linear-gradient(#F2E18F,#B9800F)"|[[File:MKT Icon Coins 3.png|70px]] | |width=10% style="background:linear-gradient(#F2E18F,#B9800F)"|[[File:MKT Icon Coins 3.png|70px]] | ||
|width=10% style="background:linear-gradient(#F2E18F,#B9800F)"|[[File:MKT Icon Ruby.png|70px]] | |width=10% style="background:linear-gradient(#F2E18F,#B9800F)"|[[File:MKT Icon Ruby.png|70px]] | ||
|width=10% style="background:linear-gradient(#F2E18F,#B9800F)"|[[File:MKT Icon Point-boostticket3.png|70px]] | |width=10% style="background:linear-gradient(#F2E18F,#B9800F)"|[[File:MKT Icon Point-boostticket3.png|70px]] | ||
|-style="color: #FFF" | |-style="color:#FFF" | ||
|style="background:linear-gradient(#864D00,#A26000); border-top:1px solid #B9800F;"|{{Color | |style="background:linear-gradient(#864D00,#A26000);border-top:1px solid #B9800F;"|{{Color link|#A1A1FF|Coin|Coins}} ×3,000 | ||
|style="background:linear-gradient(#864D00,#A26000); border-top:1px solid #B9800F;"|{{Color | |style="background:linear-gradient(#864D00,#A26000);border-top:1px solid #B9800F;"|{{Color link|#A1A1FF|Ruby|Rubies}} ×10 | ||
|style="background:linear-gradient(#864D00,#A26000); border-top:1px solid #B9800F;"|Glider {{Color | |style="background:linear-gradient(#864D00,#A26000);border-top:1px solid #B9800F;"|Glider {{Color link|#A1A1FF|point-boost ticket}} ×3 | ||
|-style="color: #FFF" | |-style="color:#FFF" | ||
|style="background:linear-gradient(#A26000,#C88512); border-top:1px solid #A26000;"|''Do 50 Jump Boosts.'' | |style="background:linear-gradient(#A26000,#C88512);border-top:1px solid #A26000;"|''Do 50 Jump Boosts.'' | ||
|style="background:linear-gradient(#A26000,#C88512); border-top:1px solid #A26000;"|''Participate in a race.'' | |style="background:linear-gradient(#A26000,#C88512);border-top:1px solid #A26000;"|''Participate in a race.'' | ||
|style="background:linear-gradient(#A26000,#C88512); border-top:1px solid #A26000;"|''Do 100 Mini-Turbo boosts.'' | |style="background:linear-gradient(#A26000,#C88512);border-top:1px solid #A26000;"|''Do 100 Mini-Turbo boosts.'' | ||
|-style="height: 80px" | |-style="height:80px" | ||
|width=10% style="background:linear-gradient(#F2E18F,#B9800F)"|[[File:MKT Icon Level-boostticket1.png|70px]] | |width=10% style="background:linear-gradient(#F2E18F,#B9800F)"|[[File:MKT Icon Level-boostticket1.png|70px]] | ||
|width=10% style="background:linear-gradient(#F2E18F,#B9800F)"|[[File:MKT Icon Level-boostticket4.png|70px]] | |width=10% style="background:linear-gradient(#F2E18F,#B9800F)"|[[File:MKT Icon Level-boostticket4.png|70px]] | ||
|width=10% style="background:linear-gradient(#F2E18F,#B9800F)"|[[File:MKT Icon Level-boostticket7.png|70px]] | |width=10% style="background:linear-gradient(#F2E18F,#B9800F)"|[[File:MKT Icon Level-boostticket7.png|70px]] | ||
|-style="color: #FFF" | |-style="color:#FFF" | ||
|style="background:linear-gradient(#864D00,#A26000); border-top:1px solid #B9800F;"|Normal driver {{Color | |style="background:linear-gradient(#864D00,#A26000);border-top:1px solid #B9800F;"|Normal driver {{Color link|#A1A1FF|level-boost ticket}} ×1 | ||
|style="background:linear-gradient(#864D00,#A26000); border-top:1px solid #B9800F;"|Super driver level-boost ticket ×1 | |style="background:linear-gradient(#864D00,#A26000);border-top:1px solid #B9800F;"|Super driver level-boost ticket ×1 | ||
|style="background:linear-gradient(#864D00,#A26000); border-top:1px solid #B9800F;"|High-End driver level-boost ticket ×1 | |style="background:linear-gradient(#864D00,#A26000);border-top:1px solid #B9800F;"|High-End driver level-boost ticket ×1 | ||
|-style="color: #FFF" | |-style="color:#FFF" | ||
|style="background:linear-gradient(#A26000,#C88512); border-top:1px solid #A26000;"|''Get 1st place in a race 10 times.'' | |style="background:linear-gradient(#A26000,#C88512);border-top:1px solid #A26000;"|''Get 1st place in a race 10 times.'' | ||
|style="background:linear-gradient(#A26000,#C88512); border-top:1px solid #A26000;"|''Get 1st place in a race 15 times.'' | |style="background:linear-gradient(#A26000,#C88512);border-top:1px solid #A26000;"|''Get 1st place in a race 15 times.'' | ||
|style="background:linear-gradient(#A26000,#C88512); border-top:1px solid #A26000;"|''Get 1st place in a race 20 times.'' | |style="background:linear-gradient(#A26000,#C88512);border-top:1px solid #A26000;"|''Get 1st place in a race 20 times.'' | ||
|} | |} | ||
<br> | <br> | ||
{| align=center width=30% cellspacing=0 border=1 cellpadding=3 style="border-collapse:collapse; font-family:Arial; text-align:center" | {|align=center width=30% cellspacing=0 border=1 cellpadding=3 style="border-collapse:collapse;font-family:Arial; text-align:center" | ||
|- | |- | ||
!colspan=3 style="background: #C3F84E"|'''Tour Multiplayer Challenges''' | !colspan=3 style="background:#C3F84E"|'''Tour Multiplayer Challenges''' | ||
|-style="color: #000" | |-style="color:#000" | ||
|colspan=3 style="background: #C3F84E"|'''Three in a row reward:''' [[File:MKT Icon Coins 2.png|60px]] [[Coin|Coins]] ×300 | |colspan=3 style="background:#C3F84E"|'''Three in a row reward:''' [[File:MKT Icon Coins 2.png|60px]] [[Coin|Coins]] ×300 | ||
|-style="color: #000" | |-style="color:#000" | ||
|colspan=3 style="background: #C3F84E"|'''Completion reward:''' [[File:MKT Icon 1Ruby.png|60px]] Rubies ×5 | |colspan=3 style="background:#C3F84E"|'''Completion reward:''' [[File:MKT Icon 1Ruby.png|60px]] Rubies ×5 | ||
|-style="color: #FFF" | |-style="color:#FFF" | ||
|width=10% style="background: #2F5D1C"|[[File:MKT 134CB.png|70px]]<br>[[File:MKT Icon GrandStar.png|15px]] | |width=10% style="background: #2F5D1C"|[[File:MKT 134CB.png|70px]]<br>[[File:MKT Icon GrandStar.png|15px]] | ||
|width=10% style="background: #2F5D1C"|[[File:MKT 041CB.png|70px]]<br>[[File:MKT Icon GrandStar.png|15px]] | |width=10% style="background: #2F5D1C"|[[File:MKT 041CB.png|70px]]<br>[[File:MKT Icon GrandStar.png|15px]] | ||
|width=10% style="background: #2F5D1C"|[[File:MKT 049CB.png|70px]]<br>[[File:MKT Icon GrandStar.png|15px]] | |width=10% style="background: #2F5D1C"|[[File:MKT 049CB.png|70px]]<br>[[File:MKT Icon GrandStar.png|15px]] | ||
|-style="color: #FFF" | |-style="color:#FFF" | ||
|style="background: #2F5D1C; border-top:1px solid #2F5D1C;"|''Do 50 Jump Boosts in multiplayer.'' | |style="background: #2F5D1C;border-top:1px solid #2F5D1C;"|''Do 50 Jump Boosts in multiplayer.'' | ||
|style="background: #2F5D1C; border-top:1px solid #2F5D1C;"|''Land 3 hits with Red Shells in multiplayer.'' | |style="background: #2F5D1C;border-top:1px solid #2F5D1C;"|''Land 3 hits with Red Shells in multiplayer.'' | ||
|style="background: #2F5D1C; border-top:1px solid #2F5D1C;"|''Land 3 hits with Bananas in multiplayer.'' | |style="background: #2F5D1C;border-top:1px solid #2F5D1C;"|''Land 3 hits with Bananas in multiplayer.'' | ||
|-style="color: #FFF" | |-style="color:#FFF" | ||
|width=10% style="background: #2F5D1C"|[[File:MKT 112-3CB.png|70px]]<br>[[File:MKT Icon GrandStar.png|15px]] [[File:MKT Icon GrandStar.png|15px]] | |width=10% style="background:#2F5D1C"|[[File:MKT 112-3CB.png|70px]]<br>[[File:MKT Icon GrandStar.png|15px]] [[File:MKT Icon GrandStar.png|15px]] | ||
|width=10% style="background: #2F5D1C"|[[File:MKT 112-1CB.png|70px]]<br>[[File:MKT Icon GrandStar.png|15px]] [[File:MKT Icon GrandStar.png|15px]] | |width=10% style="background:#2F5D1C"|[[File:MKT 112-1CB.png|70px]]<br>[[File:MKT Icon GrandStar.png|15px]] [[File:MKT Icon GrandStar.png|15px]] | ||
|width=10% style="background: #2F5D1C"|[[File:MKT 112CB.png|70px]]<br>[[File:MKT Icon GrandStar.png|15px]] [[File:MKT Icon GrandStar.png|15px]] | |width=10% style="background:#2F5D1C"|[[File:MKT 112CB.png|70px]]<br>[[File:MKT Icon GrandStar.png|15px]] [[File:MKT Icon GrandStar.png|15px]] | ||
|-style="color: #FFF" | |-style="color:#FFF" | ||
|style="background: #2F5D1C; border-top:1px solid #2F5D1C;"|''Join 3 multiplayer races.'' | |style="background:#2F5D1C;border-top:1px solid #2F5D1C;"|''Join 3 multiplayer races.'' | ||
|style="background: #2F5D1C; border-top:1px solid #2F5D1C;"|''Join 5 multiplayer races.'' | |style="background:#2F5D1C;border-top:1px solid #2F5D1C;"|''Join 5 multiplayer races.'' | ||
|style="background: #2F5D1C; border-top:1px solid #2F5D1C;"|''Join 10 multiplayer races.'' | |style="background:#2F5D1C;border-top:1px solid #2F5D1C;"|''Join 10 multiplayer races.'' | ||
|-style="color: #FFF" | |-style="color:#FFF" | ||
|width=10% style="background: #2F5D1C"|[[File:MKT 130CB.png|70px]]<br>[[File:MKT Icon GrandStar.png|15px]] [[File:MKT Icon GrandStar.png|15px]] | |width=10% style="background:#2F5D1C"|[[File:MKT 130CB.png|70px]]<br>[[File:MKT Icon GrandStar.png|15px]] [[File:MKT Icon GrandStar.png|15px]] | ||
|width=10% style="background: #2F5D1C"|[[File:MKT 131CB.png|70px]]<br>[[File:MKT Icon GrandStar.png|15px]] [[File:MKT Icon GrandStar.png|15px]] | |width=10% style="background:#2F5D1C"|[[File:MKT 131CB.png|70px]]<br>[[File:MKT Icon GrandStar.png|15px]] [[File:MKT Icon GrandStar.png|15px]] | ||
|width=10% style="background: #2F5D1C"|[[File:MKT 129CB.png|70px]]<br>[[File:MKT Icon GrandStar.png|15px]] [[File:MKT Icon GrandStar.png|15px]] | |width=10% style="background:#2F5D1C"|[[File:MKT 129CB.png|70px]]<br>[[File:MKT Icon GrandStar.png|15px]] [[File:MKT Icon GrandStar.png|15px]] | ||
|-style="color: #FFF" | |-style="color:#FFF" | ||
|style="background: #2F5D1C; border-top:1px solid #2F5D1C;"|''Get 3rd place or higher in a multiplayer race.'' | |style="background:#2F5D1C;border-top:1px solid #2F5D1C;"|''Get 3rd place or higher in a multiplayer race.'' | ||
|style="background: #2F5D1C; border-top:1px solid #2F5D1C;"|''Get 3rd place or higher 3 times in a multiplayer race.'' | |style="background:#2F5D1C;border-top:1px solid #2F5D1C;"|''Get 3rd place or higher 3 times in a multiplayer race.'' | ||
|style="background: #2F5D1C; border-top:1px solid #2F5D1C;"|''Get 3rd place or higher 5 times in a multiplayer race.'' | |style="background:#2F5D1C;border-top:1px solid #2F5D1C;"|''Get 3rd place or higher 5 times in a multiplayer race.'' | ||
|} | |} | ||
<br> | <br> | ||
{|class="wikitable" style="margin:auto; text-align:center" width=30% | {|class="wikitable"style="margin:auto;text-align:center"width=30% | ||
!colspan=2|Total Points Challenge 1 | !colspan=2|Total Points Challenge 1 | ||
|- | |- | ||
| Line 643: | Line 707: | ||
|} | |} | ||
<br> | <br> | ||
{|class="wikitable" style="margin:auto; text-align:center" width=30% | {|class="wikitable"style="margin:auto;text-align:center"width=30% | ||
!colspan=2|Total Points Challenge 2 | !colspan=2|Total Points Challenge 2 | ||
|- | |- | ||
| Line 679: | Line 743: | ||
===All-Clear Pipe=== | ===All-Clear Pipe=== | ||
The All-Clear Pipe randomly shoots out one of the following regular High-End items. The appearance rate can be viewed via the "Pipe content" link on the Gold Pass purchase screen. | The All-Clear Pipe randomly shoots out one of the following regular High-End items. The appearance rate can be viewed via the "Pipe content" link on the Gold Pass purchase screen. | ||
{|class="wikitable" style="margin:auto; text-align:center" | {|class="wikitable"style="margin:auto;text-align:center" | ||
!colspan=2|High-End items obtainable from the All-Clear Pipe during the Amsterdam Tour | !colspan=2|High-End items obtainable from the All-Clear Pipe during the Amsterdam Tour | ||
!Rate (each) | !Rate (each) | ||
|- | |- | ||
!High-End drivers | !High-End drivers | ||
|[[Dry Bowser]], [[Metal Mario]], [[Pink Gold Peach]], [[Cat Mario|Cat Peach]], [[Pauline]], [[Princess Peach|Peach (Explorer)]], [[Nabbit]], [[Captain Toad]], [[King Bob-omb]], [[Peachette]], [[Yoshi (species)|Black Yoshi]], [[Yoshi (species)|White Yoshi]], [[Princess Peach|Peach (Wintertime)]], [[Cat Mario|Cat Toad]], [[Wario|Wario (Cowboy)]], [[Birdo | |[[Dry Bowser]], [[Metal Mario]], [[Pink Gold Peach]], [[Cat Mario|Cat Peach]], [[Pauline]], [[Princess Peach|Peach (Explorer)]], [[Nabbit]], [[Captain Toad]], [[King Bob-omb]], [[Peachette]], [[Yoshi (species)|Black Yoshi]], [[Yoshi (species)|White Yoshi]], [[Princess Peach|Peach (Wintertime)]], [[Cat Mario|Cat Toad]], [[Wario|Wario (Cowboy)]], [[Birdo|Birdo (Black)]], [[Penguin Mario|Penguin Luigi]], [[Dixie Kong]], [[Funky Kong]], [[Bowser Jr.|Bowser Jr. (Pirate)]], [[Ice Mario (Super Mario Galaxy)|Ice Mario]] | ||
|rowspan=3|1.0870% | |rowspan=3|1.0870% | ||
|- | |- | ||
| Line 696: | Line 760: | ||
===Amsterdam Pipe 1=== | ===Amsterdam Pipe 1=== | ||
{|class="wikitable" style="margin:auto; text-align:center" | {|class="wikitable"style="margin:auto;text-align:center" | ||
!colspan=16|Items obtained from a new Amsterdam Pipe 1 | !colspan=16|Items obtained from a new Amsterdam Pipe 1 | ||
|- | |- | ||
| Line 733: | Line 797: | ||
|} | |} | ||
<br> | <br> | ||
{|class="wikitable"style="margin:auto;text-align:center" | |||
{|class="wikitable" style="margin:auto; text-align:center" | |||
!Class | !Class | ||
!Parts | !Parts | ||
| Line 752: | Line 815: | ||
|- | |- | ||
!High-End drivers | !High-End drivers | ||
|[[Dry Bowser]], [[Metal Mario]], [[Pink Gold Peach]], [[Cat Mario|Cat Peach]], [[Pauline]], [[Princess Peach|Peach (Explorer)]], [[Nabbit]], [[Captain Toad]], [[King Bob-omb]], [[Peachette]], [[Yoshi (species)|Black Yoshi]], [[Yoshi (species)|White Yoshi]], [[Princess Peach|Peach (Wintertime)]], [[Cat Mario|Cat Toad]], [[Wario|Wario (Cowboy)]], [[Birdo | |[[Dry Bowser]], [[Metal Mario]], [[Pink Gold Peach]], [[Cat Mario|Cat Peach]], [[Pauline]], [[Princess Peach|Peach (Explorer)]], [[Nabbit]], [[Captain Toad]], [[King Bob-omb]], [[Peachette]], [[Yoshi (species)|Black Yoshi]], [[Yoshi (species)|White Yoshi]], [[Princess Peach|Peach (Wintertime)]], [[Cat Mario|Cat Toad]], [[Wario|Wario (Cowboy)]], [[Birdo|Birdo (Black)]], [[Penguin Mario|Penguin Luigi]], [[Dixie Kong]], [[Funky Kong]], [[Bowser Jr.|Bowser Jr. (Pirate)]], [[Princess Daisy|Daisy (Fairy)]], [[Ice Mario (Super Mario Galaxy)|Ice Mario]], [[Princess Daisy|Daisy (Farmer)]] | ||
|0.0435% | |0.0435% | ||
|- | |- | ||
| Line 764: | Line 827: | ||
|- | |- | ||
!Super drivers | !Super drivers | ||
|[[Donkey Kong]], [[Toad]], [[Bowser]], [[Luigi]], [[Mario]], [[Princess Peach|Peach]], [[Yoshi]], [[Princess Daisy|Daisy]], [[Lakitu]], [[King Boo]], [[Toadette]], [[Bowser Jr.]], [[Waluigi]], [[Wario]], [[Rosalina]], [[Birdo]], [[Diddy Kong]], [[Hammer Bro]], [[Boomerang Bro]], [[Fire Bro]], [[Ice Bro]], [[Yoshi (species)|Red Yoshi]], [[Black Shy Guy]], [[Pink Shy Guy]], [[Toad|Toad (Pit Crew)]], [[Monty Mole]], [[Birdo | |[[Donkey Kong]], [[Toad]], [[Bowser]], [[Luigi]], [[Mario]], [[Princess Peach|Peach]], [[Yoshi]], [[Princess Daisy|Daisy]], [[Lakitu]], [[King Boo]], [[Toadette]], [[Bowser Jr.]], [[Waluigi]], [[Wario]], [[Rosalina]], [[Birdo]], [[Diddy Kong]], [[Hammer Bro]], [[Boomerang Bro]], [[Fire Bro]], [[Ice Bro]], [[Yoshi (species)|Red Yoshi]], [[Black Shy Guy]], [[Pink Shy Guy]], [[Toad|Toad (Pit Crew)]], [[Monty Mole]], [[Birdo|Birdo (Light Blue)]], [[Birdo|Birdo (Yellow)]], [[Roving Racers|Red Koopa (Freerunning)]] | ||
|0.3103% | |0.3103% | ||
|- | |- | ||
| Line 786: | Line 849: | ||
|[[Super Glider]], [[Paper Glider]], [[Parachute (glider)|Parachute]], [[Parafoil]], [[Piston Glider]], [[Droplet Glider]], [[BBIA Parafoil]], [[Piranha Plant Parafoil]], [[Minion Paper Glider]] | |[[Super Glider]], [[Paper Glider]], [[Parachute (glider)|Parachute]], [[Parafoil]], [[Piston Glider]], [[Droplet Glider]], [[BBIA Parafoil]], [[Piranha Plant Parafoil]], [[Minion Paper Glider]] | ||
|1.7778% | |1.7778% | ||
|} | |||
<br> | |||
===Amsterdam Pipe 2=== | |||
{|class="wikitable"style="margin:auto;text-align:center" | |||
!colspan=16|Items obtained from a new Amsterdam Pipe 2 | |||
|- | |||
!rowspan=2|Item | |||
!colspan=3|[[File:MKT Icon Normal.png|50px]]<br>Normal | |||
!colspan=3|[[File:MKT Icon Rare.png|50px]]<br>Super | |||
!colspan=3|[[File:MKT Icon HighEnd.png|50px]]<br>High-End | |||
!colspan=3|[[File:MKT Icon HighEnd.png|50px]]<br>Featured High-End | |||
|- | |||
!Driver | |||
!Kart | |||
!Glider | |||
!Driver | |||
!Kart | |||
!Glider | |||
!Driver | |||
!Kart | |||
!Glider | |||
!Driver | |||
!Kart | |||
!Glider | |||
|- | |||
!Amount | |||
|31 | |||
|25 | |||
|15 | |||
|9 | |||
|7 | |||
|4 | |||
|1 | |||
|1 | |||
|1 | |||
|2 | |||
|2 | |||
|2 | |||
|} | |||
<br> | |||
{|class="wikitable"style="margin:auto;text-align:center" | |||
!Class | |||
!Parts | |||
!Rate (each) | |||
|- | |||
!High-End Spotlight Drivers | |||
|[[Princess Daisy|Daisy (Farmer)]], [[Princess Daisy|Daisy (Fairy)]] | |||
|1.0000% | |||
|- | |||
!High-End Spotlight Karts | |||
|[[Dragonfly]], [[Prancer]] | |||
|1.0000% | |||
|- | |||
!High-End Spotlight Gliders | |||
|[[Green Sprout]], [[Daisy Glider]] | |||
|1.0000% | |||
|- | |||
!High-End drivers | |||
|[[Dry Bowser]], [[Metal Mario]], [[Pink Gold Peach]], [[Cat Mario|Cat Peach]], [[Pauline]], [[Princess Peach|Peach (Explorer)]], [[Nabbit]], [[Captain Toad]], [[King Bob-omb]], [[Peachette]], [[Yoshi (species)|Black Yoshi]], [[Yoshi (species)|White Yoshi]], [[Princess Peach|Peach (Wintertime)]], [[Cat Mario|Cat Toad]], [[Wario|Wario (Cowboy)]], [[Birdo|Birdo (Black)]], [[Penguin Mario|Penguin Luigi]], [[Dixie Kong]], [[Funky Kong]], [[Bowser Jr.|Bowser Jr. (Pirate)]], [[Ice Mario (Super Mario Galaxy)|Ice Mario]], [[Rosalina|Rosalina (Volendam)]] | |||
|0.0455% | |||
|- | |||
!High-End karts | |||
|[[B Dasher]], [[Badwagon]], [[Carrot Kart]], [[Cat Cruiser]], [[Sports Coupe]], [[Circuit Special]], [[Bruiser]], [[Wild Wing]], [[Bumble V]], [[Steel Driver]], [[Macharon]], [[Wildfire Flyer]], [[Red B Dasher]], [[Wild Pink]], [[Choco Macharon]], [[P-Wing (kart)|P-Wing]], [[Black Turbo Birdo]], [[Green Apple Kart]], [[Poison Apple Kart]], [[Dozer Dasher]], [[Banana Master]], [[Offroader]], [[Dreamy Egg]], [[Head Honcho]], [[Pink Wing]], [[Koopa King]], [[Cact-X]], [[Sushi Racer]], [[Green Circuit]], [[Crawly Kart]], [[Black Dozer]], [[Iron Cucumber]], [[Cact-Ice]], [[Pink Dozer]], [[Lime Tea Coupe]], [[Kamek's Zoom Broom]], [[Black Cat Cruiser]], [[Gray Cat Cruiser]], [[Flower Kart]] | |||
|0.0256% | |||
|- | |||
!High-End gliders | |||
|[[Swooper (glider)|Swooper]], [[Cloud Glider]], [[Gold Glider]], [[Pink Gold Paper Glider]], [[Royal Parachute]], [[Dry Bowser Umbrella]], [[Blizzard Balloons]], [[Sunset Balloons]], [[Starchute]], [[Silver Starchute]], [[Butterfly Wings]], [[Butterfly Sunset]], [[Butterfly Prism]], [[Meteor Balloons]], [[Crimson Crane]], [[Strawberry Donut]], [[Heart Balloons]], [[Great Sail]], [[Black Great Sail]], [[Dragon Wings]], [[Black Toe-Bean Balloons]], [[Toe-Bean Balloons]], [[Tropical Glider]], [[8-Bit Star]], [[Manta Glider]], [[Silver Bells]], [[Treasure Map]], [[Cheep Cheep Masks]], [[Rose Parasol]], [[Snow Crystals]], [[Silver Surf Master]], [[Starry Great Sail]] | |||
|0.0303% | |||
|- | |||
!Super drivers | |||
|[[Donkey Kong]], [[Toad]], [[Bowser]], [[Luigi]], [[Mario]], [[Princess Peach|Peach]], [[Yoshi]], [[Princess Daisy|Daisy]], [[Lakitu]], [[King Boo]], [[Toadette]], [[Bowser Jr.]], [[Waluigi]], [[Wario]], [[Rosalina]], [[Birdo]], [[Diddy Kong]], [[Hammer Bro]], [[Boomerang Bro]], [[Fire Bro]], [[Ice Bro]], [[Yoshi (species)|Red Yoshi]], [[Black Shy Guy]], [[Pink Shy Guy]], [[Toad|Toad (Pit Crew)]], [[Monty Mole]], [[Birdo|Birdo (Light Blue)]], [[Birdo|Birdo (Yellow)]], [[Roving Racers|Red Koopa (Freerunning)]] | |||
|0.3103% | |||
|- | |||
!Super karts | |||
|[[Cucumber]], [[Zucchini]], [[Egg 1]], [[Daytripper]], [[Mach 8]], [[Cloud 9]], [[Soda Jet]], [[Koopa Clown]], [[Poltergust 4000]], [[Royale]], [[Barrel Train]], [[Turbo Yoshi]], [[Blue Seven]], [[Flame Flyer]], [[Para-Wing]], [[Super Blooper (kart)|Super Blooper]], [[Turbo Birdo]], [[Streamliner]], [[DK Jumbo]], [[Red Turbo Yoshi]], [[Light-blue Turbo Birdo]], [[Yellow Turbo Birdo]] | |||
|0.3182% | |||
|- | |||
!Super gliders | |||
|[[Flower Glider]], [[Peach Parasol (glider)|Peach Parasol]], [[BaNaNa Parafoil]], [[Bob-omb Parafoil]], [[Wario Wing]], [[Oilpaper Umbrella]], [[Mushroom Glider]], [[Shell Parachute]], [[Lightning Oilpaper]], [[Blue Flower Glider]], [[Pink Flower Glider]], [[Waluigi Wing]], [[? Block (glider)|? Block]], [[8-Bit Jumping Mario]], [[Eggshell Glider]] | |||
|0.2667% | |||
|- | |||
!Normal drivers | |||
|[[Koopa Troopa]], [[Shy Guy]], [[Dry Bones]], [[Baby Daisy]], [[Baby Luigi]], [[Baby Mario]], [[Baby Peach]], [[Baby Rosalina]], [[Iggy]], [[Larry]], [[Lemmy]], [[Ludwig]], [[Morton]], [[Roy]], [[Wendy]] | |||
|2.0667% | |||
|- | |||
!Normal karts | |||
|[[Birthday Girl]], [[Landship]], [[Bullet Blaster]], [[Mushmellow]], [[Biddybuggy]], [[Pipe Frame]], [[Pipe Buggy]], [[Cheep Charger]], [[Red Kiddie Kart]], [[Koopa Dasher]], [[Green Kiddie Kart]] | |||
|2.2727% | |||
|- | |||
!Normal gliders | |||
|[[Super Glider]], [[Paper Glider]], [[Parachute (glider)|Parachute]], [[Parafoil]], [[Piston Glider]], [[Droplet Glider]], [[BBIA Parafoil]], [[Piranha Plant Parafoil]], [[Minion Paper Glider]] | |||
|1.6667% | |||
|} | |||
<br> | |||
===Green Luigi Pipe=== | |||
{|class="wikitable"style="margin:auto;text-align:center" | |||
!colspan=13|Items obtained from a new Green Luigi Pipe | |||
|- | |||
!rowspan=2|Item | |||
!colspan=3|[[File:MKT Icon Normal.png|50px]]<br>Normal | |||
!colspan=3|[[File:MKT Icon Rare.png|50px]]<br>Super | |||
!colspan=3|[[File:MKT Icon HighEnd.png|50px]]<br>High-End | |||
|- | |||
!Driver | |||
!Kart | |||
!Glider | |||
!Driver | |||
!Kart | |||
!Glider | |||
!Driver | |||
!Kart | |||
!Glider | |||
|- | |||
!Amount | |||
|12 | |||
|10 | |||
|9 | |||
|5 | |||
|4 | |||
|4 | |||
|3 | |||
|3 | |||
|0 | |||
|} | |||
<br> | |||
{|class="wikitable"style="margin:auto;text-align:center" | |||
!Class | |||
!Parts | |||
!Rate (each) | |||
|- | |||
!High-End drivers | |||
|[[Luigi|Luigi (Painter)]], [[Luigi|Luigi (Classic)]], [[Luigi|Luigi (Lederhosen)]], [[Luigi|Luigi (Vacation)]], [[Luigi|Luigi (Golf)]] | |||
|1.2000% | |||
|- | |||
!High-End karts | |||
|[[Green Apple Kart]], [[Green Circuit]], [[Lime Tea Coupe]], [[Green B Dasher Mk. 2]], [[Green Lightning]] | |||
|1.2000% | |||
|- | |||
!Super drivers | |||
|[[Donkey Kong]], [[Toad]], [[Bowser]], [[Luigi]], [[Mario]], [[Princess Peach|Peach]], [[Yoshi]], [[Princess Daisy|Daisy]], [[Lakitu]], [[King Boo]], [[Toadette]], [[Bowser Jr.]], [[Waluigi]], [[Wario]], [[Rosalina]], [[Birdo]], [[Diddy Kong]], [[Hammer Bro]], [[Boomerang Bro]], [[Fire Bro]], [[Ice Bro]], [[Yoshi (species)|Red Yoshi]], [[Black Shy Guy]], [[Pink Shy Guy]], [[Toad|Toad (Pit Crew)]], [[Monty Mole]], [[Birdo|Birdo (Light Blue)]], [[Birdo|Birdo (Yellow)]], [[Roving Racers|Red Koopa (Freerunning)]] | |||
|0.3448% | |||
|- | |||
!Super karts | |||
|[[Cucumber]], [[Zucchini]], [[Egg 1]], [[Daytripper]], [[Mach 8]], [[Cloud 9]], [[Soda Jet]], [[Koopa Clown]], [[Poltergust 4000]], [[Royale]], [[Barrel Train]], [[Turbo Yoshi]], [[Blue Seven]], [[Flame Flyer]], [[Para-Wing]], [[Super Blooper (kart)|Super Blooper]], [[Turbo Birdo]], [[Streamliner]], [[DK Jumbo]], [[Red Turbo Yoshi]], [[Light-blue Turbo Birdo]], [[Yellow Turbo Birdo]] | |||
|0.3636% | |||
|- | |||
!Super gliders | |||
|[[Flower Glider]], [[Peach Parasol (glider)|Peach Parasol]], [[BaNaNa Parafoil]], [[Bob-omb Parafoil]], [[Wario Wing]], [[Oilpaper Umbrella]], [[Mushroom Glider]], [[Shell Parachute]], [[Lightning Oilpaper]], [[Blue Flower Glider]], [[Pink Flower Glider]], [[Waluigi Wing]], [[? Block (glider)|? Block]], [[8-Bit Jumping Mario]], [[Eggshell Glider]] | |||
|0.5333% | |||
|- | |||
!Normal drivers | |||
|[[Koopa Troopa]], [[Shy Guy]], [[Dry Bones]], [[Baby Daisy]], [[Baby Luigi]], [[Baby Mario]], [[Baby Peach]], [[Baby Rosalina]], [[Iggy]], [[Larry]], [[Lemmy]], [[Ludwig]], [[Morton]], [[Roy]], [[Wendy]] | |||
|1.6000% | |||
|- | |||
!Normal karts | |||
|[[Birthday Girl]], [[Landship]], [[Bullet Blaster]], [[Mushmellow]], [[Biddybuggy]], [[Pipe Frame]], [[Pipe Buggy]], [[Cheep Charger]], [[Red Kiddie Kart]], [[Koopa Dasher]], [[Green Kiddie Kart]] | |||
|1.8182% | |||
|- | |||
!Normal gliders | |||
|[[Super Glider]], [[Paper Glider]], [[Parachute (glider)|Parachute]], [[Parafoil]], [[Piston Glider]], [[Droplet Glider]], [[BBIA Parafoil]], [[Piranha Plant Parafoil]], [[Minion Paper Glider]] | |||
|2.0000% | |||
|} | |} | ||
<br> | <br> | ||
| Line 791: | Line 1,017: | ||
==Mii Racing Suit Shop== | ==Mii Racing Suit Shop== | ||
===Banner items=== | ===Banner items=== | ||
{| align=center width=960px cellspacing=0 border=1 cellpadding=3 style="border-collapse:collapse; font-family:Arial; text-align:center" | {|align=center width=960px cellspacing=0 border=1 cellpadding=3 style="border-collapse:collapse;font-family:Arial;text-align:center" | ||
|-style="background: #ABC" | |-style="background:#ABC" | ||
!Name | !Name | ||
!Starting date | !Starting date | ||
| Line 807: | Line 1,033: | ||
===Other items=== | ===Other items=== | ||
{| class="wikitable" style="margin:auto; text-align:center" width=50% | {|class="wikitable"style="margin:auto; text-align:center"width=50% | ||
!colspan=3|Items available in Mii Racing Suit Shop (April 20, 2022 - May 3, 2022) | !colspan=3|Items available in Mii Racing Suit Shop (April 20, 2022 - May 3, 2022) | ||
|- | |- | ||
| Line 828: | Line 1,054: | ||
==Token Shop== | ==Token Shop== | ||
The limited-time event where [[event token]]s appear began on April 20, 2022 and | The limited-time event where [[event token]]s appear began on April 20, 2022 and ended on May 3, 2022. Event tokens could be earned by causing opponents to crash. | ||
{| class="wikitable" style="margin:auto; text-align:center" width=50% | {|class="wikitable"style="margin:auto;text-align:center"width=50% | ||
!colspan=3|'''Token Shop''' (April 20, 2022 - May 3, 2022) | !colspan=3|'''Token Shop''' (April 20, 2022 - May 3, 2022) | ||
|- | |- | ||
| Line 875: | Line 1,101: | ||
==Tier Shop== | ==Tier Shop== | ||
The shop features a variety of set and randomized items available for purchase. The item slots in the shop are unlocked based on the highest tier of players. | The shop features a variety of set and randomized items available for purchase. The item slots in the shop are unlocked based on the highest tier of players. | ||
{|class="wikitable"style="margin:auto;text-align:center"width=50% | |||
{| class="wikitable" style="margin:auto; text-align:center" width=50% | |||
!colspan=3|Items available in Tier Shop (April 20, 2022 - April 26, 2022) | !colspan=3|Items available in Tier Shop (April 20, 2022 - April 26, 2022) | ||
|- | |- | ||
| Line 887: | Line 1,112: | ||
![[Butterfly Prism]]<br>[[File:MKT Icon Coin.png|20px]] 10,000<br>Amount: 1 | ![[Butterfly Prism]]<br>[[File:MKT Icon Coin.png|20px]] 10,000<br>Amount: 1 | ||
|- | |- | ||
!colspan=3|Items available in Tier Shop (April 27, 2022 - May 3, 2022) | !colspan=3|Items available in Tier Shop (April 27, 2022 - May 3, 2022) | ||
|- | |- | ||
|[[File:Dry Bowser Artwork.png|80x80px]] | |[[File:Dry Bowser Artwork.png|80x80px]] | ||
| Line 931: | Line 1,156: | ||
!Level-boost ticket (High-End)<br>[[File:MKT Icon Coin.png|20px]] 13,000<br>Amount: 1 per week | !Level-boost ticket (High-End)<br>[[File:MKT Icon Coin.png|20px]] 13,000<br>Amount: 1 per week | ||
|} | |} | ||
==Gallery== | |||
<gallery> | |||
MKT Amsterdam Tour artwork.png|Promotional artwork for the tour | |||
MKT Koningsdag 2022.jpg|Promotional screenshot posted by Dutch [[Nintendo]]-operated social media accounts on ''{{wp|Koningsdag}}'' 2022 | |||
</gallery> | |||
==Names in other languages== | ==Names in other languages== | ||
{{foreign names | {{foreign names | ||
| | |Jpn=アムステルダムツアー | ||
| | |JpnR=Amusuterudamu Tsuā | ||
| | |JpnM=Amsterdam Tour | ||
|ChiS=阿姆斯特丹巡回赛 | |ChiS=阿姆斯特丹巡回赛 | ||
|ChiSR=Āmǔsītèdān Xúnhuí sài | |ChiSR=Āmǔsītèdān Xúnhuí sài | ||
| Line 950: | Line 1,181: | ||
|ItaM=Amsterdam Tour | |ItaM=Amsterdam Tour | ||
|Kor=암스테르담 투어 | |Kor=암스테르담 투어 | ||
|KorR= | |KorR=Amseutereudam Tueo | ||
|KorM=Amsterdam Tour | |KorM=Amsterdam Tour | ||
|Por=Temporada de Amsterdã | |Por=Temporada de Amsterdã | ||
| Line 957: | Line 1,188: | ||
|SpaM=Amsterdam Season | |SpaM=Amsterdam Season | ||
}} | }} | ||
{{MKT}} | {{MKT}} | ||
[[Category:Mario Kart Tour tours]] | [[Category:Mario Kart Tour tours]] | ||
[[it:Tour di Amsterdam]] | [[it:Tour di Amsterdam]] | ||
Latest revision as of 12:02, January 7, 2025
| Amsterdam Tour | |
|---|---|

| |
| Start date | April 19, 2022 11:00 p.m. (PT)[?] |
| End date | May 3, 2022 10:59 p.m. (PT)[?] |
| Number of cups | 12 |
| Ranked cups | Rosalina Cup (week 1) Dry Bowser Cup (week 2) |
| Coin Rush course | Amsterdam Drift |
| << List of tours >> | |
The Amsterdam Tour was the sixty-eighth tour of Mario Kart Tour, which began on April 20, 2022, and ended on May 3, 2022. The tour featured a new city course themed after Amsterdam, the Netherlands, aptly named Amsterdam Drift. Thirty-one tours prior to this tour, Amsterdam was first referenced through a gold badge released in the Peach vs. Daisy Tour in 2021. The tour ran through Koningsdag ("King's Day"), a national Dutch holiday. With its main theme around flowers and gardening, the Amsterdam Tour introduced Rosalina in a traditional Volendam outfit and Daisy in a farmer's outfit as drivers, while also introducing a flower wagon-themed kart called the Flower Kart and the Dragonfly from Mario Kart DS. Additionally, the High-End Firefly kart, a yellow variant of the Dragonfly, was introduced as a reward for placing high in ranked cups.
This tour released Wave 4 of Mii Racing Suits, which, for the first time, consisted of only one suit. The menu's background featured some windmills from Amsterdam Drift as the landmark for this tour. This tour's Coin Rush course was Amsterdam Drift. This was the first tour since the New Year's 2022 Tour to not add any items to regular tour pipes and the All-Clear Pipe. This was also the only tour to not feature the Mii Cup after Miis were introduced.
This tour's trailer featured tulips during its opening splash screen.
Spotlights[edit]
| Amsterdam Pipe 1 April 19, 2022, 11:00 p.m. (PT) – May 3, 2022, 10:59 p.m. (PT) |
Amsterdam Pipe 2 April 26, 2022, 11:00 p.m. (PT) – May 3, 2022, 10:59 p.m. (PT) | ||||

|

| ||||
| Driver | Kart | Glider | Drivers | Karts | Gliders |
|---|---|---|---|---|---|

|
 
|
||||
| Rosalina (Volendam) | Flower Kart | Rose Parasol | Daisy (Farmer) and Daisy (Fairy) | Dragonfly and Prancer | Green Sprout and Daisy Glider |
Special pipe[edit]
| Green Luigi Pipe April 23, 2022, 10:00 p.m. (PT) – April 28, 2022, 10:59 p.m. (PT) | |

| |
| Drivers | Karts |
|---|---|
    
|
|
| Luigi (Golf), Luigi (Vacation), Luigi (Classic), Luigi (Painter) and Luigi (Lederhosen) | Green Lightning, Green B Dasher Mk. 2, Green Circuit, Lime Tea Coupe and Green Apple Kart |
- Names in other languages
| Language | Name | Meaning | Notes |
|---|---|---|---|
| Japanese | 緑のルイージドカン[?] Midori no Ruīji Dokan |
Green Luigi Pipe | |
| Chinese (simplified) | 绿色的路易吉水[?] Lǜsè de Lùyìjí Shuǐguǎn |
Green Luigi Pipe | |
| Chinese (traditional) | 綠色的路易吉管[?] Lǜsè de Lùyìjí Shuǐguǎn |
Green Luigi Pipe | |
| French | Tuyau Luigi vert[?] | Green Luigi Pipe | |
| German | Grün-Luigi-Röhre[?] | Green Luigi Pipe | |
| Italian | Tubo Luigi verdi[?] | Green Luigi Pipe | |
| Korean | 초록 루이지 토관[?] Chorok Ru'iji Togwan |
Green Luigi Pipe | |
| Portuguese | Cano Luigi verde[?] | Green Luigi pipe | |
| Spanish | Tubería de Luigi verde[?] | Green Luigi Pipe |
Cups[edit]
Rosalina Cup Ranked cup (week 1) |
Amsterdam Drift |
3DS Rosalina's Ice World R/T |
Amsterdam Drift R/T |
Ring Race | ||||
 GBA Sunset Wilds |
Birdo (Yellow) | |||||||
Monty Mole Cup |
RMX Rainbow Road 2 |
N64 Yoshi Valley |
SNES Choco Island 1R |
Glider Challenge | ||||
 SNES Rainbow Road |
Rosalina | |||||||
Dry Bowser Cup Ranked cup (week 2) |
Amsterdam Drift R |
GBA Sunset Wilds R/T |
Amsterdam Drift T |
Goomba Takedown | ||||
 N64 Choco Mountain |
Lakitu | |||||||
Luigi Cup |
N64 Yoshi Valley T |
N64 Choco Mountain T |
DS Airship Fortress |
Snap a Photo | ||||
 Amsterdam Drift T |
Rosalina (Volendam) | |||||||
Dixie Kong Cup |
Wii Maple Treeway |
Amsterdam Drift R |
RMX Rainbow Road 2R |
Break Item Boxes | ||||
 GCN Yoshi Circuit |
Dry Bowser | |||||||
Bowser Cup |
SNES Choco Island 1 |
SNES Rainbow Road T |
GCN Yoshi Circuit R |
Steer Clear of Obstacles | ||||
 DS Airship Fortress |
Rosalina | |||||||
Toadette Cup |
3DS Rosalina's Ice World T |
DS Airship Fortress T |
Wii Maple Treeway T |
Time Trial | ||||
 RMX Rainbow Road 2 |
Luigi | |||||||
Daisy Cup |
SNES Rainbow Road |
GCN Yoshi Circuit T |
RMX Rainbow Road 2T |
Combo Attack | ||||
 Wii Maple Treeway T |
Peach | |||||||
Ludwig Cup |
N64 Choco Mountain R |
Amsterdam Drift T |
Wii Maple Treeway R |
vs. Mega Ice Bro | ||||
 3DS Rosalina's Ice World |
Any character | |||||||
Toad Cup |
SNES Rainbow Road R |
3DS Rosalina's Ice World |
GCN Yoshi Circuit |
Do Jump Boosts | ||||
 Amsterdam Drift |
Daisy | |||||||
Donkey Kong Cup |
SNES Choco Island 1T |
Amsterdam Drift |
N64 Yoshi Valley R |
Smash Small Dry Bones | ||||
 N64 Choco Mountain |
Toad | |||||||
Kamek Cup |
3DS Rosalina's Ice World R |
N64 Choco Mountain |
DS Airship Fortress R |
Time Trial | ||||
 SNES Choco Island 1R |
Monty Mole | |||||||
Signature kart sets[edit]
Drivers with a corresponding cup are bumped one rank up in every course of their cup.
| Cup | Driver | Kart | Glider |
|---|---|---|---|
| First course of every cup | — | ||
| Second course of every cup | |||
| Third course of every cup | |||
| — | — | ||
| — | — | ||
| — | — | ||
| — | — | ||
| — | — | ||
| — | — | ||
| — | — | ||
| — | — | ||
| — | — | ||
| — | — | ||
| — | — | ||
| — | — |
Today's Challenge[edit]
Players' most recently used kart and glider are chosen, and favorite and favored ones have extra priority. Opponents are arranged randomly. On day 1 of this tour, players finish a race in RMX Rainbow Road 2 in the Monty Mole Cup using Cat Peach for a free pipe launch. Starting from day 2, players have to finish a race in the earliest incomplete course that is not in any of the ranked cups using the driver shown on the course's thumbnail every day to obtain the corresponding reward in the table below. Once all of the courses are completed, the courses are selected at random.
| Day(s) | Reward |
| 1-4, 6-9, 11-13 | Free pipe launch |
|---|---|
| 5, 10 | Rubies ×5 |
| 14 |  Badge |
| Today's Challenge Pipe | |

| |
| Pipe contents | |
| Rubies, coins, driver (Normal/Super/High-End), kart (Normal/Super/High-End), glider (Normal/Super/High-End), item tickets | |
Rewards[edit]
Gold cells indicate rewards that are exclusive to Gold Pass members.

|

|
|||||
| BBIA Parafoil | Baby Rosalina | Cheep Charger | Plaid Ribbon | Ludwig von Koopa | Peachette | Macharon |
| Grand Stars | 15 | 20 | 25 | 30 | 35 | 40 | 50 | 60 | 70 | 75 | 80 | 85 | 90 | 100 | 110 | 125 | 145 | 165 | 185 | 205 | 225 | 245 | 255 | 265 | Total | Grand total | |
|---|---|---|---|---|---|---|---|---|---|---|---|---|---|---|---|---|---|---|---|---|---|---|---|---|---|---|---|
| Free pipe launch | 1 | 1 | 1 | 1 | 4 | ||||||||||||||||||||||
| Coins | 500 | 500 | 1000 | 1000 | 1000 | 1000 | 5000 | 15000 | |||||||||||||||||||
| 5000 | 5000 | 10000 | |||||||||||||||||||||||||
| Rubies | 10 | 5 | 3 | 3 | 21 | 56 | |||||||||||||||||||||
| 15 | 10 | 10 | 35 | ||||||||||||||||||||||||
| Item tickets | 5 | 5 | 10 | 30 | |||||||||||||||||||||||
| 10 | 10 | 20 | |||||||||||||||||||||||||
| Star tickets | 4 | 4 | 4 | ||||||||||||||||||||||||
| 0 | |||||||||||||||||||||||||||
| Point-boost tickets | 1 | 1 | 1 | 3 | 8 | ||||||||||||||||||||||
| 5 | 5 | ||||||||||||||||||||||||||
| 1 | 1 | 1 | 3 | 8 | |||||||||||||||||||||||
| 5 | 5 | ||||||||||||||||||||||||||
| 1 | 1 | 1 | 3 | 8 | |||||||||||||||||||||||
| 5 | 5 | ||||||||||||||||||||||||||
| Level-boost tickets | 3 | 23 | |||||||||||||||||||||||||
(3) |
(3) |
(3) |
(5) |
20 | |||||||||||||||||||||||
Gold Log-In Bonus[edit]
To commemorate Golden Week in Japan, a 10-day "Gold Log-In Bonus" began on April 29, 2022 and ended several days after this tour on May 9, 2022.
| Day | Reward |
|---|---|
| 1 | Coins ×1,000 |
| 2 | Coins ×1,000 |
| 3 | Coins ×1,000 |
| 4 | Coins ×1,000 |
| 5 | Rubies ×10 |
| 6 | Coins ×2,000 |
| 7 | Coins ×2,000 |
| 8 | Coins ×2,000 |
| 9 | Coins ×2,000 |
| 10 | Rubies ×20 |
New content[edit]
Drivers[edit]
Mii Racing Suits[edit]

Karts[edit]
Gliders[edit]
Courses[edit]
Amsterdam Drift (N, R, T, R/T)
Paid banners[edit]
| Name | Availability | Cost | Contents | Banner image |
|---|---|---|---|---|
| Value Pack | April 20, 2022 – May 3, 2022 | US$1.99 |
|

|
| Celebrate the Amsterdam Tour with the Daikon Rocket! | April 20, 2022 – May 3, 2022 | US$3.99 | 
| |
| Cat Parafoil Pack | April 20, 2022 – May 3, 2022 | US$19.99 |
|

|
| Cat Toad Pack | April 20, 2022 – May 3, 2022 | US$39.99 |
|

|
| 8-Bit Super Mushroom Pack | April 20, 2022 – May 3, 2022 | US$39.99 |
|

|
| Peach (Vacation) Pack | April 27, 2022 – May 3, 2022 | US$19.99 |
|

|
| Mario (Chef) Pack | April 27, 2022 – May 3, 2022 | US$39.99 |
|

|
Challenges[edit]
| Tour Challenges 1 | Tour Challenges 2 | Gold Challenges | ||||||||
|---|---|---|---|---|---|---|---|---|---|---|
| Completion reward: |
Completion reward: |
Completion reward: | ||||||||
 |
 |
 |
 |
 |
 |
 |
 |
 | ||
| Do 5 Rocket Starts. | Land 3 hits with Bob-ombs. | Get a Fantastic combo a total of 5 times. | Use 10 Mushrooms. | Land 5 hits with Bananas. | Get 1st place in a 100cc or higher race 2 times in a row. | Land 10 hits with Red Shells. | Use Lightning. | Get 1st place 3 times in a row in races 100cc or above. | ||
 |
 |
 |
 |
 |
 |
 |
 |
 | ||
| Get an item from the Tier Shop. | Get 3rd place or higher in a race 30 times. | Drive a distance of 20,000 or more on a city course. | Use point-boost tickets 3 times. | Drive a distance of 15,000 or more using a driver wearing earrings. | Earn a score of 7,000 or higher on 3 T or R/T courses. | Use a level-boost ticket. | Activate Frenzy mode 5 times using a driver with a hat. | Do 100 Jump Boosts. | ||
 |
 |
 |
 |
 |
 |
 |
 |
 | ||
| Do 30 Jump Boosts on a city course. | Cause opponents to crash using a Mega Mushroom. | Race in every course of every cup, including bonus challenges. | Race on 5 city courses. | Earn a total score of 15,000 or higher in the Ludwig Cup. | Take out 5 penguins. | Cause opponents to crash 3 times while gliding. | Earn a total score of 25,000 or higher in the Kamek Cup. | Complete Coin Rush 1 time. | ||
| Premium Challenges | ||
|---|---|---|
| Cost: US$4.99 | ||
| Three in a row reward: | ||
Completion reward:  Dixie Kong ×1 Dixie Kong ×1
| ||
| Mario ×1 | Royale ×1 | Shell Parachute ×1 |
| Land 5 hits with Green Shells. | Land 10 hits with Bananas. | Land 10 hits with Bob-ombs. |
| Coins ×3,000 | Rubies ×10 | Glider point-boost ticket ×3 |
| Do 50 Jump Boosts. | Participate in a race. | Do 100 Mini-Turbo boosts. |
| Normal driver level-boost ticket ×1 | Super driver level-boost ticket ×1 | High-End driver level-boost ticket ×1 |
| Get 1st place in a race 10 times. | Get 1st place in a race 15 times. | Get 1st place in a race 20 times. |
| Tour Multiplayer Challenges | ||
|---|---|---|
| Three in a row reward: | ||
| Completion reward: | ||
 |
 |
 |
| Do 50 Jump Boosts in multiplayer. | Land 3 hits with Red Shells in multiplayer. | Land 3 hits with Bananas in multiplayer. |
 |
 |
 |
| Join 3 multiplayer races. | Join 5 multiplayer races. | Join 10 multiplayer races. |
 |
 |
 |
| Get 3rd place or higher in a multiplayer race. | Get 3rd place or higher 3 times in a multiplayer race. | Get 3rd place or higher 5 times in a multiplayer race. |
| Total Points Challenge 1 | |
|---|---|
| Points | Rewards |
| 350,000 |
|
| 300,000 |
|
| 250,000 |
|
| 200,000 |
|
| 150,000 |
|
| 100,000 |
|
| Total Points Challenge 2 | |
|---|---|
| Points | Rewards |
| 900,000 |
|
| 800,000 |
|
| 700,000 |
|
| 600,000 |
|
| 500,000 |
|
| 400,000 |
|
Initial pipe appearance rates[edit]
All-Clear Pipe[edit]
The All-Clear Pipe randomly shoots out one of the following regular High-End items. The appearance rate can be viewed via the "Pipe content" link on the Gold Pass purchase screen.
Amsterdam Pipe 1[edit]
| Items obtained from a new Amsterdam Pipe 1 | |||||||||||||||
|---|---|---|---|---|---|---|---|---|---|---|---|---|---|---|---|
| Item | Normal |
Super |
High-End |
Featured High-End | |||||||||||
| Driver | Kart | Glider | Driver | Kart | Glider | Driver | Kart | Glider | Driver | Kart | Glider | ||||
| Amount | 32 | 26 | 16 | 9 | 7 | 4 | 1 | 1 | 1 | 1 | 1 | 1 | |||
Amsterdam Pipe 2[edit]
| Items obtained from a new Amsterdam Pipe 2 | |||||||||||||||
|---|---|---|---|---|---|---|---|---|---|---|---|---|---|---|---|
| Item | Normal |
Super |
High-End |
Featured High-End | |||||||||||
| Driver | Kart | Glider | Driver | Kart | Glider | Driver | Kart | Glider | Driver | Kart | Glider | ||||
| Amount | 31 | 25 | 15 | 9 | 7 | 4 | 1 | 1 | 1 | 2 | 2 | 2 | |||
Green Luigi Pipe[edit]
| Items obtained from a new Green Luigi Pipe | ||||||||||||
|---|---|---|---|---|---|---|---|---|---|---|---|---|
| Item | Normal |
Super |
High-End | |||||||||
| Driver | Kart | Glider | Driver | Kart | Glider | Driver | Kart | Glider | ||||
| Amount | 12 | 10 | 9 | 5 | 4 | 4 | 3 | 3 | 0 | |||
Mii Racing Suit Shop[edit]
Banner items[edit]
| Name | Starting date | Cost | Contents | Banner image |
|---|---|---|---|---|
| Nabbit Mii Racing Suit | April 20, 2022 | 70 100 rubies for 2nd and 3rd purchases respectively |
Nabbit Mii Racing Suit ×1 |

|
Other items[edit]
| Items available in Mii Racing Suit Shop (April 20, 2022 - May 3, 2022) | ||
|---|---|---|
| Yoshi Mii Racing Suit Amount: 3 |
King Bob-omb Mii Racing Suit Amount: 3 |
Toad Mii Racing Suit Amount: 3 |
| Luigi Mii Racing Suit Amount: 3 |
Mario Mii Racing Suit Amount: 3 |
Peach Mii Racing Suit Amount: 3 |
Token Shop[edit]
The limited-time event where event tokens appear began on April 20, 2022 and ended on May 3, 2022. Event tokens could be earned by causing opponents to crash.
| Token Shop (April 20, 2022 - May 3, 2022) | ||
|---|---|---|

|
||
| Toad (Pit Crew) Amount: 1 |
Super 1 Amount: 1 |
Oilpaper Umbrella Amount: 1 |
| Ruby ×3 Amount: 5 |
Coin ×500 Amount: 10 |
Coin Rush ticket Amount: 1 |
| Point-boost ticket Amount: 5 |
Point-boost ticket Amount: 5 |
Point-boost ticket Amount: 5 |
| Pipe Amount: 31 |
Level-boost ticket (Normal) Amount: 3 |
Level-boost ticket (Super) Amount: 1 |
| Star ticket Amount: 5 |
Points-cap ticket (Normal) Amount: 1 |
Points-cap ticket (Super) Amount: 1 |
Tier Shop[edit]
The shop features a variety of set and randomized items available for purchase. The item slots in the shop are unlocked based on the highest tier of players.
| Items available in Tier Shop (April 20, 2022 - April 26, 2022) | ||
|---|---|---|
| Rosalina Amount: 1 |
Pink Wing Amount: 1 |
Butterfly Prism Amount: 1 |
| Items available in Tier Shop (April 27, 2022 - May 3, 2022) | ||

|
||
| Dry Bowser Amount: 1 |
Cucumber Amount: 1 |
Dry Bowser Umbrella Amount: 1 |
| Items available in Tier Shop (April 20, 2022 - May 3, 2022) | ||
| Level-boost ticket (Normal) Amount: 3 per week |
Level-boost ticket (Normal) Amount: 3 per week |
Level-boost ticket (Normal) Amount: 3 per week |
OR |
OR |
OR |
| Level-boost ticket (Super) Amount: 2 per week OR Level-boost ticket (High-End) Amount: 1 per week |
Level-boost ticket (Super) Amount: 2 per week OR Level-boost ticket (High-End) Amount: 1 per week |
Level-boost ticket (Super) Amount: 2 per week OR Level-boost ticket (High-End) Amount: 1 per week |
OR OR |
OR OR |
OR OR |
| Points-cap ticket (Normal) Amount: 1 per week |
Points-cap ticket (Super) Amount: 1 per week |
Points-cap ticket (High-End) Amount: 1 per week |
| Level-boost ticket (High-End) Amount: 1 per week |
Level-boost ticket (High-End) Amount: 1 per week |
Level-boost ticket (High-End) Amount: 1 per week |
Gallery[edit]
Promotional artwork for the tour
Promotional screenshot posted by Dutch Nintendo-operated social media accounts on Koningsdag 2022


Names in other languages[edit]
| Language | Name | Meaning | Notes |
|---|---|---|---|
| Japanese | アムステルダムツアー[?] Amusuterudamu Tsuā |
Amsterdam Tour | |
| Chinese (simplified) | 阿姆斯特丹巡回赛[?] Āmǔsītèdān Xúnhuí sài |
Amsterdam Tour | |
| Chinese (traditional) | 阿姆斯特丹巡迴賽[?] Āmǔsītèdān Xúnhuí sài |
Amsterdam Tour | |
| French | Saison d'Amsterdam[?] | Amsterdam Season | |
| German | Amsterdam-Tour-Saison[?] | Amsterdam Tour Season | |
| Italian | Tour di Amsterdam[?] | Amsterdam Tour | |
| Korean | 암스테르담 투어[?] Amseutereudam Tueo |
Amsterdam Tour | |
| Portuguese | Temporada de Amsterdã[?] | Amsterdam Season | |
| Spanish | Temporada de Ámsterdam[?] | Amsterdam Season |