Barrendale Mesa: Difference between revisions
Tag: Mobile edit |
|||
| (30 intermediate revisions by 10 users not shown) | |||
| Line 1: | Line 1: | ||
{{ | {{M+RSOH planet infobox | ||
|title='''Barrendale Mesa''' [[File:M+RSOH-BarrendaleMesa-Icon.png]] | |||
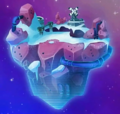
| | |image=Barrendale Mesa saved.png | ||
|warden=[[Momma]] | |warden=[[Momma]] [[File:Momma icon MRSOH.png|20px]] | ||
|spark=2 | |||
| | |side=23 | ||
|level=22-29 | |||
|before=[[Terra Flora|<<]] | |||
|after=[[Cursa's stronghold|>>]] | |||
}} | }} | ||
{{quote|We are approaching '''Barrendale Mesa''' [[File:M+RSOH-BarrendaleMesa-Icon.png|15px]] , once known as a cradle of abundance throughout the galaxy. That was until they stripped it of its natural resources and abandoned it to repeat their mistakes elsewhere.|Beep-0|Mario + Rabbids Sparks of Hope}} | {{quote|We are approaching '''Barrendale Mesa''' [[File:M+RSOH-BarrendaleMesa-Icon.png|15px]] , once known as a cradle of abundance throughout the galaxy. That was until they stripped it of its natural resources and abandoned it to repeat their mistakes elsewhere.|Beep-0|Mario + Rabbids Sparks of Hope}} | ||
'''Barrendale Mesa''' is the fifth and final (not counting [[Cursa's stronghold]]) planet the player visits in ''[[Mario + Rabbids Sparks of Hope]]'', accessible after having collected two [[Purified Darkmess Energy Crystal]]s from the previous planet [[Terra Flora]]. There are 13 [[Memory|Memories]] that the player can unlock | '''Barrendale Mesa''' is the fifth and final (not counting [[Cursa's stronghold]]) planet the player visits in ''[[Mario + Rabbids Sparks of Hope]]'', accessible after having collected two [[Purified Darkmess Energy Crystal]]s from the previous planet [[Terra Flora]]. There are 13 [[Memory|Memories]] that the player can unlock. | ||
==History== | ==History== | ||
Mario and heroes first arrive at Barrendale Mesa, and skydive down to the surface due to a storm preventing the [[WM ARC]] from landing. They soon meet the planet's warden [[Momma]], who asks them to repair the planet's [[Windmill]] so the storm will pass and she can build a [[Shield Buster]] | [[File:Barrendale Mesa storm.png|thumb|left|Barrendale Mesa under the electrical storm]] | ||
Mario and heroes first arrive at Barrendale Mesa, and skydive down to the surface due to a storm preventing the [[WM ARC]] from landing. They soon meet the planet's warden [[Momma]], who asks them to repair the planet's [[Windmill]] so the storm will pass and she can build a [[Shield Buster]] to break the barrier surrounding [[Cursa's stronghold]], while sending the heroes transmission to keep them updated. The heroes manage to repair the Windmill and obtain a [[Purified Darkmess Energy Crystal]]. | |||
After they repair the Windmill, the heroes receive an unusual transmission from Momma, and when they return, it is revealed to be [[Daphne]] pretending to be Momma, who ambushes the heroes by creating a [[Darkmess Tentacle]] that hoists the garage into the sky and tilts it, causing them to fall into the [[Darkmess Dimension]]. It is then revealed that Daphne took Momma hostage, forcing the heroes through a tough battle to defeat her to save Momma. After the heroes defeat Daphne and obtain a second Purified Darkmess Energy Crystal, Cursa arrives and tries to stop the heroes, but [[Rosalina]] temporarily breaks free from her possession, and creates a portal for everyone to escape. [[JEANIE]] tells the heroes the backstory of Cursa. Momma then creates the Shield Buster for the heroes, and with two Purified Darkmess Energy Crystals in their possession, the WM ARC allows the heroes to warp to Cursa's stronghold. | |||
==Quests== | ==Quests== | ||
| Line 22: | Line 28: | ||
*[[Momma's Payback]] | *[[Momma's Payback]] | ||
**[[The Hunter of the Mesa]] (Boss battle quest) | **[[The Hunter of the Mesa]] (Boss battle quest) | ||
===Spark Quests=== | |||
*[[Tortured Artist]] | |||
**[[Da Da in Danger]] | |||
*[[Barrendale Mesa Secret Zone]] | |||
===Side Quests=== | ===Side Quests=== | ||
*[[Red Coin Challenge]] | *[[Red Coin Challenge]] | ||
| Line 36: | Line 48: | ||
*[[Courageous Duo]] | *[[Courageous Duo]] | ||
*[[Barren Gateway]] | *[[Barren Gateway]] | ||
*[[Darkmess, Uncontained]] | *[[Darkmess, Uncontained]] | ||
*[[Be | *[[Be a Depleter Defeater!]] | ||
*[[Worksite Hazard]] | *[[Worksite Hazard]] | ||
*[[A Lost Art]] | *[[A Lost Art]] | ||
| Line 46: | Line 56: | ||
*[[Victor's Barrendale Mesa Invitational]] | *[[Victor's Barrendale Mesa Invitational]] | ||
*[[Generator Investigator]] | *[[Generator Investigator]] | ||
*[[The Riddle of Barrendale Mesa]] | |||
*[[A "Fowl" Attraction]] | *[[A "Fowl" Attraction]] | ||
| Line 56: | Line 67: | ||
|Clear [[Magikoopa Mayhem]] battle. | |Clear [[Magikoopa Mayhem]] battle. | ||
|- | |- | ||
|[[File:Scoper | |[[File:Scoper Master icon MRSOH.png|70px]]<br>[[Scoper Master]] | ||
|Clear [[Tortured Artist]] Spark quest. | |Clear [[Tortured Artist]] Spark quest. | ||
|- | |- | ||
|[[File:Squashette | |[[File:Squashette Master icon MRSOH.png|70px]]<br>[[Squashette Master]] | ||
|Clear [[Barrendale Mesa Secret Zone]]. | |Clear [[Barrendale Mesa Secret Zone]]. | ||
|} | |} | ||
| Line 78: | Line 89: | ||
|- | |- | ||
|[[File:Speedway Kaboomer icon MRSOH.png]]<br>Speedway Kaboomer | |[[File:Speedway Kaboomer icon MRSOH.png]]<br>Speedway Kaboomer | ||
|In a chest guarded by a Depleter in Barrendale Mesa | |In a chest guarded by a Depleter in Barrendale Mesa; clear [[Be a Depleter Defeater!]] battle | ||
|- | |- | ||
|[[File:Steampunk Bowzooka icon MRSOH.png]]<br>Steampunk Bowzooka | |[[File:Steampunk Bowzooka icon MRSOH.png]]<br>Steampunk Bowzooka | ||
| Line 92: | Line 103: | ||
|Reach 100% completion for Barrendale Mesa | |Reach 100% completion for Barrendale Mesa | ||
|} | |} | ||
==Collectible items== | |||
{|width=100% cellspacing=0 border=2 cellpadding=3 style="border-collapse:collapse;text-align:center;" | |||
!width=15%"|Item | |||
!How to obtain | |||
|- | |||
|[[File:Super Mushroom Chest icon.png|50px]]<br>[[Super Mushroom Chest]] | |||
|On a path above [[Tortured Artist]] | |||
|- | |||
|[[File:POW Block icon MRSOH.png|50px]]<br>[[Red POW Block|POW Block]] | |||
|Between two Rabbid cannons on the centre bridge | |||
|- | |||
|[[File:Multi Dash icon.png|50px]]<br>[[Multi Dash]] | |||
|Guarded by the [[Deep Freeze]] near [[Build Bridges]] | |||
|} | |||
==Shops== | |||
{{main|SALESBOT 9.99+TX#List of shops}} | |||
Shops on Barrendale Mesa are located near [[Momma's Garage]] and on the crane in the [[Windmill]] area. | |||
==Enemies== | ==Enemies== | ||
| Line 114: | Line 144: | ||
*[[Daphne]] | *[[Daphne]] | ||
*[[Giant Magnafowl]] (optional) | *[[Giant Magnafowl]] (optional) | ||
==Stone spiral locations== | |||
<gallery> | |||
Swirl 5A.jpg | |||
Swirl 5B.jpg | |||
Swirld 5C.jpg | |||
Swirl 5D.jpg | |||
Swirl 5E.jpg | |||
Swirl 5F.jpg | |||
Swirl 5G.jpg | |||
Swirl 5H.jpg | |||
Swirl 5I.jpg | |||
Swirl 5J.jpg | |||
Swirl 5K.jpg | |||
Swirl 5L.jpg | |||
Swirl 5M.jpg | |||
</gallery> | |||
==Profiles== | ==Profiles== | ||
===[[Memory]] bio=== | ===[[Memory]] bio=== | ||
[[File:M+RSOH Barrendale Mesa Memory.jpg|right|250px]] | |||
'''GALACTIC ATLAS: BARRENDALE MESA'''<br> | '''GALACTIC ATLAS: BARRENDALE MESA'''<br> | ||
''Barrendale Mesa was not always barren. After arriving, the Rabbids quickly depleted its natural resources with little thought to the future, transforming this once verdant mesa into a wasteland. Momma has changed the Rabbids' attitudes, but changing the landscape will take more time.<br>Yet the planet is not without charm - its panoramic views inspire, and its canyons offer much in the way of exploration.'' | ''Barrendale Mesa was not always barren. After arriving, the Rabbids quickly depleted its natural resources with little thought to the future, transforming this once verdant mesa into a wasteland. Momma has changed the Rabbids' attitudes, but changing the landscape will take more time.<br>Yet the planet is not without charm - its panoramic views inspire, and its canyons offer much in the way of exploration.'' | ||
{{br}} | |||
==Musical themes== | |||
{{main|Mario + Rabbids Sparks of Hope (Original Game Soundtrack)}} | |||
"Never Center of the Desert" is the background music theme for Barrendale Mesa and its Industrial Area before clearing the [[It's an Ill Wind that Blows]] Quest; once cleared, "Desolate Beauty" plays instead. "Metagalactic Marauders Ver. 2" plays during regular and "enemy hunt" Quest battles. | |||
==Gallery== | ==Gallery== | ||
<gallery> | <gallery> | ||
M+RSOH Barrendale Mesa World Icon.png|World icon | |||
M+RSOH-BarrendaleMesa-Icon.png|Icon | M+RSOH-BarrendaleMesa-Icon.png|Icon | ||
Barrendale Mesa Teleport Flag icon MRSOH.png|Barrendale Mesa [[Teleport Flag]] | Barrendale Mesa Teleport Flag icon MRSOH.png|Barrendale Mesa [[Teleport Flag]] | ||
| Line 130: | Line 185: | ||
==Names in other languages== | ==Names in other languages== | ||
{{foreign names | {{foreign names | ||
| | |Jpn=バレンデ{{ruby|台地|だいち}} | ||
| | |JpnR=Barende Daichi | ||
| | |JpnM=Barende Plateau | ||
|Chi=巴倫戴爾山莊 | |||
|ChiR=Bālúndài'ěr Shānzhuāng | |||
|ChiM=Barendale Villa | |||
|Dut=Schralinger Plat | |Dut=Schralinger Plat | ||
|DutM= | |DutM=Sparse Flat (''-inger'' is a common suffix for place names) | ||
|Ger=Kargmahltal | |Ger=Kargmahltal | ||
|GerM= | |GerM=Barren Grind Valley | ||
|Ita=Proxima Arsuria | |||
|Rus=Пустынное плато | |||
|RusR=Pustynnoye plato | |||
|RusM=Desert Plateau | |||
|Spa=Meseta Vallebaldío | |Spa=Meseta Vallebaldío | ||
|SpaM= | |SpaM=Barrenvalley Plateau | ||
}} | |||
{{M+RSOH}} | {{M+RSOH}} | ||
[[Category:Deserts]] | [[Category:Deserts]] | ||
[[Category:Plateaus]] | |||
[[Category:Planets]] | [[Category:Planets]] | ||
[[Category:Mario + Rabbids Sparks of Hope locations]] | [[Category:Mario + Rabbids Sparks of Hope locations]] | ||
Latest revision as of 20:42, March 12, 2025
| Barrendale Mesa | |

| |
| Warden | Momma |
| Spark Quests | 2 |
| Side Quests | 23 |
| Enemy levels | 22-29 |
| << >> | |
- “We are approaching Barrendale Mesa
 , once known as a cradle of abundance throughout the galaxy. That was until they stripped it of its natural resources and abandoned it to repeat their mistakes elsewhere.”
 - —Beep-0, Mario + Rabbids Sparks of Hope
Barrendale Mesa is the fifth and final (not counting Cursa's stronghold) planet the player visits in Mario + Rabbids Sparks of Hope, accessible after having collected two Purified Darkmess Energy Crystals from the previous planet Terra Flora. There are 13 Memories that the player can unlock.
History[edit]

Mario and heroes first arrive at Barrendale Mesa, and skydive down to the surface due to a storm preventing the WM ARC from landing. They soon meet the planet's warden Momma, who asks them to repair the planet's Windmill so the storm will pass and she can build a Shield Buster to break the barrier surrounding Cursa's stronghold, while sending the heroes transmission to keep them updated. The heroes manage to repair the Windmill and obtain a Purified Darkmess Energy Crystal.
After they repair the Windmill, the heroes receive an unusual transmission from Momma, and when they return, it is revealed to be Daphne pretending to be Momma, who ambushes the heroes by creating a Darkmess Tentacle that hoists the garage into the sky and tilts it, causing them to fall into the Darkmess Dimension. It is then revealed that Daphne took Momma hostage, forcing the heroes through a tough battle to defeat her to save Momma. After the heroes defeat Daphne and obtain a second Purified Darkmess Energy Crystal, Cursa arrives and tries to stop the heroes, but Rosalina temporarily breaks free from her possession, and creates a portal for everyone to escape. JEANIE tells the heroes the backstory of Cursa. Momma then creates the Shield Buster for the heroes, and with two Purified Darkmess Energy Crystals in their possession, the WM ARC allows the heroes to warp to Cursa's stronghold.
Quests[edit]
Main Quests[edit]
- It's an Ill Wind that Blows
- The Desert Riptides
- Danger, Keep Out!
- Magikoopa Mayhem
- A Foul Windmill Blows (Boss battle quest)
- Momma's Payback
- The Hunter of the Mesa (Boss battle quest)
Spark Quests[edit]
Side Quests[edit]
- Red Coin Challenge
- Green Coin Challenge
- Blue Coin Challenge
- Stuck at Work
- Desert Highway Darkmess
- Gate to the Abandoned Settlement
- Toadette Trouble
- Build Bridges
- Launch Site Secrets
- Cannon Front
- The Brawn and the Brain
- Courageous Duo
- Barren Gateway
- Darkmess, Uncontained
- Be a Depleter Defeater!
- Worksite Hazard
- A Lost Art
- Magikoopa Hunt
- Spellraiser Hunt
- Victor's Barrendale Mesa Invitational
- Generator Investigator
- The Riddle of Barrendale Mesa
- A "Fowl" Attraction
Sparks encountered[edit]
| Spark | How to obtain |
|---|---|
Gargantu-fan |
Clear Magikoopa Mayhem battle. |
Scoper Master |
Clear Tortured Artist Spark quest. |
Squashette Master |
Clear Barrendale Mesa Secret Zone. |
Weapon Skins found[edit]
| Weapon Skin | How to obtain |
|---|---|
Vintage Blade |
SALESBOT 9.99+TX; purchase for two Barrendale Mesa Planet Coins each |
Wildwood Triple Troll | |
Wildwood Kaboomer | |
Speedway Bowzooka | |
Speedway Kaboomer |
In a chest guarded by a Depleter in Barrendale Mesa; clear Be a Depleter Defeater! battle |
Steampunk Bowzooka |
Clear The Brawn and the Brain in Barrendale Mesa |
Steampunk Dual Slinger |
Clear Courageous Duo in Barrendale Mesa |
Gleaming Discruptor |
Clear the Barrendale Mesa Secret Zone time trial |
Gleaming Boom-Brella |
Reach 100% completion for Barrendale Mesa |
Collectible items[edit]
| Item | How to obtain |
|---|---|
Super Mushroom Chest |
On a path above Tortured Artist |
POW Block |
Between two Rabbid cannons on the centre bridge |
Multi Dash |
Guarded by the Deep Freeze near Build Bridges |
Shops[edit]
- Main article: SALESBOT 9.99+TX § List of shops
Shops on Barrendale Mesa are located near Momma's Garage and on the crane in the Windmill area.
Enemies[edit]
- Riptides (new)
- Scopers
- Magikoopas (new)
- Oozers
- Spellraisers (new)
- Bob-ombs
- Magnafowls
- Wildclaws
- Deep Freezes
- Squashettes
- Stooges
- Sea Stooges
- Depleters
- Medicians
- Goombas
- Armored Goombas
Bosses[edit]
- Daphne
- Giant Magnafowl (optional)
Stone spiral locations[edit]


Profiles[edit]
Memory bio[edit]

GALACTIC ATLAS: BARRENDALE MESA
Barrendale Mesa was not always barren. After arriving, the Rabbids quickly depleted its natural resources with little thought to the future, transforming this once verdant mesa into a wasteland. Momma has changed the Rabbids' attitudes, but changing the landscape will take more time.
Yet the planet is not without charm - its panoramic views inspire, and its canyons offer much in the way of exploration.
Musical themes[edit]
"Never Center of the Desert" is the background music theme for Barrendale Mesa and its Industrial Area before clearing the It's an Ill Wind that Blows Quest; once cleared, "Desolate Beauty" plays instead. "Metagalactic Marauders Ver. 2" plays during regular and "enemy hunt" Quest battles.
Gallery[edit]
World icon

Icon

Barrendale Mesa Teleport Flag

Barrendale Mesa Planet Coin

Barren Key, a Planet Key used to unlock the door to the Barrendale Mesa Secret Zone

Names in other languages[edit]
| Language | Name | Meaning | Notes |
|---|---|---|---|
| Japanese | バレンデ Barende Daichi |
Barende Plateau | |
| Chinese | 巴倫戴爾山莊[?] Bālúndài'ěr Shānzhuāng |
Barendale Villa | |
| Dutch | Schralinger Plat[?] | Sparse Flat (-inger is a common suffix for place names) | |
| German | Kargmahltal[?] | Barren Grind Valley | |
| Italian | Proxima Arsuria[?] | - | |
| Russian | Пустынное плато[?] Pustynnoye plato |
Desert Plateau | |
| Spanish | Meseta Vallebaldío[?] | Barrenvalley Plateau |