Animal Tour: Difference between revisions
mNo edit summary |
m (Text replacement - "== *Trivia *==" to "==Notes==") |
||
| (84 intermediate revisions by 33 users not shown) | |||
| Line 1: | Line 1: | ||
{{tour infobox | {{tour infobox | ||
|title=Animal Tour | |title=Animal Tour | ||
|image= | |image=[[File:MKT Animal Tour.png|200px]] | ||
|start=November 15, 2022<br>10:00 p.m. (PT) | |start=November 15, 2022<br>November 14, 2023<br>November 12, 2024<br>10:00 p.m. (PT) | ||
|end=November 29, 2022<br>9:59 p.m. (PT) | |end=November 29, 2022<br>November 28, 2023<br>November 26, 2024<br>9:59 p.m. (PT) | ||
|cups= | |cups=15 | ||
|rank= | |rank=[[Monty Mole Cup]] (week 1)<br>[[Chargin' Chuck Cup]] (week 2) | ||
|coin= | |coin=[[GCN Dino Dino Jungle]] | ||
|before=[[Autumn Tour (2022)|<<]] | |before=[[Autumn Tour (2022)|<<]] | ||
|after= | |after=[[Peach vs. Bowser Tour (November–December 2022)|>>]] | ||
}} | }} | ||
The '''Animal Tour''' | The '''Animal Tour''' was the eighty-third tour of ''[[Mario Kart Tour]]'', which began on November 16, 2022 and ended on November 29, 2022. It was rerun from November 15, 2023 to November 28, 2023 as the game's hundred-and-ninth tour, and was rerun again from November 13, 2024 to November 26, 2024 as the hundred-and-thirty-fifth tour. | ||
This tour also | This tour introduced [[Tanooki Mario|Kitsune Luigi]] from ''[[Super Mario 3D Land]]'' as a new driver, as well as a [[Moo Moo]]-themed [[Mii|Mii Racing Suit]], which players could retrieve by placing high in the tour's ranked cups. Like the [[Sky Tour]], players could also earn [[Shy Guy|Light-blue Shy Guy]] for placing high in the ranked cups. | ||
This tour also introduced [[GCN DK Mountain|DK Mountain]] from ''[[Mario Kart: Double Dash!!]]'' and [[GBA Riverside Park|Riverside Park]] from ''[[Mario Kart: Super Circuit]]'' (the latter of which made its series debut as a [[classic course]]). Various other animal-themed drivers, [[kart]]s, and [[glider]]s were also featured and introduced. This was the first tour since the introduction of [[Battle Mode]] in the [[Battle Tour]] to not introduce any new battle courses. The [[Chargin' Chuck Cup]] debuted in this tour, making this the first tour to introduce a new cup since the [[Cat Tour (2022)|2022 Cat Tour]] twelve tours prior, even though [[Chargin' Chuck]] had been playable since the [[Los Angeles Tour (2022)|2022 Los Angeles Tour]] and had been available in regular pipes since the [[Peach vs. Bowser Tour (May 2022)|May 2022 Peach vs. Bowser Tour]]. | |||
This tour's [[Coin Rush (Mario Kart Tour)|Coin Rush]] course was [[GCN Dino Dino Jungle]], which was reused from the [[Hammer Bro Tour]] and the [[Autumn Tour (2021)|2021 Autumn Tour]]. The menu's background featured the volcano from DK Mountain as the landmark for this tour. | |||
Starting in this tour, weekly spotlight items can appear as daily spotlights in the week opposite to the one in which they appear as a weekly spotlight. | |||
==Spotlight Shop== | |||
{| align=center width=80% cellspacing=0 border=1 cellpadding=3 style="border-collapse:collapse; font-family:Arial; text-align:center" | |||
|-style="background: #89A" | |||
|colspan=5|'''Week 1 banner items'''<br>November 15, 2022, 10:00 p.m. (PT) – November 22, 2022, 9:59 p.m. (PT)<br>November 14, 2023, 10:00 p.m. (PT) – November 21, 2023, 9:59 p.m. (PT) | |||
|-style="background: #ABC" | |||
! style="width: 10%;"|Item type | |||
! style="width: 15%;"|Name | |||
! style="width: 15%;"|Cost | |||
! style="width: 20%;"|Contents | |||
! style="width: 40%;"|Banner image | |||
|- | |||
!style="background: #ABC"|Driver | |||
!Tanooki Mario | |||
|150 [[File:MKT Icon 1Ruby.png|20px]] [[ruby|rubies]]; <br> Amount: 3 | |||
|[[File:TanookiMario SM3DS.png|x100px]]<br> [[Tanooki Mario]] ×1 | |||
|[[File:MKT Tour83 TanookiMario.png|x150px]] | |||
|- | |||
!style="background: #ABC"|Kart | |||
!Tanooki Kart | |||
|100 [[File:MKT Icon 1Ruby.png|20px]] [[ruby|rubies]]; <br> Amount: 3 | |||
|[[File:MKT Icon TanookiKart.png|x100px]]<br> [[Tanooki Kart]] ×1 | |||
|[[File:MKT Tour83 TanookiKart.png|x150px]] | |||
|-style="background: #89A" | |||
|colspan=5|'''Week 2 banner items'''<br>November 22, 2022, 10:00 p.m. (PT) – November 29, 2022, 9:59 p.m. (PT)<br>November 21, 2023, 10:00 p.m. (PT) – November 28, 2023, 9:59 p.m. (PT) | |||
|-style="background: #ABC" | |||
!Item type | |||
!Name | |||
!Cost | |||
!Contents | |||
!Banner image | |||
|- | |||
!style="background: #ABC"|Driver | |||
!Kitsune Luigi | |||
|150 [[File:MKT Icon 1Ruby.png|20px]] [[ruby|rubies]]; <br> Amount: 3 | |||
|[[File:MKT Artwork KitsuneLuigi.png|x100px]]<br> [[Tanooki Mario|Kitsune Luigi]] ×1 | |||
|[[File:MKT Tour83 KitsuneLuigi.png|x150px]] | |||
|- | |||
!style="background: #ABC"|Kart | |||
!Camo Tanooki Kart | |||
|100 [[File:MKT Icon 1Ruby.png|20px]] [[ruby|rubies]]; <br> Amount: 3 | |||
|[[File:MKT Icon CamoTanookiKart.png|x100px]]<br> [[Camo Tanooki Kart]] ×1 | |||
|[[File:MKT Tour83 CamoTanookiKart.png|x150px]] | |||
|- | |||
!style="background: #ABC"|Glider | |||
!Autumn Leaves | |||
|100 [[File:MKT Icon 1Ruby.png|20px]] [[ruby|rubies]]; <br> Amount: 3 | |||
|[[File:MKT Icon AutumnLeaves.png|120px]]<br> [[Autumn Leaves]] ×1 | |||
|[[File:MKT Tour83 AutumnLeaves.png|x150px]] | |||
|} | |||
===Daily Spotlight=== | |||
The Daily Spotlight contains a mixture of items themed around the tour, items that have ranked tracks as favorites, and gold items. The rates listed are specific for that type of item; drivers, karts, and gliders are selected separately. Items marked with an asterisk (*) do not appear in the Daily Spotlight during the week they are available as Spotlight Shop banner items. | |||
{|class="wikitable" style="margin:auto; text-align:center" | |||
!colspan=2|High-End items obtainable from Daily Spotlight during the 2022 Animal Tour | |||
!Rate (each) | |||
|- | |||
!rowspan=3|High-End drivers | |||
|[[Cat Mario|Cat Peach]], [[Cat Mario|Cat Toad]], [[Baby Mario|Baby Mario (Koala)]], [[Yoshi (species)|Yoshi (Kangaroo)]], [[Tanooki Mario|Tanooki Rosalina]], [[Cat Mario|Cat Rosalina]], [[Cat Mario]], [[Cat Mario|Cat Luigi]], [[White Tanooki Mario]], [[Donkey Kong Jr.|Donkey Kong Jr. (SNES)]], [[Meowser]] | |||
|4.5704% | |||
|- | |||
|[[Builder Mario|Builder Toad]], [[Princess Daisy|Daisy (Fairy)]], [[Mario|Mario (Halloween)]], [[Princess Peach|Peach (Explorer)]], [[Fire Mario|Fire Rosalina]], [[Mario|Mario (Tuxedo)]], [[Tanooki Mario]]*, [[Penguin Mario|Penguin Toadette]], [[Dr. Mario]], [[Princess Daisy|Daisy (Sailor)]], [[Luigi|Luigi (Knight)]], [[Tanooki Mario|Kitsune Luigi]]*, [[Funky Kong]], [[Birdo|Birdo (Black)]], [[Chargin' Chuck]], [[Birdo|Birdo (White)]] | |||
|3.0469% | |||
|- | |||
|[[Yoshi (species)|Yoshi (Gold Egg)]], [[Roving Racers|Gold Koopa (Freerunning)]], [[Dry Bones|Dry Bones (Gold)]], [[Dry Bowser|Dry Bowser (Gold)]], [[Shy Guy|Shy Guy (Gold)]], [[King Boo|King Boo (Gold)]], [[King Bob-omb|King Bob-omb (Gold)]], [[Chargin' Chuck|Chargin' Chuck (Gold)]] | |||
|0.1219% | |||
|- | |||
!rowspan=3|High-End karts | |||
|[[Cat Cruiser]], [[Rambi Runner]], [[Black Cat Cruiser]], [[Gray Cat Cruiser]], [[Cream Cat Cruiser]], [[Green Cat Cruiser]], [[DK Maximum]], [[Tiger Bruiser]] | |||
|4.0021% | |||
|- | |||
|[[Wild Wing]], [[Clanky Kart]], [[Wild Black]], [[Sunset Cloud]], [[Rose Taxi]], [[Inferno Flyer]], [[Grand Badwagon]], [[Classic B Dasher Mk. 2]], [[Green B Dasher Mk. 2]], [[Tanooki Kart]]*, [[Magma Broom]], [[White Bruiser]], [[Sweet Ride]], [[Tropical Truck]], [[Ice-Cream Minibus]], [[Shielded Speedster]], [[Camo Tanooki Kart]]*, [[Koopa King]], [[Brown Offroader]], [[Cact-Ice]], [[Jade Hop Rod]], [[Crimson Hop Rod]], [[Red Crawly Kart]], [[Yellow Offroader]], [[Red Offroader]] | |||
|2.6681% | |||
|- | |||
|[[Gold Egg]], [[Gold Clanky Kart]], [[Gold Pipe Frame]], [[Gold Snow Skimmer]], [[Gold Bunny]], [[Gold Kiddie Kart]], [[Gold Zucchini]], [[Gold Standard]], [[Gold Double-Decker]], [[Gold Cheep Snorkel]], [[Gold Cheep Charger]], [[Gold Bullet Blaster]] | |||
|0.1067% | |||
|- | |||
!rowspan=3|High-End gliders | |||
|[[Toe-Bean Balloons]], [[Calico Parafoil]], [[Black Toe-Bean Balloons]], [[Tanooki Parafoil]], [[Black Cat Parafoil]], [[Cat Parafoil]], [[Cream Toe-Bean Balloons]], [[Green Cat Parafoil]] | |||
|3.9063% | |||
|- | |||
|[[Starchute]], [[Treasure Map]], [[Silver Starchute]], [[Butterfly Prism]], [[Silver Manta Glider]], [[Snow Crystals]], [[8-Bit Fire Flower]], [[Starry Great Sail]], [[8-Bit Bullet Bill]], [[Meteor Balloons]], [[Pink Gold Meteors]], [[Glittering Parasol]], [[8-Bit 1-Up Mushroom]], [[Fire Manta Glider]], [[Vanilla & Chocolate Balloons]], [[Icy Mario's Mustache]], [[Mario's Hat Balloon]], [[Luigi's Hat Balloon]], [[Autumn Leaves]]*, [[Tropical Glider]], [[Dragon Wings]], [[Vampire Wings]], [[Lava Rocks]], [[Black Starchute]], [[Boo Masks]], [[Barrel Hanafuda]] | |||
|2.6042% | |||
|- | |||
|[[Gold Glider]], [[Gold Crane]], [[Silver-and-Gold Hearts]], [[Gold Home-Field Glider]], [[Gold Tanooki Parafoil]], [[Gold Penguin Wingtip]], [[Gold Toe-Bean Balloons]], [[Gold Eggshell Glider]], [[Gold Cloud Balloons]], [[Golden Wings]] | |||
|0.1042% | |||
|} | |||
<br> | |||
{|class="wikitable" style="margin:auto; text-align:center" | |||
!colspan=2|High-End items obtainable from Daily Spotlight during the 2023 Animal Tour | |||
!Rate (each) | |||
|- | |||
!rowspan=3|High-End drivers | |||
|[[Cat Mario|Cat Peach]], [[Cat Mario|Cat Toad]], [[Baby Mario|Baby Mario (Koala)]], [[Yoshi (species)|Yoshi (Kangaroo)]], [[Tanooki Mario|Tanooki Rosalina]], [[Cat Mario|Cat Rosalina]], [[Cat Mario]], [[Cat Mario|Cat Luigi]], [[White Tanooki Mario]], [[Donkey Kong Jr.|Donkey Kong Jr. (SNES)]], [[Meowser]] | |||
|4.44% | |||
|- | |||
|[[Yoshi|Yoshi (Egg Hunt)]], [[Builder Mario|Builder Toad]], [[Princess Daisy|Daisy (Fairy)]], [[Princess Peach|Peach (Explorer)]], [[Fire Mario|Fire Rosalina]], [[Mario|Mario (Tuxedo)]], [[Tanooki Mario]]*, [[Penguin Mario|Penguin Toadette]], [[Dr. Mario]], [[Princess Daisy|Daisy (Sailor)]], [[Luigi|Luigi (Knight)]], [[Poochy]], [[Funky Kong]], [[Birdo|Birdo (Black)]], [[Chargin' Chuck]], [[Birdo|Birdo (White)]], [[Exploring Shy Guy|Light-blue Shy Guy (Explorer)]] | |||
|2.96% | |||
|- | |||
|[[Yoshi (species)|Yoshi (Gold Egg)]], [[Roving Racers|Gold Koopa (Freerunning)]], [[Dry Bones|Dry Bones (Gold)]], [[Dry Bowser|Dry Bowser (Gold)]], [[Shy Guy|Shy Guy (Gold)]], [[King Bob-omb|King Bob-omb (Gold)]], [[Chargin' Chuck|Chargin' Chuck (Gold)]] | |||
|0.12% | |||
|- | |||
!rowspan=3|High-End karts | |||
|[[Cat Cruiser]], [[Rambi Runner]], [[Black Cat Cruiser]], [[Gray Cat Cruiser]], [[Cream Cat Cruiser]], [[Green Cat Cruiser]], [[DK Maximum]], [[Tiger Bruiser]] | |||
|2.49% | |||
|- | |||
|[[Wild Wing]], [[Clanky Kart]], [[Wild Black]], [[Dark Trickster]], [[Sunset Cloud]], [[Rose Taxi]], [[Inferno Flyer]], [[Grand Badwagon]], [[Cleanup Hitter]], [[Classic B Dasher Mk. 2]], [[Green B Dasher Mk. 2]], [[Tanooki Kart]]*, [[Magma Broom]], [[White Bruiser]], [[Sweet Ride]], [[Tropical Truck]], [[Ice-Cream Minibus]], [[Shielded Speedster]], [[Black Carriage]], [[Flaming Speeder]], [[Pineapple 1]], [[Hot Pot Hot Rod]], [[Taiko Drum Dasher]], [[Iron Cucumber]], [[Cream Classic]], [[Pink Comet]], [[Green Comet (kart)|Green Comet]], [[Silver Cupid's Arrow]], [[Black Shielded Speedster]], [[Dolphin Dasher]], [[Spicy Zucchini]], [[Koopa King]], [[Brown Offroader]], [[Penguin Slider]], [[Cact-Ice]], [[Purple Bunny]], [[Jade Hop Rod]], [[Crimson Hop Rod]], [[Red Crawly Kart]], [[Yellow Offroader]], [[Red Offroader]], [[Red Vampire Flyer]], [[Dry Bones Dasher]], [[Chain Chomp Chariot]], [[Fish Bone Ferry]], [[Wiggler Egg]], [[Wild Wiggler]] | |||
|1.66% | |||
|- | |||
|[[Gold Egg]], [[Gold Clanky Kart]], [[Gold Pipe Frame]], [[Gold Snow Skimmer]], [[Gold Pumpkin Kart]], [[Gold Bunny]], [[Gold Kiddie Kart]], [[Gold Zucchini]], [[Gold Standard]], [[Gold Double-Decker]], [[Gold Sweet Ride]], [[Gold Jingle Bell]], [[Wild Gold]], [[Gold Quickshaw]], [[Gold Capsule Kart]], [[Gold Paintster]], [[Gold Comet]], [[Gold Cupid's Arrow]], [[Gold Warrior Wagon]], [[Gold Driver]], [[Goo-Goo Gold]], [[Gold Wild Slugger]], [[Gold Soft Swerve]], [[Gold B Dasher]], [[Gold Train]], [[Gold Cheep Snorkel]], [[Gold Cheep Charger]], [[Gold Bullet Blaster]], [[Gold Bruiser]], [[Gold Sushi Racer]], [[Gold Fish Bone Ferry]], [[Gold Pipes]] | |||
|0.07% | |||
|- | |||
!rowspan=3|High-End gliders | |||
|[[Toe-Bean Balloons]], [[Calico Parafoil]], [[Black Toe-Bean Balloons]], [[Tanooki Parafoil]], [[Black Cat Parafoil]], [[Cat Parafoil]], [[Cream Toe-Bean Balloons]], [[Green Cat Parafoil]] | |||
|2.55% | |||
|- | |||
|[[Le Tricolore]], [[Starchute]], [[Treasure Map]], [[Silver Starchute]], [[Butterfly Prism]], [[Silver Manta Glider]], [[Snow Crystals]], [[8-Bit Fire Flower]], [[Starry Great Sail]], [[8-Bit Bullet Bill]], [[Polka-Dot Manta Glider]], [[Meteor Balloons]], [[Pink Gold Meteors]], [[Glittering Parasol]], [[Tulip Corsage]], [[Red and Gold Umbrella]], [[8-Bit 1-Up Mushroom]], [[Fire Manta Glider]], [[Vanilla & Chocolate Balloons]], [[Icy Mario's Mustache]], [[Mario's Hat Balloon]], [[Luigi's Hat Balloon]], [[White Waves Origami Glider]], [[Para-Panini]], [[New Year's 2023]], [[Rainbow Fare Flier]], [[Stealth Glider]], [[Bright Ribbon]], [[Red Checkered Glider]], [[Red Emblem]], [[Green Emblem]], [[Mario Bros. Parafoil]], [[Mosaic Starchute]], [[Dolphin Great Sail]], [[Mario Golf Cap]], [[Melon & Banana Balloons]], [[Tropical Glider]], [[Dragon Wings]], [[Bright Balloons]], [[Vampire Wings]], [[Lava Rocks]], [[Black Starchute]], [[Boo Masks]], [[Rainbow Flappy Wings]], [[Wiggler Parachute]], [[Barrel Hanafuda]] | |||
|1.70% | |||
|- | |||
|[[Gold Glider]], [[Gold Crane]], [[Silver-and-Gold Hearts]], [[Gold Home-Field Glider]], [[Gold Tanooki Parafoil]], [[Gold Penguin Wingtip]], [[Gold Toe-Bean Balloons]], [[Gold Eggshell Glider]], [[Gold Cloud Balloons]], [[Gold Meteors]], [[Gold Umbrella]], [[Gold Candlelight Flight]], [[Golden Glider]], [[Gold Tulips]], [[Gold Checkered Glider]], [[Gold Bells]], [[Glittering Glider]], [[Gold Mario Golf Cap]], [[Gold Swooper]], [[Golden Wings]], [[Gold Boo Masks]], [[Gold Piranha Plant Balloons]] | |||
|0.07% | |||
|} | |||
==Cups== | |||
{| align=center width=90% cellspacing=0 border=1 cellpadding=3 style="border-collapse:collapse; font-family:Arial; text-align:center" | |||
{{MKT cup table row | |||
|C=Monty Mole||Ra=1 | |||
|R1=[[GCN DK Mountain]]||R1.I=DKMountainGCN||R1.1=1,100||R1.2=1,700||R1.3=2,000||R1.4=2,300||R1.5=2,600 | |||
|R2=[[GCN Dino Dino Jungle|GCN Dino Dino Jungle R/T]]||R2.I=DinoDinoJungleRTGCN BabyMarioKoala||R2.1=900||R2.2=1,400||R2.3=1,600||R2.4=1,800||R2.5=2,000 | |||
|R3=[[GBA Riverside Park|GBA Riverside Park R]]||R3.I=RiversideParkRGBA||R3.1=900||R3.2=1,300||R3.3=1,500||R3.4=1,700||R3.5=1,900 | |||
|CN=[[Goomba Takedown]]||C.I=Tour83 MontyMoleCupChallenge||CC=[[Birdo|Birdo (Light Blue)]]||CT=[[RMX Bowser's Castle 1]]||C.1=10||C.2=30||C.3=40 | |||
}} | |||
{{MKT cup table row | |||
|C=Mii||Ra= | |||
|R1=[[GBA Battle Course 1]]<br>(Balloon Battle)||R1.I=BattleCourse1GBA CatMiiRacingSuit||R1.1=1,500||R1.2=2,300||R1.3=2,700||R1.4=3,100||R1.5=3,700 | |||
|R2=[[GCN Yoshi Circuit|GCN Yoshi Circuit T]]||R2.I=YoshiCircuitTGCN BuilderToad||R2.1=1,100||R2.2=1,600||R2.3=1,900||R2.4=2,200||R2.5=2,600 | |||
|R3=RMX Bowser's Castle 1||R3.I=RMXBowsersCastle1 Meowser||R3.1=1,200||R3.2=1,900||R3.3=2,200||R3.4=2,600||R3.5=3,000 | |||
|CN=[[Do Jump Boosts]]||C.I=Tour3 LemmyCupChallenge||CC=[[Morton]]||CT=GCN Dino Dino Jungle||C.1=8||C.2=14||C.3=18 | |||
}} | |||
{{MKT cup table row | |||
|C=Chargin' Chuck||Ra=2 | |||
|R1=[[N64 Choco Mountain|N64 Choco Mountain R/T]]||R1.I=ChocoMountainRTN64 CharginChuck||R1.1=1,700||R1.2=2,700||R1.3=3,100||R1.4=3,600||R1.5=4,400 | |||
|R2=GBA Riverside Park T||R2.I=RiversideParkTGBA||R2.1=1,300||R2.2=2,100||R2.3=2,400||R2.4=2,800||R2.5=3,400 | |||
|R3=GCN DK Mountain R/T||R3.I=DKMountainRTGCN||R3.1=1,800||R3.2=2,900||R3.3=3,400||R3.4=3,900||R3.5=4,800 | |||
|CN=[[Glider Challenge]]||C.I=Tour19 HammerBroCupChallenge||CC=[[Baby Luigi]]||CT=[[3DS Rock Rock Mountain]]||C.1=250||C.2=450||C.3=650 | |||
}} | |||
{{MKT cup table row | |||
|C=Kamek||Ra= | |||
|R1=[[GCN Baby Park]]||R1.I=BabyParkGCN||R1.1=1,800||R1.2=3,000||R1.3=3,500||R1.4=4,000||R1.5=5,200 | |||
|R2=[[3DS Piranha Plant Slide|3DS Piranha Plant Slide T]]||R2.I=PiranhaPlantSlideT3DS Kamek||R2.1=2,200||R2.2=3,600||R2.3=4,200||R2.4=4,900||R2.5=6,200 | |||
|R3=[[N64 Yoshi Valley|N64 Yoshi Valley R]]||R3.I=YoshiValleyRN64 BirdoWhite||R3.1=1,300||R3.2=2,200||R3.3=2,500||R3.4=3,000||R3.5=3,800 | |||
|CN=[[Ring Race]]||C.I=Tour83 KamekCupChallenge||CC=[[Diddy Kong]]||CT=GCN DK Mountain||C.1=12||C.2=26||C.3=34 | |||
}} | |||
{{MKT cup table row | |||
|C=Nabbit||Ra= | |||
|R1=3DS Rock Rock Mountain||R1.I=RockRockMountain3DS Meowser||R1.1=1,400||R1.2=2,400||R1.3=2,700||R1.4=3,200||R1.5=4,200 | |||
|R2=[[GCN Cookie Land]]<br>(Balloon Battle)||R2.I=CookieLandGCN Nabbit||R2.1=1,800||R2.2=3,100||R2.3=3,500||R2.4=4,100||R2.5=5,500 | |||
|R3=GCN Dino Dino Jungle||R3.I=DinoDinoJungleGCN CatToad||R3.1=1,400||R3.2=2,400||R3.3=2,800||R3.4=3,300||R3.5=4,400 | |||
|CN=[[Time Trial (Mario Kart Tour)|Time Trial]]||C.I=Tour83 NabbitCupChallenge||CC=[[Boomerang Bro]]||CT=N64 Yoshi Valley R||C.1=2:05.00||C.2=1:58.00||C.3=1:50.00 | |||
}} | |||
{{MKT cup table row | |||
|C=Baby Rosalina||Ra= | |||
|R1=[[GBA Sky Garden|GBA Sky Garden R]]||R1.I=SkyGardenRGBA CatMario||R1.1=1,400||R1.2=2,500||R1.3=2,900||R1.4=3,400||R1.5=4,600 | |||
|R2=[[Wii Mushroom Gorge|Wii Mushroom Gorge T]]||R2.I=MushroomGorgeTWii CatRosalina||R2.1=2,000||R2.2=3,400||R2.3=3,900||R2.4=4,700||R2.5=6,300 | |||
|R3=GCN Yoshi Circuit R||R3.I=YoshiCircuitRGCN BabyRosalina||R3.1=1,300||R3.2=2,300||R3.3=2,600||R3.4=3,100||R3.5=4,300 | |||
|CN=[[Steer Clear of Obstacles]]||C.I=Tour1 DryBonesCupChallenge||CC=[[Dry Bones]]||CT=GCN Dino Dino Jungle||C.1=1||C.2=2||C.3=3 | |||
}} | |||
{{MKT cup table row | |||
|C=Dry Bowser||Ra= | |||
|R1=GBA Riverside Park||R1.I=RiversideParkGBA||R1.1=1,200||R1.2=2,200||R1.3=2,500||R1.4=3,000||R1.5=4,200 | |||
|R2=N64 Choco Mountain T||R2.I=ChocoMountainTN64 DryBowser||R2.1=1,700||R2.2=3,000||R2.3=3,400||R2.4=4,100||R2.5=5,700 | |||
|R3=3DS Piranha Plant Slide R||R3.I=PiranhaPlantSlideR3DS CheepCheepMiiRacingSuit||R3.1=1,700||R3.2=3,100||R3.3=3,600||R3.4=4,300||R3.5=6,000 | |||
|CN=[[Big Reverse Race]]||C.I=Tour24 DryBowserCupChallenge||CC=Any character||CT=GCN Yoshi Circuit||C.1=50cc||C.2=100cc||C.3=150cc | |||
}} | |||
{{MKT cup table row | |||
|C=Waluigi||Ra= | |||
|R1=N64 Yoshi Valley T||R1.I=YoshiValleyTN64 PenguinToadette||R1.1=2,000||R1.2=3,700||R1.3=4,200||R1.4=5,100||R1.5=7,300 | |||
|R2=GCN DK Mountain R||R2.I=DKMountainRGCN||R2.1=1,600||R2.2=3,000||R2.3=3,400||R2.4=4,100||R2.5=5,900 | |||
|R3=GCN Baby Park T||R3.I=BabyParkTGCN Waluigi||R3.1=2,200||R3.2=4,000||R3.3=4,500||R3.4=5,500||R3.5=7,800 | |||
|CN=[[Snap a Photo]]||C.I=Tour83 WaluigiCupChallenge||CC=[[Tanooki Mario]]||CT=GBA Riverside Park T||C.1=1||C.2=2||C.3=3 | |||
}} | |||
{{MKT cup table row | |||
|C=Roy||Ra= | |||
|R1=GCN Dino Dino Jungle R||R1.I=DinoDinoJungleRGCN Roy||R1.1=1,400||R1.2=2,700||R1.3=3,100||R1.4=3,700||R1.5=5,500 | |||
|R2=3DS Rock Rock Mountain T||R2.I=RockRockMountainT3DS FunkyKong||R2.1=1,700||R2.2=3,300||R2.3=3,700||R2.4=4,500||R2.5=6,600 | |||
|R3=GBA Battle Course 1<br>(Balloon Battle)||R3.I=BattleCourse1GBA LuigiKnight||R3.1=1,900||R3.2=3,600||R3.3=4,000||R3.4=4,900||R3.5=7,200 | |||
|CN=[[Combo Attack]]||C.I=Tour83 RoyCupChallenge||CC=[[Luigi]]||CT=3DS Piranha Plant Slide T||C.1=10||C.2=15||C.3=20 | |||
}} | |||
{{MKT cup table row | |||
|C=King Boo||Ra= | |||
|R1=GBA Sky Garden T||R1.I=SkyGardenTGBA YoshiKangaroo||R1.1=1,600||R1.2=3,000||R1.3=3,400||R1.4=4,200||R1.5=6,200 | |||
|R2=RMX Bowser's Castle 1R||R2.I=RMXBowsersCastle1R KingBoo||R2.1=1,600||R2.2=3,100||R2.3=3,500||R2.4=4,300||R2.5=6,400 | |||
|R3=Wii Mushroom Gorge||R3.I=MushroomGorgeWii DonkeyKongJrSNES||R3.1=2,100||R3.2=4,100||R3.3=4,600||R3.4=5,600||R3.5=8,300 | |||
|CN=Ring Race||C.I=Tour71 MiiCupChallenge||CC=[[Baby Peach]]||CT=GCN Baby Park||C.1=8||C.2=12||C.3=17 | |||
}} | |||
{{MKT cup table row | |||
|C=Diddy Kong||Ra= | |||
|R1=GCN Yoshi Circuit R/T||R1.I=YoshiCircuitRTGCN PeteyPiranhaMiiRacingSuit||R1.1=1,000||R1.2=1,900||R1.3=2,200||R1.4=2,600||R1.5=4,000 | |||
|R2=GBA Riverside Park R/T||R2.I=RiversideParkRTGBA||R2.1=1,600||R2.2=3,200||R2.3=3,600||R2.4=4,400||R2.5=6,700 | |||
|R3=3DS Rock Rock Mountain R||R3.I=RockRockMountainR3DS DiddyKong||R3.1=1,400||R3.2=2,800||R3.3=3,100||R3.4=3,900||R3.5=5,900 | |||
|CN=Steer Clear of Obstacles||C.I=Tour64 DaisyCupChallenge||CC=[[Mario]]||CT=GBA Sky Garden||C.1=1||C.2=2||C.3=3 | |||
}} | |||
{{MKT cup table row | |||
|C=Pauline||Ra= | |||
|R1=3DS Piranha Plant Slide||R1.I=PiranhaPlantSlide3DS Pauline||R1.1=1,900||R1.2=3,900||R1.3=4,400||R1.4=5,400||R1.5=8,400 | |||
|R2=GCN Baby Park R||R2.I=BabyParkRGCN BabyMarioKoala||R2.1=2,200||R2.2=4,400||R2.3=5,000||R2.4=6,100||R2.5=9,500 | |||
|R3=N64 Choco Mountain||R3.I=ChocoMountainN64 TanookiMario||R3.1=1,600||R3.2=3,200||R3.3=3,600||R3.4=4,400||R3.5=6,900 | |||
|CN=[[Smash Small Dry Bones]]||C.I=Tour67 FunkyKongCupChallenge||CC=[[Toad|Toad (Pit Crew)]]||CT=Wii Mushroom Gorge||C.1=8||C.2=12||C.3=16 | |||
}} | |||
{{MKT cup table row | |||
|C=Fire Bro||Ra= | |||
|R1=RMX Bowser's Castle 1T||R1.I=RMXBowsersCastle1T YoshiKangaroo||R1.1=1,600||R1.2=3,400||R1.3=3,800||R1.4=4,700||R1.5=7,400 | |||
|R2=GCN Yoshi Circuit||R2.I=YoshiCircuitGCN FireRosalina||R2.1=1,200||R2.2=2,400||R2.3=2,700||R2.4=3,400||R2.5=5,300 | |||
|R3=GCN Dino Dino Jungle T||R3.I=DinoDinoJungleTGCN FireBro||R3.1=1,400||R3.2=2,900||R3.3=3,200||R3.4=4,000||R3.5=6,300 | |||
|CN=Time Trial||C.I=Tour33 RosalinaCupChallenge||CC=[[Roy]]||CT=N64 Choco Mountain||C.1=1:54.00||C.2=1:40.00||C.3=1:34.00 | |||
}} | |||
{{MKT cup table row | |||
|C=Baby Daisy||Ra= | |||
|R1=GBA Sky Garden||R1.I=SkyGardenGBA PeachExplorer||R1.1=1,500||R1.2=3,100||R1.3=3,500||R1.4=4,300||R1.5=7,000 | |||
|R2=N64 Yoshi Valley||R2.I=YoshiValleyN64 TanookiRosalina||R2.1=1,600||R2.2=3,500||R2.3=3,900||R2.4=4,900||R2.5=7,800 | |||
|R3=GCN Cookie Land<br>(Balloon Battle)||R3.I=CookieLandGCN BabyDaisy||R3.1=1,900||R3.2=4,100||R3.3=4,600||R3.4=5,700||R3.5=9,200 | |||
|CN=[[Break Item Boxes]]||C.I=Tour5 DryBowserCupChallenge||CC=[[Princess Peach|Peach]]||CT=3DS Rock Rock Mountain||C.1=6||C.2=10||C.3=14 | |||
}} | |||
{{MKT cup table row | |||
|C=Hammer Bro||Ra= | |||
|R1=N64 Choco Mountain R||R1.I=ChocoMountainRN64 HammerBro||R1.1=1,600||R1.2=3,500||R1.3=3,900||R1.4=4,800||R1.5=7,900 | |||
|R2=Wii Mushroom Gorge R||R2.I=MushroomGorgeRWii WhiteTanookiMario||R2.1=1,800||R2.2=4,000||R2.3=4,500||R2.4=5,600||R2.5=9,200 | |||
|R3=GCN DK Mountain T||R3.I=DKMountainTGCN||R3.1=2,000||R3.2=4,400||R3.3=4,900||R3.4=6,000||R3.5=9,900 | |||
|CN=[[Take them out quick!]]||C.I=Tour83 HammerBroCupChallenge||CC=[[Yoshi]]||CT=GBA Riverside Park||C.1=0:00.00||C.2=0:05.00||C.3=0:10.00 | |||
}} | |||
|} | |||
==Today's Challenge== | |||
Players' most recently used kart and glider are chosen, and favorite and favored ones have extra priority. Opponents are arranged randomly. On day 1 of this tour, players finish a balloon battle in [[GBA Battle Course 1]] in the [[Mii Cup]] using the [[Mii|Cat Mii Racing Suit]] for a free pipe launch. Starting from day 2, players have to finish a race in the earliest incomplete course that is not in any of the ranked cups using the driver shown on the course's thumbnail every day to obtain the corresponding reward in the table below. Once all of the courses are completed, the courses are selected at random. | |||
The badge for this tour's Today's Challenge is reused from the [[Autumn Tour (2021)|2021 Autumn Tour]]. | |||
{| align=center width=40% cellspacing=0 border=1 cellpadding=3 style="border-collapse:collapse; font-family:Arial; text-align:center" | |||
|-style="background: #89A" | |||
|'''Day(s)''' | |||
|'''Reward''' | |||
|- | |||
!1-13 | |||
|[[File:MKT Icon Launch Pipe Green.png|50px]]<br>Free pipe launch | |||
|- | |||
!14 | |||
|[[File:MKT 390QB.png|50px]]<br>Badge | |||
|-style="background: #89A" | |||
|colspan=2|'''Today's Challenge Pipe''' | |||
|- | |||
|colspan=2|[[File:MKT Tour45 TodaysChallengePipe.png|x150px]] | |||
|-style="background: #ABC" | |||
|colspan=2|'''Pipe contents''' | |||
|- | |||
|colspan=2|[[Ruby|Rubies]], [[coin]]s, driver (Normal/Super/High-End), kart (Normal/Super/High-End), glider (Normal/Super/High-End), [[item ticket]]s | |||
|} | |||
==Rewards== | |||
Gold cells indicate rewards that are exclusive to Gold Pass members. | |||
===2022=== | |||
{|class="wikitable" style="margin:auto; text-align:center" | |||
|- | |||
![[File:MKT Icon GrandStar.png|20x20px]] 30 | |||
![[File:MKT Icon GrandStar.png|20x20px]] 55 | |||
|- | |||
|[[File:MKT Icon GoldRambiRider.png|75x75px]] | |||
|[[File:MKT Icon RambiRider.png|75x75px]] | |||
|- | |||
|style=background:gold|[[Gold Rambi Rider]] | |||
|style=background:gold|[[Rambi Rider]] | |||
|} | |||
<br> | |||
{|class="wikitable scrollable" style="margin:auto; text-align:center; font-size:90%" | |||
|- | |||
!Grand Stars!![[File:MKT Icon GrandStar.png|20x20px]]!!15!!20!!25!!30!!35!!40!!45!!50!!55!!60!!65!!70!!80!!90!!100!!110!!120!!130!!140!!150!!160!!170!!180!!190!!200!!210!!220!!230!!240!!250!!260!!270!!280!!290!!300!!310!!320!!Total!!Grand total | |||
|- | |||
!rowspan=2 colspan=2|[[Pipe Cannon|Pipes]] | |||
|||[[File:MKT Icon Launch Pipe Green.png|20px]]||||[[File:MKT Icon Launch Pipe Green.png|20px]]||||[[File:MKT Icon Launch Pipe Green.png|20px]]||||||||||||||[[File:MKT Icon Launch Pipe Green.png|20px]]||||||||||[[File:MKT Icon Launch Pipe Green.png|20px]]||||||[[File:MKT Icon Launch Pipe Green.png|20px]]||||||||[[File:MKT Icon Launch Pipe Green.png|20px]]||||||||[[File:MKT Icon Launch Pipe Green.png|20px]]||||[[File:MKT Icon Launch Pipe Green.png|20px]]||||[[File:MKT Icon Launch Pipe Green.png|20px]]||||||||||10 | |||
!rowspan=2|26 | |||
|-style=background:gold | |||
|||[[File:MKT Icon Launch Pipe Green.png|20px]]||[[File:MKT Icon Launch Pipe Green.png|20px]]||[[File:MKT Icon Launch Pipe Green.png|20px]]||[[File:MKT Icon Launch Pipe Green.png|20px]]||[[File:MKT Icon Launch Pipe Green.png|20px]]||||||||||||[[File:MKT Icon Launch Pipe Gold.png|20px]]||[[File:MKT Icon Launch Pipe Green.png|20px]]||||||||[[File:MKT Icon Launch Pipe Gold.png|20px]]||[[File:MKT Icon Launch Pipe Green.png|20px]]||||||[[File:MKT Icon Launch Pipe Green.png|20px]]||||||||[[File:MKT Icon Launch Pipe Green.png|20px]]||||||||[[File:MKT Icon Launch Pipe Green.png|20px]]||[[File:MKT Icon Launch Pipe Green.png|20px]]||[[File:MKT Icon Launch Pipe Green.png|20px]]||[[File:MKT Icon Launch Pipe Green.png|20px]]||[[File:MKT Icon Launch Pipe Green.png|20px]]||||||||||16 | |||
|- | |||
!rowspan=2|[[Coin]]s | |||
!rowspan=2|[[File:MKT Icon Coins 2.png|50x50px]] | |||
|500||||500||||500||||500||||||500||||500||||||||||||||||500||||||||||||||||||||500||||500||||500||||||||5000 | |||
!rowspan=2|15000 | |||
|-style=background:gold | |||
|5000||||||||||||5000||||||||||||||||||||||||||||||||||||||||||||||||||||||||||||||10000 | |||
|- | |||
!rowspan=2|[[Ruby|Rubies]] | |||
!rowspan=2|[[File:MKT Icon 1Ruby.png|50x50px]] | |||
|10||||||||||||5||||||||||3||||||||||||||||3||||||||||||||||||||||||||||||||||||21 | |||
!rowspan=2|56 | |||
|-style=background:gold | |||
|15||||||||||||10||||||||||10||||||||||||||||||||||||||||||||||||||||||||||||||||35 | |||
|- | |||
!rowspan=2|[[Item ticket]]s | |||
!rowspan=2|[[File:MKT Icon ItemTicket.png|50x50px]] | |||
|||||||||||||||5||||||||||||||||||||||5||||||||||||||||||||||||||||||||||||||10 | |||
!rowspan=2|30 | |||
|-style=background:gold | |||
|||||||||||||||10||||||||||||||||||||||10||||||||||||||||||||||||||||||||||||||20 | |||
|- | |||
!rowspan=2|[[Star ticket]]s | |||
!rowspan=2|[[File:MKT Icon StarTicket.png|50x50px]] | |||
|||||||||||||||||||||2||||||||||||3||||||||||||||||||||||||||||||||||||||||||5 | |||
!rowspan=2|5 | |||
|-style=background:gold | |||
|||||||||||||||||||||||||||||||||||||||||||||||||||||||||||||||||||||||||||0 | |||
|- | |||
!rowspan=2|[[Quick ticket]]s | |||
!rowspan=2|[[File:MKT Icon QuickTicket.png|50x50px]] | |||
|||||||||||||||||1||||||||||||||||||||||||||||||||||||||||||||||||||||||||||1 | |||
!rowspan=2|4 | |||
|-style=background:gold | |||
|||||||||||||||||||||||||||||||||||||||3||||||||||||||||||||||||||||||||||||3 | |||
|- | |||
!rowspan=6|[[Point-boost ticket]]s | |||
!rowspan=2|[[File:MKT Icon Point-boostticket1.png|50x50px]] | |||
|||||||||||||||||||||||||||||||1||||||||||||||||1||||||||1||||||||||||||||||||3 | |||
!rowspan=2|8 | |||
|-style=background:gold | |||
|||||||||||||||||||||||||||||||||||||||||||||||||||||||5||||||||||||||||||||5 | |||
|- | |||
!rowspan=2|[[File:MKT Icon Point-boostticket2.png|50x50px]] | |||
|||||||||||||||||||||||||||||1||||||||||||||||1||||||||1||||||||||||||||||||||3 | |||
!rowspan=2|8 | |||
|-style=background:gold | |||
|||||||||||||||||||||||||||||||||||||||||||||||||||||5||||||||||||||||||||||5 | |||
|- | |||
!rowspan=2|[[File:MKT Icon Point-boostticket3.png|50x50px]] | |||
|||||||||||||||||||||||||||1||||||||||||||||1||||||||1||||||||||||||||||||||||3 | |||
!rowspan=2|8 | |||
|-style=background:gold | |||
|||||||||||||||||||||||||||||||||||||||||||||||||||5||||||||||||||||||||||||5 | |||
|- | |||
!rowspan=2 colspan=2|[[Level-boost ticket]]s | |||
|||||||||||||||||||||||||||||||||||||||||||||||||||||||||||||||||||||[[File:MKT Icon Level-boostticket1.png|30px]]||[[File:MKT Icon Level-boostticket4.png|30px]]||[[File:MKT Icon Level-boostticket7.png|30px]]||3 | |||
!rowspan=2|22 | |||
|-style=background:gold | |||
|||||||||||||||||[[File:MKT Icon Level-boostticket3.png|30px]]<br>(3)||[[File:MKT Icon Level-boostticket2.png|30px]]<br>(3)||[[File:MKT Icon Level-boostticket1.png|30px]]<br>(3)||||||[[File:MKT Icon Level-boostticket6.png|30px]]<br>(2)||[[File:MKT Icon Level-boostticket5.png|30px]]<br>(2)||[[File:MKT Icon Level-boostticket4.png|30px]]<br>(2)||||||||||||[[File:MKT Icon Level-boostticket9.png|30px]]||[[File:MKT Icon Level-boostticket8.png|30px]]||[[File:MKT Icon Level-boostticket7.png|30px]]||||||||||||||||||||[[File:MKT Icon Level-boostticket7.png|30px]]||||||||19 | |||
|} | |||
===2023+=== | |||
{|class="wikitable" style="margin:auto; text-align:center" | |||
|- | |||
![[File:MKT Icon GrandStar.png|20x20px]] 40 | |||
![[File:MKT Icon GrandStar.png|20x20px]] 80 | |||
|- | |||
|[[File:MKT Icon GoldRambiRider.png|75x75px]] | |||
|[[File:MKT Icon RambiRider.png|75x75px]] | |||
|- | |||
|style=background:gold|[[Gold Rambi Rider]] | |||
|style=background:gold|[[Rambi Rider]] | |||
|} | |||
<br> | |||
{|class="wikitable scrollable" style="margin:auto; text-align:center; font-size:90%" | |||
|- | |||
!Grand Stars!![[File:MKT Icon GrandStar.png|20x20px]]!!10!!20!!30!!40!!50!!60!!70!!80!!90!!100!!110!!120!!130!!140!!150!!160!!170!!180!!190!!200!!210!!220!!230!!240!!260!!280!!300!!320!!Total!!Grand total | |||
|- | |||
!rowspan=2 colspan=2|[[Pipe Cannon|Pipes]] | |||
|||[[File:MKT Icon Launch Pipe Green.png|20px]]<br>(10)||||||||||||[[File:MKT Icon Launch Pipe Green.png|20px]]||||||[[File:MKT Icon Launch Pipe Green.png|20px]]||||||||[[File:MKT Icon Launch Pipe Green.png|20px]]||||||||||||[[File:MKT Icon Launch Pipe Green.png|20px]]||||||||||||||||14 | |||
!rowspan=2|31 | |||
|-style=background:gold | |||
|||[[File:MKT Icon Launch Pipe Green.png|20px]]<br>(10)||||||[[File:MKT Icon Launch Pipe Green.png|20px]]||[[File:MKT Icon Launch Pipe Gold.png|20px]]||||||||||[[File:MKT Icon Launch Pipe Gold.png|20px]]||||||||[[File:MKT Icon Launch Pipe Green.png|20px]]||||[[File:MKT Icon Launch Pipe Green.png|20px]]||||||||[[File:MKT Icon Launch Pipe Green.png|20px]]||||||||[[File:MKT Icon Launch Pipe Green.png|20px]]||||||||17 | |||
|- | |||
!rowspan=2|[[Coin]]s | |||
!rowspan=2|[[File:MKT Icon Coins 2.png|50x50px]] | |||
|500||||||500||||1000||||||1000||||||||||||||||1000||||||||||||||||1000||||||||5000 | |||
!rowspan=2|15000 | |||
|-style=background:gold | |||
|5000||||||5000||||||||||||||||||||||||||||||||||||||||||||||||||10000 | |||
|- | |||
!rowspan=2|[[Ruby|Rubies]] | |||
!rowspan=2|[[File:MKT Icon 1Ruby.png|50x50px]] | |||
|10||||||5||||3||||||||||3||||||||||||||||||||||||||||||||||||21 | |||
!rowspan=2|56 | |||
|-style=background:gold | |||
|15||||||||||10||||||||||10||||||||||||||||||||||||||||||||||||35 | |||
|- | |||
!rowspan=2|[[Item ticket]]s | |||
!rowspan=2|[[File:MKT Icon ItemTicket.png|50x50px]] | |||
|||||5||||||||||||||||||||||||||5||||||||||||||||||||||||||10 | |||
!rowspan=2|30 | |||
|-style=background:gold | |||
|||||10||||||||||||||||||||||||||10||||||||||||||||||||||||||20 | |||
|- | |||
!rowspan=2|[[Star ticket]]s | |||
!rowspan=2|[[File:MKT Icon StarTicket.png|50x50px]] | |||
|||||||||2||||||||||3||||||||||||||||||||||||||||||||||||||5 | |||
!rowspan=2|5 | |||
|-style=background:gold | |||
|||||||||||||||||||||||||||||||||||||||||||||||||||||||||0 | |||
|- | |||
!rowspan=2|[[Quick ticket]]s | |||
!rowspan=2|[[File:MKT Icon QuickTicket.png|50x50px]] | |||
|||||||||||||1||||||||||||||||||||||||||||||||||||||||||||1 | |||
!rowspan=2|4 | |||
|-style=background:gold | |||
|||||||||||||3||||||||||||||||||||||||||||||||||||||||||||3 | |||
|- | |||
!rowspan=6|[[Point-boost ticket]]s | |||
!rowspan=2|[[File:MKT Icon Point-boostticket1.png|50x50px]] | |||
|||||||||||||||||||||||||||1||||||||||||1||||||||1||||||||||3 | |||
!rowspan=2|8 | |||
|-style=background:gold | |||
|||||||||||||||||||||||||||||||||||||||||||||||5||||||||||5 | |||
|- | |||
!rowspan=2|[[File:MKT Icon Point-boostticket2.png|50x50px]] | |||
|||||||||||||||||||||||||1||||||||||||1||||||||1||||||||||||3 | |||
!rowspan=2|8 | |||
|-style=background:gold | |||
|||||||||||||||||||||||||||||||||||||||||||||5||||||||||||5 | |||
|- | |||
!rowspan=2|[[File:MKT Icon Point-boostticket3.png|50x50px]] | |||
|||||||||||||||||||||||1||||||||||||1||||||||1||||||||||||||3 | |||
!rowspan=2|8 | |||
|-style=background:gold | |||
|||||||||||||||||||||||||||||||||||||||||||5||||||||||||||5 | |||
|- | |||
!rowspan=2 colspan=2|[[Level-boost ticket]]s | |||
|||||||||||||||||||||||||||||||||||||||||||||||||||[[File:MKT Icon Level-boostticket1.png|30px]]||[[File:MKT Icon Level-boostticket4.png|30px]]||[[File:MKT Icon Level-boostticket7.png|30px]]||3 | |||
!rowspan=2|22 | |||
|-style=background:gold | |||
|||||||||||||||[[File:MKT Icon Level-boostticket3.png|30px]]<br>(3)||[[File:MKT Icon Level-boostticket2.png|30px]]<br>(3)||[[File:MKT Icon Level-boostticket1.png|30px]]<br>(3)||||[[File:MKT Icon Level-boostticket6.png|30px]]<br>(2)||[[File:MKT Icon Level-boostticket5.png|30px]]<br>(2)||[[File:MKT Icon Level-boostticket4.png|30px]]<br>(2)||||||||[[File:MKT Icon Level-boostticket9.png|30px]]||[[File:MKT Icon Level-boostticket8.png|30px]]||[[File:MKT Icon Level-boostticket7.png|30px]]||||||||||||[[File:MKT Icon Level-boostticket7.png|30px]]||||||19 | |||
|} | |||
==New content== | ==New content== | ||
The following content was introduced during the tour's debut in 2022. | |||
===Cups=== | |||
<gallery> | |||
MKT Icon Chargin' Chuck Cup.png|[[Chargin' Chuck Cup]] | |||
</gallery> | |||
===Drivers=== | ===Drivers=== | ||
<gallery> | <gallery> | ||
MKT Artwork KitsuneLuigi.png|[[Tanooki Mario|Kitsune Luigi]] | |||
</gallery> | </gallery> | ||
====Mii Racing Suits==== | ====Mii Racing Suits==== | ||
<gallery> | |||
MKT Artwork MooMooMiiRacingSuit.png|[[Mii|Moo Moo Mii Racing Suit]] | |||
</gallery> | |||
===Karts=== | ===Karts=== | ||
<gallery> | |||
MKT Icon CamoTanookiKart.png|[[Camo Tanooki Kart]] | |||
MKT Icon GoldRambiRider.png|[[Gold Rambi Rider]] | |||
MKT Icon MooMooOffroader.png|[[Moo Moo Offroader]] | |||
</gallery> | |||
===Gliders=== | ===Gliders=== | ||
<gallery> | |||
MKT Icon AutumnLeaves.png|[[Autumn Leaves]] | |||
MKT Icon CalicoToeBeanBalloons.png|[[Calico Toe-Bean Balloons]] | |||
</gallery> | |||
===Balloon designs=== | |||
<gallery> | |||
MKT Icon BalloonCircleDonkeyKong.png|[[Donkey Kong]] Balloon | |||
</gallery> | |||
===Courses=== | ===Courses=== | ||
<gallery heights=50px> | |||
MKT Icon Riverside Park.png|[[GBA Riverside Park]] (N, R, T, R/T) | |||
<!-- | MKT Icon DK Mountain.png|[[GCN DK Mountain]] (N, R, T, R/T) | ||
</gallery> | |||
==Paid banners== | |||
{| align=center width=960px cellspacing=0 border=1 cellpadding=3 style="border-collapse:collapse; font-family:Arial; text-align:center" | |||
|-style="background: #ABC" | |||
!Name | |||
!Availability | |||
!Cost | |||
!Contents | |||
!Banner image | |||
|- | |||
|'''Value Pack''' | |||
|November 16, 2022 – November 29, 2022<br>November 15, 2023 – November 28, 2023 | |||
|US$1.99 | |||
|[[File:MKT Icon Ruby.png|30px]] [[Ruby|Rubies]] ×6<br> | |||
[[File:MKT Icon StarTicket.png|30px]] [[Star ticket]] ×2<br> | |||
[[File:MKT Icon ItemTicket.png|30px]] [[Item ticket]] ×3 | |||
|[[File:MKT ValuePack2.png|x150px]] | |||
|- | |||
|'''Driver Point-Boost Tickets 10 Ticket Set''' | |||
|November 16, 2022 – November 29, 2022<br>November 15, 2023 – November 28, 2023 | |||
|US$3.99 | |||
|[[File:MKT Icon Point-boostticket1.png|30px]] [[Point-boost ticket|Driver point-boost ticket]] ×10 | |||
|[[File:MKT Tour69 DriverPointBoostTickets10TicketSet.png|x150px]] | |||
|- | |||
|'''Celebrate the Animal Tour with the Moo Moo Offroader!''' | |||
|November 16, 2022 – November 29, 2022<br>November 15, 2023 – November 28, 2023 | |||
|US$3.99 | |||
|[[File:MKT Icon MooMooOffroader.png|30px]] [[Moo Moo Offroader]] ×1 | |||
|[[File:MKT Tour83 MooMooOffroaderPack.png|x150px]] | |||
|- | |||
|'''The Animal Tour brings the Calico Toe-Bean Balloons!''' | |||
|November 16, 2022 – November 29, 2022<br>November 15, 2023 – November 28, 2023 | |||
|US$3.99 | |||
|[[File:MKT Icon CalicoToeBeanBalloons.png|30px]] [[Calico Toe-Bean Balloons]] ×1 | |||
|[[File:MKT Tour83 CalicoToeBeanBalloonsPack.png|x150px]] | |||
|- | |||
|'''70 Rubies and Ticket Pack''' | |||
|November 16, 2022 – November 29, 2022<br>November 15, 2023 – November 28, 2023 | |||
|US$19.99 | |||
|[[File:MKT Icon Ruby 4.png|30px]] [[Ruby|Rubies]] ×70<br> | |||
[[File:MKT Icon Point-boostticket1.png|30px]] [[Point-boost ticket|Driver point-boost ticket]] ×5<br> | |||
[[File:MKT Icon StarTicket.png|30px]] [[Star ticket]] ×5<br> | |||
|[[File:MKT Tour80 70RubiesandTicketPack.png|x150px]] | |||
|- | |||
|'''150 Rubies and Ticket Pack''' | |||
|November 16, 2022 – November 29, 2022<br>November 15, 2023 – November 28, 2023 | |||
|US$39.99 | |||
|[[File:MKT Icon Ruby 5.png|30px]] [[Ruby|Rubies]] ×150<br> | |||
[[File:MKT Icon Point-boostticket1.png|30px]] [[Point-boost ticket|Driver point-boost ticket]] ×10<br> | |||
[[File:MKT Icon StarTicket.png|30px]] [[Star ticket]] ×10<br> | |||
|[[File:MKT Tour80 150RubiesandTicketPack.png|x150px]] | |||
|} | |||
==Challenges== | |||
{{MKT challenge table | |||
|TCR1=[[File:MKT Icon CoinRushTicket.png|70px]] [[Coin Rush ticket]] ×1 | |||
|T1.1=115 | |||
|T1.1E=Do 5 {{Color link|#A1A1FF|Rocket Start|Rocket Starts}}. | |||
|T1.1S=1 | |||
|T1.2=040 | |||
|T1.2E=Use 15 {{Color link|#A1A1FF|Mushroom|Mushrooms}}. | |||
|T1.2S=1 | |||
|T1.3=006 | |||
|T1.3E=Get a Fantastic combo a total of 5 times. | |||
|T1.3S=1 | |||
|T1.4=375 | |||
|T1.4E=Get 1 item from the Daily Selects section of the Shop. | |||
|T1.4S=2 | |||
|T1.5=338 | |||
|T1.5E=Get 3rd place or higher 30 times. | |||
|T1.5S=2 | |||
|T1.6=333 | |||
|T1.6E=Cause an opponent to crash while gliding. | |||
|T1.6S=2 | |||
|T1.7=036 | |||
|T1.7E=Glide a total distance of 5,000. | |||
|T1.7S=2 | |||
|T1.8=073 | |||
|T1.8E=Land a hit with a {{Color link|#A1A1FF|Blooper}}. | |||
|T1.8S=2 | |||
|T1.9=390 | |||
|T1.9E=Finish every course of every cup, including bonus challenges. | |||
|T1.9S=2 | |||
|TCR2=[[File:MKT Icon QuickTicket.png|70px]] [[Quick ticket]] ×1 | |||
|T2.1=068 | |||
|T2.1E=Land 3 hits with {{Color link|#A1A1FF|Green Shell|Green Shells}}. | |||
|T2.1S=1 | |||
|T2.2=175-1 | |||
|T2.2E=Land 5 hits with {{Color link|#A1A1FF|Red Shell|Red Shells}}. | |||
|T2.2S=1 | |||
|T2.3=005 | |||
|T2.3E=Drive a distance of 20,000 or more. | |||
|T2.3S=1 | |||
|T2.4=332 | |||
|T2.4E=Use {{Color link|#A1A1FF|point-boost ticket|point-boost tickets}} 3 times. | |||
|T2.4S=2 | |||
|T2.5=141 | |||
|T2.5E=Cause opponents to crash 5 times using a driver with a hat. | |||
|T2.5S=2 | |||
|T2.6=142 | |||
|T2.6E=Earn a score of 7,000 or higher on 3 T or R/T courses. | |||
|T2.6S=2 | |||
|T2.7=404 | |||
|T2.7E=Cause opponents to crash using a {{Color link|#A1A1FF|Mega Mushroom}}. | |||
|T2.7S=2 | |||
|T2.8=200 | |||
|T2.8E=Earn a total score of 15,000 or higher in the {{Color link|#A1A1FF|Pauline Cup}}. | |||
|T2.8S=2 | |||
|T2.9=337 | |||
|T2.9E=Race in auto mode. | |||
|T2.9S=2 | |||
|GCR=[[File:MKT Icon 1Ruby.png|70px]] [[Ruby|Rubies]] ×5 | |||
|G.1=332 | |||
|G.1E=Do a total of 5 {{Color link|#A1A1FF|Slipstream}} boosts. | |||
|G.1S=1 | |||
|G.2=069 | |||
|G.2E=Land 5 hits with {{Color link|#A1A1FF|Bob-omb|Bob-ombs}}. | |||
|G.2S=1 | |||
|G.3=333 | |||
|G.3E=Cause opponents to crash 3 times while gliding. | |||
|G.3S=1 | |||
|G.4=337 | |||
|G.4E=Use a {{Color link|#A1A1FF|points-cap ticket}}. | |||
|G.4S=2 | |||
|G.5=215 | |||
|G.5E=Activate {{Color link|#A1A1FF|Frenzy}} mode 5 times using a driver with a mustache. | |||
|G.5S=2 | |||
|G.6=338 | |||
|G.6E=Earn a score of 10,000 or higher on 5 courses. | |||
|G.6S=2 | |||
|G.7=111 | |||
|G.7E=Use {{Color link|#A1A1FF|Lightning}}. | |||
|G.7S=2 | |||
|G.8=160 | |||
|G.8E=Earn a total score of 15,000 or higher in the {{Color link|#A1A1FF|Diddy Kong Cup}}. | |||
|G.8S=2 | |||
|G.9=142 | |||
|G.9E=Complete {{Color link|#A1A1FF|Coin Rush (Mario Kart Tour)|Coin Rush}} 1 time. | |||
|G.9S=2 | |||
}} | |||
<br> | |||
{| align=center width=100% cellspacing=0 border=1 cellpadding=3 style="border-collapse:collapse; font-family:Arial; text-align:center" | |||
|- | |||
!colspan=3 style="background: #EEEEFF"|'''Premium Challenges''' | |||
|rowspan=13 style="border-top:1px solid #FFF; border-bottom:1px solid #FFF;" width=5%| | |||
!colspan=3 style="background: #EEEEFF"|'''Premium Challenges+''' | |||
|rowspan=13 style="border-top:1px solid #FFF; border-bottom:1px solid #FFF;" width=5%| | |||
!colspan=3 style="background: #EEEEFF"|'''Premium Challenges++''' | |||
|- | |||
|colspan=3 style="background: #EEEEFF"|'''Cost:''' US$4.99 | |||
|colspan=3 style="background: #EEEEFF"|'''Cost:''' US$9.99 | |||
|colspan=3 style="background: #EEEEFF"|'''Cost:''' US$19.99 | |||
|- | |||
|colspan=3 style="background: #EEEEFF"|'''Three in a row reward:''' [[File:MKT Icon Coins 2.png|70px]] [[Coin|Coins]] ×300 | |||
|colspan=3 style="background: #EEEEFF"|'''Three in a row reward:''' [[File:MKT Icon Coins 2.png|70px]] [[Coin|Coins]] ×300 | |||
|colspan=3 style="background: #EEEEFF"|'''Three in a row reward:''' [[File:MKT Icon Coins 2.png|70px]] [[Coin|Coins]] ×300 | |||
|- | |||
|colspan=3 style="background: #EEEEFF"|'''Completion reward:''' [[File:MKT Icon Launch Pipe Gold.png|70px]] Gold Pipe ×1 | |||
|colspan=3 style="background: #EEEEFF"|'''Completion reward:''' [[File:MKT Icon Launch Pipe Gold.png|70px]] Gold Pipe ×1 | |||
|colspan=3 style="background: #EEEEFF"|'''Completion reward:''' [[File:MKT Icon Launch Pipe Gold.png|70px]] Gold Pipe ×1 | |||
|-style="height: 80px" | |||
|width=10% style="background:linear-gradient(#F2E18F,#B9800F)"|[[File:MKT Icon Launch Pipe Green.png|70px]] | |||
|width=10% style="background:linear-gradient(#F2E18F,#B9800F)"|[[File:MKT Icon Launch Pipe Green.png|70px]] | |||
|width=10% style="background:linear-gradient(#F2E18F,#B9800F)"|[[File:MKT Icon Launch Pipe Green.png|70px]] | |||
|width=10% style="background:linear-gradient(#F2E18F,#B9800F)"|[[File:MKT Icon Launch Pipe Green.png|70px]] | |||
|width=10% style="background:linear-gradient(#F2E18F,#B9800F)"|[[File:MKT Icon Launch Pipe Gold.png|70px]] | |||
|width=10% style="background:linear-gradient(#F2E18F,#B9800F)"|[[File:MKT Icon Coins 3.png|70px]] | |||
|width=10% style="background:linear-gradient(#F2E18F,#B9800F)"|[[File:MKT Icon Launch Pipe Gold.png|70px]] | |||
|width=10% style="background:linear-gradient(#F2E18F,#B9800F)"|[[File:MKT Icon Ruby 2.png|70px]] | |||
|width=10% style="background:linear-gradient(#F2E18F,#B9800F)"|[[File:MKT Icon Coins 3.png|70px]] | |||
|-style="color: #FFF" | |||
|style="background:linear-gradient(#864D00,#A26000); border-top:1px solid #B9800F;"|Pipe ×1 | |||
|style="background:linear-gradient(#864D00,#A26000); border-top:1px solid #B9800F;"|Pipe ×1 | |||
|style="background:linear-gradient(#864D00,#A26000); border-top:1px solid #B9800F;"|Pipe ×1 | |||
|style="background:linear-gradient(#864D00,#A26000); border-top:1px solid #B9800F;"|Pipe ×1 | |||
|style="background:linear-gradient(#864D00,#A26000); border-top:1px solid #B9800F;"|Gold Pipe ×1 | |||
|style="background:linear-gradient(#864D00,#A26000); border-top:1px solid #B9800F;"|Coins ×5,000 | |||
|style="background:linear-gradient(#864D00,#A26000); border-top:1px solid #B9800F;"|Gold Pipe ×1 | |||
|style="background:linear-gradient(#864D00,#A26000); border-top:1px solid #B9800F;"|Rubies ×30 | |||
|style="background:linear-gradient(#864D00,#A26000); border-top:1px solid #B9800F;"|Coins ×10,000 | |||
|-style="color: #FFF" | |||
|style="background:linear-gradient(#A26000,#C88512); border-top:1px solid #A26000;"|''Land 5 hits with Green Shells.'' | |||
|style="background:linear-gradient(#A26000,#C88512); border-top:1px solid #A26000;"|''Land 5 hits with Bananas.'' | |||
|style="background:linear-gradient(#A26000,#C88512); border-top:1px solid #A26000;"|''Land 3 hits with Bob-ombs.'' | |||
|style="background:linear-gradient(#A26000,#C88512); border-top:1px solid #A26000;"|''Land 10 hits with Green Shells.'' | |||
|style="background:linear-gradient(#A26000,#C88512); border-top:1px solid #A26000;"|''Land 10 hits with Bananas.'' | |||
|style="background:linear-gradient(#A26000,#C88512); border-top:1px solid #A26000;"|''Use 10 Mushrooms.'' | |||
|style="background:linear-gradient(#A26000,#C88512); border-top:1px solid #A26000;"|''Land 10 hits with Red Shells.'' | |||
|style="background:linear-gradient(#A26000,#C88512); border-top:1px solid #A26000;"|''Start a new tour.'' | |||
|style="background:linear-gradient(#A26000,#C88512); border-top:1px solid #A26000;"|''Land 20 hits with Bananas.'' | |||
|-style="height: 80px" | |||
|width=10% style="background:linear-gradient(#F2E18F,#B9800F)"|[[File:MKT Icon Coins 3.png|70px]] | |||
|width=10% style="background:linear-gradient(#F2E18F,#B9800F)"|[[File:MKT Icon Ruby.png|70px]] | |||
|width=10% style="background:linear-gradient(#F2E18F,#B9800F)"|[[File:MKT Icon Point-boostticket1.png|70px]] | |||
|width=10% style="background:linear-gradient(#F2E18F,#B9800F)"|[[File:MKT Icon Point-boostticket1.png|70px]] | |||
|width=10% style="background:linear-gradient(#F2E18F,#B9800F)"|[[File:MKT Icon Ruby 2.png|70px]] | |||
|width=10% style="background:linear-gradient(#F2E18F,#B9800F)"|[[File:MKT Icon Points-capticket7.png|70px]] | |||
|width=10% style="background:linear-gradient(#F2E18F,#B9800F)"|[[File:MKT Icon Level-boostticket7.png|70px]] | |||
|width=10% style="background:linear-gradient(#F2E18F,#B9800F)"|[[File:MKT Icon Level-boostticket8.png|70px]] | |||
|width=10% style="background:linear-gradient(#F2E18F,#B9800F)"|[[File:MKT Icon Level-boostticket9.png|70px]] | |||
|-style="color: #FFF" | |||
|style="background:linear-gradient(#864D00,#A26000); border-top:1px solid #B9800F;"|{{Color link|#A1A1FF|Coins}} ×3,000 | |||
|style="background:linear-gradient(#864D00,#A26000); border-top:1px solid #B9800F;"|{{Color link|#A1A1FF|Ruby|Rubies}} ×10 | |||
|style="background:linear-gradient(#864D00,#A26000); border-top:1px solid #B9800F;"|{{Color link|#A1A1FF|Point-boost ticket}} (Driver) ×3 | |||
|style="background:linear-gradient(#864D00,#A26000); border-top:1px solid #B9800F;"|Point-boost ticket (Driver) ×5 | |||
|style="background:linear-gradient(#864D00,#A26000); border-top:1px solid #B9800F;"|Rubies ×20 | |||
|style="background:linear-gradient(#864D00,#A26000); border-top:1px solid #B9800F;"|{{Color link|#A1A1FF|Points-cap ticket}} (High-end driver) ×1 | |||
|style="background:linear-gradient(#864D00,#A26000); border-top:1px solid #B9800F;"|Level-boost ticket (High-End driver) ×2 | |||
|style="background:linear-gradient(#864D00,#A26000); border-top:1px solid #B9800F;"|Level-boost ticket (High-End kart) ×2 | |||
|style="background:linear-gradient(#864D00,#A26000); border-top:1px solid #B9800F;"|Level-boost ticket (High-End glider) ×2 | |||
|-style="color: #FFF" | |||
|style="background:linear-gradient(#A26000,#C88512); border-top:1px solid #A26000;"|''Do 20 Jump Boosts.'' | |||
|style="background:linear-gradient(#A26000,#C88512); border-top:1px solid #A26000;"|''Start a new tour.'' | |||
|style="background:linear-gradient(#A26000,#C88512); border-top:1px solid #A26000;"|''Do 50 Mini-Turbo boosts.'' | |||
|style="background:linear-gradient(#A26000,#C88512); border-top:1px solid #A26000;"|''Do 50 Jump Boosts.'' | |||
|style="background:linear-gradient(#A26000,#C88512); border-top:1px solid #A26000;"|''Start a new tour.'' | |||
|style="background:linear-gradient(#A26000,#C88512); border-top:1px solid #A26000;"|''Do 100 Mini-Turbo boosts.'' | |||
|style="background:linear-gradient(#A26000,#C88512); border-top:1px solid #A26000;"|''Land 5 hits with Bob-ombs.'' | |||
|style="background:linear-gradient(#A26000,#C88512); border-top:1px solid #A26000;"|''Do 100 Jump Boosts.'' | |||
|style="background:linear-gradient(#A26000,#C88512); border-top:1px solid #A26000;"|''Do 150 Mini-Turbo boosts.'' | |||
|-style="height: 80px" | |||
|width=10% style="background:linear-gradient(#F2E18F,#B9800F)"|[[File:MKT Icon Level-boostticket1.png|70px]] | |||
|width=10% style="background:linear-gradient(#F2E18F,#B9800F)"|[[File:MKT Icon Level-boostticket4.png|70px]] | |||
|width=10% style="background:linear-gradient(#F2E18F,#B9800F)"|[[File:MKT Icon Level-boostticket7.png|70px]] | |||
|width=10% style="background:linear-gradient(#F2E18F,#B9800F)"|[[File:MKT Icon Level-boostticket7.png|70px]] | |||
|width=10% style="background:linear-gradient(#F2E18F,#B9800F)"|[[File:MKT Icon Level-boostticket8.png|70px]] | |||
|width=10% style="background:linear-gradient(#F2E18F,#B9800F)"|[[File:MKT Icon Level-boostticket9.png|70px]] | |||
|width=10% style="background:linear-gradient(#F2E18F,#B9800F)"|[[File:MKT Icon Points-capticket7.png|70px]] | |||
|width=10% style="background:linear-gradient(#F2E18F,#B9800F)"|[[File:MKT Icon Points-capticket8.png|70px]] | |||
|width=10% style="background:linear-gradient(#F2E18F,#B9800F)"|[[File:MKT Icon Points-capticket9.png|70px]] | |||
|-style="color: #FFF" | |||
|style="background:linear-gradient(#864D00,#A26000); border-top:1px solid #B9800F;"|{{Color link|#A1A1FF|Level-boost ticket}} (Normal driver) ×1 | |||
|style="background:linear-gradient(#864D00,#A26000); border-top:1px solid #B9800F;"|Level-boost ticket (Super driver) ×1 | |||
|style="background:linear-gradient(#864D00,#A26000); border-top:1px solid #B9800F;"|Level-boost ticket (High-End driver) ×1 | |||
|style="background:linear-gradient(#864D00,#A26000); border-top:1px solid #B9800F;"|Level-boost ticket (High-End driver) ×1 | |||
|style="background:linear-gradient(#864D00,#A26000); border-top:1px solid #B9800F;"|Level-boost ticket (High-End kart) ×1 | |||
|style="background:linear-gradient(#864D00,#A26000); border-top:1px solid #B9800F;"|Level-boost ticket (High-End glider) ×1 | |||
|style="background:linear-gradient(#864D00,#A26000); border-top:1px solid #B9800F;"|Points-cap ticket (High-end driver) ×2 | |||
|style="background:linear-gradient(#864D00,#A26000); border-top:1px solid #B9800F;"|Points-cap ticket (High-end kart) ×2 | |||
|style="background:linear-gradient(#864D00,#A26000); border-top:1px solid #B9800F;"|Points-cap ticket (High-end glider) ×2 | |||
|-style="color: #FFF" | |||
|style="background:linear-gradient(#A26000,#C88512); border-top:1px solid #A26000;"|''Get 1st place 3 times.'' | |||
|style="background:linear-gradient(#A26000,#C88512); border-top:1px solid #A26000;"|''Get 1st place 5 times.'' | |||
|style="background:linear-gradient(#A26000,#C88512); border-top:1px solid #A26000;"|''Get 1st place 10 times.'' | |||
|style="background:linear-gradient(#A26000,#C88512); border-top:1px solid #A26000;"|''Get 1st place 5 times.'' | |||
|style="background:linear-gradient(#A26000,#C88512); border-top:1px solid #A26000;"|''Get 1st place 10 times.'' | |||
|style="background:linear-gradient(#A26000,#C88512); border-top:1px solid #A26000;"|''Get 1st place 15 times.'' | |||
|style="background:linear-gradient(#A26000,#C88512); border-top:1px solid #A26000;"|''Get 1st place 10 times.'' | |||
|style="background:linear-gradient(#A26000,#C88512); border-top:1px solid #A26000;"|''Get 1st place 15 times.'' | |||
|style="background:linear-gradient(#A26000,#C88512); border-top:1px solid #A26000;"|''Get 1st place 20 times.'' | |||
|} | |||
<br> | |||
{| align=center width=65% cellspacing=0 border=1 cellpadding=3 style="border-collapse:collapse; font-family:Arial; text-align:center" | |||
|- | |||
!colspan=3 style="background: #C3F84E"|'''Kart Pro Challenges''' | |||
|rowspan=9 style="border-top:1px solid #FFF; border-bottom:1px solid #FFF;" width=5%| | |||
!colspan=3 style="background: #C3F84E"|'''Tour Multiplayer Challenges''' | |||
|-style="color: #000" | |||
|colspan=3 style="background: #C3F84E"|'''Three in a row reward:''' [[File:MKT Icon Coins 2.png|60px]] [[Coin|Coins]] ×500 | |||
|colspan=3 style="background: #C3F84E"|'''Three in a row reward:''' [[File:MKT Icon Coins 2.png|60px]] Coins ×300 | |||
|-style="color: #000" | |||
|colspan=3 style="background: #C3F84E"|'''Completion reward:''' [[File:MKT Icon Ruby 2.png|70px]] [[Ruby|Rubies]] (depending on player's multiplayer grade) | |||
|colspan=3 style="background: #C3F84E"|'''Completion reward:''' [[File:MKT Icon 1Ruby.png|60px]] [[Ruby|Rubies]] ×5 | |||
|-style="color: #FFF" | |||
|width=10% style="background: #2F5D1C"|[[File:MKT 006PB.png|70px]]<br>[[File:MKT Icon 1Ruby.png|15px]] | |||
|width=10% style="background: #2F5D1C"|[[File:MKT 007PB.png|70px]]<br>[[File:MKT Icon 1Ruby.png|15px]] | |||
|width=10% style="background: #2F5D1C"|[[File:MKT 008PB.png|70px]]<br>[[File:MKT Icon 1Ruby.png|15px]] | |||
|width=10% style="background: #2F5D1C"|[[File:MKT 127CB.png|70px]]<br>[[File:MKT Icon GrandStar.png|15px]] | |||
|width=10% style="background: #2F5D1C"|[[File:MKT 049CB.png|70px]]<br>[[File:MKT Icon GrandStar.png|15px]] | |||
|width=10% style="background: #2F5D1C"|[[File:MKT 146CB.png|70px]]<br>[[File:MKT Icon GrandStar.png|15px]] | |||
|-style="color: #FFF" | |||
|style="background: #2F5D1C; border-top:1px solid #2F5D1C;"|''Play multiplayer.'' | |||
|style="background: #2F5D1C; border-top:1px solid #2F5D1C;"|''Play multiplayer 3 times.'' | |||
|style="background: #2F5D1C; border-top:1px solid #2F5D1C;"|''Play multiplayer 5 times.'' | |||
|style="background: #2F5D1C; border-top:1px solid #2F5D1C;"|''Land 3 hits with Green Shells in multiplayer.'' | |||
|style="background: #2F5D1C; border-top:1px solid #2F5D1C;"|''Land 3 hits with Bananas in multiplayer.'' | |||
|style="background: #2F5D1C; border-top:1px solid #2F5D1C;"|''Do 3 Rocket Starts in multiplayer{{sic}}'' | |||
|-style="color: #FFF" | |||
|width=10% style="background: #2F5D1C"|[[File:MKT 011PB.png|70px]]<br>[[File:MKT Icon 1Ruby.png|15px]] | |||
|width=10% style="background: #2F5D1C"|[[File:MKT 013PB.png|70px]]<br>[[File:MKT Icon 1Ruby.png|15px]] [[File:MKT Icon 1Ruby.png|15px]] [[File:MKT Icon 1Ruby.png|15px]] | |||
|width=10% style="background: #2F5D1C"|[[File:MKT 012PB.png|70px]]<br>[[File:MKT Icon 1Ruby.png|15px]] [[File:MKT Icon 1Ruby.png|15px]] | |||
|width=10% style="background: #2F5D1C"|[[File:MKT 041CB.png|70px]]<br>[[File:MKT Icon GrandStar.png|15px]] [[File:MKT Icon GrandStar.png|15px]] | |||
|width=10% style="background: #2F5D1C"|[[File:MKT 138CB.png|70px]]<br>[[File:MKT Icon GrandStar.png|15px]] [[File:MKT Icon GrandStar.png|15px]] | |||
|width=10% style="background: #2F5D1C"|[[File:MKT 210CB.png|70px]]<br>[[File:MKT Icon GrandStar.png|15px]] [[File:MKT Icon GrandStar.png|15px]] | |||
|-style="color: #FFF" | |||
|style="background: #2F5D1C; border-top:1px solid #2F5D1C;"|''Get 1 win in Kart Pro.'' | |||
|style="background: #2F5D1C; border-top:1px solid #2F5D1C;"|''Achieve a winning streak that includes 3 1st-place wins.'' | |||
|style="background: #2F5D1C; border-top:1px solid #2F5D1C;"|''Achieve a winning streak that includes 2 1st-place wins.'' | |||
|style="background: #2F5D1C; border-top:1px solid #2F5D1C;"|''Land 3 hits with Red Shells in multiplayer.'' | |||
|style="background: #2F5D1C; border-top:1px solid #2F5D1C;"|''Play multiplayer.'' | |||
|style="background: #2F5D1C; border-top:1px solid #2F5D1C;"|''Use the Bullet Bill item in multiplayer.'' | |||
|-style="color: #FFF" | |||
|width=10% style="background: #2F5D1C"|[[File:MKT 005PB.png|70px]]<br>[[File:MKT Icon 1Ruby.png|15px]] | |||
|width=10% style="background: #2F5D1C"|[[File:MKT 009PB.png|70px]]<br>[[File:MKT Icon 1Ruby.png|15px]] | |||
|width=10% style="background: #2F5D1C"|[[File:MKT 010PB.png|70px]]<br>[[File:MKT Icon 1Ruby.png|15px]] | |||
|width=10% style="background: #2F5D1C"|[[File:MKT 133CB.png|70px]]<br>[[File:MKT Icon GrandStar.png|15px]] [[File:MKT Icon GrandStar.png|15px]] | |||
|width=10% style="background: #2F5D1C"|[[File:MKT 119-2CB.png|70px]]<br>[[File:MKT Icon GrandStar.png|15px]] [[File:MKT Icon GrandStar.png|15px]] | |||
|width=10% style="background: #2F5D1C"|[[File:MKT 147CB.png|70px]]<br>[[File:MKT Icon GrandStar.png|15px]] [[File:MKT Icon GrandStar.png|15px]] | |||
|-style="color: #FFF" | |||
|style="background: #2F5D1C; border-top:1px solid #2F5D1C;"|''Play multiplayer 10 times.'' | |||
|style="background: #2F5D1C; border-top:1px solid #2F5D1C;"|''Get 3rd place or higher 3 times in multiplayer.'' | |||
|style="background: #2F5D1C; border-top:1px solid #2F5D1C;"|''Get 3rd place or higher 5 times in multiplayer.'' | |||
|style="background: #2F5D1C; border-top:1px solid #2F5D1C;"|''Do 50 Jump Boosts in multiplayer.'' | |||
|style="background: #2F5D1C; border-top:1px solid #2F5D1C;"|''Do 50 Mini-Turbo boosts in multiplayer.'' | |||
|style="background: #2F5D1C; border-top:1px solid #2F5D1C;"|''Cause opponents to crash 30 times in multiplayer.'' | |||
|} | |||
<br> | |||
{|class="wikitable" style="margin:auto; text-align:center" width=65% | |||
!colspan=2 width=30%|Total Points Challenge 1 (2022) | |||
|rowspan=8 style="border-top:1px solid #FFF; border-bottom:1px solid #FFF;" width=5%| | |||
!colspan=2 width=30%|Total Points Challenge 2 (2022) | |||
|- | |||
!Points | |||
!Rewards | |||
!Points | |||
!Rewards | |||
|- | |||
!400,000 | |||
|[[File:MKT Icon 1Ruby.png|20px]] [[Ruby|Rubies]] ×3<br> | |||
[[File:MKT Icon Point-boostticket1.png|30px]] [[Point-boost ticket]]s (driver) ×5<br> | |||
[[File:MKT Icon Point-boostticket2.png|30px]] Point-boost tickets (kart) ×5<br> | |||
[[File:MKT Icon Point-boostticket3.png|30px]] Point-boost tickets (glider) ×5 | |||
!999,999 | |||
|[[File:MKT Icon 1Ruby.png|20px]] [[Ruby|Rubies]] ×3<br> | |||
[[File:MKT Icon Point-boostticket1.png|30px]] Point-boost tickets (driver) ×5<br> | |||
[[File:MKT Icon Point-boostticket2.png|30px]] Point-boost tickets (kart) ×5<br> | |||
[[File:MKT Icon Point-boostticket3.png|30px]] Point-boost tickets (glider) ×5 | |||
|- | |||
!300,000 | |||
|[[File:MKT Icon Coins 3.png|30px]] [[Coin]]s ×1,000<br> | |||
[[File:MKT Icon ItemTicket.png|30px]] [[Item ticket]]s ×10<br> | |||
!900,000 | |||
|[[File:MKT Icon Coins 3.png|30px]] Coins ×1,000<br> | |||
[[File:MKT Icon ItemTicket.png|30px]] Item tickets ×10<br> | |||
|- | |||
!250,000 | |||
|[[File:MKT Icon Coins 3.png|30px]] Coins ×1,000<br> | |||
[[File:MKT Icon Points-capticket6.png|30px]] Points-cap ticket (Super glider) ×1 | |||
!800,000 | |||
|[[File:MKT Icon Coins 3.png|30px]] Coins ×1,000<br> | |||
[[File:MKT Icon Points-capticket9.png|30px]] Points-cap ticket (High-End glider) ×1 | |||
|- | |||
!200,000 | |||
|[[File:MKT Icon Coins 3.png|30px]] Coins ×1,000<br> | |||
[[File:MKT Icon Level-boostticket6.png|30px]] Level-boost ticket (Super glider) ×1 | |||
!700,000 | |||
|[[File:MKT Icon Coins 3.png|30px]] Coins ×1,000<br> | |||
[[File:MKT Icon Level-boostticket9.png|30px]] Level-boost ticket (High-End glider) ×1 | |||
|- | |||
!150,000 | |||
|[[File:MKT Icon Coins 3.png|30px]] Coins ×1,000<br> | |||
[[File:MKT Icon Points-capticket3.png|30px]] [[Points-cap ticket]] (Normal glider) ×1 | |||
!600,000 | |||
|[[File:MKT Icon Coins 3.png|30px]] Coins ×1,000<br> | |||
[[File:MKT Icon Points-capticket6.png|30px]] Points-cap ticket (Super glider) ×1 | |||
|- | |||
!100,000 | |||
|[[File:MKT Icon Coins 3.png|30px]] Coins ×1,000<br> | |||
[[File:MKT Icon Level-boostticket3.png|30px]] [[Level-boost ticket]] (Normal glider) ×1 | |||
!500,000 | |||
|[[File:MKT Icon Coins 3.png|30px]] Coins ×1,000<br> | |||
[[File:MKT Icon Level-boostticket6.png|30px]] Level-boost ticket (Super glider) ×1 | |||
|} | |||
<br> | |||
{|class="wikitable" style="margin:auto; text-align:center" width=65% | |||
!colspan=2 width=30%|Total Points Challenge 1 (2023) | |||
|rowspan=8 style="border-top:1px solid #FFF; border-bottom:1px solid #FFF;" width=5%| | |||
!colspan=2 width=30%|Total Points Challenge 2 (2023) | |||
|- | |||
!Points | |||
!Rewards | |||
!Points | |||
!Rewards | |||
|- | |||
!400,000 | |||
|[[File:MKT Icon 1Ruby.png|20px]] [[Ruby|Rubies]] ×3<br> | |||
[[File:MKT Icon Point-boostticket1.png|30px]] [[Point-boost ticket]]s (driver) ×5<br> | |||
[[File:MKT Icon Point-boostticket2.png|30px]] Point-boost tickets (kart) ×5<br> | |||
[[File:MKT Icon Point-boostticket3.png|30px]] Point-boost tickets (glider) ×5 | |||
!999,999 | |||
|[[File:MKT Icon 1Ruby.png|20px]] [[Ruby|Rubies]] ×3<br> | |||
[[File:MKT Icon Point-boostticket1.png|30px]] Point-boost tickets (driver) ×5<br> | |||
[[File:MKT Icon Point-boostticket2.png|30px]] Point-boost tickets (kart) ×5<br> | |||
[[File:MKT Icon Point-boostticket3.png|30px]] Point-boost tickets (glider) ×5 | |||
|- | |||
!300,000 | |||
|[[File:MKT Icon Coins 2.png|30px]] [[Coin]]s ×500<br> | |||
[[File:MKT Icon ItemTicket.png|30px]] [[Item ticket]]s ×10<br> | |||
[[File:MKT Icon StarTicket.png|30px]] [[Star ticket]]s ×3 | |||
!900,000 | |||
|[[File:MKT Icon Coins 2.png|30px]] Coins ×500<br> | |||
[[File:MKT Icon ItemTicket.png|30px]] Item tickets ×10<br> | |||
[[File:MKT Icon QuickTicket.png|30px]] Quick ticket ×1 | |||
|- | |||
!250,000 | |||
|[[File:MKT Icon Coins 2.png|30px]] Coins ×500<br> | |||
[[File:MKT Icon Points-capticket6.png|30px]] Points-cap ticket (Super glider) ×1<br> | |||
[[File:MKT Icon ItemTicket.png|30px]] Item tickets ×2 | |||
!800,000 | |||
|[[File:MKT Icon Coins 2.png|30px]] Coins ×500<br> | |||
[[File:MKT Icon Points-capticket9.png|30px]] Points-cap ticket (High-End glider) ×1<br> | |||
[[File:MKT Icon QuickTicket.png|30px]] Quick ticket ×1 | |||
|- | |||
!200,000 | |||
|[[File:MKT Icon Coins 2.png|30px]] Coins ×500<br> | |||
[[File:MKT Icon Level-boostticket6.png|30px]] Level-boost ticket (Super glider) ×1<br> | |||
[[File:MKT Icon ItemTicket.png|30px]] Item tickets ×2 | |||
!700,000 | |||
|[[File:MKT Icon Coins 2.png|30px]] Coins ×500<br> | |||
[[File:MKT Icon Level-boostticket9.png|30px]] Level-boost ticket (High-End glider) ×1<br> | |||
[[File:MKT Icon QuickTicket.png|30px]] Quick ticket ×1 | |||
|- | |||
!150,000 | |||
|[[File:MKT Icon Coins 2.png|30px]] Coins ×500<br> | |||
[[File:MKT Icon Points-capticket3.png|30px]] [[Points-cap ticket]] (Normal glider) ×1<br> | |||
[[File:MKT Icon ItemTicket.png|30px]] Item tickets ×2 | |||
!600,000 | |||
|[[File:MKT Icon Coins 2.png|30px]] Coins ×500<br> | |||
[[File:MKT Icon Points-capticket6.png|30px]] Points-cap ticket (Super glider) ×1<br> | |||
[[File:MKT Icon ItemTicket.png|30px]] Item tickets ×3 | |||
|- | |||
!100,000 | |||
|[[File:MKT Icon Coins 2.png|30px]] Coins ×500<br> | |||
[[File:MKT Icon Level-boostticket3.png|30px]] [[Level-boost ticket]] (Normal glider) ×1<br> | |||
[[File:MKT Icon ItemTicket.png|30px]] Item tickets ×2 | |||
!500,000 | |||
|[[File:MKT Icon Coins 2.png|30px]] Coins ×500<br> | |||
[[File:MKT Icon Level-boostticket6.png|30px]] Level-boost ticket (Super glider) ×1<br> | |||
[[File:MKT Icon ItemTicket.png|30px]] Item tickets ×3 | |||
|} | |||
==Gold Pipe== | |||
The Gold Pipe, including the All-Clear Pipe, randomly shoots out one of the following regular High-End items. The appearance rate can be viewed via the "Pipe content" link on the Gold Pass purchase screen. | |||
{|class="wikitable" style="margin:auto; text-align:center" | |||
!colspan=2|High-End items obtainable from Gold Pipes during the Battle Tour | |||
!Rate (each) | |||
|- | |||
!High-End drivers | |||
|[[Dry Bowser]], [[Metal Mario]], [[Pink Gold Peach]], [[Cat Mario|Cat Peach]], [[Tanooki Mario]], [[Pauline]], [[Princess Peach|Peach (Explorer)]], [[Nabbit]], [[Captain Toad]], [[King Bob-omb]], [[Fire Mario|Fire Rosalina]], [[Tanooki Mario|Tanooki Rosalina]], [[Kamek]], [[Peachette]], [[Yoshi (species)|Black Yoshi]], [[Yoshi (species)|White Yoshi]], [[Princess Peach|Peach (Wintertime)]], [[Cat Mario|Cat Rosalina]], [[Chargin' Chuck]], [[Toadette|Toadette (Explorer)]], [[Cat Mario|Cat Toad]], [[Wario|Wario (Cowboy)]], [[Birdo|Birdo (Black)]], [[Birdo|Birdo (White)]], [[Roving Racers|Gold Koopa (Freerunning)]], [[Penguin Mario|Penguin Luigi]], [[Shy Guy|Shy Guy (Pastry Chef)]], [[Dixie Kong]], [[Funky Kong]], [[Mario|Mario (Aviator)]], [[Toad|Toad (Party Time)]], [[Pauline|Pauline (Party Time)]], [[Bowser Jr.|Bowser Jr. (Pirate)]], [[Mario|Mario (Classic)]], [[Baby Peach|Baby Peach (Cherub)]], [[Princess Daisy|Daisy (Swimwear)]], [[Luigi|Luigi (Classic)]], [[Ice Mario (Super Mario Galaxy)|Ice Mario]], [[Princess Daisy|Daisy (Farmer)]], [[Mario|Mario (Racing)]], [[Lakitu|Lakitu (Party Time)]], [[Pauline|Pauline (Rose)]] | |||
|rowspan=3|0.5319% | |||
|- | |||
!High-End karts | |||
|[[B Dasher]], [[Badwagon]], [[Carrot Kart]], [[Cat Cruiser]], [[Prancer]], [[Sneeker]], [[Sports Coupe]], [[Circuit Special]], [[Bruiser]], [[Wild Wing]], [[Bumble V]], [[Steel Driver]], [[Goo-Goo Buggy]], [[Macharon]], [[Black B Dasher]], [[Black Circuit]], [[Queen Bee]], [[Gold Train]], [[Black Turbo Yoshi]], [[White Turbo Yoshi]], [[Radish Rider]], [[Inferno Flyer]], [[Wildfire Flyer]], [[Red B Dasher]], [[Platinum Taxi]], [[Glam Bruiser]], [[Wild Black]], [[Wild Pink]], [[Apple Kart]], [[Gilded Prancer]], [[Choco Macharon]], [[P-Wing (kart)|P-Wing]], [[Black Turbo Birdo]], [[White Turbo Birdo]], [[Snow Skimmer]], [[Green Apple Kart]], [[Poison Apple Kart]], [[Dragonfly]], [[Firefly]], [[Dozer Dasher]], [[Clanky Kart]], [[Rose Queen]], [[Banana Master]], [[Offroader]], [[Dreamy Egg]], [[Head Honcho]], [[Pink Wing]], [[Red Taxi]], [[Blue Soda]], [[Dark Buggy]], [[Koopa King]], [[Cact-X]], [[Sushi Racer]], [[Pirate Sushi Racer]], [[Silver Bullet Blaster]], [[Green Circuit]], [[Gilded King]], [[Crawly Kart]], [[Black Dozer]], [[Sunset Cloud]], [[Iron Cucumber]], [[Rose Taxi]], [[Cact-Ice]], [[B Dasher Mk. 2]], [[Sakura Quickshaw]], [[Jet Cruiser]], [[Pink Dozer]], [[Grand Badwagon]], [[Lime Tea Coupe]], [[Sunny Surf Sailer]], [[Kamek's Zoom Broom]], [[Black Cat Cruiser]], [[Cream Cat Cruiser]], [[Vampire Flyer]], [[White Snow Skimmer]], [[Gray Cat Cruiser]], [[Jukebox Buggy]], [[Green Lightning]], [[Cupid's Arrow]], [[Prop Kart]], [[Tropical Truck]] | |||
|- | |||
!High-End gliders | |||
|[[Swooper (glider)|Swooper]], [[Cloud Glider]], [[Gold Glider]], [[Pink Gold Paper Glider]], [[Bullet Bill Parachute]], [[Royal Parachute]], [[Dry Bowser Umbrella]], [[Rainy Balloons]], [[Blizzard Balloons]], [[Sunset Balloons]], [[Chocolate Banana Crêpe]], [[Strawberry Crêpe]], [[Wicked Wings]], [[Wonderful Wings]], [[Starchute]], [[Rainbow Starchute]], [[Silver Starchute]], [[Daisy Glider]], [[Butterfly Wings]], [[Butterfly Sunset]], [[Butterfly Prism]], [[Banana Wingtip]], [[Blooper Wingtip]], [[Meteor Balloons]], [[Crimson Crane]], [[Springtime Crane]], [[Pink Gold Meteors]], [[Chocolate Donut]], [[Strawberry Donut]], [[Heart Balloons]], [[Fireworks Parachute]], [[Great Sail]], [[Blizzard Parasol]], [[Black Great Sail]], [[Planet Glider]], [[Dragon Wings]], [[Black Toe-Bean Balloons]], [[Toe-Bean Balloons]], [[Ship's Wheel (glider)|Ship's Wheel]], [[Tropical Glider]], [[8-Bit Star]], [[Manta Glider]], [[Silver Bells]], [[Treasure Map]], [[Flybrary Book]], [[Cheep Cheep Masks]], [[Pretzel Glider]], [[Vampire Wings]], [[Dream Glider]], [[Silver Manta Glider]], [[Calico Parafoil]], [[Cat Parafoil]], [[Rose Parasol]], [[Black Cat Parafoil]], [[Snow Crystals]], [[Surf Master]], [[Silver Surf Master]], [[Starry Great Sail]], [[Tanooki Parafoil]], [[Candlelight Flight (glider)|Candlelight Flight]], [[Piranha Plant Balloons]], [[Candlelight Flight Cake]], [[Luigi Parafoil]], [[Sky-High Flyer]], [[Wicked Topaz]] | |||
|} | |||
==Mii Racing Suit Shop== | |||
{| class="wikitable" style="margin:auto; text-align:center" width=50% | |||
!colspan=3|Items available in Mii Racing Suit Shop (November 16, 2022 - November 29, 2022) | |||
|- | |||
|width=33%|[[File:MKT Artwork YellowMiiRacingSuit.png|80x80px]] | |||
|width=34%|[[File:MKT Artwork DryBonesMiiRacingSuit.png|80x80px]] | |||
|width=33%|[[File:MKT Artwork GreenMiiRacingSuit.png|80x80px]] | |||
|- | |||
![[Mii|Yellow Mii Racing Suit]]<br>[[File:MKT Icon 1Ruby.png|20px]] 100<br>Amount: 3 | |||
![[Mii|Dry Bones Mii Racing Suit]]<br>[[File:MKT Icon 1Ruby.png|20px]] 100<br>Amount: 3 | |||
![[Mii|Green Mii Racing Suit]]<br>[[File:MKT Icon 1Ruby.png|20px]] 100<br>Amount: 3 | |||
|- | |||
|[[File:MKT Artwork CheepCheepMiiRacingSuit.png|80x80px]] | |||
|[[File:MKT Artwork DolphinMiiRacingSuit.png|80x80px]] | |||
|[[File:MKT Artwork PeteyPiranhaMiiRacingSuit.png|80x80px]] | |||
|- | |||
![[Mii|Cheep Cheep Mii Racing Suit]]<br>[[File:MKT Icon 1Ruby.png|20px]] 100<br>Amount: 3 | |||
![[Mii|Dolphin Mii Racing Suit]]<br>[[File:MKT Icon 1Ruby.png|20px]] 100<br>Amount: 3 | |||
![[Mii|Petey Piranha Mii Racing Suit]]<br>[[File:MKT Icon 1Ruby.png|20px]] 100<br>Amount: 3 | |||
|- | |||
|[[File:MKT Artwork CatMiiRacingSuit.png|80x80px]] | |||
|[[File:MKT Artwork NabbitMiiRacingSuit.png|80x80px]] | |||
|[[File:MKT Artwork KingBobombMiiRacingSuit.png|80x80px]] | |||
|- | |||
![[Mii|Cat Mii Racing Suit]]<br>70 [[File:MKT Icon 1Ruby.png|20px]] [[ruby|rubies]] for 1st purchase;<br>100 rubies for 2nd and 3rd purchases respectively | |||
![[Mii|Nabbit Mii Racing Suit]]<br>[[File:MKT Icon 1Ruby.png|20px]] 100<br>Amount: 3 | |||
![[Mii|King Bob-omb Mii Racing Suit]]<br>[[File:MKT Icon 1Ruby.png|20px]] 100<br>Amount: 3 | |||
|} | |||
{| class="wikitable" style="margin:auto; text-align:center" width=50% | |||
!colspan=3|Items available in Mii Racing Suit Shop (November 15, 2023 - November 28, 2023) | |||
|- | |||
|width=33%|[[File:MKT Artwork KingBooMiiRacingSuit.png|80x80px]] | |||
|width=34%|[[File:MKT Artwork LarryMiiRacingSuit.png|80x80px]] | |||
|width=33%|[[File:MKT Artwork IggyMiiRacingSuit.png|80x80px]] | |||
|- | |||
![[Mii|King Boo Mii Racing Suit]]<br>[[File:MKT Icon 1Ruby.png|20px]] 100<br>Amount: 3 | |||
![[Mii|Larry Mii Racing Suit]]<br>[[File:MKT Icon 1Ruby.png|20px]] 100<br>Amount: 3 | |||
![[Mii|Iggy Mii Racing Suit]]<br>[[File:MKT Icon 1Ruby.png|20px]] 100<br>Amount: 3 | |||
|- | |||
|[[File:MKT Artwork KingBobombMiiRacingSuit.png|80x80px]] | |||
|[[File:MKT Artwork PeteyPiranhaMiiRacingSuit.png|80x80px]] | |||
|[[File:MKT Artwork SpikeMiiRacingSuit.png|80x80px]] | |||
|- | |||
![[Mii|King Bob-omb Mii Racing Suit]]<br>[[File:MKT Icon 1Ruby.png|20px]] 100<br>Amount: 3 | |||
![[Mii|Petey Piranha Mii Racing Suit]]<br>70 [[File:MKT Icon 1Ruby.png|20px]] [[ruby|rubies]] for 1st purchase;<br>100 rubies for 2nd and 3rd purchases respectively | |||
![[Mii|Spike Mii Racing Suit]]<br>[[File:MKT Icon 1Ruby.png|20px]] 100<br>Amount: 3 | |||
|- | |||
|[[File:MKT Artwork CatMiiRacingSuit.png|80x80px]] | |||
|[[File:MKT Artwork DolphinMiiRacingSuit.png|80x80px]] | |||
|[[File:MKT Artwork BlueMiiRacingSuit.png|80x80px]] | |||
|- | |||
![[Mii|Cat Mii Racing Suit]]<br>[[File:MKT Icon 1Ruby.png|20px]] 100<br>Amount: 3 | |||
![[Mii|Dolphin Mii Racing Suit]]<br>[[File:MKT Icon 1Ruby.png|20px]] 100<br>Amount: 3 | |||
![[Mii|Blue Mii Racing Suit]]<br>[[File:MKT Icon 1Ruby.png|20px]] 100<br>Amount: 3 | |||
|} | |||
==Token Shop== | |||
The limited-time event where [[event token]]s appear began on November 16, 2022 and ended on November 29, 2022. Event tokens could be earned by causing opponents to crash. | |||
{| class="wikitable" style="margin:auto; text-align:center" width=50% | |||
!colspan=3|'''Token Shop''' (November 16, 2022 - November 29, 2022) | |||
|- | |||
|width=33%|[[File:MKT Icon Launch Pipe Green.png|70px]] | |||
|width=34%|[[File:MKT Icon 1Ruby.png|55px]] | |||
|width=33%|[[File:MKT Icon Coins 2.png|80px]] | |||
|- | |||
!Pipe<br>[[File:MKT Icon Eventtoken.png|20px]] 20-500<br>Amount: 34 | |||
![[Ruby]] ×3<br>[[File:MKT Icon Eventtoken.png|20px]] 15<br>Amount: 5 | |||
![[Coin]] ×500<br>[[File:MKT Icon Eventtoken.png|20px]] 15<br>Amount: 5 | |||
|- | |||
|width=33%|[[File:MKT Icon BalloonCircleDonkeyKong.png|60px]] | |||
|width=33%|[[File:MKT Icon Level-boostticket3.png|70px]] | |||
|width=33%|[[File:MKT Icon Level-boostticket6.png|70px]] | |||
|- | |||
![[Donkey Kong]] Balloon<br>[[File:MKT Icon Eventtoken.png|20px]] 100<br>Amount: 1 | |||
![[Level-boost ticket]] (Normal)<br>[[File:MKT Icon Eventtoken.png|20px]] 50<br>Amount: 3 | |||
![[Level-boost ticket]] (Super)<br>[[File:MKT Icon Eventtoken.png|20px]] 100<br>Amount: 2 | |||
|} | |||
==Tier Shop== | |||
The shop features a variety of set and randomized items available for purchase. The item slots in the shop are unlocked based on the highest tier of players. | |||
{| class="wikitable" style="margin:auto; text-align:center" width=50% | |||
!colspan=3|Items available in Tier Shop (November 16, 2022 - November 29, 2022) | |||
|- | |||
|[[File:MKT Icon Level-boostticket1.png|80px]] | |||
|[[File:MKT Icon Level-boostticket2.png|80px]] | |||
|[[File:MKT Icon Level-boostticket3.png|80px]] | |||
|- | |||
![[Level-boost ticket]] (Normal)<br>[[File:MKT Icon Coin.png|20px]] 1,000<br>Amount: 3 per week | |||
!Level-boost ticket (Normal)<br>[[File:MKT Icon Coin.png|20px]] 800<br>Amount: 3 per week | |||
!Level-boost ticket (Normal)<br>[[File:MKT Icon Coin.png|20px]] 800<br>Amount: 3 per week | |||
|- | |||
|[[File:MKT Icon Level-boostticket4.png|80px]]<br>OR<br>[[File:MKT Icon Level-boostticket7.png|80px]] | |||
|[[File:MKT Icon Level-boostticket5.png|80px]]<br>OR<br>[[File:MKT Icon Level-boostticket8.png|80px]] | |||
|[[File:MKT Icon Level-boostticket6.png|80px]]<br>OR<br>[[File:MKT Icon Level-boostticket9.png|80px]] | |||
|- | |||
!Level-boost ticket (Super)<br>[[File:MKT Icon Coin.png|20px]] 4,000<br>Amount: 2 per week<br>OR<br>Level-boost ticket (High-End)<br>[[File:MKT Icon Coin.png|20px]] 15,000<br>Amount: 1 per week | |||
!Level-boost ticket (Super)<br>[[File:MKT Icon Coin.png|20px]] 3,000<br>Amount: 2 per week<br>OR<br>Level-boost ticket (High-End)<br>[[File:MKT Icon Coin.png|20px]] 13,000<br>Amount: 1 per week | |||
!Level-boost ticket (Super)<br>[[File:MKT Icon Coin.png|20px]] 3,000<br>Amount: 2 per week<br>OR<br>Level-boost ticket (High-End)<br>[[File:MKT Icon Coin.png|20px]] 13,000<br>Amount: 1 per week | |||
|- | |||
|[[File:MKT Icon Points-capticket1.png|80px]]<br>OR<br>[[File:MKT Icon Points-capticket2.png|80px]]<br>OR<br>[[File:MKT Icon Points-capticket3.png|80px]] | |||
|[[File:MKT Icon Points-capticket4.png|80px]]<br>OR<br>[[File:MKT Icon Points-capticket5.png|80px]]<br>OR<br>[[File:MKT Icon Points-capticket6.png|80px]] | |||
|[[File:MKT Icon Points-capticket7.png|80px]]<br>OR<br>[[File:MKT Icon Points-capticket8.png|80px]]<br>OR<br>[[File:MKT Icon Points-capticket9.png|80px]] | |||
|- | |||
![[Points-cap ticket]] (Normal)<br>[[File:MKT Icon Coin.png|20px]] 2,000<br>Amount: 1 per week | |||
!Points-cap ticket (Super)<br>[[File:MKT Icon Coin.png|20px]] 5,000<br>Amount: 1 per week | |||
!Points-cap ticket (High-End)<br>[[File:MKT Icon Coin.png|20px]] 20,000<br>Amount: 1 per week | |||
|- | |||
|[[File:MKT Icon Level-boostticket9.png|80px]] | |||
|[[File:MKT Icon Level-boostticket8.png|80px]] | |||
|[[File:MKT Icon Level-boostticket7.png|80px]] | |||
|- | |||
!Level-boost ticket (High-End)<br>[[File:MKT Icon Coin.png|20px]] 13,000<br>Amount: 1 per week | |||
!Level-boost ticket (High-End)<br>[[File:MKT Icon Coin.png|20px]] 13,000<br>Amount: 1 per week | |||
!Level-boost ticket (High-End)<br>[[File:MKT Icon Coin.png|20px]] 15,000<br>Amount: 1 per week | |||
|} | |||
==Gallery== | |||
<gallery> | |||
MKT_Animal_Tour_Landscape.png|Landscape version of the loading screen | |||
</gallery> | |||
==Names in other languages== | |||
{{foreign names | |||
|Jpn=アニマルツアー | |||
|JpnR=Animaru Tsuā | |||
|JpnM=Animal Tour | |||
|ChiS=动物巡回赛 | |||
|ChiSR=Dòngwù Xúnhuí sài | |||
|ChiSM=Animal Tour | |||
|ChiT=動物巡迴賽 | |||
|ChiTR=Dòngwù Xúnhuí sài | |||
|ChiTM=Animal Tour | |||
|Fre=Saison des animaux | |||
|FreM=Animals' Season | |||
|Ger=Tour-Saison Tiere | |||
|GerM=Tour Season Animals | |||
|Ita=Tour animale | |||
|ItaM=Animal Tour | |||
|Kor=애니멀 투어 | |||
|KorR=Aenimeol Tueo | |||
|KorM=Animal Tour | |||
|Por=Temporada Animal | |||
|PorM=Animal Season | |||
|Spa=Temporada de animales | |||
|SpaM=Season of animals | |||
}} | |||
==Notes== | |||
*When this tour was announced to be rerun, Choco Mountain R/T was erroneously listed as Choco Mountain R in the English version of the trailer.<ref>Nintendo Mobile (October 13, 2023). [https://youtu.be/-ee0wS69bYI Mario Kart Tour - Halloween Tour Trailer]. ''YouTube''. Retrieved October 15, 2023.</ref> | |||
==References== | |||
<references/> | |||
{{MKT}} | {{MKT}} | ||
[[Category:Mario Kart Tour tours]] | [[Category:Mario Kart Tour tours]] | ||
[[it:Tour animale]] | |||
Latest revision as of 13:49, February 2, 2025
| Animal Tour | |
|---|---|

| |
| Start date | November 15, 2022 November 14, 2023 November 12, 2024 10:00 p.m. (PT)[?] |
| End date | November 29, 2022 November 28, 2023 November 26, 2024 9:59 p.m. (PT)[?] |
| Number of cups | 15 |
| Ranked cups | Monty Mole Cup (week 1) Chargin' Chuck Cup (week 2) |
| Coin Rush course | GCN Dino Dino Jungle |
| << List of tours >> | |
The Animal Tour was the eighty-third tour of Mario Kart Tour, which began on November 16, 2022 and ended on November 29, 2022. It was rerun from November 15, 2023 to November 28, 2023 as the game's hundred-and-ninth tour, and was rerun again from November 13, 2024 to November 26, 2024 as the hundred-and-thirty-fifth tour.
This tour introduced Kitsune Luigi from Super Mario 3D Land as a new driver, as well as a Moo Moo-themed Mii Racing Suit, which players could retrieve by placing high in the tour's ranked cups. Like the Sky Tour, players could also earn Light-blue Shy Guy for placing high in the ranked cups.
This tour also introduced DK Mountain from Mario Kart: Double Dash!! and Riverside Park from Mario Kart: Super Circuit (the latter of which made its series debut as a classic course). Various other animal-themed drivers, karts, and gliders were also featured and introduced. This was the first tour since the introduction of Battle Mode in the Battle Tour to not introduce any new battle courses. The Chargin' Chuck Cup debuted in this tour, making this the first tour to introduce a new cup since the 2022 Cat Tour twelve tours prior, even though Chargin' Chuck had been playable since the 2022 Los Angeles Tour and had been available in regular pipes since the May 2022 Peach vs. Bowser Tour.
This tour's Coin Rush course was GCN Dino Dino Jungle, which was reused from the Hammer Bro Tour and the 2021 Autumn Tour. The menu's background featured the volcano from DK Mountain as the landmark for this tour.
Starting in this tour, weekly spotlight items can appear as daily spotlights in the week opposite to the one in which they appear as a weekly spotlight.
Spotlight Shop[edit]
| Week 1 banner items November 15, 2022, 10:00 p.m. (PT) – November 22, 2022, 9:59 p.m. (PT) November 14, 2023, 10:00 p.m. (PT) – November 21, 2023, 9:59 p.m. (PT) | ||||
| Item type | Name | Cost | Contents | Banner image |
|---|---|---|---|---|
| Driver | Tanooki Mario | 150 Amount: 3 |
 Tanooki Mario ×1 |

|
| Kart | Tanooki Kart | 100 Amount: 3 |
Tanooki Kart ×1 |

|
| Week 2 banner items November 22, 2022, 10:00 p.m. (PT) – November 29, 2022, 9:59 p.m. (PT) November 21, 2023, 10:00 p.m. (PT) – November 28, 2023, 9:59 p.m. (PT) | ||||
| Item type | Name | Cost | Contents | Banner image |
| Driver | Kitsune Luigi | 150 Amount: 3 |
 Kitsune Luigi ×1 |

|
| Kart | Camo Tanooki Kart | 100 Amount: 3 |
Camo Tanooki Kart ×1 |

|
| Glider | Autumn Leaves | 100 Amount: 3 |
Autumn Leaves ×1 |

|
Daily Spotlight[edit]
The Daily Spotlight contains a mixture of items themed around the tour, items that have ranked tracks as favorites, and gold items. The rates listed are specific for that type of item; drivers, karts, and gliders are selected separately. Items marked with an asterisk (*) do not appear in the Daily Spotlight during the week they are available as Spotlight Shop banner items.
Cups[edit]
Monty Mole Cup Ranked cup (week 1) |
GCN DK Mountain |
GCN Dino Dino Jungle R/T |
GBA Riverside Park R |
Goomba Takedown | ||||
 RMX Bowser's Castle 1 |
Birdo (Light Blue) | |||||||
Mii Cup |
GBA Battle Course 1 (Balloon Battle) |
GCN Yoshi Circuit T |
RMX Bowser's Castle 1 |
Do Jump Boosts | ||||
 GCN Dino Dino Jungle |
Morton | |||||||
Chargin' Chuck Cup Ranked cup (week 2) |
N64 Choco Mountain R/T |
GBA Riverside Park T |
GCN DK Mountain R/T |
Glider Challenge | ||||
 3DS Rock Rock Mountain |
Baby Luigi | |||||||
Kamek Cup |
GCN Baby Park |
3DS Piranha Plant Slide T |
N64 Yoshi Valley R |
Ring Race | ||||
 GCN DK Mountain |
Diddy Kong | |||||||
Nabbit Cup |
3DS Rock Rock Mountain |
GCN Cookie Land (Balloon Battle) |
GCN Dino Dino Jungle |
Time Trial | ||||
 N64 Yoshi Valley R |
Boomerang Bro | |||||||
Baby Rosalina Cup |
GBA Sky Garden R |
Wii Mushroom Gorge T |
GCN Yoshi Circuit R |
Steer Clear of Obstacles | ||||
 GCN Dino Dino Jungle |
Dry Bones | |||||||
Dry Bowser Cup |
GBA Riverside Park |
N64 Choco Mountain T |
3DS Piranha Plant Slide R |
Big Reverse Race | ||||
 GCN Yoshi Circuit |
Any character | |||||||
Waluigi Cup |
N64 Yoshi Valley T |
GCN DK Mountain R |
GCN Baby Park T |
Snap a Photo | ||||
 GBA Riverside Park T |
Tanooki Mario | |||||||
Roy Cup |
GCN Dino Dino Jungle R |
3DS Rock Rock Mountain T |
GBA Battle Course 1 (Balloon Battle) |
Combo Attack | ||||
 3DS Piranha Plant Slide T |
Luigi | |||||||
King Boo Cup |
GBA Sky Garden T |
RMX Bowser's Castle 1R |
Wii Mushroom Gorge |
Ring Race | ||||
 GCN Baby Park |
Baby Peach | |||||||
Diddy Kong Cup |
GCN Yoshi Circuit R/T |
GBA Riverside Park R/T |
3DS Rock Rock Mountain R |
Steer Clear of Obstacles | ||||
 GBA Sky Garden |
Mario | |||||||
Pauline Cup |
3DS Piranha Plant Slide |
GCN Baby Park R |
N64 Choco Mountain |
Smash Small Dry Bones | ||||
 Wii Mushroom Gorge |
Toad (Pit Crew) | |||||||
Fire Bro Cup |
RMX Bowser's Castle 1T |
GCN Yoshi Circuit |
GCN Dino Dino Jungle T |
Time Trial | ||||
 N64 Choco Mountain |
Roy | |||||||
Baby Daisy Cup |
GBA Sky Garden |
N64 Yoshi Valley |
GCN Cookie Land (Balloon Battle) |
Break Item Boxes | ||||
 3DS Rock Rock Mountain |
Peach | |||||||
Hammer Bro Cup |
N64 Choco Mountain R |
Wii Mushroom Gorge R |
GCN DK Mountain T |
Take them out quick! | ||||
 GBA Riverside Park |
Yoshi | |||||||
Today's Challenge[edit]
Players' most recently used kart and glider are chosen, and favorite and favored ones have extra priority. Opponents are arranged randomly. On day 1 of this tour, players finish a balloon battle in GBA Battle Course 1 in the Mii Cup using the Cat Mii Racing Suit for a free pipe launch. Starting from day 2, players have to finish a race in the earliest incomplete course that is not in any of the ranked cups using the driver shown on the course's thumbnail every day to obtain the corresponding reward in the table below. Once all of the courses are completed, the courses are selected at random.
The badge for this tour's Today's Challenge is reused from the 2021 Autumn Tour.
| Day(s) | Reward |
| 1-13 | Free pipe launch |
|---|---|
| 14 |  Badge |
| Today's Challenge Pipe | |

| |
| Pipe contents | |
| Rubies, coins, driver (Normal/Super/High-End), kart (Normal/Super/High-End), glider (Normal/Super/High-End), item tickets | |
Rewards[edit]
Gold cells indicate rewards that are exclusive to Gold Pass members.
2022[edit]
| Gold Rambi Rider | Rambi Rider |
| Grand Stars | 15 | 20 | 25 | 30 | 35 | 40 | 45 | 50 | 55 | 60 | 65 | 70 | 80 | 90 | 100 | 110 | 120 | 130 | 140 | 150 | 160 | 170 | 180 | 190 | 200 | 210 | 220 | 230 | 240 | 250 | 260 | 270 | 280 | 290 | 300 | 310 | 320 | Total | Grand total | |
|---|---|---|---|---|---|---|---|---|---|---|---|---|---|---|---|---|---|---|---|---|---|---|---|---|---|---|---|---|---|---|---|---|---|---|---|---|---|---|---|---|
| Pipes | 10 | 26 | ||||||||||||||||||||||||||||||||||||||
| 16 | ||||||||||||||||||||||||||||||||||||||||
| Coins | 500 | 500 | 500 | 500 | 500 | 500 | 500 | 500 | 500 | 500 | 5000 | 15000 | ||||||||||||||||||||||||||||
| 5000 | 5000 | 10000 | ||||||||||||||||||||||||||||||||||||||
| Rubies | 10 | 5 | 3 | 3 | 21 | 56 | ||||||||||||||||||||||||||||||||||
| 15 | 10 | 10 | 35 | |||||||||||||||||||||||||||||||||||||
| Item tickets | 5 | 5 | 10 | 30 | ||||||||||||||||||||||||||||||||||||
| 10 | 10 | 20 | ||||||||||||||||||||||||||||||||||||||
| Star tickets | 2 | 3 | 5 | 5 | ||||||||||||||||||||||||||||||||||||
| 0 | ||||||||||||||||||||||||||||||||||||||||
| Quick tickets | 1 | 1 | 4 | |||||||||||||||||||||||||||||||||||||
| 3 | 3 | |||||||||||||||||||||||||||||||||||||||
| Point-boost tickets | 1 | 1 | 1 | 3 | 8 | |||||||||||||||||||||||||||||||||||
| 5 | 5 | |||||||||||||||||||||||||||||||||||||||
| 1 | 1 | 1 | 3 | 8 | ||||||||||||||||||||||||||||||||||||
| 5 | 5 | |||||||||||||||||||||||||||||||||||||||
| 1 | 1 | 1 | 3 | 8 | ||||||||||||||||||||||||||||||||||||
| 5 | 5 | |||||||||||||||||||||||||||||||||||||||
| Level-boost tickets | 3 | 22 | ||||||||||||||||||||||||||||||||||||||
(3) |
(3) |
(3) |
(2) |
(2) |
(2) |
19 | ||||||||||||||||||||||||||||||||||
2023+[edit]
| Gold Rambi Rider | Rambi Rider |
| Grand Stars | 10 | 20 | 30 | 40 | 50 | 60 | 70 | 80 | 90 | 100 | 110 | 120 | 130 | 140 | 150 | 160 | 170 | 180 | 190 | 200 | 210 | 220 | 230 | 240 | 260 | 280 | 300 | 320 | Total | Grand total | |
|---|---|---|---|---|---|---|---|---|---|---|---|---|---|---|---|---|---|---|---|---|---|---|---|---|---|---|---|---|---|---|---|
| Pipes | (10) |
14 | 31 | ||||||||||||||||||||||||||||
(10) |
17 | ||||||||||||||||||||||||||||||
| Coins | 500 | 500 | 1000 | 1000 | 1000 | 1000 | 5000 | 15000 | |||||||||||||||||||||||
| 5000 | 5000 | 10000 | |||||||||||||||||||||||||||||
| Rubies | 10 | 5 | 3 | 3 | 21 | 56 | |||||||||||||||||||||||||
| 15 | 10 | 10 | 35 | ||||||||||||||||||||||||||||
| Item tickets | 5 | 5 | 10 | 30 | |||||||||||||||||||||||||||
| 10 | 10 | 20 | |||||||||||||||||||||||||||||
| Star tickets | 2 | 3 | 5 | 5 | |||||||||||||||||||||||||||
| 0 | |||||||||||||||||||||||||||||||
| Quick tickets | 1 | 1 | 4 | ||||||||||||||||||||||||||||
| 3 | 3 | ||||||||||||||||||||||||||||||
| Point-boost tickets | 1 | 1 | 1 | 3 | 8 | ||||||||||||||||||||||||||
| 5 | 5 | ||||||||||||||||||||||||||||||
| 1 | 1 | 1 | 3 | 8 | |||||||||||||||||||||||||||
| 5 | 5 | ||||||||||||||||||||||||||||||
| 1 | 1 | 1 | 3 | 8 | |||||||||||||||||||||||||||
| 5 | 5 | ||||||||||||||||||||||||||||||
| Level-boost tickets | 3 | 22 | |||||||||||||||||||||||||||||
(3) |
(3) |
(3) |
(2) |
(2) |
(2) |
19 | |||||||||||||||||||||||||
New content[edit]
The following content was introduced during the tour's debut in 2022.
Cups[edit]
Drivers[edit]
Mii Racing Suits[edit]

Karts[edit]
Gliders[edit]
Balloon designs[edit]
Donkey Kong Balloon
Courses[edit]

GBA Riverside Park (N, R, T, R/T)
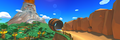
GCN DK Mountain (N, R, T, R/T)
Paid banners[edit]
| Name | Availability | Cost | Contents | Banner image |
|---|---|---|---|---|
| Value Pack | November 16, 2022 – November 29, 2022 November 15, 2023 – November 28, 2023 |
US$1.99 |
|

|
| Driver Point-Boost Tickets 10 Ticket Set | November 16, 2022 – November 29, 2022 November 15, 2023 – November 28, 2023 |
US$3.99 | 
| |
| Celebrate the Animal Tour with the Moo Moo Offroader! | November 16, 2022 – November 29, 2022 November 15, 2023 – November 28, 2023 |
US$3.99 | 
| |
| The Animal Tour brings the Calico Toe-Bean Balloons! | November 16, 2022 – November 29, 2022 November 15, 2023 – November 28, 2023 |
US$3.99 | 
| |
| 70 Rubies and Ticket Pack | November 16, 2022 – November 29, 2022 November 15, 2023 – November 28, 2023 |
US$19.99 | 
| |
| 150 Rubies and Ticket Pack | November 16, 2022 – November 29, 2022 November 15, 2023 – November 28, 2023 |
US$39.99 |
|

|
Challenges[edit]
| Tour Challenges 1 | Tour Challenges 2 | Gold Challenges | ||||||||
|---|---|---|---|---|---|---|---|---|---|---|
| Completion reward: |
Completion reward: |
Completion reward: | ||||||||
 |
 |
 |
 |
 |
 |
 |
 |
 | ||
| Do 5 Rocket Starts. | Use 15 Mushrooms. | Get a Fantastic combo a total of 5 times. | Land 3 hits with Green Shells. | Land 5 hits with Red Shells. | Drive a distance of 20,000 or more. | Do a total of 5 Slipstream boosts. | Land 5 hits with Bob-ombs. | Cause opponents to crash 3 times while gliding. | ||
 |
 |
 |
 |
 |
 |
 |
 |
 | ||
| Get 1 item from the Daily Selects section of the Shop. | Get 3rd place or higher 30 times. | Cause an opponent to crash while gliding. | Use point-boost tickets 3 times. | Cause opponents to crash 5 times using a driver with a hat. | Earn a score of 7,000 or higher on 3 T or R/T courses. | Use a points-cap ticket. | Activate Frenzy mode 5 times using a driver with a mustache. | Earn a score of 10,000 or higher on 5 courses. | ||
 |
 |
 |
 |
 |
 |
 |
 |
 | ||
| Glide a total distance of 5,000. | Land a hit with a Blooper. | Finish every course of every cup, including bonus challenges. | Cause opponents to crash using a Mega Mushroom. | Earn a total score of 15,000 or higher in the Pauline Cup. | Race in auto mode. | Use Lightning. | Earn a total score of 15,000 or higher in the Diddy Kong Cup. | Complete Coin Rush 1 time. | ||
| Premium Challenges | Premium Challenges+ | Premium Challenges++ | ||||||||
|---|---|---|---|---|---|---|---|---|---|---|
| Cost: US$4.99 | Cost: US$9.99 | Cost: US$19.99 | ||||||||
| Three in a row reward: |
Three in a row reward: |
Three in a row reward: | ||||||||
| Completion reward: |
Completion reward: |
Completion reward: | ||||||||
| Pipe ×1 | Pipe ×1 | Pipe ×1 | Pipe ×1 | Gold Pipe ×1 | Coins ×5,000 | Gold Pipe ×1 | Rubies ×30 | Coins ×10,000 | ||
| Land 5 hits with Green Shells. | Land 5 hits with Bananas. | Land 3 hits with Bob-ombs. | Land 10 hits with Green Shells. | Land 10 hits with Bananas. | Use 10 Mushrooms. | Land 10 hits with Red Shells. | Start a new tour. | Land 20 hits with Bananas. | ||
| Coins ×3,000 | Rubies ×10 | Point-boost ticket (Driver) ×3 | Point-boost ticket (Driver) ×5 | Rubies ×20 | Points-cap ticket (High-end driver) ×1 | Level-boost ticket (High-End driver) ×2 | Level-boost ticket (High-End kart) ×2 | Level-boost ticket (High-End glider) ×2 | ||
| Do 20 Jump Boosts. | Start a new tour. | Do 50 Mini-Turbo boosts. | Do 50 Jump Boosts. | Start a new tour. | Do 100 Mini-Turbo boosts. | Land 5 hits with Bob-ombs. | Do 100 Jump Boosts. | Do 150 Mini-Turbo boosts. | ||
| Level-boost ticket (Normal driver) ×1 | Level-boost ticket (Super driver) ×1 | Level-boost ticket (High-End driver) ×1 | Level-boost ticket (High-End driver) ×1 | Level-boost ticket (High-End kart) ×1 | Level-boost ticket (High-End glider) ×1 | Points-cap ticket (High-end driver) ×2 | Points-cap ticket (High-end kart) ×2 | Points-cap ticket (High-end glider) ×2 | ||
| Get 1st place 3 times. | Get 1st place 5 times. | Get 1st place 10 times. | Get 1st place 5 times. | Get 1st place 10 times. | Get 1st place 15 times. | Get 1st place 10 times. | Get 1st place 15 times. | Get 1st place 20 times. | ||
| Kart Pro Challenges | Tour Multiplayer Challenges | |||||
|---|---|---|---|---|---|---|
| Three in a row reward: |
Three in a row reward: | |||||
| Completion reward: |
Completion reward: | |||||
 |
 |
 |
 |
 |
 | |
| Play multiplayer. | Play multiplayer 3 times. | Play multiplayer 5 times. | Land 3 hits with Green Shells in multiplayer. | Land 3 hits with Bananas in multiplayer. | Do 3 Rocket Starts in multiplayer[sic] | |
 |
 |
 |
 |
 |
 | |
| Get 1 win in Kart Pro. | Achieve a winning streak that includes 3 1st-place wins. | Achieve a winning streak that includes 2 1st-place wins. | Land 3 hits with Red Shells in multiplayer. | Play multiplayer. | Use the Bullet Bill item in multiplayer. | |
 |
 |
 |
 |
 |
 | |
| Play multiplayer 10 times. | Get 3rd place or higher 3 times in multiplayer. | Get 3rd place or higher 5 times in multiplayer. | Do 50 Jump Boosts in multiplayer. | Do 50 Mini-Turbo boosts in multiplayer. | Cause opponents to crash 30 times in multiplayer. | |
| Total Points Challenge 1 (2022) | Total Points Challenge 2 (2022) | |||
|---|---|---|---|---|
| Points | Rewards | Points | Rewards | |
| 400,000 |
|
999,999 |
| |
| 300,000 |
|
900,000 |
| |
| 250,000 |
|
800,000 |
| |
| 200,000 |
|
700,000 |
| |
| 150,000 |
|
600,000 |
| |
| 100,000 |
|
500,000 |
| |
| Total Points Challenge 1 (2023) | Total Points Challenge 2 (2023) | |||
|---|---|---|---|---|
| Points | Rewards | Points | Rewards | |
| 400,000 |
|
999,999 |
| |
| 300,000 |
|
900,000 |
| |
| 250,000 |
|
800,000 |
| |
| 200,000 |
|
700,000 |
| |
| 150,000 |
|
600,000 |
| |
| 100,000 |
|
500,000 |
| |
Gold Pipe[edit]
The Gold Pipe, including the All-Clear Pipe, randomly shoots out one of the following regular High-End items. The appearance rate can be viewed via the "Pipe content" link on the Gold Pass purchase screen.
Mii Racing Suit Shop[edit]
| Items available in Mii Racing Suit Shop (November 16, 2022 - November 29, 2022) | ||
|---|---|---|
| Yellow Mii Racing Suit Amount: 3 |
Dry Bones Mii Racing Suit Amount: 3 |
Green Mii Racing Suit Amount: 3 |
| Cheep Cheep Mii Racing Suit Amount: 3 |
Dolphin Mii Racing Suit Amount: 3 |
Petey Piranha Mii Racing Suit Amount: 3 |
| Cat Mii Racing Suit 70 100 rubies for 2nd and 3rd purchases respectively |
Nabbit Mii Racing Suit Amount: 3 |
King Bob-omb Mii Racing Suit Amount: 3 |
| Items available in Mii Racing Suit Shop (November 15, 2023 - November 28, 2023) | ||
|---|---|---|
| King Boo Mii Racing Suit Amount: 3 |
Larry Mii Racing Suit Amount: 3 |
Iggy Mii Racing Suit Amount: 3 |
| King Bob-omb Mii Racing Suit Amount: 3 |
Petey Piranha Mii Racing Suit 70 100 rubies for 2nd and 3rd purchases respectively |
Spike Mii Racing Suit Amount: 3 |
| Cat Mii Racing Suit Amount: 3 |
Dolphin Mii Racing Suit Amount: 3 |
Blue Mii Racing Suit Amount: 3 |
Token Shop[edit]
The limited-time event where event tokens appear began on November 16, 2022 and ended on November 29, 2022. Event tokens could be earned by causing opponents to crash.
| Token Shop (November 16, 2022 - November 29, 2022) | ||
|---|---|---|
| Pipe Amount: 34 |
Ruby ×3 Amount: 5 |
Coin ×500 Amount: 5 |
| Donkey Kong Balloon Amount: 1 |
Level-boost ticket (Normal) Amount: 3 |
Level-boost ticket (Super) Amount: 2 |
Tier Shop[edit]
The shop features a variety of set and randomized items available for purchase. The item slots in the shop are unlocked based on the highest tier of players.
| Items available in Tier Shop (November 16, 2022 - November 29, 2022) | ||
|---|---|---|
| Level-boost ticket (Normal) Amount: 3 per week |
Level-boost ticket (Normal) Amount: 3 per week |
Level-boost ticket (Normal) Amount: 3 per week |
OR |
OR |
OR |
| Level-boost ticket (Super) Amount: 2 per week OR Level-boost ticket (High-End) Amount: 1 per week |
Level-boost ticket (Super) Amount: 2 per week OR Level-boost ticket (High-End) Amount: 1 per week |
Level-boost ticket (Super) Amount: 2 per week OR Level-boost ticket (High-End) Amount: 1 per week |
OR OR |
OR OR |
OR OR |
| Points-cap ticket (Normal) Amount: 1 per week |
Points-cap ticket (Super) Amount: 1 per week |
Points-cap ticket (High-End) Amount: 1 per week |
| Level-boost ticket (High-End) Amount: 1 per week |
Level-boost ticket (High-End) Amount: 1 per week |
Level-boost ticket (High-End) Amount: 1 per week |
Gallery[edit]
Landscape version of the loading screen

Names in other languages[edit]
| Language | Name | Meaning | Notes |
|---|---|---|---|
| Japanese | アニマルツアー[?] Animaru Tsuā |
Animal Tour | |
| Chinese (simplified) | 动物巡回赛[?] Dòngwù Xúnhuí sài |
Animal Tour | |
| Chinese (traditional) | 動物巡迴賽[?] Dòngwù Xúnhuí sài |
Animal Tour | |
| French | Saison des animaux[?] | Animals' Season | |
| German | Tour-Saison Tiere[?] | Tour Season Animals | |
| Italian | Tour animale[?] | Animal Tour | |
| Korean | 애니멀 투어[?] Aenimeol Tueo |
Animal Tour | |
| Portuguese | Temporada Animal[?] | Animal Season | |
| Spanish | Temporada de animales[?] | Season of animals |
Notes[edit]
- When this tour was announced to be rerun, Choco Mountain R/T was erroneously listed as Choco Mountain R in the English version of the trailer.[1]
References[edit]
- ^ Nintendo Mobile (October 13, 2023). Mario Kart Tour - Halloween Tour Trailer. YouTube. Retrieved October 15, 2023.