London Loop 2: Difference between revisions
MarioComix (talk | contribs) |
MarioComix (talk | contribs) mNo edit summary |
||
| Line 2: | Line 2: | ||
|title=London Loop 2 | |title=London Loop 2 | ||
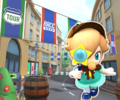
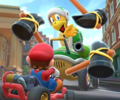
|image=[[File:MKT London Loop 2 Scene.jpg|250px]]<br>View of [[Chain Chomp]]s on the course | |image=[[File:MKT London Loop 2 Scene.jpg|250px]]<br>View of [[Chain Chomp]]s on the course | ||
|appearances=''[[Mario Kart Tour]]'' ( | |appearances=''[[Mario Kart Tour]]'' (2020) | ||
|tours=[[Baby Rosalina Tour]] | |tours=[[Baby Rosalina Tour]] | ||
|music=[[File:MKT London Loop Theme.oga]] | |music=[[File:MKT London Loop Theme.oga]] | ||
Revision as of 05:04, December 31, 2020
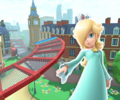
Template:Racecourse London Loop 2 is a race course in Mario Kart Tour and the second version of London Loop. It is named after and inspired by London, England; and due to London being the home of Sherlock Holmes, a detective referenced by Baby Rosalina's detective outfit, it is the signature course of the Baby Rosalina Tour. The course also appears as London Loop 2R (reverse), London Loop 2T (with ramps), and London Loop 2R/T (reverse and with ramps). It is a favorite of Baby Rosalina (Detective)
Course layout
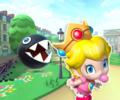
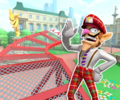
The course has the same things as London Loop but turned. The course begins to the left of the Big Ben, followed by a gradual right next to a double-decker bus. The road then weaves its way around Nelson's Column, then makes another gradual right through Charing Cross and a part of Trafalgar Square before making a sharp left at St Paul's Cathedral. The player then reaches Leadenhall Market, which they exit after making a single slight right. After another sharp right with a Chain Chomp in a green space in front of the Tower of London, the player crosses Tower Bridge, then takes another sharp right to bypass City Hall and The Shard with the London Eye in the background. After a left sigmoid curve, the player returns to the finish line.
Appearances
Baby Rosalina Tour
In the Baby Rosalina Tour, London Loop 2 served as the tour's signature course. It appeared as the first course in the Baby Rosalina Cup, the second course of the Toadette Cup, and the location of the challenges in the Baby Rosalina Cup, Koopa Troopa Cup, and Rosalina Cup. Its T variant appeared as the third course in the Waluigi Cup and second course in the Wario Cup, its R variant appeared as the first course in the Baby Peach Cup and the third course in the Peachette Cup, and its R/T variant appeared as the first course in the Ludwig Cup and the third course in the Rosalina Cup.
London Loop 2 | |||
|---|---|---|---|
| Drivers | Karts | Gliders | |
| Favorite of | |||
| Favored by | |||
London Loop 2T | |||
| Drivers | Karts | Gliders | |
| Favorite of | |||
| Favored by | |||
London Loop 2R | |||
| Drivers | Karts | Gliders | |
| Favorite of | |||
| Favored by | |||
London Loop 2T | |||
| Drivers | Karts | Gliders | |
| Favorite of | |||
| Favored by | |||
London Loop 2 | |||
| Drivers | Karts | Gliders | |
| Favorite of | |||
| Favored by | |||
London Loop 2R/T | |||
| Drivers | Karts | Gliders | |
| Favorite of | |||
| Favored by | |||
London Loop 2R | |||
| Drivers | Karts | Gliders | |
| Favorite of | |||
| Favored by | |||
London Loop 2R/T | |||
| Drivers | Karts | Gliders | |
| Favorite of | |||
| Favored by | |||
Profiles
Mario Kart Tour
- Mario Kart Tour Twitter: "London Loop 2 shows you a different side of this famous city...but this is no joyride! You'll have to dodge hungry Chain Chomps as you take in the sights. Keep your wits about you—other drivers aren't the only hazards on this blue course!"[1]
Gallery
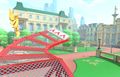
Course icons
The course icon of the regular variant
The course icon of the Reverse variant
The course icon of the Reverse variant with Lakitu
The course icon of the Trick variant
The course icon of the Trick variant with Waluigi (Bus Driver)

The course icon of the Reverse/Trick variant
The course icon of the Reverse/Trick variant with Rosalina
The course icon of the challenge in the Baby Rosalina Cup (Baby Rosalina Tour)
The course icon of the challenge in the Koopa Troopa Cup (Baby Rosalina Tour)
The course icon of the challenge in the Rosalina Cup (Baby Rosalina Tour)


Screenshots
View of the trick variant
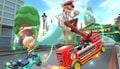
Rosalina and Waluigi (Bus Driver) tricking near the finish line
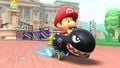
Baby Mario drifting in the Bullet Blaster

"Thank you" message for the end of the Baby Rosalina Tour


References
- ^ https://twitter.com/mariokarttourEN/status/1238464835953754113 Mario Kart Tour Twitter