Super Smash Bros. Brawl: Difference between revisions
Shadow1567 (talk | contribs) No edit summary |
No edit summary |
||
| (1,000 intermediate revisions by more than 100 users not shown) | |||
| Line 1: | Line 1: | ||
{{italic title}} | |||
{{FA}} | {{FA}} | ||
{{ | {{game infobox | ||
|image=[[File:SSBB Cover.jpeg|250px]] | |||
|image=[[ | |developer=[[Sora Ltd.]]<br>[[HAL Laboratory]]<br>[[Game Arts]]<br>Monolith Soft<br>[[Paon DP|Paon]]<br>[[Intelligent Systems]] | ||
|developer=[[Sora Ltd.]]< | |||
|publisher=[[Nintendo]] | |publisher=[[Nintendo]] | ||
| | |release='''Original release:'''<br>{{flag list|Japan|January 31, 2008|HK|January 31, 2008|USA|March 9, 2008|Mexico|March 9, 2008<ref>{{cite|title=''Club Nintendo'' (MX) issue 197|page=60}}</ref>|Australia|June 26, 2008|Europe|June 27, 2008|ROC|July 12, 2008|South Africa|August 21, 2008<ref>{{cite|url=www.nintendo.com/en-za/Games/Wii/Super-Smash-Bros-Brawl-283366.html|title=Super Smash Bros. Brawl|publisher=Nintendo of South Africa|language=en-gb|accessdate=October 21, 2024}}</ref>|South Korea|April 29, 2010}} '''[[Nintendo Selects#Wii|Nintendo Selects]]:'''<br>{{flag list|Europe|October 18, 2013|Australia|November 7, 2013|South Korea|November 6, 2014}} | ||
|genre=Fighting | |languages={{languages|en_us=y|en_gb=y|es_es=y|fr_fr=y|de=y|it=y|jp=y|kr=y}} | ||
|genre=[[Genre#Fighting|Fighting]] | |||
|modes=Single player, 1-4 players simultaneous, multiplayer online | |modes=Single player, 1-4 players simultaneous, multiplayer online | ||
|ratings= | |ratings={{ratings|acp=pg|cero=a|esrb=t|pegi=12|usk=12|acb=pg|classind=10|grac=all}} | ||
|platforms=[[Wii]] | |platforms=[[Wii]] | ||
| | |format={{format|wiidual=1}}<ref name="disk">{{cite|deadlink=y|archive=web.archive.org/web/20080204084347/http://www.nintendo.co.jp/wii/rsbj/info.html|title=Wii専用ソフト「大乱闘スマッシュブラザーズX」のディスクが読み取れない症状についてのお知らせ|lanugage=ja|publisher=Nintendo.co.jp|author=Nintendo|accessdate=October 21, 2024}}</ref> | ||
|input= | |input={{input|wmsideways=1|nunchuk=1|classic=1|wiigcn=1}} | ||
|serials={{flag list|Japan|RVL-RSBJ-JPN}} | |||
}} | }} | ||
'''''Super Smash Bros. Brawl''''' | '''''Super Smash Bros. Brawl''''' is a [[Genre#Fighting|fighting]] game for the [[Wii]]. It is the third game within the [[Super Smash Bros. (series)|''Super Smash Bros.'' series]], following after ''[[Super Smash Bros. Melee]]''. The game was designed by [[Masahiro Sakurai]] and developed by a team that was specifically created for it.{{ref needed}} The game engine is titled Havok, provided by the Irish company of the same name, and it focuses mainly on the game physics.<ref>{{cite|url=gonintendo.com/?p=34360|author=rawmeatcowboy|date=January 28, 2008|language=en|title=''Super Smash Bros. Brawl'': Havok engine confirmed|publisher=GoNintendo|accessdate=October 21, 2024}}</ref> After a planned release date of December 3, [[List of games by date#2007|2007]] in North America, all regions had their release dates pushed back.{{ref needed}} It was then slated for release on February 10, [[List of games by date#2008|2008]] in North America, and January 24, 2008 for Japan.{{ref needed}} However, on January 15, 2008, it was then delayed to January 31, 2008 for Japan<ref>{{cite|url=www.nintendo.co.jp/corporate/release/2008/080115.html|title=ニュースリリース : 2008年1月15日|publisher=Nintendo.co.jp|author=Nintendo|language=ja|accessdate=October 21, 2024|date=January 15, 2008}}</ref> and March 9, 2008 for North America.<ref>{{cite|url=www.smashbros.com/wii/en_us/index.html|title=Smash Bros. DOJO!!|language=en-us|publisher=Nintendo of America|accessdate=October 21, 2024}}</ref> It was released in Oceania on June 26, 2008 and in Europe on June 27, 2008.<ref>{{cite|url=www.smashbros.com/wii/en_uk/index.html|language=en-gb|title=Smash Bros. DOJO!!|publisher=Nintendo of Europe|accessdate=October 21, 2024}}</ref> | ||
After a planned release date of December | |||
==Gameplay== | ==Gameplay== | ||
[[File:SSBB Group artwork 2.jpg|thumb|Mario battling fellow Nintendo protagonists Link, Samus, and Pit]] | |||
The basic controls are essentially the same as in the previous two games. {{iw|smashwiki|Fighter}}s have to attack their opponents to increase their {{iw|smashwiki|damage|percentage}}. The amount of damage affects how far the players can be knocked back. The objective is to knock opponents off the {{iw|smashwiki|blast line}} to score a {{iw|smashwiki|KO}}. The {{button|A}} involves basic moves while the {{button|B}} has the character perform {{iw|smashwiki|special move}}s. Players can do several moves depending on where {{button|Stick}} is tilted. If players are knocked from the stage, they can use their [[Double Jump (airborne)|midair jump]] and special moves, typically {{button|B}} and tilting up on {{button|Stick}} to recover. Most attacks can be blocked by {{iw|smashwiki|shield}}ing, though it shrinks the longer from either the player holding the button or the shield blocking attacks. If the shield is too small, the player is vulnerable to {{iw|smashwiki|shield stab}}s. If the shield breaks, the player is temporarily stunned. {{iw|smashwiki|Grab}}bing allows the player to either pummel the opponent with the attack button or throw them with {{button|Stick}}. An opponent can be released from a grab by moving the {{iw|smashwiki|control stick}} and mashing buttons, though opponents at higher percentages struggle to release more. Characters can use one of three [[taunt]]s, two more than in previous games. The {{iw|smashwiki|tether recovery}} allows fighters to grab onto ledges using chain-like items, such as a {{iw|smashwiki|Plasma Whip}} or a {{iw|smashwiki|Hookshot}}. Even {{iw|smashwiki|Natural combo}}s are simpler, since holding it down is enough for the character to start a combo attack. | |||
The game | The game introduces a variety of moves and abilities. There is {{iw|smashwiki|Footstool Jump}} technique, reminiscent of the different varieties of [[jump]]ing within the [[Super Mario (franchise)|''Super Mario'' franchise]], and it allows fighters to {{iw|smashwiki|jump}} onto another fighter up to five times and spring up by pressing the jump button at the right time. Another added technique is {{iw|smashwiki|Glide|gliding}}, available only to winged characters, as well as {{iw|smashwiki|crawl}}ing for certain fighters. Gliding fighters can direct themselves upwards or downwards, depending on which direction the {{button|gcn|Stick}} or the {{button|wii|Pad}} is held. All fighters can {{iw|smashwiki|slip}}, which has no benefit besides the {{iw|smashwiki|invincibility}} frames given to them while getting up. Slipping occurs when players either try to run suddenly, go down slopes, turn around, or walk on a [[Banana Peel]]. Players are now able to walk and jump while using projectile-shooting items. | ||
{| | |||
|[[ | |||
| | |||
| | |||
| | |||
| | |||
| | |||
The most major addition is the [[Final Smash]], a powerful special move involving either a strong attack, character transformation, or {{iw|smashwiki|stage hazard}} that most likely results in an opponent being KO'd. | |||
Like previous games, {{iw|smashwiki|item}}s appear randomly. In {{iw|smashwiki|Versus Mode|Brawl mode}} only, the player can set certain items to not appear and adjust how commonly each type of item appears. Items are more common on stages representing the same franchise, such as [[Super Mushroom]]s in ''[[Super Mario (franchise)|Super Mario]]'' stages. | |||
Players | Players can make customizable button configurations and save them on the Wii Remote's internal memory. They can insert {{iw|smashwiki|name}}s with up to five letters, as in ''Super Smash Bros. Melee'', though names can now have custom button configurations applied to them by default. If the player is using a {{iw|nwiki|Nintendo GameCube Controller}} or a {{iw|nwiki|Classic Controller}}, tilting {{button|gcn|C}} or {{button|wii|CCStickR}} while on the main menu will change the camera angle. There are four controller options, listed below with their default control configurations: | ||
<gallery> | |||
Default Wii Remote Brawl.png|[[Wii#Wii Remote|Wii Remote]] (Sideways) | |||
Default Nunchuk Brawl.png|[[Wii#Wii Remote|Wii Remote]] + [[Wii#Nunchuk|Nunchuk Attachment]] | |||
Default Classic Controller Brawl.png|[[Wii#Classic Controller|Wii Classic Controller]] | |||
Default GameCube Controller Brawl.png|[[Nintendo GameCube#Nintendo GameCube Controller|Nintendo GameCube Controller]] | |||
</gallery> | |||
==Playable characters== | |||
{{multiple image | |||
|align=left | |||
|direction=horizontal | |||
|image1=Character Select Brawl complete.png | |||
|width1=200 | |||
|caption1=The character select screen, with all characters unlocked. | |||
|image2=SSBBfullcast.png | |||
|width2=200 | |||
|caption2=The entire cast (excluding Sheik and Zero Suit Samus), as they appear in the opening. | |||
}} | |||
{{main|List of fighters debuting in Super Smash Bros. Brawl}} | |||
Super Smash Bros. Brawl'' has 35 playable characters (39, if {{iw|smashwiki|Sheik (SSBB)|Sheik}}, {{iw|smashwiki|Zero Suit Samus (SSBB)|Zero Suit Samus}}, and the {{iw|smashwiki|Pokémon Trainer (SSBB)|Pokémon Trainer}}'s three {{iw|bulbapedia|Pokémon}} are counted, each), ten more than in ''Super Smash Bros. Melee''. 21 characters (25 if counting the four aforementioned characters) are playable directly from the start, while the other fourteen have to be {{iw|smashwiki|Unlockable character|unlocked}} to become playable; as new characters are unlocked, they can be seen amongst the fighters in the opening scene. Only five fighters from the previous game were not added to the roster: {{iw|smashwiki|Roy (SSBM)|Roy}}, {{iw|smashwiki|Dr. Mario (SSBM)|Dr. Mario}}, {{iw|smashwiki|Young Link (SSBM)|Young Link}}, {{iw|smashwiki|Pichu (SSBM)|Pichu}}, and {{iw|smashwiki|Mewtwo (SSBM)|Mewtwo}}. The game adds fifteen {{iw|smashwiki|Fighter#Newcomers and veterans|newcomers}} (18 counting Zero Suit Samus and the Pokémon Trainer's Pokémon). ''Super Smash Bros. Brawl'' is the first game with fighters from third-party franchises, particularly {{iw|smashwiki|Sonic (SSBB)|Sonic}} and {{iw|smashwiki|Snake (SSBB)|Snake}}. | |||
Of the roster, eight characters are from the [[Super Mario (franchise)|''Super Mario'' franchise]]: [[Mario]], [[Luigi]], [[Princess Peach]], [[Bowser]], [[Donkey Kong]], [[Diddy Kong]], [[Yoshi]], and [[Wario]]. | |||
{{br}} | |||
===Default | ===Default characters=== | ||
{| | {|class=wikitable width=100% | ||
|- | |- | ||
!width=12%| | !width=12%|Character | ||
!width=40%|Description | !width=40%|Description | ||
! | !width=25%|Special moves | ||
|- | |- | ||
|[[File:BrawlMario.png|120px]]<br>{{iw|smashwiki|Mario (SSBB)|Mario}}[[File:Mario Emblem.png|30px|class=invert-dark]] | |||
|[[Mario]] is a balanced character armed with a projectile, a fireball, a cape that reflects opposing projectiles and flips opponents, and [[F.L.U.D.D.]], which can spray water at targets. Mario is one of the characters who can [[Wall Jump|wall jump]]. For his Final Smash, Mario blasts a giant fireball that moves slowly and horizontally. | |||
| | |<nowiki/> | ||
|Standard || [[Fireball]] | *Standard: {{iw|smashwiki|Fireball}} ([[Fireball|article]]) | ||
*Side: {{iw|smashwiki|Cape}} ([[Cape|article]]) | |||
*Up: {{iw|smashwiki|Super Jump Punch}} ([[Super Jump Punch|article]]) | |||
*Down: {{iw|smashwiki|F.L.U.D.D.}} ([[F.L.U.D.D.|article]]) | |||
*Final Smash: {{iw|smashwiki|Mario Finale}} ([[Mario Finale|article]]) | |||
|- | |- | ||
|Side || [[ | |[[File:BrawlDK.jpg|120px]]<br>{{iw|smashwiki|Donkey Kong (SSBB)|Donkey Kong}}[[File:DK Emblem.png|30px|class=invert-dark]] | ||
|Donkey Kong is {{iw|smashwiki|Weight|heavy}} and strong. He can not only grab enemies but also carry them. His speed is high compared to other heavy characters, but his {{iw|smashwiki|recovery}} lacks vertical distance. | |||
|<nowiki/> | |||
*Standard: {{iw|smashwiki|Giant Punch}} ([[Giant Punch|article]]) | |||
*Side: {{iw|smashwiki|Headbutt}} ([[Headbutt|article]]) | |||
*Up: {{iw|smashwiki|Spinning Kong}} ([[Spinning Kong|article]]) | |||
*Down: {{iw|smashwiki|Hand Slap}} ([[Hand Slap|article]]) | |||
*Final Smash: {{iw|smashwiki|Konga Beat}} ([[Konga Beat|article]]) | |||
|- | |- | ||
| | |[[File:BrawlLink.jpg|120px]]<br>{{iw|smashwiki|Link (SSBB)|Link}}[[File:Zelda Emblem.png|30px|class=invert-dark]] | ||
|{{iw|zeldawiki|Link}} is a moderate fighter who uses various equipment while fighting. His {{iw|zeldawiki|Bomb}}s affect himself and opponents alike. His {{iw|zeldawiki|Boomerang}} can damage and push opponents, as well as move items. Link's {{iw|zeldawiki|Bow}} can shoot {{iw|zeldawiki|Arrow}}s. Link's {{iw|zeldawiki|Spin Attack}} counts as an extra jump for recovering, though he can still use it on the ground. Link's {{iw|zeldawiki|Claw Shot}} has a reach capable of grabbing opponents and ledges. Link can block projectiles using his own {{iw|zeldawiki|shield}}. Link uses his Final Smash to slash the opponent next to him several times, and lastly one powerful slash. | |||
|<nowiki/> | |||
*Standard: {{iw|smashwiki|Hero's Bow}} | |||
*Side: {{iw|smashwiki|Gale Boomerang}} | |||
*Up: {{iw|smashwiki|Spin Attack}} | |||
*Down: {{iw|smashwiki|Bomb (Link)|Bomb}} | |||
*Final Smash: {{iw|smashwiki|Triforce Slash}} | |||
|- | |- | ||
| | |[[File:BrawlSamus.jpg|120px]]<br>{{iw|smashwiki|Samus (SSBB)|Samus}}[[File:Metroid Emblem.png|30px|class=invert-dark]] | ||
|{{iw|metroidwiki|Samus}} has great projectiles, is {{iw|smashwiki|Weight|heavy}}, and falls at a {{iw|smashwiki|Falling speed|floaty}} speed. After using her Final Smash, Samus loses her suit, becoming Zero Suit Samus. | |||
|<nowiki/> | |||
*Standard: {{iw|smashwiki|Charge Shot}} | |||
*Side: {{iw|smashwiki|Missile}} | |||
*Up: {{iw|smashwiki|Screw Attack}} | |||
*Down: {{iw|smashwiki|Bomb (Samus)|Bomb}} | |||
*Final Smash: {{iw|smashwiki|Zero Laser}} | |||
|- | |- | ||
| | |[[File:BrawlZeroSuitSamus.png|120px]]<br>{{iw|smashwiki|Zero Suit Samus (SSBB)|Zero Suit Samus}}[[File:Metroid Emblem.png|30px|class=invert-dark]] (newcomer) | ||
|{{iw|metroidwiki|Zero Suit Samus}} is lighter and faster than when wearing a suit, although her attacks are weaker. Zero Suit Samus has no actual Final Smash other than transforming back into Samus. | |||
|<nowiki/> | |||
*Standard: {{iw|smashwiki|Paralyzer}} | |||
*Side: {{iw|smashwiki|Plasma Whip}} | |||
*Up: {{iw|smashwiki|Plasma Wire}} | |||
*Down: {{iw|smashwiki|Flip Jump}} | |||
*Final Smash: {{iw|smashwiki|Power Suit Samus}} | |||
|- | |- | ||
|[[File:BrawlKirby.jpg|120px]]<br>{{iw|smashwiki|Kirby (SSBB)|Kirby}}[[File:Kirby Emblem.png|30px|class=invert-dark]] | |||
|{{iw|wikirby|Kirby}} is one of the lightest fighters, but this makes him vulnerable to being knocked away. Kirby can float upward multiple times for his recovery. He can {{iw|wikirby|inhale}} an opponent and copy their {{iw|smashwiki|standard special move}} or spit them out. Kirby can use his {{iw|wikirby|Hammer}} not only on the ground but also in midair. Kirby can become a {{iw|wikirby|Stone}} to slam onto opponents, also giving him temporary protection from most attacks. With {{iw|wikirby|Final Cutter}}, Kirby takes out his {{iw|wikirby|sword}} and slashes upward then down, also forming a fast shockwave if it lands on the ground. | |||
| | |<nowiki/> | ||
|Standard || | *Standard: {{iw|smashwiki:Inhale (Kirby)|Inhale}} | ||
*Side: {{iw|smashwiki:Hammer (move)|Hammer}} | |||
*Up: {{iw|smashwiki:Final Cutter}} | |||
*Down: {{iw|smashwiki:Stone}} | |||
*Final Smash: {{iw|smashwiki:Cook Kirby}} | |||
|- | |- | ||
|Side || [[ | |[[File:BrawlFox.jpg|120px]]<br>{{iw|smashwiki|Fox (SSBB)|Fox}}[[File:StarFox Emblem.png|30px|class=invert-dark]] | ||
|{{iw|lylatwiki|Fox McCloud|Fox}} is very fast at attacking and running. He has high {{iw|smashwiki|falling speed}}. Fox can use his {{iw|lylatwiki|Blaster}} to shoot quick lasers. The Fox Illusion does an immediate horizontal strike. Fox's Reflector can deflect most projectiles and even opponents if they are close enough. Fox can use Fire Fox to perform a fiery charge in any direction. For his Final Smash, Fox uses his {{iw|lylatwiki|Landmaster}}. | |||
|<nowiki/> | |||
*Standard: [[smashwiki:Blaster (Fox)|Blaster]] | |||
*Side: [[smashwiki:Fox Illusion|Fox Illusion]] | |||
*Up: [[smashwiki:Fire Fox|Fire Fox]] | |||
*Down: [[smashwiki:Reflector (Fox)|Reflector]] | |||
*Final Smash: [[smashwiki:Landmaster|Landmaster]] | |||
|- | |- | ||
| | |[[File:BrawlPikachu.png|120px]]<br>{{iw|smashwiki|Pikachu (SSBB)|Pikachu}}[[File:Pokemon Emblem.png|30px|class=invert-dark]] | ||
|{{iw|bulbapedia|Pikachu (Pokémon)|Pikachu}} has fast movements but weak attacks. Pikachu can create small, damaging sparks of electricity that move around the stage. Pikachu's {{iw|bulbapedia|Skull Bash (move)|Skull Bash}} can be charged to ram into opponents or be used as another jump. Its {{iw|bulbapedia|Thunder (move)|Thunder}} attacks opponents directly above it. Pikachu's {{iw|bulbapedia|Quick Attack (move)|Quick Attack}} involves performing two quick jumps as a {{iw|smashwiki|recovery}}. His Final Smash is {{iw|bulbapedia|Volt Tackle (move)|Volt Tackle}}, causing Pikachu to move around in a large, purple electrical ball, though with little control. | |||
|<nowiki/> | |||
*Standard: {{iw|smashwiki|Thunder Jolt}} | |||
*Side: {{iw|smashwiki|Skull Bash}} | |||
*Up: {{iw|smashwiki|Quick Attack}} | |||
*Down: {{iw|smashwiki|Thunder (Pokémon)|Thunder}} | |||
*Final Smash: {{iw|smashwiki|Volt Tackle}} | |||
|- | |- | ||
|Down || [[ | |[[File:BrawlDiddyKong.jpg|120px]]<br>{{iw|smashwiki|Diddy Kong (SSBB)|Diddy Kong}}[[File:DK Emblem.png|30px|class=invert-dark]] (newcomer) | ||
|[[Diddy Kong]] is both light and agile. He can use the Peanut Popgun as a weapon and his rocketbarrel to launch upward, like in ''[[Donkey Kong 64]]''. Diddy has the ability to latch on opponents, either to attack or jump off of them. Diddy can use banana peels on his own. Diddy's Final Smash involves using both his Rocketbarrel and Peanut Popgun to shoot several peanuts below rapidly. | |||
|<nowiki/> | |||
*Standard: {{iw|smashwiki|Peanut Popgun}} ([[Popgun#Peanut Popgun|article]]) | |||
*Side: {{iw|smashwiki|Monkey Flip}} ([[Monkey Flip|article]]) | |||
*Up: {{iw|smashwiki|Rocketbarrel Boost}} ([[Rocketbarrel Boost|article]]) | |||
*Down: {{iw|smashwiki|Banana Peel}} ([[Banana Peel (move)|article]] | |||
*Final Smash: {{iw|smashwiki|Rocketbarrel Barrage}} ([[Rocketbarrel Barrage|article]]) | |||
|- | |- | ||
| | |[[File:BrawlZelda.jpg|120px]]<br>{{iw|smashwiki|Zelda (SSBB)|Zelda}}[[File:Zelda Emblem.png|30px|class=invert-dark]] | ||
|{{iw|zeldawiki|Princess Zelda|Zelda}} is light and fairly slow. Her attacks are powerful {{iw|smashwiki|Magic (type|magic}}, but there is little control while using them. | |||
|<nowiki/> | |||
*Standard: {{iw|smashwiki|Nayru's Love}} | |||
*Side: {{iw|smashwiki|Din's Fire}} | |||
*Up: {{iw|smashwiki|Farore's Wind}} | |||
*Down: {{iw|smashwiki|Transform}} | |||
*Final Smash: {{iw|smashwiki|Light Arrow}} | |||
|- | |- | ||
|[[File:Sheik Brawl art.png|120px]]<br>{{iw|smashwiki|Sheik (SSBB)|Sheik}}[[File:Zelda Emblem.png|30px|class=invert-dark]] | |||
|{{iw|zeldawiki|Sheik}} is whom Zelda becomes when using Transform. Sheik is a lot faster but has weaker moves than Zelda. | |||
| | |<nowiki/> | ||
|Standard || | *Standard: {{iw|smashwiki|Needle Storm}} | ||
*Side: {{iw|smashwiki|Chain}} | |||
*Up: {{iw|smashwiki|Vanish}} | |||
*Down: {{iw|smashwiki|Transform}} | |||
*Final Smash: {{iw|smashwiki|Light Arrow}} | |||
|- | |- | ||
| | |[[File:BrawlPit.jpg|120px]]<br>{{iw|smashwiki|Pit (SSBB)|Pit}}[[File:KidIcarus Emblem.png|30px|class=invert-dark]] (newcomer) | ||
|{{iw|icaruspedia|Pit}} uses a bow, which can uniquely be divided into two usable blades. Pit can use very fast slashes. Pit's wings allow him to fly around for a period of time, also giving him longer recovery time. | |||
|<nowiki/> | |||
*Standard: {{iw|smashwiki|Palutena Bow}} | |||
*Side: {{iw|smashwiki|Angel Ring}} | |||
*Up: {{iw|smashwiki|Wings of Icarus}} | |||
*Down: {{iw|smashwiki|Mirror Shield}} | |||
*Final Smash: {{iw|smashwiki|Palutena's Army}} | |||
|- | |- | ||
| | |[[File:BrawlMetaKnight.jpg|120px]]<br>{{iw|smashwiki|Meta Knight (SSBB)|Meta Knight}}[[File:Kirby Emblem.png|30px|class=invert-dark]] (newcomer) | ||
|{{iw|wikirby|Meta Knight}} can fly around briefly and has a very fast combo attack. He can spin around while bearing a tornado-like shape. However, Meta Knight is light and lacking in power. | |||
|<nowiki/> | |||
*Standard: {{iw|smashwiki|Mach Tornado}} | |||
*Side: {{iw|smashwiki|Drill Rush}} | |||
*Up: {{iw|smashwiki|Shuttle Loop}} | |||
*Down: {{iw|smashwiki|Dimensional Cape}} | |||
*Final Smash: {{iw|smashwiki|Galaxia Darkness}} | |||
|- | |- | ||
|[[File:BrawlPokemonTrainer.jpg|120px]]<br>{{iw|smashwiki|Pokémon Trainer (SSBB)|Pokémon Trainer}}[[File:Pokemon Emblem.png|30px|class=invert-dark]] (newcomer) | |||
|{{iw|bulbapedia|Pokémon Trainer (Super Smash Bros.)|Pokémon Trainer}} uses three {{iw|bulbapedia|Pokémon}} to fight on his behalf: {{iw|bulbapedia|Squirtle (Pokémon)|Squirtle}}, {{iw|bulbapedia|Ivysaur (Pokémon)|Ivysaur}}, and {{iw|bulbapedia|Charizard (Pokémon)|Charizard}}. The Pokémon Trainer cannot do much other than switch out the Pokémon in battle. | |||
|<nowiki/> | |||
{{columns|count=2| | |||
'''Pokémon Trainer''' | |||
*Down: {{iw|smashwiki|Pokémon Change}} | |||
*Final Smash: {{iw|smashwiki|Triple Finish}} | |||
'''{{iw|smashwiki|Squirtle (SSBB)|Squirtle}}''' | |||
*Standard: {{iw|smashwiki|Water Gun}} | |||
*Side: {{iw|smashwiki|Withdraw}} | |||
*Up: {{iw|smashwiki|Waterfall}} | |||
'''{{iw|smashwiki|Ivysaur (SSBB)|Ivysaur}}''' | |||
*Standard: {{iw|smashwiki|Bullet Seed}} | |||
*Side: {{iw|smashwiki|Razor Leaf}} | |||
*Up: {{iw|smashwiki|Vine Whip}} | |||
'''{{iw|smashwiki|Charizard (SSBB)|Charizard}}''' | |||
*Standard: {{iw|smashwiki|Flamethrower}} | |||
*Side: {{iw|smashwiki|Rock Smash}} | |||
*Up: {{iw|smashwiki|Fly}} | |||
}} | |||
| | |||
| | |||
| | |||
| | |||
| | |||
| | |||
| | |||
| | |||
| | |||
| | |||
| | |||
| | |||
| | |||
| | |||
|- | |- | ||
| | |[[File:BrawlIke.jpg|120px]]<br>{{iw|smashwiki|Ike (SSBB)|Ike}}[[File:FireEmblem Emblem.png|30px|class=invert-dark]] (newcomer) | ||
|{{iw|fireemblem|Ike}} uses a {{iw|fireemblem|Ragnell|two-handed blade}} in battle. He has some of the strongest and longest-ranged attacks, but they are very slow. Ike has a relatively slow speed in general. | |||
|<nowiki/> | |||
*Standard: {{iw|smashwiki|Eruption}} | |||
*Side: {{iw|smashwiki|Quick Draw}} | |||
*Up: {{iw|smashwiki|Aether}} | |||
*Down: {{iw|smashwiki|Counter}} | |||
*Final Smash: {{iw|smashwiki|Great Aether}} | |||
|- | |- | ||
|Up || [[ | |[[File:BrawlPeach.jpg|120px]]<br>{{iw|smashwiki|Peach (SSBB)|Peach}}[[File:Mario Emblem.png|30px|class=invert-dark]] | ||
|[[Princess Peach]] specializes in aerial techniques, has a good horizontal recovery, and her attacks have high {{iw|smashwiki|priority}}. However, Peach is vulnerable to {{iw|smashwiki|knockback}} and lacks strength. | |||
|<nowiki/> | |||
*Standard: {{iw|smashwiki|Toad (move)|Toad}} ([[Toad (move)|article]]) | |||
*Side: {{iw|smashwiki|Peach Bomber}} ([[Peach Bomber|article]]) | |||
*Up: {{iw|smashwiki|Peach Parasol}} ([[Peach Parasol (move)|article]]) | |||
*Down: {{iw|smashwiki|Vegetable}} ([[Vegetable (move)|article]]) | |||
*Final Smash: {{iw|smashwiki|Peach Blossom}} ([[Peach Blossom|article]]) | |||
|- | |- | ||
|Down || [[ | |[[File:BrawlYoshi.png|120px]]<br>{{iw|smashwiki|Yoshi (SSBB)|Yoshi}}[[File:Yoshi Emblem.png|30px|class=invert-dark]] | ||
|[[Yoshi]] is both fast and heavy, although he is weak. Yoshi's Egg Throw can be used as a third jump, unlike before. | |||
|<nowiki/> | |||
*Standard: {{iw|smashwiki|Egg Lay}} ([[Egg Lay|article]]) | |||
*Side: {{iw|smashwiki|Egg Roll}} ([[Egg Roll (move)|article]]) | |||
*Up: {{iw|smashwiki|Egg Throw}} ([[Egg Throw|article]]) | |||
*Down: {{iw|smashwiki|Yoshi Bomb}} ([[Yoshi Bomb|article]]) | |||
*Final Smash: {{iw|smashwiki|Super Dragon}} ([[Super Dragon|article]]) | |||
|- | |- | ||
| | |[[File:BrawlIceClimbers.jpg|120px]]<br>{{iw|smashwiki|Ice Climbers (SSBB)|Ice Climbers}}[[File:IceClimbers Emblem.png|30px|class=invert-dark]] | ||
|The Ice Climber duo, Popo and Nana, are controlled by the player and the {{iw|smashwiki|Artificial intelligence|CPU}}, respectively, or the inverse with certain {{iw|smashwiki|alternate costume|costumes}}. They have a good {{iw|smashwiki|range}}, but their normal attacks are weak, and they are rather light. | |||
|<nowiki/> | |||
*Standard: {{iw|smashwiki|Ice Shot}} | |||
*Side: {{iw|smashwiki|Squall Hammer}} | |||
*Up: {{iw|smashwiki|Belay}} | |||
*Down: {{iw|smashwiki|Blizzard}} | |||
*Final Smash: {{iw|smashwiki|Iceberg}} | |||
|- | |- | ||
|[[File:BrawlKingDedede.jpg|120px]]<br>{{iw|smashwiki|King Dedede (SSBB)|King Dedede}}[[File:Kirby Emblem.png|30px|class=invert-dark]] (newcomer) | |||
|{{iw|wikirby|King Dedede}} is a heavy character who uses his large hammer for close-range attacks, but he relies on {{iw|wikirby|Waddle Dee}}s, {{iw|wikirby|Waddle Doo}}s, or {{iw|wikirby|Gordo}}s to damage distant opponents. King Dedede can inhale opponents and spit them back out. He has a long reach but very low speed and mobility. | |||
| | |<nowiki/> | ||
|Standard || | *Standard: {{iw|smashwiki|Inhale (King Dedede)|Inhale}} | ||
*Side: {{iw|smashwiki|Waddle Dee Toss}} | |||
*Up: {{iw|smashwiki|Super Dedede Jump}} | |||
*Down: {{iw|smashwiki|Jet Hammer}} | |||
*Final Smash: {{iw|smashwiki|Waddle Dee Army}} | |||
|- | |- | ||
|Side || [[ | |[[File:BrawlBowser.jpg|120px]]<br>{{iw|smashwiki|Bowser (SSBB)|Bowser}}[[File:Mario Emblem.png|30px|class=invert-dark]] | ||
|[[Bowser]] is both heavier and larger than any other fighter. His attacks are powerful but slow to use. Bowser's {{iw|smashwiki|speed}} is slightly higher than in ''[[Super Smash Bros. Melee]]''. | |||
|<nowiki/> | |||
*Standard: {{iw|smashwiki|Fire Breath}} ([[Fire Breath|article]]) | |||
*Side: {{iw|smashwiki|Flying Slam}} ([[Flying Slam|article]]) | |||
*Up: {{iw|smashwiki|Whirling Fortress}} ([[Whirling Fortress|article]]) | |||
*Down: {{iw|smashwiki|Bowser Bomb}} ([[Bowser Bomb (move)|article]]) | |||
*Final Smash: {{iw|smashwiki|Giga Bowser (Final Smash)|Giga Bowser}} ([[Giga Bowser|article]]) | |||
|- | |- | ||
|Up || [[ | |[[File:BrawlWario.jpg|120px]]<br>{{iw|smashwiki|Wario (SSBB)|Wario}}[[File:Wario Emblem.png|30px|class=invert-dark]] (newcomer) | ||
|[[Wario]] is a small heavyweight skilled in aerial and recovery moves. His range is poor, and his attacks are somewhat slow. Despite being a heavyweight, Wario has average strength. Either his ''[[WarioWare (series)|WarioWare]]'' series and usual outfit can be worn, each with color varieties of their own. Wario's Chomp involves him biting an opponent while keeping them trapped in his mouth. The potency of his Wario Waft depends on when it was last used, to the point of also functioning like an added jump. Wario can drive on his Wario Bike and ram into opponents with it. Wario's Final Smash transforms him into his superhero form, [[Wario-Man]], who has greater movement and much stronger attacks. | |||
|<nowiki/> | |||
*Standard: {{iw|smashwiki|Chomp}} ([[Chomp (Super Smash Bros. series)|article]]) | |||
*Side: {{iw|smashwiki|Wario Bike}} ([[Wario Bike#Super Smash Bros. series|article]]) | |||
*Up: {{iw|smashwiki|Corkscrew}} ([[Corkscrew (Super Smash Bros. series)|article]]) | |||
*Down: {{iw|smashwiki|Wario Waft}} ([[Wario Waft|article]]) | |||
*Final Smash: {{iw|smashwiki|Wario-Man}} ([[Wario-Man|article]]) | |||
|- | |- | ||
| | |[[File:BrawlOlimar.jpg|120px]]<br>{{iw|smashwiki|Olimar (SSBB)|Olimar}}[[File:Pikmin Emblem.png|30px|class=invert-dark]] (newcomer) | ||
|{{iw|pikipedia|Olimar}} relies largely on {{iw|pikipedia|Pikmin family|Pikmin}} while battling, but Olimar has to {{iw|pikipedia|pluck}} them from the ground before he can use them. Each Pikmin has their own properties: {{iw|pikipedia|Blue Pikmin}} are resistant to {{iw|smashwiki|Water (type)|water}}; {{iw|pikipedia|Red Pikmin|Red}} to {{iw|smashwiki|flame|fire}}; {{iw|pikipedia|Yellow Pikmin|Yellow}} to {{iw|smashwiki|electric}}ity; {{iw|pikipedia|White Pikmin|White}} to {{iw|smashwiki|darkness}}; and {{iw|pikipedia|Purple Pikmin}} are strong. | |||
|<nowiki/> | |||
*Standard: {{iw|smashwiki|Pikmin Pluck}} | |||
*Side: {{iw|smashwiki|Pikmin Throw}} | |||
*Up: {{iw|smashwiki|Pikmin Chain}} | |||
*Down: {{iw|smashwiki|Pikmin Order}} | |||
*Final Smash: {{iw|smashwiki|End of Day}} | |||
|- | |- | ||
|[[File:BrawlLucas.jpg|120px]]<br>{{iw|smashwiki|Lucas (SSBB)|Lucas}}[[File:EarthBound Emblem.png|30px|class=invert-dark]] (newcomer) | |||
|{{iw|wikibound|Lucas}}' special moves are based around {{iw|wikibound|PSI}} attacks, much like Ness's. Lucas' {{iw|wikibound|PK Freeze}} can freeze opponents temporarily. His {{iw|wikibound|PK Fire}} explodes on contact. Lucas's {{iw|wikibound|PSI Magnet}} absorbs projectiles and heals him. Lucas's {{iw|wikibound|PK Thunder}} unleashes a controllable electric projectile, but it can hit Lucas to propel him upward as a recovery. Lucas can use PK Starstorm to unleash several fireballs rain in a fan formation, hurting players that touch them. | |||
|<nowiki/> | |||
*Standard: {{iw|smashwiki|PK Freeze}} | |||
| | *Side: {{iw|smashwiki|PK Fire}} | ||
*Up: {{iw|smashwiki|PK Thunder}} | |||
*Down: {{iw|smashwiki|PSI Magnet}} | |||
*Final Smash: {{iw|smashwiki|PK Starstorm}} | |||
| | |||
| | |||
| | |||
| | |||
|Standard || | |||
|} | |} | ||
===Unlockable | ===Unlockable characters=== | ||
{|class="wikitable"width=100% | |||
!width=10%|Character | |||
{| | !width=40%|Description | ||
!width=30%|How to unlock | |||
!witdh=20%|Special moves | |||
|- | |- | ||
|[[File:Ness Brawl art.png|120px]]<br>{{iw|smashwiki|Ness (SSBB)|Ness}}[[File:EarthBound Emblem.png|30px|class=invert-dark]] | |||
|{{iw|wikibound|Ness}} has a similar yet distinct moveset from Lucas's. He is light but remains decently strong. | |||
|<nowiki/> | |||
*Play five {{iw|smashwiki|Versus Mode|Brawl matches}} | |||
*Reflect ten projectiles | |||
*Complete {{iw|smashwiki|Subspace (Part I)}} in {{iw|smashwiki|Adventure Mode: The Subspace Emissary|The Subspace Emissary}} | |||
|<nowiki/> | |||
*Standard: {{iw|smashwiki|PK Flash}} | |||
*Side: {{iw|smashwiki|PK Fire}} | |||
*Up: {{iw|smashwiki|PK Thunder}} | |||
*Down: {{iw|smashwiki|PSI Magnet}} | |||
*Final Smash: {{iw|smashwiki|PK Starstorm}} | |||
|- | |- | ||
|[[File:Marth Brawl art.png|120px]]<br>{{iw|smashwiki|Marth (SSBB)|Marth}}[[File:FireEmblem Emblem.png|30px|class=invert-dark]] | |||
|{{iw|fireemblem|Marth}} is quick yet slightly weak. His attacks are more damaging from the tip of his sword, but his grab range is much shorter than in ''[[Super Smash Bros. Melee]]''. | |||
| | |<nowiki/> | ||
* | *Play 10 Brawl matches | ||
* | *Complete {{iw|smashwiki|Classic Mode (SSBB)|Classic Mode}} | ||
* | *Complete {{iw|smashwiki|The Battlefield Fortress}} in The Subspace Emissary | ||
| Standard || | |<nowiki/> | ||
*Standard: {{iw|smashwiki|Shield Breaker}} | |||
*Side: {{iw|smashwiki|Dancing Blade}} | |||
*Up: {{iw|smashwiki|Dolphin Slash}} | |||
*Down: {{iw|smashwiki|Counter}} | |||
*Final Smash: {{iw|smashwiki|Critical Hit}} | |||
|- | |- | ||
| Side || [[ | |[[File:BrawlLuigi.png|120px]]<br>{{iw|smashwiki|Luigi (SSBB)|Luigi}}[[File:Mario Emblem.png|30px|class=invert-dark]] | ||
|[[Luigi]] is similar to Mario, but compared to him, Luigi can jump higher, move faster, and has higher strength. Luigi cannot wall jump, unlike Mario. | |||
|<nowiki/> | |||
*Play 22 Brawl matches | |||
*Complete Classic Mode without using a {{iw|smashwiki|continue}} | |||
*Complete Subspace (Part I) in The Subspace Emissary | |||
|<nowiki/> | |||
*Standard: {{iw|smashwiki|Fireball}} ([[Green Fireball|article]]) | |||
*Side: {{iw|smashwiki|Green Missile}} ([[Green Missile|article]]) | |||
*Up: {{iw|smashwiki|Super Jump Punch}} ([[Super Jump Punch|article]]) | |||
*Down: {{iw|smashwiki|Luigi Cyclone}} ([[Luigi Cyclone|article]]) | |||
*Final Smash: {{iw|smashwiki|Negative Zone}} ([[Negative Zone|article]]) | |||
|- | |- | ||
| | |[[File:BrawlFalco.jpg|130px]]<br>{{iw|smashwiki|Falco (SSBB)|Falco}}[[File:StarFox Emblem.png|30px|class=invert-dark]] | ||
|{{iw|lylatwiki|Falco Lombardi|Falco}} controls similarly to Fox, but his moves have different properties. Falco has the highest initial jump of any character, and he is skilled with aerial moves. | |||
|<nowiki/> | |||
*Play 50 Brawl matches | |||
*Complete 100-Man Brawl | |||
*Complete {{iw|smashwiki|The Swamp}} in The Subspace Emissary | |||
|<nowiki/> | |||
*Standard: {{iw|smashwiki|Blaster (Falco)|Blaster}} | |||
*Side: {{iw|smashwiki|Falco Phantasm}} | |||
*Up: {{iw|smashwiki|Fire Bird}} | |||
*Down: {{iw|smashwiki|Reflector (Falco)|Reflector}} | |||
*Final Smash: {{iw|smashwiki|Landmaster}} | |||
|- | |- | ||
| | |[[File:BrawlCaptainFalcon.jpg|130px]]<br>{{iw|smashwiki|Captain Falcon (SSBB)|Captain Falcon}}[[File:F-Zero Emblem.png|30px|class=invert-dark]] | ||
|{{iw|fzerowiki|Captain Falcon}} moves very fast, and he is the second fastest fighter overall. His moves inflict strong knockback and damage, but they are slow and short-ranged. | |||
|<nowiki/> | |||
*Play 70 Brawl matches | |||
*Clear Classic Mode in less than 12 minutes on Normal {{iw|smashwiki|difficulty}} or higher | |||
*Complete {{iw|smashwiki|Outside the Ancient Ruins}} in The Subspace Emissary | |||
|<nowiki/> | |||
*Standard: {{iw|smashwiki|Falcon Punch}} | |||
*Side: {{iw|smashwiki|Raptor Boost}} | |||
*Up: {{iw|smashwiki|Falcon Dive}} | |||
*Down: {{iw|smashwiki|Falcon Kick}} | |||
*Final Smash: {{iw|smashwiki|Blue Falcon}} | |||
|- | |- | ||
| | |[[File:BrawlLucario.jpg|130px]]<br>[[smashwiki:Lucario (SSBB)|Lucario]][[File:Pokemon Emblem.png|30px|class=invert-dark]] (newcomer) | ||
|{{iw|bulbapedia|Lucario (Pokémon)|Lucario}} uses aura in most of his attacks, and he excels in speed. Lucario uses attacks that have good range. Lucario's attacks are stronger the more he is damaged. | |||
| | |||
*Play 100 Brawl matches | |||
*Clear every stage in {{iw|smashwiki|Target Smash!}} | |||
*Complete {{iw|smashwiki|The Glacial Peak}} in The Subspace Emissary | |||
|<nowiki/> | |||
*Standard: {{iw|smashwiki|Aura Sphere}} | |||
*Side: {{iw|smashwiki|Force Palm}} | |||
*Up: {{iw|smashwiki|Extreme Speed|ExtremeSpeed}} | |||
*Down: {{iw|smashwiki|Double Team}} | |||
*Final Smash: {{iw|smashwiki|Aura Storm}} | |||
|- | |- | ||
|[[File:BrawlSolidSnake.jpg|120px]]<br>{{iw|smashwiki|Snake (SSBB)|Snake}}[[File:MetalGear Emblem.png|30px|class=invert-dark]] (newcomer) | |||
|Snake uses a variety of explosives and weapons in battle. He is one of the heavier and stronger characters, but he lacks vertical jumping distance and has slow air speed. | |||
| | | | ||
* | *Play 15 Brawl matches on [[smashwiki:Shadow Moses Island|Shadow Moses Island]] | ||
* | *Play 130 Brawl matches | ||
* | *Complete {{iw|smashwiki|Battleship Halberd Interior}} in The Subspace Emissary | ||
| Standard || | |<nowiki/> | ||
*Standard: {{iw|smashwiki|Hand Grenade}} | |||
*Side: {{iw|smashwiki|Remote Controlled Missile}} | |||
*Up: {{iw|smashwiki|Cypher}} | |||
*Down: {{iw|smashwiki|C4}} | |||
*Final Smash: {{iw|smashwiki|Grenade Launcher}} | |||
|- | |- | ||
| | |[[File:BrawlROB.jpg|130px]]<br>[[R.O.B.]][[File:ROB Emblem.png|30px|class=invert-dark]] (newcomer) | ||
|R.O.B. is a heavy fighter, although he is still weak and is faster than most other heavy characters. | |||
|<nowiki/> | |||
*Play 160 Brawl matches | |||
*Collect 250 unique trophies | |||
*Complete {{iw|smashwiki|The Subspace Bomb Factory}} in The Subspace Emissary | |||
|<nowiki/> | |||
*Standard: {{iw|smashwiki|Robo Beam}} | |||
*Side: {{iw|smashwiki|Arm Rotor}} | |||
*Up: {{iw|smashwiki|Robo Burner}} | |||
*Down: {{iw|smashwiki|Gyro}} | |||
*Final Smash: {{iw|smashwiki|Diffusion Beam}} | |||
|- | |- | ||
| | |[[File:Ganondorf Brawl art.png|130px]]<br>{{iw|smashwiki|Ganondorf (SSBB)|Ganondorf}}[[File:Zelda Emblem.png|30px|class=invert-dark]] | ||
|{{iw|zeldawiki|Ganondorf}} is a heavy character whose attacks are very powerful. However, Ganondorf is one of the slowest characters. | |||
| | |||
*Clear Classic Mode with Link or Zelda on Hard difficulty or higher | |||
*Play 200 Brawl matches | |||
*Rescue Zelda and Link in {{iw|smashwiki|Subspace (Part II)}} in The Subspace Emissary | |||
|<nowiki/> | |||
*Standard: {{iw|smashwiki|Warlock Punch}} | |||
*Side: {{iw|smashwiki|Flame Choke}} | |||
*Up: {{iw|smashwiki|Dark Dive}} | |||
*Down: {{iw|smashwiki|Wizard's Foot}} | |||
*Final Smash: {{iw|smashwiki|Beast Ganon}} | |||
|- | |- | ||
| | |[[File:BrawlMrGameAndWatch.png|130px]]<br>{{iw|smashwiki|Mr. Game & Watch (SSBB)|Mr. Game & Watch}}[[File:Game&Watch Emblem.png|30px|class=invert-dark]] | ||
| | |[[Mr. Game & Watch]] uses moves that reference the {{iw|nwiki|Game & Watch}} games. He can use fast and powerful attacks, though he is vulnerable to {{iw|smashwiki|knockback}}. | ||
| Final Smash || | | | ||
*Play 250 Brawl matches | |||
*Clear Target Smash! with 30 {{iw|smashwiki|fighter}}s on any difficulty level | |||
*Complete {{iw|smashwiki|Battleship Halberd Bridge}} in The Subspace Emissary | |||
|<nowiki/> | |||
*Standard: {{iw|smashwiki|Chef}} | |||
*Side: {{iw|smashwiki|Judge}} | |||
*Up: {{iw|smashwiki|Fire}} | |||
*Down: {{iw|smashwiki|Oil Panic}} | |||
*Final Smash: {{iw|smashwiki|Octopus}} | |||
|- | |- | ||
|[[File:BrawlSonic.jpg|120px]]<br>{{iw|smashwiki|Sonic (SSBB)|Sonic}}[[File:Sonic Emblem.png|30px|class=invert-dark]] (newcomer) | |||
|[[Sonic]] is noted for being faster than any of the other characters. | |||
| | |<nowiki/> | ||
* | *Complete {{iw|smashwiki|The Great Maze}} in The Subspace Emissary | ||
* | *Complete Classic Mode with ten fighters | ||
* | *Play a combined total of ten hours of Brawl matches. | ||
| Standard || | *Play 300 Brawl matches | ||
|<nowiki/> | |||
*Standard: {{iw|smashwiki|Homing Attack}} | |||
*Side: {{iw|smashwiki|Spin Dash}} | |||
*Up: {{iw|smashwiki|Spring Jump}} | |||
*Down: {{iw|smashwiki|Spin Charge}} | |||
*Final Smash: {{iw|smashwiki|Super Sonic}} | |||
|- | |- | ||
| Side || [[ | |[[File:Jigglypuff Brawl art.png|130px]]<br>{{iw|smashwiki|Jigglypuff (SSBB)|Jigglypuff}}[[File:Pokemon Emblem.png|30px|class=invert-dark]] | ||
|{{iw|bulbapedia|Jigglypuff (Pokémon)|Jigglypuff}} is lighter than any of the other fighters. It has the slowest fall speed, the second fastest {{iw|smashwiki|air speed}}, and the slowest dash speed. | |||
|<nowiki/> | |||
*Beat 20 or more events after completing The Subspace Emissary | |||
*Play 350 Brawl matches | |||
*After clearing The Subspace Emissary, enter a hidden {{iw|smashwiki|door}} in {{iw|smashwiki|The Swamp}} and defeat it in a one-{{iw|smashwiki|stock}} match on {{iw|smashwiki|Pokémon Stadium 2}} | |||
|<nowiki/> | |||
*Standard: [[Jigglypuff#Rollout|Rollout]] | |||
*Side: [[Jigglypuff#Pound|Pound]] | |||
*Up: [[Jigglypuff#Sing|Sing]] | |||
*Down: [[Jigglypuff#Rest|Rest]] | |||
*Final Smash: [[Jigglypuff#Puff Up|Puff Up]] | |||
|- | |- | ||
| | |[[File:Toon Link Brawl art.png|120px]]<br>{{iw|smashwiki|Toon Link (SSBB)|Toon Link}}[[File:Zelda_Emblem.png|30px|class=invert-dark]] (newcomer) | ||
|{{iw|zeldawiki|Toon Link}} is almost exactly like [[Link]], but is quicker and floatier. | |||
|<nowiki/> | |||
*After clearing The Subspace Emissary, enter a hidden door in {{iw|smashwiki|The Forest}} and defeat him in a one-stock match on {{iw|smashwiki|Pirate Ship}} | |||
*Clear Classic Mode with any character once the The Subspace Emissary has already been completed | |||
*Play 400 Brawl matches | |||
|<nowiki/> | |||
*Standard: {{iw|smashwiki|Hero's Bow}} | |||
*Side: {{iw|smashwiki|Boomerang}} | |||
*Up: {{iw|smashwiki|Spin Attack}} | |||
*Down: {{iw|smashwiki|Bomb (Link)|Bomb}} | |||
*Final Smash: {{iw|smashwiki|Triforce Slash}} | |||
|- | |- | ||
|[[File:Wolf Brawl art.png|130px]]<br>{{iw|smashwiki|Wolf (SSBB)|Wolf}}[[File:StarFox Emblem.png|30px|class=invert-dark]] (newcomer) | |||
|{{iw|lylatwiki|Wolf O'Donnell|Wolf}} is one of the heavier characters, yet his speed and attacks are both average. His moves are similar to the other two ''{{iw|lylatwiki|Star Fox (series)|Star Fox}}'' fighters. Wolf lacks accuracy when using his {{iw|smashwiki|recovery}}. | |||
|<nowiki/> | |||
*After clearing The Subspace Emissary, enter a hidden door in {{iw|smashwiki|The Ruins}} and defeat Wolf in a one-stock match on {{iw|smashwiki|Lylat Cruise}} | |||
*Play 450 Brawl matches | |||
*Clear {{iw|smashwiki|Boss Battles}} as Fox or Falco | |||
|<nowiki/> | |||
*Standard: {{iw|smashwiki|Blaster (Wolf)|Blaster}} | |||
*Side: {{iw|smashwiki|Wolf Flash}} | |||
*Up: {{iw|smashwiki|Fire Wolf}} | |||
*Down: {{iw|smashwiki|Reflector (Wolf)|Reflector}} | |||
*Final Smash: {{iw|smashwiki|Landmaster}} | |||
| | |||
| | |||
| | |||
| | |||
| | |||
*After clearing The Subspace Emissary, | |||
| | |||
|- | |||
*Play 450 | |||
* | |||
| Standard || | |||
* | |||
|} | |} | ||
==Stages== | ==Stages== | ||
There are 41 total stages in ''Super Smash Bros. Brawl''. | There are 41 total stages in ''Super Smash Bros. Brawl''. 10 of these stages are returning stages from ''Super Smash Bros. Melee''. | ||
===Default stages=== | |||
===Default | {|class="wikitable sortable" width=100% | ||
{| class=sortable | |||
|- | |- | ||
! width=15% | | !width=15%|Image | ||
! width=17% | Stage | !width=17%|Stage | ||
! width=40% | Description | !width=40%|Description | ||
! width=28% | Songs | !width=28%|Songs | ||
|- | |- | ||
|[[File:SSBB Battlefield Stage.png|150px]] | |||
| align=center | | |align=center|{{iw|smashwiki|Battlefield (SSBB)|Super Smash Bros. Brawl: Battlefield}}[[File:SmashBros Emblem.png|30px|class=invert-dark]] | ||
| | |This iteration of Battlefield takes place on a green landscape at different times of day. It is intended to be the most basic stage and lacks any {{iw|smashwiki|stage hazard}}s. | ||
| | |<nowiki/> | ||
*Battlefield | *Battlefield | ||
*[http://www.smashbros.com/en_us/music/music01.html Menu (Super Smash Bros. Melee)] | *[http://www.smashbros.com/en_us/music/music01.html Menu (Super Smash Bros. Melee)] | ||
| Line 652: | Line 493: | ||
*Multi-Man Melee 1 (Melee) | *Multi-Man Melee 1 (Melee) | ||
|- | |- | ||
|[[File:SSBB Final Destination Stage.png|150px]] | |||
| align=center | | |align=center|{{iw|smashwiki|Final Destination (SSBB)|Super Smash Bros. Brawl: Final Destination}}[[File:SmashBros Emblem.png|30px|class=invert-dark]] | ||
| | |This stage features a wide, flat platform in space, and there are no features besides a dynamically changing background. | ||
| | |<nowiki/> | ||
*Final Destination | *Final Destination | ||
*Credits (Super Smash Bros.) | *Credits (Super Smash Bros.) | ||
| Line 662: | Line 503: | ||
*Giga Bowser | *Giga Bowser | ||
|- | |- | ||
|[[File:SSBB Delfino Plaza Stage.png|150px]] | |||
| align=center | | |align=center|{{iw|smashwiki|Delfino Plaza|Super Mario Sunshine: Delfino Plaza}}[[File:Mario Emblem.png|30px|class=invert-dark]] | ||
| | |[[Delfino Plaza (stage)|Delfino Plaza]] is a moving stage with a series of platforms that carry characters to different areas of the location, comparable to {{iw|smashwiki|Mute City}}. There is interactable water in some of the segments. | ||
| | |<nowiki/> | ||
*Delfino Plaza ([[Super Mario Sunshine]]) | *Delfino Plaza ([[Super Mario Sunshine]]) | ||
*Title / Ending ([[Super Mario World]]) | *Title / Ending ([[Super Mario World]]) | ||
| Line 672: | Line 513: | ||
*Main Theme (Super Mario 64) | *Main Theme (Super Mario 64) | ||
|- | |- | ||
|[[File:SSBB Mushroomy Kingdom Stage.png|150px]] | |||
| align=center | | |rowspan=2 align=center|{{iw|smashwiki|Mushroomy Kingdom|Super Mario Bros.: Mushroomy Kingdom}}[[File:Mario Emblem.png|30px|class=invert-dark]] | ||
| | |rowspan=2|[[Mushroomy Kingdom]] is an autoscrolling stage with the exact layout of [[World 1-1 (Super Mario Bros.)|World 1-1]] from ''[[Super Mario Bros.]]'', although [[World 1-2 (Super Mario Bros.)|World 1-2]] is sometimes used instead. {{iw|smashwiki|block}}s can be hit to spawn its, like in the {{iw|smashwiki|Super Mario Bros.|origin game}}. There are several [[pit]]s that {{iw|smashwiki|KO}} anyone who falls down them. There are a number of [[pipe]]s to jump over along the way. | ||
| Ground: | |Ground: | ||
*[http://www.smashbros.com/en_us/music/music21.html Ground Theme (Super Mario Bros.)] | *[http://www.smashbros.com/en_us/music/music21.html Ground Theme (Super Mario Bros.)] | ||
*Gritzy Desert ([[Mario & Luigi Partners in Time]]) | *Gritzy Desert ([[Mario & Luigi: Partners in Time]]) | ||
*Ground Theme 2 (Super Mario Bros.) | *Ground Theme 2 (Super Mario Bros.) | ||
Underground: | |- | ||
|[[File:SSBB Mushroomy Kingdom Stage 2.png|150px]] | |||
|Underground: | |||
*Underground Theme ([[Super Mario Bros.]]) | *Underground Theme ([[Super Mario Bros.]]) | ||
*Underwater Theme (Super Mario Bros.) | *Underwater Theme (Super Mario Bros.) | ||
*Underground Theme (Super Mario Land) | *Underground Theme (Super Mario Land) | ||
|- | |- | ||
|[[File:SSBB Mario Circuit Stage.png|150px]] | |||
| align=center | | |align=center|{{iw|smashwiki|Figure-8 Circuit|Mario Kart: Mario Circuit}}[[File:Mario Emblem.png|30px|class=invert-dark]] | ||
| | |[[Figure-8 Circuit (stage)|Mario Circuit]] takes place on the intersection of the [[Figure-8 Circuit]] stage of the [[Mario Kart (series)|''Mario Kart'' series]]. The obstacles are {{iw|smashwiki|Shy Guy}}s that drive in from either behind or when driving from the side across the bridge. | ||
| | |<nowiki/> | ||
*Mario Circuit ([[Super Mario Kart]]) | *Mario Circuit (''[[Super Mario Kart]]'') | ||
*Luigi Circuit ([[Mario Kart 64]]) | *Luigi Circuit (''[[Mario Kart 64]]'') | ||
*Waluigi Pinball ([[Mario Kart DS]]) | *Waluigi Pinball (''[[Mario Kart DS]]'') | ||
*Rainbow Road ([[Mario Kart Double Dash!!]]) | *Rainbow Road (''[[Mario Kart Double Dash!!]]'') | ||
*Mario Tennis / Mario Golf | *Mario Tennis / Mario Golf | ||
*Excite Truck | *Excite Truck | ||
*Title (3D Hot Rally) | *Title (3D Hot Rally) | ||
|- | |- | ||
|[[File:SSBB Rumble Falls Stage.png|150px]] | |||
| align=center | | |align=center|{{iw|smashwiki|Rumble Falls|Donkey Kong Jungle Beat: Rumble Falls}}[[File:DK Emblem.png|30px|class=invert-dark]] | ||
| | |[[Rumble Falls]] is a stage that autoscrolls vertically at a slow speed before looping eventually, much like {{iw|smashwiki|Icicle Mountain}}. Besides using platforms, there are usable switches and {{iw|smashwiki|ladder}}s, as well as highly damaging thorns. There are times when the stage speeds up, but gives notice of this, unlike Icicle Mountain. | ||
| | |<nowiki/> | ||
*Jungle Level Ver.2 | *Jungle Level Ver.2 | ||
*Jungle Level | *Jungle Level | ||
| Line 708: | Line 551: | ||
*[[Bramble Blast]] | *[[Bramble Blast]] | ||
|- | |- | ||
|[[File:SSBB Bridge of Eldin Stage.png|150px]] | |||
| align=center | | |align=center|{{iw|smashwiki|Bridge of Eldin|The Legend of Zelda: Twilight Princess: Bridge of Eldin}}[[File:Zelda Emblem.png|30px|class=invert-dark]] | ||
| A flat stage. | |A flat stage where the {{iw|smashwiki|blast line}}s can be walked off from the sides. {{iw|smashwiki|King Bulblin & Lord Bullbo}} destroy the bridge sometimes, creating a gap preventing fighters from accessing the middle part of the stage. After a while, a {{iw|zeldawiki|Portal (Object)|Portal}} arrives to fix the bridge. | ||
| | |<nowiki/> | ||
*Main Theme (The Legend of Zelda) | *Main Theme (The Legend of Zelda) | ||
*[http://www.smashbros.com/en_us/music/music04.html Ocarina of Time Medley] | *[http://www.smashbros.com/en_us/music/music04.html Ocarina of Time Medley] | ||
| Line 722: | Line 565: | ||
*Midna's Lament | *Midna's Lament | ||
|- | |- | ||
|[[File:SSBB Norfair Stage.png|150px]] | |||
| align=center | | |align=center|{{iw|smashwiki|Norfair|Metroid: Norfair}}[[File:Metroid Emblem.png|30px|class=invert-dark]] | ||
| | |This is a stage taking place in {{iw|metroidwiki|Planet Zebes}}. There are a few types of lava obstacles, including rising lava, lava falls appearing from the left or right, lava spurts, and a giant lava wave. When the giant wave approaches, players are forced to enter a capsule or jump high enough to dodge it. | ||
| | |<nowiki/> | ||
*Main Theme (Metroid) | *Main Theme (Metroid) | ||
*Ending (Metroid) | *Ending (Metroid) | ||
| Line 734: | Line 577: | ||
*Norfair | *Norfair | ||
|- | |- | ||
|[[File:SSBB Frigate Orpheon Stage.png|150px]] | |||
| align=center | | |align=center|{{iw|smashwiki|Frigate Orpheon|Metroid Prime: Frigate Orpheon}}[[File:Metroid Emblem.png|30px|class=invert-dark]] | ||
| | |Frigate Orpheon occasionally flips around, switching between two groups of platforms to fight on. Moving platforms can appear on the sides temporarily. A power outage may occur, darkening the stage. | ||
| | |<nowiki/> | ||
*Vs. Ridley | *Vs. Ridley | ||
*Opening / Menu (Metroid Prime) | *Opening / Menu (Metroid Prime) | ||
| Line 745: | Line 588: | ||
*Vs. Parasite Queen | *Vs. Parasite Queen | ||
|- | |- | ||
|[[File:SSBB Yoshi's Island Stage.png|150px]] | |||
| align=center | | |align=center|{{iw|smashwiki|Yoshi's Island (SSBB)|Yoshi's Island: Yoshi's Island}}[[File:Yoshi Emblem.png|30px|class=invert-dark]] | ||
| Yoshi's Island | |[[Yoshi's Island (Super Smash Bros. Brawl)|Yoshi's Island]] changes seasons as the fight progresses. There are several [[Fly Guy]]s that hold items, and they can be knocked away. A [[Blarggwich]] can appear on the side of the stage briefly to be used as a platform. | ||
| | |<nowiki/> | ||
*Obstacle Course | *Obstacle Course | ||
*[http://www.smashbros.com/en_us/music/music02.html Ending (Yoshi's Story)] | *[http://www.smashbros.com/en_us/music/music02.html Ending (Yoshi's Story)] | ||
| Line 755: | Line 598: | ||
*Wildlands | *Wildlands | ||
|- | |- | ||
|[[File:SSBB Halberd Stage.png|150px]] | |||
| align=center | | |align=center|{{iw|smashwiki|Halberd|Kirby: Halberd}}[[File:Kirby Emblem.png|30px|class=invert-dark]] | ||
| | |Takes place on a [[Battlefield]]-like platform that lands on the {{iw|wikirby|Halberd}} itself. On the ship is a laser cannon that can target fighters and shoot them, as well as a giant arm that targets a fighter. The platform rises and leaves the Halberd, restarting the loop. | ||
| | |<nowiki/> | ||
*[http://www.smashbros.com/en_us/music/music14.html Meta Knight’s Revenge] | *[http://www.smashbros.com/en_us/music/music14.html Meta Knight’s Revenge] | ||
*Gourmet Race | *Gourmet Race | ||
| Line 772: | Line 615: | ||
*O² Battle | *O² Battle | ||
|- | |- | ||
|[[File:SSBB Lylat Cruise Stage.png|150px]] | |||
| align=center | | |align=center|{{iw|smashwiki|Lylat Cruise|Star Fox: Lylat Cruise}}[[File:StarFox Emblem.png|30px|class=invert-dark]] | ||
| A stage that moves through the Lylat System. | |A stage that moves through various settings of the {{iw|lylatwiki|Lylat System}}. Besides different visuals, Lylat Cruise is essentially the same as the game's Final Destination. | ||
| | |<nowiki/> | ||
*[http://www.smashbros.com/en_us/music/music05.html Space Armada] | *[http://www.smashbros.com/en_us/music/music05.html Space Armada] | ||
*Main Theme (Star Fox) | *Main Theme (Star Fox) | ||
| Line 787: | Line 630: | ||
*[http://www.smashbros.com/en_us/music/music16.html Tunnel Scene (X)] | *[http://www.smashbros.com/en_us/music/music16.html Tunnel Scene (X)] | ||
|- | |- | ||
|[[File:SSBB Pokémon Stadium 2 Stage.png|150px]] | |||
| align=center | | |align=center|{{iw|smashwiki|Pokémon Stadium 2|Pokémon: Pokémon Stadium 2}}[[File:Pokemon Emblem.png|30px|class=invert-dark]] | ||
| | |Taking place in a ''{{iw|bulbapedia|Pokémon}}''-themed stadium, the stage changes temporarily into one of four terrains as time passes: {{iw|bulbapedia|Ice (type)|Ice}}, {{iw|bulbapedia|Electric (type)|Electric}}, {{iw|smashwiki|Ground (type)|Ground}}, and {{iw|bulbapedia|Flying (type)|Flying}}. Each of the terrains have a different layout. | ||
| | |<nowiki/> | ||
*Pokémon Main Theme (Red/Blue/Yellow) | *Pokémon Main Theme (Red/Blue/Yellow) | ||
*[http://www.smashbros.com/en_us/music/music09.html Pokémon Gym / Evolution] | *[http://www.smashbros.com/en_us/music/music09.html Pokémon Gym / Evolution] | ||
| Line 797: | Line 640: | ||
*Road to Viridian City (From Pallet Town / Pewter City) | *Road to Viridian City (From Pallet Town / Pewter City) | ||
|- | |- | ||
|[[File:SSBB Port Town Aero Dive Stage.png|150px]] | |||
| align=center | | |align=center|{{iw|smashwiki|Port Town Aero Dive|F-Zero: Port Town Aero Dive}}[[File:F-Zero Emblem.png|30px|class=invert-dark]] | ||
| | |The stage takes place on platforms hovering along a race course, stopping on occasion. {{iw|fzerowiki|Machine}}s may zoom on the stage to hit fighters, dealing high {{iw|smashwiki|knockback}}. | ||
| | |<nowiki/> | ||
*Mute City | *Mute City | ||
*Fire Field | *Fire Field | ||
| Line 814: | Line 657: | ||
*Shotgun Kiss | *Shotgun Kiss | ||
|- | |- | ||
|[[File:SSBB Castle Siege Stage.png|150px]] | |||
| align=center | | |align=center|{{iw|smashwiki|Castle Siege|Fire Emblem: Castle Siege}}[[File:FireEmblem Emblem.png|30px|class=invert-dark]] | ||
| | |The stage takes place around an unnamed castle. It goes through three different layouts before restarting. The second layout features destructible statues that hold platforms. A fight occurs in the background, but it does not affect the match. | ||
| | |<nowiki/> | ||
*[http://www.smashbros.com/en_us/music/music13.html Fire Emblem Theme] | *[http://www.smashbros.com/en_us/music/music13.html Fire Emblem Theme] | ||
*With Mila's Divine Protection (Celica Map 1) | *With Mila's Divine Protection (Celica Map 1) | ||
| Line 831: | Line 674: | ||
*Victory Is Near | *Victory Is Near | ||
|- | |- | ||
|[[File:SSBB WarioWare, Inc. Stage.png|150px]] | |||
| align=center | | |align=center|{{iw|smashwiki|WarioWare, Inc.|WarioWare: WarioWare, Inc.}}[[File:Wario Emblem.png|30px|class=invert-dark]] | ||
| | |[[WarioWare, Inc. (stage)|WarioWare, Inc.]] has the fighters play through various [[microgame]], which is where the {{iw|smashwiki|stage hazard}}s are featured. Any players who clear a microgame successfully receive a reward, which can be temporary {{iw|smashwiki|invincibility}} or {{iw|smashwiki|Super Mushroom|growth}}, or having health restored. The intermission area between microgames has a few platforms, but they disappear while a microgame is being played. | ||
| | |<nowiki/> | ||
*WarioWare, Inc. | *WarioWare, Inc. | ||
*WarioWare, Inc. Medley | *WarioWare, Inc. Medley | ||
| Line 844: | Line 687: | ||
*Mike's Song (JP) | *Mike's Song (JP) | ||
|- | |- | ||
|[[File:SSBB Distant Planet Stage.png|150px]] | |||
| align=center | | |align=center|{{iw|smashwiki|Distant Planet|Pikmin: Distant Planet}}[[File:Pikmin Emblem.png|30px|class=invert-dark]] | ||
| A | |Fighters battle in an area around forest vegetation. A {{iw|pikipedia|Bulborb}} can enter and leave the right side, KO'ing fighters if it manages to eat them, although the Bulborb can be stood on. Rainfall occurs intermittently, making the left slope too slippery to use. There are red, yellow, and blue {{iw|pikipedia|Pellet Posy|Pellet Posies}} that release {{iw|pikipedia|Pellet}}s when hit. There are {{iw|pikipedia|Onion}}s where Pellets of the same color can be thrown into to produce the number of items stated on the pellet. | ||
| | |<nowiki/> | ||
*Main Theme (Pikmin) | *Main Theme (Pikmin) | ||
*World Map (Pikmin 2) | *World Map (Pikmin 2) | ||
| Line 858: | Line 701: | ||
*Title (Big Brain Academy) | *Title (Big Brain Academy) | ||
|- | |- | ||
|[[File:SSBB Smashville Stage.png|150px]] | |||
| align=center | | |align=center|{{iw|smashwiki|Smashville|Animal Crossing: Wild World: Smashville}}[[File:AnimalCrossing Emblem.png|30px|class=invert-dark]] | ||
| The | |A stage without any hazards and a low moving platform on the top. Balloons with {{iw|smashwiki|food}} appear sometimes. The events and time of day corresponds to the [[Wii]]'s internal clock, such as how {{iw|nookipedia|K.K. Slider}} does live performances on Saturdays at 8 P.M. | ||
| | |<nowiki/> | ||
*Title (Animal Crossing) | *Title (Animal Crossing) | ||
*[http://www.smashbros.com/en_us/music/music07.html Go K.K. Rider!] | *[http://www.smashbros.com/en_us/music/music07.html Go K.K. Rider!] | ||
| Line 868: | Line 711: | ||
*2:00 am. | *2:00 am. | ||
|- | |- | ||
|[[File:SSBB New Pork City Stage.png|150px]] | |||
| align=center | | |align=center|{{iw|smashwiki|New Pork City|EarthBound: New Pork City}}[[File:EarthBound Emblem.png|30px|class=invert-dark]] | ||
| | |New Pork City is a very large and wide open stage, similarly to {{iw|smashwiki|Temple}}. Its platforms are mostly stationary, with one platform swinging and a hovering car moving throughout the stage. The {{iw|smashwiki|Ultimate Chimera}} may appear, and it deals very high damage and knockback on fighters on contact. | ||
| | |<nowiki/> | ||
*[http://www.smashbros.com/en_us/music/music18.html Porky's Theme] | *[http://www.smashbros.com/en_us/music/music18.html Porky's Theme] | ||
*Unfounded Revenge / Smashing Song of Praise | *Unfounded Revenge / Smashing Song of Praise | ||
| Line 879: | Line 722: | ||
*Snowman | *Snowman | ||
|- | |- | ||
|[[File:SSBB Summit Stage.png|150px]] | |||
| align=center | | |align=center|{{iw|smashwiki|Summit|Ice Climber: Summit}}[[File:IceClimbers Emblem.png|30px|class=invert-dark]] | ||
| A stage that takes place on a | |A stage that takes place on a glacier. The only hazard at first is an icicle falling from the bottom of the stage. However, the glacier eventually detaches and travels down the water for a while before stopping, followed by the water level rising back. A {{iw|smashwiki|fish}} can appear unexpectedly to eat nearby fighters, KO'ing them. | ||
| | |<nowiki/> | ||
*[http://www.smashbros.com/en_us/music/music17.html Ice Climber] | *[http://www.smashbros.com/en_us/music/music17.html Ice Climber] | ||
*Balloon Trip | *Balloon Trip | ||
| Line 889: | Line 732: | ||
*[[Icicle Mountain]] (Melee) | *[[Icicle Mountain]] (Melee) | ||
|- | |- | ||
|[[File:SSBB Skyworld Stage.png|150px]] | |||
| align=center | | |align=center|{{iw|smashwiki|Skyworld|Kid Icarus: Skyworld}}[[File:KidIcarus Emblem.png|30px|class=invert-dark]] | ||
| | |Skyworld has several breakable platforms atop cloud platforms. The breakable platforms are not {{iw|smashwiki|Platform#Semisoft platforms|semisoft platforms}}, but players can destroy them to make the cloud platforms accessible. A small platform sometimes hovers in the lower area of the stage. | ||
| | |<nowiki/> | ||
*[http://www.smashbros.com/en_us/music/music06.html Underworld] | *[http://www.smashbros.com/en_us/music/music06.html Underworld] | ||
*Skyworld | *Skyworld | ||
| Line 898: | Line 741: | ||
*Title (Kid Icarus) | *Title (Kid Icarus) | ||
|- | |- | ||
|[[File:SSBB PictoChat Stage.png|150px]] | |||
| align=center | | |align=center|{{iw|smashwiki|PictoChat|Nintendo DS: PictoChat}}[[File:NintendoDS Emblem.png|30px|class=invert-dark]] | ||
| | |Takes place in a setting themed after the {{iw|nwiki|PictoChat|Nintendo DS application}}. Several types of sketches appear and vanish, including ladders, platforms, and hazards. | ||
| | |<nowiki/> | ||
*PictoChat | *PictoChat | ||
*Mii Channel | *Mii Channel | ||
| Line 912: | Line 755: | ||
*[http://www.smashbros.com/jp/characters/kirby.html#3rd Shaberu! DS Cooking Navi] | *[http://www.smashbros.com/jp/characters/kirby.html#3rd Shaberu! DS Cooking Navi] | ||
|- | |- | ||
|[[File:SSBB Shadow Moses Island Stage.png|150px]] | |||
| align=center | | |align=center|{{iw|smashwiki|Shadow Moses Island|Metal Gear Solid: Shadow Moses Island}}[[File:MetalGear Emblem.png|30px|class=invert-dark]] | ||
| | |Takes place just outside a helipad with walls that are breakable yet still regenerative. A Metal Gear sometimes appears in the background. | ||
| | |<nowiki/> | ||
*[http://www.smashbros.com/en_us/music/music11.html MGS4 [Theme of Love] Smash Bros. Brawl Version] | *[http://www.smashbros.com/en_us/music/music11.html MGS4 [Theme of Love] Smash Bros. Brawl Version] | ||
*Encounter | *Encounter | ||
| Line 926: | Line 769: | ||
*Calling to the Night | *Calling to the Night | ||
|- | |- | ||
|[[File:SSBB Temple Stage.png|150px]] | |||
| align=center | | |align=center|{{iw|smashwiki|Temple|The Legend of Zelda: Hyrule Temple}}[[File:Zelda Emblem.png|30px|class=invert-dark]] | ||
| | |A large and wide stage returning from ''[[Super Smash Bros. Melee]]'', the Temple is same as before, with a cover of the old background music plus additional ones, including the original track. | ||
| | |<nowiki/> | ||
*[http://www.smashbros.com/en_us/stages/stage18.html Great Temple/Temple] | *[http://www.smashbros.com/en_us/stages/stage18.html Great Temple/Temple] | ||
*Temple (Melee) | *Temple (Melee) | ||
|- | |- | ||
|[[File:SSBB Yoshi's Island Melee Stage.png|150px]] | |||
| align=center | | |align=center|{{iw|smashwiki|Yoshi's Island (SSBM)|Super Mario World: Yoshi's Island}}[[File:Yoshi Emblem.png|30px|class=invert-dark]] | ||
| | |[[Yoshi's Island (Super Smash Bros. Melee)|Yoshi's Island]] is another stage returning from ''Super Smash Bros. Melee''. The main gimmick is the [[Rotating Block]]s. | ||
| | |<nowiki/> | ||
*Yoshi's Island (Melee) | *Yoshi's Island (Melee) | ||
*Super Mario Bros. 3 (Melee) | *Super Mario Bros. 3 (Melee) | ||
|- | |- | ||
|[[File:SSBB Onett Stage.png|150px]] | |||
| align=center | | |align=center|{{iw|smashwiki|Onett|EarthBound: Onett}}[[File:EarthBound Emblem.png|30px|class=invert-dark]] | ||
| | |A stage from ''Super Smash Bros. Melee'' with cars as the stage hazards and collapsible platforms attached to the middle building. | ||
| | |<nowiki/> | ||
*Mother (Melee) | *Mother (Melee) | ||
*Mother 2 (Melee) | *Mother 2 (Melee) | ||
|- | |- | ||
|[[File:SSBB Corneria Stage.png|150px]] | |||
| align=center | [[Corneria|Star Fox: Corneria]] [[ | |align=center|[[smashwiki:Corneria|Star Fox: Corneria]][[File:StarFox Emblem.png|30px|class=invert-dark]] | ||
| | |A stage from ''Super Smash Bros. Melee'' set on the {{iw|lylatwiki|Great Fox}}. {{iw|lylatwiki|Arwing}}s and {{iw|lylatwiki|Wolfen}}s are the main stage hazards, but they are also makeshift platforms. The laser cannons from the Great Fox can damage fighters near it. | ||
| | |<nowiki/> | ||
*Corneria (Melee) | *Corneria (Melee) | ||
*Venom (Melee) | *Venom (Melee) | ||
|- | |- | ||
|[[File:SSBB Rainbow Ride Stage.png|150px]] | |||
| align=center | [[Rainbow Cruise|Super Mario 64: Rainbow Cruise]] [[ | |align=center|[[Rainbow Cruise|Super Mario 64: Rainbow Cruise]][[File:Mario Emblem.png|30px|class=invert-dark]] | ||
| | |A scrolling stage from ''Super Smash Bros. Melee'' where players ride on the [[Rainbow Cruiser]] and [[magic carpet]]s while encounter falling blocks, and other platforms themed after ''[[Super Mario 64]]'' | ||
| | |<nowiki/> | ||
*Rainbow Cruise (Melee) | *Rainbow Cruise (Melee) | ||
*Princess Peach's Castle (Melee) | *Princess Peach's Castle (Melee) | ||
|- | |- | ||
|[[File:SSBB Brinstar Stage.png|150px]] | |||
| align=center | [[Brinstar|Metroid: Brinstar]] [[ | |align=center|[[smashwiki:Brinstar|Metroid: Brinstar]][[File:Metroid Emblem.png|30px|class=invert-dark]] | ||
| | |A stage from ''Super Smash Bros. Melee'' where acid rises in a set pattern. | ||
| | |<nowiki/> | ||
*Brinstar (Melee) | *Brinstar (Melee) | ||
*Brinstar Depths (Melee) | *Brinstar Depths (Melee) | ||
|} | |} | ||
===Unlockable stages=== | |||
{|class="wikitable sortable" width=100% | |||
===Unlockable | |||
{| class=sortable | |||
|- | |- | ||
! width=15% | | !width=15%|Image | ||
! width=17% | Stage | !width=17%|Stage | ||
! width=40% | Description | !width=40%|Description | ||
! width=28% | Songs | !width=28%|Songs | ||
|- | |- | ||
|[[File:SSBB Luigi's Mansion Stage.png|150px]] | |||
| align=center | | |align=center|{{iw|smashwiki|Luigi's Mansion|Luigi's Mansion: Luigi's Mansion}}[[File:Mario Emblem.png|30px|class=invert-dark]] | ||
| | |[[Luigi's Mansion (stage)|Luigi's Mansion]] takes place at its namesake haunted mansion. The roof is held up by four poles that can be attacked, causing the mansion to collapse and then rebuild itself a while later. | ||
| | This stage is unlocked by playing 3 {{iw|smashwiki|Versus Mode|matches}} as Luigi. | ||
|<nowiki/> | |||
*Luigi's Mansion Theme | *Luigi's Mansion Theme | ||
*Tetris: Type A | *Tetris: Type A | ||
| Line 990: | Line 831: | ||
*Castle / Boss Fortress (Super Mario World / SMB 3) | *Castle / Boss Fortress (Super Mario World / SMB 3) | ||
|- | |- | ||
|[[File:SSBB Pirate Ship Stage.png|150px]] | |||
| align=center | [[Pirate Ship | |align=center|[[smashwiki:Pirate Ship|The Legend of Zelda: The Wind Waker: Pirate Ship]][[File:Zelda Emblem.png|30px|class=invert-dark]] | ||
| | |Players ride on a ship voyaging through the {{iw|zeldawiki|Great Sea}} from {{iw|zeldawiki|The Legend of Zelda (Series)|''The Legend of Zelda'' series}}. Stage hazards include cannons firing at the ship, a rock that the ship crashes into, and a whirlwind that sends the ship flying. The {{iw|zeldawiki|King of Red Lions}} sometimes appears to follow the ship, and players can use it as a platform. | ||
| | The stage is unlocked alongside {{iw|smashwiki|Toon Link (SSBB)|Toon Link}}. | ||
|<nowiki/> | |||
*Great Sea | *Great Sea | ||
*Dragon Roost Island | *Dragon Roost Island | ||
| Line 1,004: | Line 846: | ||
*Village of the Blue Maiden | *Village of the Blue Maiden | ||
|- | |- | ||
|[[File:SSBB Spear Pillar Stage.png|150px]] | |||
| align=center | | |align=center|{{iw|smashwiki|Spear Pillar|Pokémon: Spear Pillar}}[[File:Pokemon Emblem.png|30px|class=invert-dark]] | ||
| The stage takes place at the top of Spear Pillar | |The stage takes place at the top of {{iw|bulbapedia|Spear Pillar}}. A few {{iw|bulbapedia|Legendary Pokémon}} are the stage hazards. [[bulbapedia:Palkia (Pokémon)|Palkia]] can reverse the screen and tilt it upside-down. [[bulbapedia:Dialga (Pokémon)|Dialga]] can alter the speed of the battle. [[bulbapedia:Cresselia (Pokémon)|Cresselia]] hurls a spinning light beam, damaging any fighters. Both Palkia and Dialga can generate giant beams capable of removing parts of the stage. | ||
| | The stage is unlocked by winning {{iw|smashwiki|Event 25: The Aura Is With Me}}. | ||
|<nowiki/> | |||
*Dialga / Palkia Battle at Spear Pillar! | *Dialga / Palkia Battle at Spear Pillar! | ||
*Victory Road | *Victory Road | ||
| Line 1,014: | Line 857: | ||
*Route 209 | *Route 209 | ||
|- | |- | ||
|[[File:SSBB 75m Stage.png|150px]] | |||
| align=center | | |align=center|{{iw|smashwiki|75m|Donkey Kong: 75 m}}[[File:DK Emblem.png|30px|class=invert-dark]] | ||
| | |[[75 m (stage)|75 m]] takes place in the [[75m|third stage]] of ''[[Donkey Kong (game)|Donkey Kong]]''. The only hazard not from the ''Donkey Kong'' iteration is [[Donkey Kong]] himself, who appears out of the background after an audio cue plays, alerting of it. While Donkey Kong is active, bouncing [[jack]]s appear to harm the player. | ||
| | The stage is unlocked after platying twenty matches as {{iw|smashwiki|Donkey Kong (SSBB)|Donkey Kong}}. | ||
|<nowiki/> | |||
*[http://www.smashbros.com/en_us/music/music15.html Donkey Kong] | *[http://www.smashbros.com/en_us/music/music15.html Donkey Kong] | ||
*Opening (Donkey Kong) | *Opening (Donkey Kong) | ||
*25m BGM | *25m BGM | ||
|- | |- | ||
|[[File:SSBB Mario Bros. Stage.png|150px]] | |||
| align=center | | |align=center|{{iw|smashwiki|Mario Bros.|Mario Bros.: Mario Bros.}}[[File:Mario Emblem.png|30px|class=invert-dark]] | ||
| | |The stage is set in the location within the ''[[Mario Bros. (game)|Mario Bros.]]'' game. [[Shellcreeper]]s and [[Sidestepper]]s are the stage hazards, though fighters can immobilize the enemies to pick them up and throw them. However, any immobilized enemy gets up eventually, changes color, and moves even faster than before. | ||
| | The stage is unlocked by winning {{iw|smashwiki|Event 19: Wario Bros.}} | ||
|<nowiki/> | |||
*Mario Bros. | *Mario Bros. | ||
*Famicom Medley | *Famicom Medley | ||
| Line 1,032: | Line 877: | ||
*Douchuumen (Nazo no Murasamejo) | *Douchuumen (Nazo no Murasamejo) | ||
|- | |- | ||
|[[File:SSBB Flat Zone 2 Stage.png|150px]] | |||
| align=center | | |align=center|{{iw|smashwiki|Flat Zone 2|Game & Watch: Flat Zone 2}}[[File:Game&Watch Emblem.png|30px|class=invert-dark]] | ||
| An enhanced version of | |An enhanced version of {{iw|smashwiki|Flat Zone}} that has scenes based on the {{iw|nwiki|Game & Watch}} titles ''{{iw|nwiki|Fire}}'', ''{{iw|nwiki|Chef}}'', ''{{iw|nwiki|Oil Panic}}'', and ''{{iw|nwiki|Lion}}''. Each scene barring ''Fire'' has its own stage hazards. A figure with a bell appears whenever the scene is about to change. | ||
| | The stage is unlocked alongside Mr. Game & Watch. | ||
|<nowiki/> | |||
*[http://www.smashbros.com/en_us/music/music23.html Flat Zone 2] | *[http://www.smashbros.com/en_us/music/music23.html Flat Zone 2] | ||
*Flat Zone (Melee) | *Flat Zone (Melee) | ||
*Chill (Dr. Mario) | *Chill (Dr. Mario) | ||
|- | |- | ||
|[[File:SSBB Hanenbow Stage.png|150px]] | |||
| align=center | | |align=center|{{iw|smashwiki|Hanenbow|Electroplankton: Hanenbow}}[[File:Electroplankton Emblem.png|30px|class=invert-dark]] | ||
| A leafy stage, | |A leafy stage where Hanenbows fly around, hurting players on contact. Leaves tilt when attacked and change from green to red depending on the amount of damage inflicted. There is a swimmable pool of water at the bottom. | ||
| | The stage is unlocked after winning {{iw|smashwiki|Event 28: Flower Blooms in the Echoes}}. | ||
|<nowiki/> | |||
None | None | ||
|- | |- | ||
|[[File:SSBB Green Hill Zone Stage.png|150px]] | |||
| align=center | | |align=center|{{iw|smashwiki|Green Hill Zone|Sonic the Hedgehog: Green Hill Zone}}[[File:Sonic Emblem.png|30px|class=invert-dark]] | ||
| | |The stage is based on the first stage of ''{{wp|Sonic the Hedgehog (1991 video game)|Sonic the Hedgehog}}''. It has a breakable sloping dip that can break off in parts from damage, resulting in holes, until it regenerates eventually. | ||
| | The stage is unlocked alongside {{iw|smashwiki|Sonic (SSBB)|Sonic}}. | ||
|<nowiki/> | |||
*[http://www.smashbros.com/en_us/music/music19.html Angel Island Zone] | *[http://www.smashbros.com/en_us/music/music19.html Angel Island Zone] | ||
*Sonic Boom | *Sonic Boom | ||
| Line 1,063: | Line 911: | ||
*HIS WORLD (Instrumental) | *HIS WORLD (Instrumental) | ||
|- | |- | ||
|[[File:SSBB Jungle Japes Stage.png|150px]] | |||
| align=center | | |align=center|{{iw|smashwiki|Jungle Japes|Donkey Kong Country: Jungle Japes}}[[File:DK Emblem.png|30px|class=invert-dark]] | ||
| | |[[Jungle Japes (stage)|Jungle Japes]] is a stage from ''Super Smash Bros. Melee'' with obstacles that include rapid downstream water and [[Klaptrap]]s. | ||
| | The stage is unlocked by playing in ''Melee'' stages ten times. | ||
|<nowiki/> | |||
*Jungle Japes (Melee) | *Jungle Japes (Melee) | ||
*Kongo Jungle (Melee) | *Kongo Jungle (Melee) | ||
|- | |- | ||
|[[File:SSBB Green Greens Stage.png|150px]] | |||
| align=center | | |align=center|{{iw|smashwiki|Green Greens|Kirby's Dream Land: Green Greens}}[[File:Kirby Emblem.png|30px|class=invert-dark]] | ||
| | |A stage from ''Super Smash Bros. Melee'' featuring {{iw|wikirby|Whispy Woods}}, who blows strong wind that can push fighters. There are also {{iw|wikirby|block}}s functioning as platforms and obstacles, as well as {{iw|wikirby|Bomb Block}}s that can damage players and destroy items. | ||
| | The stage is unlocked after playing twenty matches as {{iw|smashwiki|Kirby (SSBB)|Kirby}}. | ||
|<nowiki/> | |||
*Green Greens (Melee) | *Green Greens (Melee) | ||
*Fountain of Dreams (Melee) | *Fountain of Dreams (Melee) | ||
|- | |- | ||
|[[File:SSBB Big Blue Stage.png|150px]] | |||
| align=center | [[Big Blue|F-Zero: Big Blue]] [[ | |align=center|[[smashwiki:Big Blue|F-Zero: Big Blue]][[File:F-Zero Emblem.png|30px|class=invert-dark]] | ||
| | |A stage from ''Super Smash Bros. Melee'' set on a platform moving fast along a race course with several {{iw|fzerowiki|machine}}s. Floating platforms commonly enter and exit the scene. Standing on the road quickly forces players towards the {{iw|smashwiki|blast line}}. | ||
| | It is unlocked by playing 10 matches as Captain Falcon. | ||
|<nowiki/> | |||
*Big Blue (Melee) | *Big Blue (Melee) | ||
*Mute City (Melee) | *Mute City (Melee) | ||
|- | |- | ||
|[[File:SSBB Pokémon Stadium Stage.png|150px]] | |||
| align=center | [[Pokémon Stadium|Pokémon: Pokémon Stadium]] [[ | |align=center|[[smashwiki:Pokémon Stadium|Pokémon: Pokémon Stadium]][[File:Pokemon Emblem.png|30px|class=invert-dark]] | ||
| | |A stage from ''Super Smash Bros. Melee'' that is similar to the succeeding Pokémon Stadium 2, but the four different layouts are based around {{iw|bulbapedia|Grass (type)|Grass}}, {{iw|bulbapedia|Fire (type)|Fire}}, {{iw|bulbapedia|Water (type)|Water}}, and {{iw|bulbapedia|Rock (type)|Rock}}. | ||
| | It is unlocked by playing 10 matches on Pokémon Stadium 2. | ||
|<nowiki/> | |||
*Pokémon Stadium (Melee) | *Pokémon Stadium (Melee) | ||
*Battle Theme (Melee) | *Battle Theme (Melee) | ||
*Poké Floats (Melee) | *Poké Floats (Melee) | ||
|} | |} | ||
==Items== | ==Items== | ||
{|class="wikitable" | |||
!Image | |||
{|class | !Name | ||
!Series | |||
!Description | |||
|- | |- | ||
|[[File:Assist Trophy.jpg|50px]] | |||
|{{iw|smashwiki|Assist Trophy}} | |||
|''{{iw|smashwiki|Super Smash Bros. (universe)|Super Smash Bros.}}''[[File:SmashBros Emblem.png|30px|class=invert-dark]] | |||
|A random character appears from the [[Assist Trophy]] to briefly assist whoever picked it up. | |||
|- | |- | ||
|[[File:Banana_Peel.jpg|50px]] | |||
| | |{{iw|smashwiki|Banana Peel}} | ||
| | |''{{iw|smashwiki|Donkey Kong (universe)|Donkey Kong}}''[[File:DK Emblem.png|35px|class=invert-dark]] | ||
|[[Banana Peel]]s can be dropped on the stage, and any {{iw|smashwiki|fighter}}s who run on Banana Peels {{iw|smashwiki|trip}} and fall, taking a bit of damage. | |||
|- | |- | ||
|[[File:Barrel Brawl artwork.jpg|50px]] | |||
| | |{{iw|smashwiki|Barrel}} | ||
| | |''Super Smash Bros.''[[File:SmashBros Emblem.png|30px|class=invert-dark]] | ||
|[[Barrel]]s are similar to crates, except they can tip over and roll. Players receive damage when hit by a rolling crate. | |||
|- | |- | ||
|[[File:Beam Sword Brawl artwork.png|50px]] | |||
| | |{{iw|smashwiki|Beam Sword}} | ||
| | |''Super Smash Bros.''[[File:SmashBros Emblem.png|30px|class=invert-dark]] | ||
|A Beam Sword can be carried by a fighter. Its blade has good {{iw|smashwiki|reach}}, but it improves more the longer the player charges a {{iw|smashwiki|smash attack}}. | |||
|- | |- | ||
|[[File:Wario Bike Brawl screenshot.jpg|50px]] | |||
| | |{{iw|smashwiki|Wario Bike|Bike Pieces}} | ||
| | |''{{iw|smashwiki|Wario (universe)|Wario}}''[[File:Wario Emblem.png|30px|class=invert-dark]] | ||
|The [[Wario Bike]] can break into pieces, which players can pick up and throw. | |||
|- | |- | ||
|[[File:Blast Box Brawl artwork.png|50px]] | |||
| | |{{iw|smashwiki|Blast Box}} | ||
| | |''Super Smash Bros.''[[File:SmashBros Emblem.png|30px|class=invert-dark]] | ||
|An explosive crate that explodes when hit by a strong attack or a {{iw|smashwiki|Flame|fire}}-based one. | |||
|- | |- | ||
|[[File:Bob-omb Brawl artwork.png|50px]] | |||
| | |{{iw|smashwiki|Bob-omb}} | ||
| | |''{{iw|smashwiki|Mario (universe)|Super Mario}}''[[File:Mario Emblem.png|35px|class=invert-dark]] | ||
|If a [[Bob-omb]] is left alone for a while, it will get up and walk around on its own. If thrown at an opponent, the Bob-omb explodes, causing major {{iw|smashwiki|knockback}}. During a {{iw|smashwiki|Sudden Death}}, several Bob-ombs fall from the sky if enough time has passed. | |||
|- | |- | ||
|[[File:BrawlBumper.jpg|50px]] | |||
| | |{{iw|smashwiki|Bumper}} | ||
| | |''Super Smash Bros.''[[File:SmashBros Emblem.png|30px|class=invert-dark]] | ||
|A Bumper either lies on the ground or stays in midair after being thrown. Bumpers inflict high knockback to players who touch it. | |||
|- | |- | ||
|[[File:Bunny Hood Brawl artwork.png|50px]] | |||
| | |{{iw|smashwiki|Bunny Hood}} | ||
| | |''{{iw|smashwiki|The Legend of Zelda (universe)|The Legend of Zelda}}''[[File:Zelda Emblem.png|30px|class=invert-dark]] | ||
|The {{iw|zeldawiki|Bunny Hood}} provides a substantial boost to the user's running speed and jumping height. | |||
|- | |- | ||
|[[File:Capsule Brawl artwork.png|50px]] | |||
| | |{{iw|smashwiki|Capsule}} | ||
| | |''Super Smash Bros.''[[File:SmashBros Emblem.png|30px|class=invert-dark]] | ||
|They are small containers that can be picked up and thrown, revealing items, but may sometimes explode instead. | |||
|- | |- | ||
|[[File:BrawlCDArtwork.jpg|50px]] | |||
| | |{{iw|smashwiki|CD}} | ||
| | |''Super Smash Bros.''[[File:SmashBros Emblem.png|30px|class=invert-dark]] | ||
|Picking up a CD unlocks a random song. CDs no longer appear once every song is unlocked. | |||
|- | |- | ||
|[[File:Cracker Launcher.jpg|50px]] | |||
| | |{{iw|smashwiki|Cracker Launcher}} | ||
| | |''Super Smash Bros.''[[File:SmashBros Emblem.png|30px|class=invert-dark]] | ||
|A weapon that shoots fireworks and has an adjustable aim. | |||
|- | |- | ||
|[[File:Crate Brawl artwork.jpg|50px]] | |||
| | |{{iw|smashwiki|Crate}} and {{iw|smashwiki|Rolling Crate}} | ||
| | |''Super Smash Bros.''[[File:SmashBros Emblem.png|30px|class=invert-dark]] | ||
|Players can damage Crates or simply throw one to break the Crate open and reveal the item contained. Crates appear in three designs, depending on the stage. Rolling Crates have dollies underneath them, and attacking these crates sends them rolling away. | |||
|- | |- | ||
|[[File:Deku Nut Brawl artwork.png|50px]] | |||
| | |{{iw|smashwiki|Deku Nut}} | ||
| | |''The Legend of Zelda''[[File:Zelda Emblem.png|30px|class=invert-dark]] | ||
|A {{iw|zeldawiki|Deku Nut}} can be thrown near an enemy to create a flash that stuns foes temporarily. The Deku Nut inflicts a lot of knockback if used on an opponent in midair. | |||
|- | |- | ||
|[[File:BrawlDragoonArtwork.jpg|50px]] | |||
| | |{{iw|smashwiki|Dragoon}} | ||
| | |''{{iw|smashwiki|Kirby (universe)|Kirby}}''[[File:Kirby Emblem.png|30px|class=invert-dark]] | ||
|A {{iw|wikirby|Dragoon}} comes in three parts, and when a player collects each one, they can aim the crosshair and launch the Dragoon at other players. | |||
|- | |- | ||
|[[File:Fan Brawl artwork.png|50px]] | |||
| | |{{iw|smashwiki|Fan}} | ||
| | |''Super Smash Bros.''[[File:SmashBros Emblem.png|30px|class=invert-dark]] | ||
|A Fan can whack opponents repeatedly, even breaking their {{iw|smashwiki|shield}}s. | |||
|- | |- | ||
|[[File:Fire Flower Brawl artwork.png|50px]] | |||
| | |{{iw|smashwiki|Fire Flower}} | ||
|The Fire Flower | |''Super Mario''[[File:Mario Emblem.png|35px|class=invert-dark]] | ||
|The [[Fire Flower]] can unleash a limited short stream of fire. | |||
|- | |- | ||
|[[File:Food Brawl artwork.png|50px]] | |||
| | |{{iw|smashwiki|Food}} | ||
| | |''Super Smash Bros.''[[File:SmashBros Emblem.png|30px|class=invert-dark]] | ||
|Players can eat food items to restore damage received. There are 28 types of food, each restoring a different amount of health. | |||
|- | |- | ||
|[[File:Franklin Badge.jpg|50px]] | |||
| | |{{iw|smashwiki|Franlin Badge}} | ||
| | |''{{iw|smashwiki|EarthBound (universe)|EarthBound}}''[[File:EarthBound Emblem.png|30px|class=invert-dark]] | ||
|The {{iw|wikibound|Franlin Badge}} deflects an opponent's energy-based projectile back at the them, inflicting twice the damage output. | |||
|- | |- | ||
|[[File:Freezie Brawl artwork.png|50px]] | |||
| | |{{iw|smashwiki|Freezie}} | ||
| | |''Super Mario''[[File:Mario Emblem.png|35px|class=invert-dark]] | ||
|A [[Freezie]] slides along the ground slowly, and throwing it at a target traps them in ice temporarily. | |||
|- | |- | ||
|[[File:BrawlGoldenHammerArtwork.jpg|50px]] | |||
| | |{{iw|smashwiki|Golden Hammer}} | ||
| | |''Super Mario''[[File:Mario Emblem.png|35px|class=invert-dark]] | ||
|A stronger variation of the Hammer that outputs more damage and gives the player the ability to float in mid-air, if the button is tapped rapidly. The item is sometimes a dud, the Golden Squeaky Hammer, which cannot damage opponents, similarly to if a Hammer has no head. | |||
|- | |- | ||
|[[File:Gooey Bomb.jpg|50px]] | |||
| | |{{iw|smashwiki|Gooey Bomb}} | ||
| | |''Super Smash Bros.''[[File:SmashBros Emblem.png|30px|class=invert-dark]] | ||
|A sticky explosive that can attach to either the ground or a player and explode after a few seconds. | |||
|- | |- | ||
|[[File:Green Shell Brawl artwork.png|50px]] | |||
| | |{{iw|smashwiki|Green Shell}} | ||
| | |''Super Mario''[[File:Mario Emblem.png|35px|class=invert-dark]] | ||
|A [[Green Shell]] can be thrown, jumped on, or hit to slide along the ground. Green Shells can begin to move the opposite direction if they either bump into a wall or are hit by an attack. | |||
|- | |- | ||
|[[File:Hammer Brawl artwork.png|50px]] | |||
| | |{{iw|smashwiki|Hammer}} | ||
| | |''Donkey Kong''[[File:DK Emblem.png|30px|class=invert-dark]] | ||
|The player swings a [[Hammer]] up and down rapidly. The Hammer inflicts a lot of damage, but the player cannot perform midair jumps nor special moves while using the item. The head of the hammer may sometimes fall off, making the item useless. | |||
|- | |- | ||
|[[File:Heart Container Brawl artwork.png|50px]] | |||
| | |{{iw|smashwiki|Heart Container}} | ||
| | |''The Legend of Zelda''[[File:Zelda Emblem.png|30px|class=invert-dark]] | ||
|Reduces a players damage percentage by up to 100 percent. | |||
|- | |- | ||
|[[File:Home-Run Bat Brawl artwork.png|50px]] | |||
| | |{{iw|smashwiki|Home-Run Bat}} | ||
| | |''Super Smash Bros.''[[File:SmashBros Emblem.png|30px|class=invert-dark]] | ||
|If the player charges a Home-Run Bat before swinging and hitting an opponent, this almost guarantees the target witll be {{iw|smashwiki|KO}}'d. | |||
|- | |- | ||
|[[File:Hothead Brawl artwork.png|50px]] | |||
| | |{{iw|smashwiki|Hothead}} | ||
| | |''Super Mario''[[File:Mario Emblem.png|35px|class=invert-dark]] | ||
|[[Hothead]]s slide across the ground, damaging the opponents of whoever threw it. A Hothead grows even bigger if hit with {{iw|smashwiki|Flame|fire}} or {{iw|smashwiki|electric}}-based attacks. | |||
|- | |- | ||
|[[File:SSBB - Key Artwork.png|50px]] | |||
| | |{{iw|smashwiki|Key}} | ||
| | |''Super Smash Bros.''[[File:SmashBros Emblem.png|30px|class=invert-dark]] | ||
|Single-use items in The Subspace Emissary that can open a locked door. If lost, a key spawns back in its original location. | |||
|- | |- | ||
|[[File:Lips Stick Brawl artwork.png|50px]] | |||
| | |{{iw|smashwiki|Lip's Stick}} | ||
|Hitting an enemy with | |''Super Smash Bros.''[[File:SmashBros Emblem.png|30px|class=invert-dark]] | ||
|Hitting an enemy with a Lip's Stick or throwing it causes a flower to bloom on the opponent's head, making them slowly accumulate damage. More hits from a Lip's Stick increases the size of the flower on their head. Shaking the {{iw|smashwiki|control stick}} back and forth removes the flower from the player's head. | |||
|- | |- | ||
|[[File:Lightning Brawl artwork.png|50px]] | |||
| | |{{iw|smashwiki|Lightning}} | ||
| | |''Super Mario''[[File:Mario Emblem.png|35px|class=invert-dark]] | ||
|A Lightning shrinks every opponent briefly, but may sometimes have the opposite effect of shrinking only the player. On rare occasions, a Lightning can make fighters become giant temporarily. | |||
|- | |- | ||
|[[File:Maxim Tomato Brawl artwork.png|50px]] | |||
| | |{{iw|smashwiki|Maxim Tomato}} | ||
| | |''Kirby''[[File:Kirby Emblem.png|30px|class=invert-dark]] | ||
|[[Maxim Tomato]]es can be eaten to restore up to 50 percent of damage, making them half as effective as Heart Containers. | |||
|- | |- | ||
|[[File:Metal Box Brawl artwork.png|50px]] | |||
| | |{{iw|smashwiki|Metal Box}} | ||
| | |''Super Mario''[[File:Mario Emblem.png|35px|class=invert-dark]] | ||
|Makes the user become metal temporarily, granting complete resistance to {{iw|smashwiki|flinch}}ing from lighter attacks while also causing them to fall faster. | |||
|- | |- | ||
|[[File:BrawlMotion-SensorBomb.jpg|50px]] | |||
| | |{{iw|smashwiki|Motion-Sensor Bomb}} | ||
| | |''Super Smash Bros.''[[File:SmashBros Emblem.png|30px|class=invert-dark]] | ||
|Small explosives that can be hidden on a surface, detonating when they detect the next nearby object. | |||
|- | |- | ||
|[[File:Mr Saturn Brawl artwork.png|50px]] | |||
| | |{{iw|smashwiki|Mr. Saturn}} | ||
| | |''EarthBound''[[File:EarthBound Emblem.png|30px|class=invert-dark]] | ||
|{{iw|wikibound|Mr. Saturn}} is a throwable item with a low damage output. | |||
|- | |- | ||
|[[File:Orangecube.jpg|50px]] | |||
| | |{{iw|smashwiki|Cube#Orange cubes|Orange cube}} | ||
| | |''Super Smash Bros.''[[File:SmashBros Emblem.png|30px|class=invert-dark]] | ||
|Exclusive to The Subspace Emissary, orange cubes drop valuable items, adding to the game's completion, and do not reappear after their items are collected. | |||
|- | |- | ||
|[[File:Party Ball Brawl artwork.png|50px]] | |||
| | |{{iw|smashwiki|Party Ball}} | ||
|When hit, Party Balls float up | |''Super Smash Bros.''[[File:SmashBros Emblem.png|30px|class=invert-dark]] | ||
|When hit, Party Balls float up and then open, causing several items to fall out, but sometimes only [[Bob-omb]]s. | |||
|- | |- | ||
|[[File:Pikmin items Brawl.png|50px]] | |||
| | |{{iw|smashwiki|Pellet}} | ||
| | |''{{iw|smashwiki|Pikmin (universe)|Pikmin}}''[[File:Pikmin Emblem.png|30px|class=invert-dark]] | ||
|Exclusive to the {{iw|smashwiki|Distant Planet}} stage, Pellets appear in red, blue, and yellow varieties, and can be thrown into an {{iw|pikipedia|Onion}} of the same color to release items. | |||
|- | |- | ||
|[[File:PitfallArt.jpg|50px]] | |||
| | |{{iw|smashwiki|Pitfall}} | ||
| | |''{{iw|smashwiki|Animal Crossing (universe)|Animal Crossing}}''[[File:AnimalCrossing Emblem.png|30px|class=invert-dark]] | ||
|{{iw|nookipedia|Pitfall seed|Pitfall}}s can be placed in the ground, trapping opponents, including if the item hits them directly. | |||
|- | |- | ||
|[[ | |[[File:Poison Mushroom Brawl artwork.png|50px]] | ||
| | |{{iw|smashwiki|Poison Mushroom}} | ||
| | |''Super Mario''[[File:Mario Emblem.png|35px|class=invert-dark]] | ||
|A [[Poison Mushroom]] shrinks the player temporarily, leaving them more vulnerable to KOs. | |||
|- | |- | ||
|[[File:SSBBPokeball.jpg|50px]] | |||
| | |{{iw|smashwiki|Poké Ball}} | ||
| | |''{{iw|smashwiki|Pokémon (universe)|Pokémon}}''[[File:Pokemon Emblem.png|30px|class=invert-dark]] | ||
|A {{iw|bulbapedia|Poké Ball}} can be thrown on the ground to spawn a random {{iw|bulbapedia|Pokémon}} to assist the user. | |||
|- | |- | ||
|[[File:ZSS After Zero Laser Brawl.png|50px]] | |||
| | |{{iw|smashwiki|Power Suit Piece}}s | ||
|The | |{{iw|smashwiki|Metroid (universe)|Metroid}}''[[File:Metroid Emblem.png|30px|class=invert-dark]] | ||
|The remnants of Samus' destroyed suit after she uses her Final Smash, {{iw|smashwiki|Zero Laser}}. Power Suit Pieces can be picked up and thrown at opponents. | |||
|- | |- | ||
|[[File:Ray Gun Brawl artwork.png|50px]] | |||
| | |{{iw|smashwiki|Ray Gun}} | ||
| | |''Super Smash Bros.''[[File:SmashBros Emblem.png|30px|class=invert-dark]] | ||
|A beam gun that shoots up to sixteen fast-moving blasts. | |||
|- | |- | ||
|[[File:Sandbag Brawl artwork.png|50px]] | |||
| | |{{iw|smashwiki|Sandbag}} | ||
| | |''Super Smash Bros.''[[File:SmashBros Emblem.png|30px|class=invert-dark]] | ||
|Sandbag can be beaten to drop items, to an extent, and becomes easier to launch as it takes increased damage. | |||
|- | |- | ||
|[[File:Screw Attack Brawl artwork.png|50px]] | |||
| | |{{iw|smashwiki|Screw Attack}} | ||
| | |''Metroid''[[File:Metroid Emblem.png|30px|class=invert-dark]] | ||
|While a {{iw|metroidwiki|Screw Attack}} is worn, the ability is added to the user's standard and midair jumps. | |||
|- | |- | ||
|[[File:Smash Ball.jpg|50px]] | |||
| | |{{iw|smashwiki|Smash Ball}} | ||
| | |''Super Smash Bros.''[[File:SmashBros Emblem.png|30px|class=invert-dark]] | ||
|Can be attacked repeatedly until breaking and allowing the user to perform their [[Final Smash]]. | |||
|- | |- | ||
|[[ | |[[File:Smoke Ball.jpg|50px]] | ||
| | |{{iw|smashwiki|Smoke Ball}} | ||
|A | |''Super Smash Bros.''[[File:SmashBros Emblem.png|30px|class=invert-dark]] | ||
|A Smoke Ball emits a large cloud of colorful smoke, obscuring the view, and it can stick to a player. | |||
|- | |- | ||
|[[ | |[[File:Smart Bomb Artwork.jpg|50px]] | ||
| | |{{iw|smashwiki|Smart Bomb}} | ||
| | |''{{iw|smashwiki|Star Fox (universe)|Star Fox}}''[[File:StarFox Emblem.png|30px|class=invert-dark]] | ||
|A {{iw|lylatwiki|Smart Bomb}} explodes with a large blast radius when thrown, but there there is still the possibility of it failing. | |||
|- | |- | ||
|[[File:Soccer Ball Brawl artwork.png|50px]] | |||
| | |{{iw|smashwiki|Soccer Ball}} | ||
| | |''Super Mario''[[File:Mario Emblem.png|35px|class=invert-dark]] | ||
|A Soccer Ball cannot be picked up, but when it is hit with a strong attack, the Soccer Ball flies off, engulfed in flames. The angle of the attack determines which direction the Soccer Ball travels in. | |||
|- | |- | ||
|[[File:Spring Brawl artwork.png|50px]] | |||
| | |{{iw|smashwiki|Spring}} | ||
| | |''Donkey Kong''[[File:DK Emblem.png|30px|class=invert-dark]] | ||
|A player can bounce on a [[Spring]] to perform an extra high jump. A Spring sometimes falls to the side, bouncing players similarly to a Bumper. | |||
|- | |- | ||
|[[File:Stock Ball Brawl artwork.png|50px]] | |||
| | |{{iw|smashwiki|Stock Ball}} | ||
| | |''Super Smash Bros.''[[File:SmashBros Emblem.png|30px|class=invert-dark]] | ||
|Collecting one in The Subspace Emissary gives the player another {{iw|smashwiki|stock}} | |||
|- | |- | ||
|[[File:Super Mushroom Brawl artwork.png|50px]] | |||
| | |{{iw|smashwiki|Super Mushroom}} | ||
| | |''Super Mario''[[File:Mario Emblem.png|35px|class=invert-dark]] | ||
|A Super Mushroom grows the player temporarily, the opposite of the [[Poison Mushroom]] does. | |||
|- | |- | ||
|[[File:Super Scope Brawl artwork.png|50px]] | |||
| | |{{iw|smashwiki|Super Scope}} | ||
| | |''Super Smash Bros.''[[File:SmashBros Emblem.png|30px|class=invert-dark]] | ||
|A beam gun that can use up to 48 rapid-fire shots or three fully charged blasts. | |||
|- | |- | ||
|[[ | |[[File:Superspicy Curry.jpg|50px]] | ||
| | |{{iw|smashwiki|Superspicy Curry}} | ||
| | |''Kirby''[[File:Kirby Emblem.png|30px|class=invert-dark]] | ||
|The player can eat a {{iw|wikirby|Superspicy Curry}} to start spewing {{iw|smashwiki|flame}}s temporarily, but they cannot while while its effects are active. | |||
|- | |- | ||
|[[ | |[[File:Super Star Brawl artwork.png|50px]] | ||
| | |{{iw|smashwiki|Super Star|Starman}} | ||
| | |''Super Mario''[[File:Mario Emblem.png|35px|class=invert-dark]] | ||
|Touching a [[Super Star|Starman]] grants temporary {{iw|smashwiki|invincibility}} for roughly ten seconds. | |||
|- | |- | ||
|[[File:Star Rod Brawl artwork.png|50px]] | |||
| | |{{iw|smashwiki|Star Rod}} | ||
| | |''Kirby''[[File:Kirby Emblem.png|30px|class=invert-dark]] | ||
|The {{iw|wikirby|Star Rod}} can be swung to shoot out a star-shaped projectile, and charged to unleash even stronger ones. Throwing a Star Rod at an opponent launches them sideways. | |||
|- | |- | ||
|[[File:Team Healer Artwork.jpg|50px]] | |||
| | |{{iw|smashwiki|Team Healer}} | ||
| | |''Super Smash Bros.''[[File:SmashBros Emblem.png|30px|class=invert-dark]] | ||
|Usable only in {{iw|smashwiki|Team Battle}}s, a Team Healer can be thrown at a teammate to restore their health, but for opponents, it may either damage or heal them. | |||
|- | |- | ||
|[[File:Timer Brawl artwork.png|50px]] | |||
| | |{{iw|smashwiki|Timer}} | ||
| | |''Super Smash Bros.''[[File:SmashBros Emblem.png|30px|class=invert-dark]] | ||
|A Timer can be picked up to slow the flow of time for certain players, usually opponents only, but it can sometimes slow only the user or every player. | |||
|- | |- | ||
|[[File:TrophyBase.jpg|50px]] | |||
| | |{{iw|smashwiki|Trophy Stand}} | ||
| | |''Super Smash Bros.''[[File:SmashBros Emblem.png|30px|class=invert-dark]] | ||
|Exclusive to The Subspace Emissary, a Trophy Stand can be thrown at at enemy to turn it into a {{iw|smashwiki|trophy}}, though stronger enemies have to be weakened sufficiently before they can become a trophy. | |||
|- | |- | ||
|[[File:Unira Brawl artwork.png|50px]] | |||
| | |{{iw|smashwiki|Unira}} | ||
| | |''Super Smash Bros.''[[File:SmashBros Emblem.png|30px|class=invert-dark]] | ||
|When thrown to the ground or attacked, a Unira's spikes extend, damaging players who touch it. When attacked again, the Unira retracts its spikes. | |||
|- | |- | ||
|[[File:The Summit.jpg|50px]] | |||
| | |{{iw|smashwiki|Food|Vegetables}} | ||
| | |''{{iw|smashwiki|Ice Climber (universe)|Ice Climber}}''[[File:IceClimbers Emblem.png|30px|class=invert-dark]] | ||
|A type of Food appearing only in the {{iw|smashwiki|Summit}} | |||
|- | |- | ||
|[[File:Warp Star Brawl artwork.png|50px]] | |||
| | |{{iw|smashwiki|Warp Star}} | ||
| | |''Kirby''[[File:Kirby Emblem.png|30px|class=invert-dark]] | ||
|With a {{iw|wikirby|Warp Star}}, the user launches above before slamming down near the opponent, damaging them, though the {{iw|smashwiki|control stick}} has some control over where the Warp Star lands. | |||
|} | |} | ||
=== | ===Assist Trophy characters=== | ||
[[ | [[File:Samurai Goroh Brawl.png|thumb|{{iw|smashwiki|Samurai Goroh}}, an Assist Trophy character]] | ||
*Andross | {{columns|count=3| | ||
*Barbara | *[[smashwiki:Andross|Andross]] – [[lylatwiki:Star Fox (series)|''Star Fox'' series]] | ||
*Devil | *[[smashwiki:Barbara|Barbara]] – ''Daigasso! Band Brothers | ||
*Dr. Wright | *[[smashwiki:Devil|Devil]] – ''Devil World | ||
*Excitebike | *[[smashwiki:Dr. Wright|Dr. Wright]] – ''Sim City'' for SNES | ||
*Gray Fox | *[[smashwiki:Excitebike|Excitebikes]] – ''Excitebike'' series | ||
*[[Hammer Bro | *[[smashwiki:Gray Fox|Gray Fox]] – ''Metal Gear Solid'' series | ||
*Helirin | *[[Hammer Bro]] – ''Super Mario'' franchise | ||
*Infantry | *[[smashwiki:Helirin|Helirin]] – ''Kururin'' series | ||
*Isaac | *[[smashwiki:Infantry & Tanks|Infantry & Tanks]] – [[warswiki:Advance Wars (series)|''Famicom''/''Advance Wars'' series]] | ||
*Jeff | *[[smashwiki:Isaac|Isaac]] – [[goldensun:Golden Sun (series)|''Golden Sun'' series]] | ||
* | *[[smashwiki:Jeff|Jeff]] – [[wikibound:EarthBound (series)|''EarthBound'' (''Mother'') series]] | ||
*[[Kat | *[[smashwiki:Jill|Jill]] – ''Drill Dozer'' | ||
*Knuckle Joe | *[[Kat & Ana]] – [[WarioWare (series)|''WarioWare'' series]] | ||
*[[Lakitu]] | *[[smashwiki:Knuckle Joe|Knuckle Joe]] – [[wikirby:Kirby (series)|''Kirby'' series]] | ||
*[[Little Mac]] | *[[Lakitu]] & [[Spiny|Spinies]] – ''Super Mario'' franchise | ||
*Lyn | *[[smashwiki:Little Mac|Little Mac]] – ''Punch-Out!!'' series | ||
*Metroid | *[[smashwiki:Lyn|Lyn]] – [[fireemblem:Fire Emblem (series)|''Fire Emblem'' series]] | ||
*Mr. Resetti | *[[smashwiki:Metroid (creature)|Metroid]] – [[metroidwiki:Metroid (series)|''Metroid'' series]] | ||
*[[Nintendog]] | *[[Mr. Resetti]] – [[nookipedia:Animal Crossing (series)|''Animal Crossing'' series]] | ||
*Ray Mk | *[[smashwiki:Nintendog|Nintendog]] – ''Nintendogs'' series | ||
*Saki Amamiya | *[[smashwiki:Ray Mk III|Ray Mk III]] – ''Custom Robo'' series | ||
*Samurai Goroh | *[[smashwiki:Saki Amamiya|Saki]] – ''Sin and Punishment'' series | ||
*[[Shadow | *[[smashwiki:Samurai Goroh|Samurai Goroh]] – ''F-Zero'' series | ||
*[[Stafy]] | *[[Shadow (character)|Shadow]] – ''Sonic the Hedgehog'' series | ||
*[[Tingle]] | *[[smashwiki:Starfy|Stafy]] – [[starfywiki:The Legendary Starfy (series)|''Densetsu no Stafy'' series]] | ||
*[[Waluigi]] | *[[smashwiki:Tingle|Tingle]] – [[zeldawiki:The Legend of Zelda (Series)|''The Legend of Zelda'' series]] | ||
*[[Waluigi]] – ''Super Mario'' franchise | |||
}} | |||
{{br}} | |||
===Poké Ball Pokémon=== | |||
[[File:Groudon Brawl.png|thumb|Groudon, one of the Poké Ball Pokémon]] | |||
{{columns| | |||
[[ | *[[bulbapedia:Bellossom (Pokémon)|Bellossom]] | ||
* | *[[bulbapedia:Bonsly (Pokémon)|Bonsly]] | ||
*[[bulbapedia:Celebi (Pokémon)|Celebi]] | |||
*[[bulbapedia:Chikorita (Pokémon)|Chikorita]] | |||
*Chikorita | *[[bulbapedia:Deoxys (Pokémon)|Deoxys]] | ||
*Deoxys | *[[bulbapedia:Electrode (Pokémon)|Electrode]] | ||
*Electrode | *[[bulbapedia:Gardevoir (Pokémon)|Gardevoir]] | ||
*Gardevoir | *[[bulbapedia:Goldeen (Pokémon)|Goldeen]] | ||
*Goldeen | *[[bulbapedia:Groudon (Pokémon)|Groudon]] | ||
*Groudon | *[[bulbapedia:Gulpin (Pokémon)|Gulpin]] | ||
*Gulpin | *[[bulbapedia:Ho-Oh (Pokémon)|Ho-Oh]] | ||
*Ho-Oh | *[[bulbapedia:Kyogre (Pokémon)|Kyogre]] | ||
*Kyogre | *[[bulbapedia:Latias (Pokémon)|Latias]] and [[bulbapedia:Latios (Pokémon)|Latios]] | ||
*Lugia | *[[bulbapedia:Lugia (Pokémon)|Lugia]] | ||
*Manaphy | *[[bulbapedia:Manaphy (Pokémon)|Manaphy]] | ||
*Meowth | *[[bulbapedia:Meowth (Pokémon)|Meowth]] | ||
*Metagross | *[[bulbapedia:Metagross (Pokémon)|Metagross]] | ||
*Mew | *[[bulbapedia:Mew (Pokémon)|Mew]] | ||
*Moltres | *[[bulbapedia:Moltres (Pokémon)|Moltres]] | ||
*Munchlax | *[[bulbapedia:Munchlax (Pokémon)|Munchlax]] | ||
*Piplup | *[[bulbapedia:Piplup (Pokémon)|Piplup]] | ||
*Snorlax | *[[bulbapedia:Snorlax (Pokémon)|Snorlax]] | ||
*Staryu | *[[bulbapedia:Staryu (Pokémon)|Staryu]] | ||
*Suicune | *[[bulbapedia:Suicune (Pokémon)|Suicune]] | ||
*Togepi | *[[bulbapedia:Togepi (Pokémon)|Togepi]] | ||
*Torchic | *[[bulbapedia:Torchic (Pokémon)|Torchic]] | ||
*Wobbuffet | *[[bulbapedia:Wobbuffet (Pokémon)|Wobbuffet]] | ||
* | *[[bulbapedia:Weavile (Pokémon)|Weavile]] | ||
* | *[[bulbapedia:Jirachi (Pokémon)|Jirachi]] | ||
* | *[[bulbapedia:Entei (Pokémon)|Entei]] | ||
}} | |||
==Game | ==Game modes== | ||
===Solo=== | ===Solo=== | ||
====Subspace Emissary==== | ====The Subspace Emissary==== | ||
[[ | {{main|Adventure Mode: The Subspace Emissary}} | ||
{{ | [[File:Subspace Emissary Brawl map.png|thumb|200px|The map of the Subspace Emissary]] | ||
'''{{iw|smashwiki|Adventure Mode: The Subspace Emissary}}''' is the game's adventure mode. Taking place in the {{iw|smashwiki|World of Trophies}}, The Subspace Emissary has a full-length plot and several stages, being more advanced than its {{iw|smashwiki|Adventure Mode (SSBM)|equivalent}} from ''[[Super Smash Bros. Melee]]''. The main map shows the world map and which places can be entered, and when the player selects a stage, they can choose which characters in their team to use, with the number of options increasing as the storyline progresses. The player can use {{iw|smashwiki|sticker}}s, each granting a certain effect such as resistance or an increases statistic. | |||
The mode features the following stages: | |||
{| | {|class=wikitable | ||
!# | |||
!Stage | |||
!Characters | |||
|- | |||
|1 | |||
|{{iw|smashwiki|Midair Stadium}} | |||
|Mario, Kirby, Peach, Zelda/Sheik (characters who join: Kirby, Peach/Zelda) | |||
|- | |||
|2 | |||
|{{iw|smashwiki|Skyworld (SSE)|Skyworld}} | |||
|Mario, Pit (characters who join: Mario, Pit) | |||
|- | |||
|3 | |||
|{{iw|smashwiki|Sea of Clouds}} | |||
|Kirby and Peach/Zelda | |||
|- | |||
|4 | |||
|[[The Jungle]] | |||
|Diddy Kong, Donkey Kong (characters who join: Diddy Kong) | |||
|- | |||
|5 | |||
|{{iw|smashwiki|The Plain}} | |||
|Mario, Pit | |||
|- | |||
|6 | |||
|[[The Lake]] | |||
|Diddy Kong, Fox (characters who join: Fox) | |||
|- | |||
|7 | |||
|{{iw|smashwiki|The Ruined Zoo}} | |||
|Lucas, Ness, Pokémon Trainer (characters who join: Lucas, Pokémon Trainer) | |||
|- | |||
|8 | |||
|{{iw|smashwiki|The Battlefield Fortress}} | |||
|Marth, Meta Knight, Ike (characters who join: Marth, Meta Knight, Ike) | |||
|- | |||
|9 | |||
|{{iw|smashwiki|The Forest}} | |||
|Link, Yoshi (characters who join: Link, Yoshi) | |||
|- | |||
|10 | |||
|{{iw|smashwiki|The Research Facility (Part I)}} | |||
|Zero Suit Samus, Pikachu (characters who join: Zero Suit Samus, Pikachu) | |||
|- | |||
|11 | |||
|{{iw|smashwiki|The Lake Shore}} | |||
|Mario, Pit, Link, Yoshi, Kirby (Peach/Zelda leaves) | |||
|- | |- | ||
|12 | |||
|{{iw|smashwiki|The Path to the Ruins}} | |||
|Lucas, Pokémon Trainer | |||
|- | |- | ||
|13 | |||
| | |[[The Cave]] | ||
|Mario, Pit, Link, Yoshi, Kirby | |||
|- | |- | ||
|14 | |||
| | |{{iw|smashwiki|The Ruins}} | ||
|Lucas, Pokémon Trainer | |||
|- | |- | ||
|15 | |||
| | |{{iw|smashwiki|The Wilds (Part I)}} | ||
|Marth, Meta Knight, Ike | |||
|- | |- | ||
|16 | |||
| | |{{iw|smashwiki|The Ruined Hall}} | ||
|Lucas, Pokémon Trainer | |||
|- | |- | ||
|17 | |||
| | |{{iw|smashwiki|The Wilds (Part II)}} | ||
|Mario, Pit, Link, Yoshi, Kirby | |||
|- | |- | ||
|18 | |||
| | |[[The Swamp]] | ||
|Diddy Kong, Fox, Falco (characters who join: Falco) | |||
|- | |- | ||
|19 | |||
| | |{{iw|smashwiki|The Research Facility (Part II)}} | ||
|Zero Suit Samus, Samus, Pikachu (characters who join: Samus) (Zero Suit Samus remains selectable by choosing Samus and pressing the switch form button) | |||
|- | |- | ||
|20 | |||
| | |{{iw|smashwiki|Outside the Ancient Ruins}} | ||
|Donkey Kong, Diddy Kong, Olimar, Captain Falcon (characters who join: Donkey Kong, Olimar, Captain Falcon) (Fox and Falco Leave) | |||
|- | |- | ||
|21 | |||
| | |{{iw|smashwiki|The Glacial Peak}} | ||
|Meta Knight, Ice Climbers, Lucario (characters who join: Ice Climbers, Lucario) | |||
|- | |- | ||
|22 | |||
| | |{{iw|smashwiki|The Canyon}} | ||
|Mario, Pit, Link, Yoshi, Kirby | |||
|- | |- | ||
|23 | |||
| | |{{iw|smashwiki|Battleship Halberd Interior}} | ||
|Snake, Meta Knight, Lucario (characters who join: Snake) | |||
|- | |- | ||
|24 | |||
| | |{{iw|smashwiki|Battleship Halberd Exterior}} | ||
|Peach, Zelda/Sheik (characters who join: Peach, Zelda/Sheik) (Zelda only available via Transform) | |||
|- | |- | ||
|25 | |||
| | |{{iw|smashwiki|Battleship Halberd Bridge}} | ||
|Fox, Falco, Lucario, Peach, Zelda/Sheik, Snake (characters who join: Mr. Game & Watch) | |||
|- | |- | ||
|26 | |||
|The | |{{iw|smashwiki|The Subspace Bomb Factory (Part I)}} | ||
|Samus, Pikachu | |||
|- | |||
|27 | |||
|{{iw|smashwiki|The Subspace Bomb Factory (Part II)}} | |||
|Donkey Kong, Diddy Kong, Captain Falcon, Olimar, R.O.B., Samus, Pikachu, Zero Suit Samus ({{iw|metroidwiki|Meta Ridley}} battle only) (characters who join: R.O.B.) | |||
|- | |||
|28 | |||
|{{iw|smashwiki|Entrance to Subspace}} | |||
|All previously used (except Ness), Mr. Game & Watch (everyone leaves) | |||
|- | |||
|29 | |||
|{{iw|smashwiki|Subspace (Part I)}} | |||
|Luigi, Ness, King Dedede (characters who join: anyone saved from Subspace, Luigi, Ness, Bowser, King Dedede) | |||
|- | |||
|30 | |||
|{{iw|smashwiki|Subspace (Part II)}} | |||
|Kirby (characters who join: Any rescued characters, Ganondorf if Link and Zelda are saved, Wario if trophy is saved) | |||
|- | |||
|31 | |||
|{{iw|smashwiki|The Great Maze}} | |||
|Any characters rescued from Subspace, Luigi, Ness, Bowser, King Dedede, Kirby, Sonic (characters who join: Sonic) | |||
|} | |} | ||
====Classic mode==== | |||
{{main-wiki|SmashWiki|Classic Mode (SSBB)}} | |||
[[File:Classic Mode Brawl.png|thumb|The loading screen before each level of Classic mode, with [[Link]] acting as the first opponent.]] | |||
When starting Classic mode, the player chooses a character before going through a series of battles against other fighters. Players go through stages in a certain order, such as a ''[[Super Mario (franchise)|Super Mario]]'' stage always being the eighth one. A few of the matches have certain conditions set, like in the mode's {{iw|smashwiki|Classic Mode (SSBM)|previous iteration}} in ''Super Smash Bros. Melee''. A few examples are the player fighting a giant version of an opponent, either with two allies (only against Giant Yoshi), one ally, or none, or the player fighting a {{iw|smashwiki|Metal Box|metal}} version of another player. A small heart appears next to a teammate's logo in matches with allies. When a level is finished, the score is added up, and the player earns coins, which can be used in the {{iw|smashwiki|Coin Launcher}}. | |||
Clearing this mode will give the player a trophy of the character used to complete it. When finishing it as Zelda or Sheik, the player can only get the trophy of her current form, like with Samus and Zero Suit Samus. For Pokémon Trainer, Classic Mode must be completed three separate times, each with one of his Pokémon, as clearing it only rewards the player with the trophies of the Trainer and the Pokémon in use when it was cleared. | |||
{|class="wikitable"width=100% | |||
!colspan=2|Classic Mode | |||
|- | |||
|Stage 1 | |||
|''{{iw|smashwiki|The Legend of Zelda (universe)|The Legend of Zelda}}'' ({{iw|smashwiki|Link (SSBB)|Link}}, {{iw|smashwiki|Toon Link (SSBB)|Toon Link}}, {{iw|smashwiki|Zelda (SSBB)|Zelda}}, {{iw|smashwiki|Sheik (SSBB)|Sheik}}, or {{iw|smashwiki|Ganondorf (SSBB)|Ganondorf}}) | |||
|- | |||
|Stage 2 | |||
|''{{iw|smashwiki|Yoshi (universe)|Yoshi}}'' ([[Yoshi]]) or ''{{iw|smashwiki|Donkey Kong (universe)|Donkey Kong}}'' ([[Donkey Kong]] and [[Diddy Kong]]) | |||
|- | |||
|Stage 3 | |||
|''{{iw|smashwiki|Pokémon (universe)|Pokémon}}'' ({{iw|smashwiki|Pokémon Trainer (SSBB)|Pokémon Trainer}}, {{iw|smashwiki|Pikachu (SSBB)|Pikachu}}, {{iw|smashwiki|Jigglypuff (SSBB)|Jigglypuff}}, or {{iw|smashwiki|Lucario (SSBB)|Lucario}}) | |||
|- | |||
|Stage 4 | |||
|''{{iw|smashwiki|Fire Emblem (universe)|Fire Emblem}}'' ({{iw|smashwiki|Marth (SSBB)|Marth}} or {{iw|smashwiki|Ike (SSBB)|Ike}}) or ''{{iw|smashwiki|EarthBound (universe)|EarthBound}}'' ({{iw|smashwiki|Ness (SSBB)|Ness}} or {{iw|smashwiki|Lucas (SSBB)|Lucas}}) | |||
|- | |||
|Bonus Stage 1 | |||
|{{iw|smashwiki|Target Smash!}} (level corresponds to current {{iw|smashwiki|difficulty}}) | |||
|- | |||
|Stage 5 | |||
|''{{iw|smashwiki|Kirby (universe)|Kirby}}'' ({{iw|smashwiki|Kirby (SSBB)|Kirby}}, {{iw|smashwiki|Meta Knight (SSBB)|Meta Knight}}, or {{iw|smashwiki|King Dedede (SSBB)|King Dedede}}) | |||
|- | |||
|Stage 6 | |||
|''{{iw|smashwiki|Metroid (universe)|Metroid}}'' ({{iw|smashwiki|Samus (SSBB)|Samus}} or {{iw|smashwiki|Zero Suit Samus (SSBB)|Zero Suit Samus}}) or ''{{iw|smashwiki|Pikmin (universe)|Pikmin}}'' ({{iw|smashwiki|Olimar (SSBB)|Olimar}}) | |||
|- | |||
|Stage 7 | |||
|''{{iw|smashwiki|Star Fox (universe)|Star Fox}}'' ({{iw|smashwiki|Fox (SSBB)|Fox}}, {{iw|smashwiki|Falco (SSBB)|Falco}}, and {{iw|smashwiki|Wolf (SSBB)|Wolf}}) or ''{{iw|smashwiki|F-Zero (universe)|F-Zero}}'' ({{iw|smashwiki|Captain Falcon (SSBB)|Captain Falcon}}) | |||
|- | |||
|Stage 8 | |||
|''{{iw|smashwiki|Mario (universe)|Super Mario}}'' ([[Mario]], [[Princess Peach|Peach]], [[Luigi]], or [[Bowser]]) | |||
|- | |||
|Stage 9 | |||
|{{iw|smashwiki|R.O.B. (universe)|Robot}} ({{iw|smashwiki|R.O.B. (SSBB)|R.O.B.}}), ''{{iw|smashwiki|Kid Icarus (universe)|Kid Icarus}}'' ({{iw|smashwiki|Pit}}), ''{{iw|smashwiki|Ice Climber (universe)|Ice Climber}}'' ({{iw|smashwiki|Ice Climbers (SSBB)|Ice Climbers}}), or {{iw|smashwiki|Game & Watch (universe)|Game & Watch}} ({{iw|smashwiki|Mr. Game & Watch (SSBB)|Mr. Game & Watch}}) | |||
|- | |||
|Stage 10 | |||
|''{{iw|smashwiki|Wario (universe)|Wario}}'' ([[Wario]]), ''{{iw|smashwiki|Metal Gear (universe)|Metal Gear}}'' ({{iw|smashwiki|Snake (SSBB)|Snake}}), or ''{{iw|smashwiki|Sonic the Hedgehog (universe)|Sonic the Hedgehog}}'' ({{iw|smashwiki|Sonic (SSBB)|Sonic}}) | |||
|- | |||
|Bonus Stage 2 | |||
|Target Smash! (difficulty level is at one level higher than the current difficulty) | |||
|- | |||
|Stage 11 | |||
|Three random opponents | |||
|- | |||
|Final Stage | |||
|A boss fight against {{iw|smashwiki|Master Hand}} as well as {{iw|smashwiki|Crazy Hand}} under certain conditions | |||
|} | |||
=====Bosses===== | =====Bosses===== | ||
{|class | {|class="wikitable" | ||
!Image!!Name!!Description | |||
! | |||
! | |||
! | |||
|- | |- | ||
|[[File:BrawlMasterHand.png|140px]] | |||
| | |{{iw|smashwiki|Master Hand}}[[File:SmashBros Emblem.png|30px|class=invert-dark]] | ||
| The final boss of Classic | |The final boss of Classic Mode, Master Hand is a mysterious gloved right hand, vaguely referred to as the "manifestation of creative spirit." | ||
|[[File:BrawlCrazyHand.png|140px]] | |||
|- | |- | ||
|{{iw|smashwiki|Crazy Hand}}[[File:SmashBros Emblem.png|30px|class=invert-dark]] | |||
| | |The left-handed counterpart of Master Hand described as the "manifestation of destructive spirit." Crazy Hand appears in the battle alongside Master Hand under certain conditions: arriving at the final stage on Hard difficulty or higher with no {{iw|smashwiki|continue}}s and in under nine minutes. If the player loses against both Master Hand and Crazy Hand, the latter will not assist Master Hand. | ||
| | |||
|} | |} | ||
====All-Star | ====All-Star mode==== | ||
All-Star mode returns from ''Melee'', | {{main-wiki|SmashWiki|All-Star Mode}} | ||
All-Star mode returns from ''Super Smash Bros. Melee''. It is an unlockable mode that becomes available once all {{iw|smashwiki|fighter}}s have been unlocked. In addition to single player, the mode supports two players, unlike before, and opponents are sorted by series (and the chronology of their game releases) instead of at random. No more than two foes appear during a battle, excluding the ''{{iw|bulbapedia|Pokémon}}'' stage, because the Pokémon Trainer uses each Pokémon separately. | |||
=====All-Star | If All-Star is beaten in {{iw|smashwiki|Co-op mode}}, the Final Smash trophies of both characters are unlocked. Similarly to Classic, finishing the mode with Zelda/Sheik or Samus/Zero Suit Samus does not also unlock the trophy of the other form, requiring the mode to be cleared twice. Unlike Classic mode, Pokémon Trainer has only one trophy unlocked for All-Star mode. | ||
{| | |||
=====All-Star matches===== | |||
{|class="wikitable"width=80% align=center | |||
!# | !# | ||
!Series | !Series | ||
! | !Characters | ||
! | !Stages | ||
|- | |- | ||
|[[File:AllStarMatch1.jpg|150px]] | |||
|Game & Watch | |||
|[[Mr. Game & Watch]] | |[[Mr. Game & Watch]] | ||
|[[Flat Zone 2]] | |[[smashwiki:Flat Zone 2|Flat Zone 2]] | ||
|- | |- | ||
|[[File:AllStarMatch2.jpg|150px]] | |||
|Super Mario | |||
|[[Mario]], [[Luigi]], [[Princess Peach|Peach]], [[Bowser]] | |[[Mario]], [[Luigi]], [[Princess Peach|Peach]], [[Bowser]] | ||
|[[Mushroomy Kingdom]]/[[Delfino Plaza]]/[[Mario Circuit]]/[[Luigi's Mansion ( | |[[Mushroomy Kingdom]]/[[Delfino Plaza (stage)|Delfino Plaza]]/[[Figure-8 Circuit (stage)|Mario Circuit]]/[[Luigi's Mansion (stage)|Luigi's Mansion]] | ||
|- | |- | ||
|[[File:AllStarMatch3.jpg|150px]] | |||
|Donkey Kong | |||
|[[Donkey Kong]], [[Diddy Kong]] | |[[Donkey Kong]], [[Diddy Kong]] | ||
|[[ | |[[75 m (stage)|75 m]]/[[Rumble Falls (stage)|Rumble Falls]] | ||
|- | |- | ||
|[[File:AllStarMatch4.jpg|150px]] | |||
|Ice Climbers | |||
|[[Ice Climbers]] | |[[smashwiki:Ice Climbers (SSBB)|Ice Climbers]] | ||
|[[Summit]] | |[[Summit]] | ||
|- | |- | ||
|[[File:AllStarMatch5.jpg|150px]] | |||
|R.O.B. | |||
|[[R.O.B.]] | |[[R.O.B.]] | ||
|[[Mario Bros. (stage)|Mario Bros.]] | |[[Mario Bros. (stage)|Mario Bros.]] | ||
|- | |- | ||
|[[File:AllStarMatch6.jpg|150px]] | |||
|Legend of Zelda | |||
|[[Link]], [[Toon Link]], [[Zelda]]/[[Sheik]], [[Ganondorf]] | |[[Link]], [[Link|Toon Link]], [[smashwiki:Zelda (SSBB)|Zelda]]/[[smashwiki:Sheik (SSBB)|Sheik]], [[smashwiki:Ganondorf (SSBB)|Ganondorf]] | ||
|[[Bridge of Eldin]]/[[Pirate Ship | |[[smashwiki:Bridge of Eldin|Bridge of Eldin]]/[[smashwiki:Pirate Ship|Pirate Ship]] | ||
|- | |- | ||
|[[File:AllStarMatch7.jpg|150px]] | |||
|Metroid | |||
|[[Samus | |[[smashwiki:Samus (SSBB)|Samus]]/[[smashwiki:Zero Suit Samus|Zero Suit Samus]] | ||
|[[Frigate Orpheon]]/[[Norfair]] | |[[smashwiki:Frigate Orpheon|Frigate Orpheon]]/[[smashwiki:Norfair|Norfair]] | ||
|- | |- | ||
|[[File:AllStarMatch8.jpg|150px]] | |||
|Kid Icarus | |||
|[[Pit]] | |[[smashwiki:Pit (SSBB)|Pit]] | ||
|[[Skyworld]] | |[[smashwiki:Skyworld|Skyworld]] | ||
|- | |- | ||
|[[File:AllStarMatch9.jpg|150px]] | |||
|Metal Gear Solid | |||
|[[ | |[[smashwiki:Snake (SSBB)|Snake]] | ||
|[[Shadow Moses Island]] | |[[smashwiki:Shadow Moses Island|Shadow Moses Island]] | ||
|- | |- | ||
|[[File:AllStarMatch10.jpg|150px]] | |||
|EarthBound | |||
|[[Ness]], [[Lucas]] | |[[smashwiki:Ness (SSBB)|Ness]], [[smashwiki:Lucas (SSBB)|Lucas]] | ||
|[[New Pork City]] | |[[smashwiki:New Pork City|New Pork City]] | ||
|- | |- | ||
|[[File:AllStarMatch11.jpg|150px]] | |||
|Fire Emblem | |||
|[[Marth]], [[Ike]] | |[[smashwiki:Marth (SSBB)|Marth]], [[smashwiki:Ike (SSBB)|Ike]] | ||
|[[Castle Siege]] | |[[smashwiki:Castle Siege|Castle Siege]] | ||
|- | |- | ||
|[[File:AllStarMatch12.jpg|150px]] | |||
|Yoshi's Island | |||
|[[Yoshi]] | |[[Yoshi]] | ||
|[[Yoshi's Island ( | |[[Yoshi's Island (Super Smash Bros. Brawl)|Yoshi's Island]] | ||
|- | |- | ||
|[[File:AllStarMatch13.jpg|150px]] | |||
|F-Zero | |||
|[[Captain Falcon]] | |[[smashwiki:Captain Falcon (SSBB)|Captain Falcon]] | ||
|[[Port Town Aero Dive]] | |[[smashwiki:Port Town Aero Dive|Port Town Aero Dive]] | ||
|- | |- | ||
|[[File:AllStarMatch14.jpg|150px]] | |||
|Sonic the Hedgehog | |||
|[[Sonic | |[[smashwiki:Sonic (SSBB)|Sonic]] | ||
|[[Green Hill Zone]] | |[[smashwiki:Green Hill Zone|Green Hill Zone]] | ||
|- | |- | ||
|[[File:AllStarMatch15.jpg|150px]] | |||
|Kirby | |||
|[[Kirby]], [[Meta Knight]], [[King Dedede]] | |[[smashwiki:Kirby (SSBB)|Kirby]], [[smashwiki:Meta Knight (SSBB)|Meta Knight]], [[smashwiki:King Dedede (SSBB)|King Dedede]] | ||
|[[Halberd| | |[[smashwiki:Halberd|Halberd]] | ||
|- | |- | ||
|[[File:AllStarMatch16.jpg|150px]] | |||
|Star Fox | |||
|[[Fox | |[[smashwiki:Fox (SSBB)|Fox]], [[smashwiki:Falco (SSBB)|Falco]], [[smashwiki:Wolf (SSBB)|Wolf]] | ||
|[[Lylat Cruise]] | |[[smashwiki:Lylat Cruise|Lylat Cruise]] | ||
|- | |- | ||
|[[File:AllStarMatch17.jpg|150px]] | |||
|WarioWare | |||
|[[Wario]] | |[[Wario]] | ||
|[[WarioWare, Inc. (stage)|WarioWare, Inc.]] | |[[WarioWare, Inc. (stage)|WarioWare, Inc.]] | ||
|- | |- | ||
|[[File:AllStarMatch18.jpg|150px]] | |||
|Pokémon | |||
|[[Pikachu]], [[Pokémon Trainer]], [[Lucario]], [[Jigglypuff]] | |[[smashwiki:Pikachu (SSBB)|Pikachu]], [[smashwiki:Pokémon Trainer (SSBB)|Pokémon Trainer]], [[smashwiki:Lucario (SSBB)|Lucario]], [[smashwiki:Jigglypuff (SSBB)|Jigglypuff]] | ||
|[[Pokémon Stadium 2]]/[[Spear Pillar]] | |[[smashwiki:Pokémon Stadium 2|Pokémon Stadium 2]]/[[smashwiki:Spear Pillar|Spear Pillar]] | ||
|- | |- | ||
|[[File:AllStarMatch19.jpg|150px]] | |||
|Pikmin | |||
|[[ | |[[smashwiki:Olimar (SSBB)|Olimar]] | ||
|[[Distant Planet]] | |[[smashwiki:Distant Planet|Distant Planet]] | ||
|} | |} | ||
====Events==== | ====Events==== | ||
{{main-wiki|SmashWiki|Event match}} | |||
Events return from ''Super Smash Bros. Melee'', and they are battles with predefined objectives, many of which involve defeating a certain opponent. From the menu, each event is represented by a small preview screenshot, and every event has a selectable difficulty setting (Easy, Normal, or Hard). Several events are also available in two-player co-op mode. The events include: | |||
=====Single | =====Single-player mode===== | ||
{|class="wikitable" | |||
{| | |||
!# | !# | ||
!Preview | !Preview | ||
!Event | !Event | ||
! | !Playable characters | ||
! | !In-game description (objective) | ||
!Stage | !Stage | ||
|- | |- | ||
|1 | |||
|[[File:Events01.png|85px]] | |||
|Two Trouble Kings | |||
|[[Mario]] | |[[Mario]] | ||
|''Now there are TWO greedy kings? Having a buddy doesn't change their natures.'' (Mario must defeat Bowser and King Dedede.) | |''Now there are TWO greedy kings? Having a buddy doesn't change their natures.'' (Mario must defeat Bowser and King Dedede.) | ||
|[[Delfino Plaza]] | |[[Delfino Plaza (stage)|Delfino Plaza]] | ||
|- | |- | ||
|2 | |||
|[[File:Events02.png|85px]] | |||
|Landmaster Ignition | |||
|[[Fox]] | |[[smashwiki:Fox (SSBB)|Fox]] | ||
|''Slippy! Send me a Landmaster! Show them Star Fox's [[Final Smash]]!'' (Fox must KO Zelda/Sheik and Meta Knight with the Landmaster as many times as possible within a time limit.) | |''Slippy! Send me a Landmaster! Show them Star Fox's [[Final Smash]]!'' (Fox must KO Zelda/Sheik and Meta Knight with the Landmaster as many times as possible within a time limit.) | ||
|[[Corneria]] | |[[smashwiki:Corneria|Corneria]] | ||
|- | |- | ||
|3 | |||
|[[File:Events03.png|85px]] | |||
|Pink Ball Repulsion | |||
|[[Meta Knight]] | |[[smashwiki:Meta Knight|Meta Knight]] | ||
|''Kirby must not board the Halberd! Repel him so the plans can succeed!'' (Meta Knight has to defeat Kirby before he reaches the Battleship Halberd | |''Kirby must not board the Halberd! Repel him so the plans can succeed!'' (Meta Knight has to defeat Kirby before he reaches the Battleship Halberd (1:24).) | ||
|[[Halberd]] | |[[smashwiki:Halberd|Halberd]] | ||
|- | |- | ||
|4 | |||
|[[File:Events04.png|85px]] | |||
|Cleaning House in Skyworld | |||
|[[Pit]] | |[[smashwiki:Pit (SSBB)|Pit]] | ||
|''Destroy all the breakable terrain to remodel Skyworld!'' (Pit has to destroy all platforms in Skyworld, with Wario trying to fight him.) | |''Destroy all the breakable terrain to remodel Skyworld!'' (Pit has to destroy all platforms in Skyworld, with Wario trying to fight him.) | ||
|[[Skyworld]] | |[[smashwiki:Skyworld|Skyworld]] | ||
|- | |- | ||
|5 | |||
|[[File:Events05.png|85px]] | |||
|Become the Champion! | |||
|[[Pokémon Trainer]] | |[[smashwiki:Pokémon Trainer (SSBB)|Pokémon Trainer]] | ||
|''The final Pokémon-tournament challenge. Do your Pokémon match up?!'' (Player must defeat all 3 of the rival Trainer's Pokémon.) | |''The final Pokémon-tournament challenge. Do your Pokémon match up?!'' (Player must defeat all 3 of the rival Trainer's Pokémon.) | ||
|[[Pokémon Stadium 2]] | |[[smashwiki:Pokémon Stadium 2|Pokémon Stadium 2]] | ||
|- | |- | ||
|6 | |||
|[[File:Events06.png|85px]] | |||
|Super Bowser Bros. | |||
|[[Bowser]] | |[[Bowser]] | ||
|''Want to see what it's like to be Mario? Survive as you race to the flag!'' (Race 3 Marios to the end of Mushroomy Kingdom 1-1, without being KO'd.) | |''Want to see what it's like to be Mario? Survive as you race to the flag!'' (Race 3 Marios to the end of Mushroomy Kingdom 1-1, without being KO'd.) | ||
|[[Mushroomy Kingdom|Mushroomy Kingdom 1-1]] | |[[Mushroomy Kingdom|Mushroomy Kingdom 1-1]] | ||
|- | |- | ||
|7 | |||
|[[File:Events07.png|85px]] | |||
|Diddy Kong Panic | |||
|[[Donkey Kong]] | |[[Donkey Kong]] | ||
|''So many angry little Diddy Kongs. Did they lose a race or something?'' (KO the 15 Diddy Kongs.) | |''So many angry little Diddy Kongs. Did they lose a race or something?'' (KO the 15 Diddy Kongs.) | ||
|[[Mario Circuit]] | |[[Figure-8 Circuit (stage)|Mario Circuit]] | ||
|- | |- | ||
|8 | |||
|[[File:Events08.png|85px]] | |||
|Go! Triple Finish! | |||
|[[Pikachu]] | |[[smashwiki:Pikachu (SSBB)|Pikachu]] | ||
|'' | |''Squirtle, Ivysaur and Charizard appear all at once in a Pokémon battle royale!'' (KO Squirtle, Ivysaur, and Charizard.) | ||
|[[Pokémon Stadium 2]] | |[[smashwiki:Pokémon Stadium 2|Pokémon Stadium 2]] | ||
|- | |- | ||
|9 | |||
|[[File:Events09.png|85px]] | |||
|The Monster Beneath the Earth | |||
|[[Ike]] | |[[smashwiki:Ike (SSBB)|Ike]] | ||
|''A fearsome beast awaits in the dungeon. Pray you settle things before you see it.'' (KO two Diddy Kongs; if the player reaches the dungeon below, | |''A fearsome beast awaits in the dungeon. Pray you settle things before you see it.'' (KO two Diddy Kongs; if the player reaches the dungeon below, they will end up having to fight a Giant Donkey Kong.) | ||
|[[Castle Siege]] | |[[smashwiki:Castle Siege|Castle Siege]] | ||
|- | |- | ||
|10 | |||
|[[File:Events10.png|85px]] | |||
|All-Star Battle Regulars | |||
|Choose | |Choose | ||
|''The Smash Bros. perfect-attendance crew! Fight the eight regulars in order!'' (KO the 8 series regulars: Mario, DK, Link, Samus, Yoshi, Kirby, Fox, Pikachu.) | |''The Smash Bros. perfect-attendance crew! Fight the eight regulars in order!'' (KO the 8 series regulars: Mario, DK, Link, Samus, Yoshi, Kirby, Fox, Pikachu.) | ||
|[[Final Destination]] | |[[smashwiki:Final Destination (SSBB)|Final Destination]] | ||
|- | |- | ||
|11 | |||
|[[File:Events11.png|85px]] | |||
|Yoshi's Rainbow | |||
|[[Ice Climbers]] | |[[smashwiki:Ice Climbers (SSBB)|Ice Climbers]] | ||
|''Yoshis everywhere! Beat 'em in order: red, pink, yellow, green, pale blue, blue.'' (KO the Yoshis in that particular order.) | |''Yoshis everywhere! Beat 'em in order: red, pink, yellow, green, pale blue, blue.'' (KO the Yoshis in that particular order.) | ||
|[[Rainbow Cruise]] | |[[Rainbow Cruise]] | ||
|- | |- | ||
|12 | |||
|[[File:Events12.png|85px]] | |||
|Sleeping in the Eggs | |||
|[[Yoshi]] | |[[Yoshi]] | ||
|''These two can't seem to settle down. Maybe they will if you put them in eggs.'' (Simultaneously capture Kirby and Pikachu in Yoshi's eggs.) | |''These two can't seem to settle down. Maybe they will if you put them in eggs.'' (Simultaneously capture Kirby and Pikachu in Yoshi's eggs.) | ||
|[[Yoshi's Island ( | |[[Yoshi's Island (Super Smash Bros. Brawl)|Yoshi's Island]] | ||
|- | |- | ||
|13 | |||
|[[File:Events13.png|85px]] | |||
|Dragoon Strike | |||
|[[Kirby]] | |[[smashwiki:Kirby (SSBB)|Kirby]] | ||
|''Reunite the three parts of the Dragoon! Aim well to launch your enemies!'' (KO three Warios with the Dragoon.) | |''Reunite the three parts of the Dragoon! Aim well to launch your enemies!'' (KO three Warios with the Dragoon.) | ||
|[[Halberd]] | |[[smashwiki:Halberd|Halberd]] | ||
|- | |- | ||
|14 | |||
|[[File:Events14.png|85px]] | |||
|Sproutage of the Flower Pikmin | |||
|[[ | |[[smashwiki:Olimar (SSBB)|Pikmin & Olimar]] | ||
|''In time, Pikmin blossom. Guard the six Pikmin until they all bloom into flowers!'' (Self-explanatory) | |''In time, Pikmin blossom. Guard the six Pikmin until they all bloom into flowers!'' (Self-explanatory) | ||
|[[Distant Planet]] | |[[smashwiki:Distant Planet|Distant Planet]] | ||
|- | |- | ||
|15 | |||
|[[File:Events15.png|85px]] | |||
|Hammer of the King | |||
|[[King Dedede]] | |[[smashwiki:King Dedede (SSBB)|King Dedede]] | ||
|''We are the three Dededes! It's King Dedede times three!'' (With the help of two ally Dededes, KO a Giant Metal Dedede.) | |''We are the three Dededes! It's King Dedede times three!'' (With the help of two ally Dededes, KO a Giant Metal Dedede.) | ||
|[[Smashville]] | |[[smashwiki:Smashville|Smashville]] | ||
|- | |- | ||
|16 | |||
|[[File:Events16.png|85px]] | |||
|Power Suit ON! | |||
|[[Zero Suit Samus]] | |[[smashwiki:Zero Suit Samus (SSBB)|Zero Suit Samus]] | ||
|''Quickly! Regain the Power Suit you lost. You'll need a Smash Ball to do it.'' (Get the Smash Ball and use the Final Smash.) | |''Quickly! Regain the Power Suit you lost. You'll need a Smash Ball to do it.'' (Get the Smash Ball and use the Final Smash.) | ||
|[[Frigate Orpheon]] | |[[smashwiki:Frigate Orpheon|Frigate Orpheon]] | ||
|- | |- | ||
|17 | |||
|[[File:Events17.png|85px]] | |||
|Super Waterfall Climb | |||
|[[Zelda]] | |[[smashwiki:Zelda (SSBB)|Zelda]] | ||
|''I want to climb a waterfall at high speed. Why? Because it's there.'' (Make it to the top of the stage.) | |''I want to climb a waterfall at high speed. Why? Because it's there.'' (Make it to the top of the stage.) | ||
|[[Rumble Falls]] | |[[Rumble Falls (stage)|Rumble Falls]] | ||
|- | |- | ||
|18 | |||
|[[File:Events18.png|85px]] | |||
|Dark Link Duel | |||
|[[Link]] | |[[Link]] | ||
|''A predestined battle with Dark Link. Nowhere to run, but no one in the way.'' (KO Dark Link in a match with hitpoints instead of damage percentages.) | |''A predestined battle with Dark Link. Nowhere to run, but no one in the way.'' (KO Dark Link in a match with hitpoints instead of damage percentages.) | ||
|[[Bridge of Eldin]] | |[[smashwiki:Bridge of Eldin|Bridge of Eldin]] | ||
|- | |- | ||
|19 | |||
|[[File:Events19.png|85px]] | |||
|Wario Bros. | |||
|[[Wario]] | |[[Wario]] | ||
|''I came to find the Mario Bros.' roots. What's this giant stage?'' (KO Mario and Luigi.) | |''I came to find the Mario Bros.' roots. What's this giant stage?'' (KO Mario and Luigi.) | ||
|[[Mario Bros. | |[[Mario Bros. (stage)|Mario Bros.]] | ||
|- | |- | ||
|20 | |||
|[[File:Events20.png|85px]] | |||
|All-Star Battle x 1 | |||
|Choose | |Choose | ||
|''Challengers approaching! Fight eight Brawl newcomers in all!'' (KO Wario, Meta Knight, Pit, Zero Suit Samus, Olimar, Lucas, Diddy Kong, and Pokémon Trainer.) | |''Challengers approaching! Fight eight Brawl newcomers in all!'' (KO Wario, Meta Knight, Pit, Zero Suit Samus, Olimar, Lucas, Diddy Kong, and Pokémon Trainer.) | ||
|[[Battlefield]] | |[[Battlefield]] | ||
|- | |- | ||
|21 | |||
|[[File:Events21.png|85px]] | |||
|Visit to Onett | |||
|[[Lucas]] | |[[smashwiki:Lucas (SSBB)|Lucas]] | ||
|''In the legendary boy's town, even one as timid as I could become a warrior.'' (KO Ness.) | |''In the legendary boy's town, even one as timid as I could become a warrior.'' (KO Ness.) | ||
|[[Onett]] | |[[smashwiki:Onett|Onett]] | ||
|- | |- | ||
|22 | |||
|[[File:Events22.png|85px]] | |||
|Monkeys Unite | |||
|[[Diddy Kong]] | |[[Diddy Kong]] | ||
|''Donkey Kong is under attack! Defeat his opponent!'' (KO Sheik and Lucario, with Giant Donkey Kong as an ally.) | |''Donkey Kong is under attack! Defeat his opponent!'' (KO Sheik and Lucario, with Giant Donkey Kong as an ally.) | ||
|[[Rumble Falls]] | |[[Rumble Falls (stage)|Rumble Falls]] | ||
|- | |- | ||
|23 | |||
|[[File:Events23.png|85px]] | |||
|Molten Norfair | |||
|[[Samus | |[[smashwiki:Samus (SSBB)|Samus]] | ||
|''Get inside the safety capsule before your foes to survive the lava of Norfair.'' (Enter the capsule when the huge wave of lava approaches.) | |''Get inside the safety capsule before your foes to survive the lava of Norfair.'' (Enter the capsule when the huge wave of lava approaches.) | ||
|[[Norfair]] | |[[smashwiki:Norfair|Norfair]] | ||
|- | |- | ||
|24 | |||
|[[File:Events24.png|85px]] | |||
|Come On! Blue Falcon! | |||
|[[Captain Falcon]] | |[[smashwiki:Captain Falcon|Captain Falcon]] | ||
|''Dawdle too much and the race will end! Ride the Blue Falcon to victory!'' (KO the two R.O.B.s with the Final Smash within one lap.) | |''Dawdle too much and the race will end! Ride the Blue Falcon to victory!'' (KO the two R.O.B.s with the Final Smash within one lap.) | ||
|[[Port Town Aero Dive]] | |[[smashwiki:Port Town Aero Dive|Port Town Aero Dive]] | ||
|- | |- | ||
|25 | |||
|[[File:Events25.png|85px]] | |||
|The Aura is with Me | |||
|[[Lucario]] | |[[smashwiki:Lucario (SSBB)|Lucario]] | ||
|''When pushed to the limit, his power grows! Fight as | |''When pushed to the limit, his power grows! Fight as Lucario at lethal damage!'' (KO Ness and Sheik; Lucario starts with 182% damage.) | ||
|[[Spear Pillar]] | |[[smashwiki:Spear Pillar|Spear Pillar]] | ||
|- | |- | ||
|26 | |||
|[[File:Events26.png|85px]] | |||
|The Slow and Easy Life | |||
|[[Ness]] | |[[smashwiki:Ness (SSBB)|Ness]] | ||
|''You want to enjoy K.K. Slider's show. But those guys keep gettin' in the way...'' (KO three Tiny Olimars.) | |''You want to enjoy K.K. Slider's show. But those guys keep gettin' in the way...'' (KO three Tiny Olimars.) | ||
|[[Smashville]] | |[[smashwiki:Smashville|Smashville]] | ||
|- | |- | ||
|27 | |||
|[[File:Events27.png|85px]] | |||
|Three-Beast Carnage | |||
|[[R.O.B.]] | |[[R.O.B.]] | ||
|''Three beasts are in the tyrant's town! Facing them is a lone figure...R.O.B.'' (KO Giant Bowser, Giant Donkey Kong, and Giant Charizard.) | |''Three beasts are in the tyrant's town! Facing them is a lone figure...R.O.B.'' (KO Giant Bowser, Giant Donkey Kong, and Giant Charizard.) | ||
|[[New Pork City]] | |[[smashwiki:New Pork City|New Pork City]] | ||
|- | |- | ||
|28 | |||
|[[File:Events28.png|85px]] | |||
|Flower Blooms in the Echoes | |||
|[[Princess Peach|Peach]] | |[[Princess Peach|Peach]] | ||
|''Wrapped in sound waves, flowers of joy bloom. Make all the leaves on the right tree red!'' (Hit all the leaves on the tree on the right, until they are all red at the same time.) | |''Wrapped in sound waves, flowers of joy bloom. Make all the leaves on the right tree red!'' (Hit all the leaves on the tree on the right, until they are all red at the same time.) | ||
|[[Hanenbow]] | |[[smashwiki:Hanenbow|Hanenbow]] | ||
|- | |- | ||
|29 | |||
|[[File:Events29.png|85px]] | |||
|All-Star Semifinal Regulars | |||
|Choose | |Choose | ||
|''Four hidden characters from the | |''Four hidden characters from the past game! They're secret perfect attendees.'' (KO Luigi, Captain Falcon, Ness, and Jigglypuff.) | ||
|[[Yoshi's Island ( | |[[Yoshi's Island (Super Smash Bros. Brawl)|Yoshi's Island]] | ||
|- | |- | ||
|30 | |||
|[[File:Events30.png|85px]] | |||
|Sonic Boom | |||
|[[ | |[[Sonic]] | ||
|''Hey, guys! Is this some kind of joke? Isn't one Sonic enough?'' (KO 15 enemy Sonics.) | |''Hey, guys! Is this some kind of joke? Isn't one Sonic enough?'' (KO 15 enemy Sonics.) | ||
|[[Green Hill Zone]] | |[[smashwiki:Green Hill Zone|Green Hill Zone]] | ||
|- | |- | ||
|31 | |||
|[[File:Events31.png|85px]] | |||
|The Ultimate Bodyguard | |||
|[[Marth]] | |[[smashwiki:Marth (SSBB)|Marth]] | ||
|''Ganondorfs attack Zelda as she focuses! Protect her at all costs!'' (Protect Zelda from 2 Ganondorfs until she transforms, then finish the battle.) | |''Ganondorfs attack Zelda as she focuses! Protect her at all costs!'' (Protect Zelda from 2 Ganondorfs until she transforms, then finish the battle.) | ||
|[[Castle Siege]] | |[[smashwiki:Castle Siege|Castle Siege]] | ||
|- | |- | ||
|32 | |||
|[[File:Events32.png|85px]] | |||
|Bird in Darkest Night | |||
|[[Falco | |[[smashwiki:Falco (SSBB)|Falco]] | ||
|''What's happening? It's getting darker! Today's just isn't my lucky day.'' (KO Mr. Game & Watch in a darker version of [[Brinstar]].) | |''What's happening? It's getting darker! Today's just isn't my lucky day.'' (KO Mr. Game & Watch in a darker version of [[Brinstar]].) | ||
|[[Brinstar]] | |[[smashwiki:Brinstar|Brinstar]] | ||
|- | |- | ||
|33 | |||
|[[File:Events33.png|85px]] | |||
|Advent of the Evil King | |||
|[[Ganondorf]] | |[[smashwiki:Ganondorf (SSBB)|Ganondorf]] | ||
|''The king of evil wants the Triforce, but the fated pair have help from above.'' (KO Link, Zelda, and Pit.) | |''The king of evil wants the Triforce, but the fated pair have help from above.'' (KO Link, Zelda, and Pit.) | ||
|[[Temple]] | |[[smashwiki:Temple|Temple]] | ||
|- | |- | ||
|34 | |||
|[[File:Events34.png|85px]] | |||
|All-Star Battle Melee | |||
|Choose | |Choose | ||
|''It's the eight challengers from Melee! What's different between then and now?'' (KO Bowser, Peach, Zelda, Ice Climbers, Marth, Mr. Game & Watch, Falco, and Ganondorf.) | |''It's the eight challengers from Melee! What's different between then and now?'' (KO Bowser, Peach, Zelda, Ice Climbers, Marth, Mr. Game & Watch, Falco, and Ganondorf.) | ||
|[[Pokémon Stadium]] | |[[smashwiki:Pokémon Stadium|Pokémon Stadium]] | ||
|- | |- | ||
|35 | |||
|[[File:Events35.png|85px]] | |||
|The Visitor to Flat Zone | |||
|[[Mr. Game & Watch]] | |[[smashwiki:Mr. Game & Watch (SSBB)|Mr. Game & Watch]] | ||
|''Can anyone move well in this flat world? Maybe an ally?! Maybe not...'' (KO Peach, Jigglypuff, and Toon Link.) | |''Can anyone move well in this flat world? Maybe an ally?! Maybe not...'' (KO Peach, Jigglypuff, and Toon Link.) | ||
|[[Flat Zone 2]] | |[[smashwiki:Flat Zone 2|Flat Zone 2]] | ||
|- | |- | ||
|36 | |||
|[[File:Events36.png|85px]] | |||
|High-Tech Special Forces | |||
|[[ | |[[smashwiki:Snake (SSBB)|Snake]] | ||
|''Colonel: Snake. Intel shows FOXHOUND has hired three bounty hunters to kill you.'' (KO Samus, Captain Falcon, and Wolf.) | |''Colonel: Snake. Intel shows FOXHOUND has hired three bounty hunters to kill you.'' (KO Samus, Captain Falcon, and Wolf.) | ||
|[[Shadow Moses Island]] | |[[smashwiki:Shadow Moses Island|Shadow Moses Island]] | ||
|- | |- | ||
|37 | |||
|[[File:Events37.png|85px]] | |||
|The Pirate Airship | |||
|[[Toon Link]] | |[[Link|Toon Link]] | ||
|''Your chance comes when the whirlwind lifts the pirate ship. Finish it in the sky!'' (KO the two Yoshis when the ship is in the sky.) | |''Your chance comes when the whirlwind lifts the pirate ship. Finish it in the sky!'' (KO the two Yoshis when the ship is in the sky.) | ||
|[[Pirate Ship | |[[smashwiki:Pirate Ship|Pirate Ship]] | ||
|- | |- | ||
|38 | |||
|[[File:Events38.png|85px]] | |||
|The Wolf Hunts the Fox | |||
|[[Wolf | |[[smashwiki:Wolf (SSBB)|Wolf]] | ||
|''Wolf will be the one to finish you! It's Star Fox's final battle.'' (KO Fox and Falco.) | |''Wolf will be the one to finish you! It's Star Fox's final battle.'' (KO Fox and Falco.) | ||
|[[Lylat Cruise]] | |[[smashwiki:Lylat Cruise|Lylat Cruise]] | ||
|- | |- | ||
|39 | |||
|[[File:Events39.png|85px]] | |||
|All-Star Battle x 2 | |||
|Choose | |Choose | ||
|''It's even more new Brawl challengers! There's a total of eight. Defeat them all.'' (KO King Dedede, Ike, Lucario, R.O.B, Toon Link, Snake, Sonic, and Wolf.) | |''It's even more new Brawl challengers! There's a total of eight. Defeat them all.'' (KO King Dedede, Ike, Lucario, R.O.B, Toon Link, Snake, Sonic, and Wolf.) | ||
|[[Skyworld]] | |[[smashwiki:Skyworld|Skyworld]] | ||
|- | |- | ||
|40 | |||
|[[File:Events40.png|85px]] | |||
|The Final Battle | |||
|Choose | |Choose | ||
|''Bowser, King Dedede, and Ganondorf... A battle with the bossiest of bosses!'' (KO Bowser, King Dedede, and Ganondorf.) | |''Bowser, King Dedede, and Ganondorf... A battle with the bossiest of bosses!'' (KO Bowser, King Dedede, and Ganondorf.) | ||
|[[Final Destination]] | |[[smashwiki:Final Destination (SSBB)|Final Destination]] | ||
|- | |- | ||
|41 | |||
|[[File:Events41.png|85px]] | |||
|The FINAL, Final Battle | |||
|Choose | |Choose | ||
|''It's the REAL final battle!'' (KO Snake, Sonic, and Giant Mario.) | |''It's the REAL final battle!'' (KO Snake, Sonic, and Giant Mario.) | ||
| | |Final Destination | ||
|} | |} | ||
=====Co-Op | =====Co-Op mode===== | ||
This mode requires two human players, and has different events from the single-player mode (excluding one which was also an event in Single-Player Mode). | |||
This mode requires two human players, and has | {|class="wikitable" | ||
{| | |||
!# | !# | ||
!Preview | !Preview | ||
!Event | !Event | ||
! | !Playable characters | ||
! | !In-game Description (objective) | ||
!Stage | !Stage | ||
|- | |- | ||
|1 | |||
|[[File:Events01.png|85px]] | |||
|Two Trouble Kings | |||
|[[Mario]] and [[Kirby]] | |[[Mario]] and [[Kirby]] | ||
|''Now there are TWO greedy kings? Having a buddy doesn't change their natures.'' (KO Bowser and King Dedede) | |''Now there are TWO greedy kings? Having a buddy doesn't change their natures.'' (KO Bowser and King Dedede.) | ||
|[[Delfino Plaza]] | |[[Delfino Plaza (stage)|Delfino Plaza]] | ||
|- | |- | ||
|2 | |||
|[[File:C-02.png|85px]] | |||
|Master the Pokémon Tag Battle | |||
|[[Pokémon Trainer]] and [[Pikachu]] | |[[smashwiki:Pokémon Trainer (SSBB)|Pokémon Trainer]] and [[smashwiki:Pikachu (SSBB)|Pikachu]] | ||
|''The | |''The Pokémon tournament's final challenge. Your rivals have the same Pokémon!'' (KO rival Pokémon Trainer and Pikachu.) | ||
|[[Pokémon Stadium 2]] | |[[smashwiki:Pokémon Stadium 2|Pokémon Stadium 2]] | ||
|- | |- | ||
|3 | |||
|[[File:C-03.png|85px]] | |||
|Fastest, Shortest, Sudden Death | |||
|[[Yoshi]] and [[King Dedede]] | |[[Yoshi]] and [[smashwiki:King Dedede (SSBB)|King Dedede]] | ||
|''Only ten seconds left?! Beat as many foes as you can in Super Sudden Death and live!'' ( | |''Only ten seconds left?! Beat as many foes as you can in Super Sudden Death and live!'' (Survive 10 seconds at 300% damage.) | ||
|[[WarioWare, Inc. (stage)|WarioWare, Inc.]] | |[[WarioWare, Inc. (stage)|WarioWare, Inc.]] | ||
|- | |- | ||
|4 | |||
|[[File:C-04.png|85px]] | |||
|The DK Tag Calamity | |||
|[[Donkey Kong]] and [[Diddy Kong]] | |[[Donkey Kong]] and [[Diddy Kong]] | ||
|''DK and Diddy got tiny! Use lightning to help deal the final blow!'' ( | |''DK and Diddy got tiny! Use lightning to help deal the final blow!'' (Defeat all enemies while many Lightning Bolt items appear.) | ||
|[[Mario Circuit]] | |[[Figure-8 Circuit (stage)|Mario Circuit]] | ||
|- | |- | ||
|5 | |||
|[[File:C-05.png|85px]] | |||
|The Yoshi Team of 50 | |||
|[[Meta Knight]] and [[Pit]] | |[[smashwiki:Meta Knight (SSBB)|Meta Knight]] and [[smashwiki:Pit (SSBB)|Pit]] | ||
|''It's a mountain of Yoshis! Take care of them all before completing one lap.'' (KO all 50 Yoshis in under one lap) | |''It's a mountain of Yoshis! Take care of them all before completing one lap.'' (KO all 50 Yoshis in under one lap.) | ||
|[[Rainbow Cruise]] | |[[Rainbow Cruise]] | ||
|- | |- | ||
|6 | |||
|[[File:Event6.PNG|85px]] | |||
|Unwanted Suitors | |||
|[[Zelda]] and [[Zero Suit Samus]] | |[[smashwiki:Zelda (SSBB)|Zelda]] and [[smashwiki:Zero Suit Samus (SSBB)|Zero Suit Samus]] | ||
|''What do these guys want, anyway? Chase 'em off, will ya?'' (KO the invisible enemies) | |''What do these guys want, anyway? Chase 'em off, will ya?'' (KO the invisible enemies.) | ||
|[[Port Town Aero Dive]] | |[[smashwiki:Port Town Aero Dive|Port Town Aero Dive]] | ||
|- | |- | ||
|7 | |||
|[[File:Event7.PNG|80px]] | |||
|Battle of the Dark Sides | |||
|[[Link]] and [[Samus | |[[Link]] and [[smashwiki:Samus (SSBB)|Samus]] | ||
|''A predestined battle with their dark sides. Nowhere to run, but no one in the way.'' (KO Dark Link and Dark Samus; all players have 200 HP) | |''A predestined battle with their dark sides. Nowhere to run, but no one in the way.'' (KO Dark Link and Dark Samus; all players have 200 HP.) | ||
|[[Bridge of Eldin]] | |[[smashwiki:Bridge of Eldin|Bridge of Eldin]] | ||
|- | |- | ||
|8 | |||
|[[File:Event8.PNG|85px]] | |||
|All MINE! | |||
|[[Wario]] and [[Bowser]] | |[[Wario]] and [[Bowser]] | ||
|''Money! Money makes the world go 'round! Gather 2,000 coins and eat something good.'' (Gather 2,000 coins) | |''Money! Money makes the world go 'round! Gather 2,000 coins and eat something good.'' (Gather 2,000 coins.) | ||
|[[Skyworld]] | |[[smashwiki:Skyworld|Skyworld]] | ||
|- | |- | ||
|9 | |||
|[[File:Event9.PNG|85px]] | |||
|Those Who Wait in Onett | |||
|[[Lucas]] and [[Ness]] | |[[Lucas]] and [[Ness]] | ||
|''A green combo has descended on Onett. And they don't seem to be leaving.'' (KO Luigi and Yoshi.) | |''A green combo has descended on Onett. And they don't seem to be leaving.'' (KO Luigi and Yoshi.) | ||
|[[Onett]] | |[[smashwiki:Onett|Onett]] | ||
|- | |- | ||
|10 | |||
|[[File:Event10.PNG|85px]] | |||
|The R.O.B.'s of Tomorrow | |||
|[[Lucario]] and [[Ice Climbers]] | |[[smashwiki:Lucario (SSBB)|Lucario]] and [[smashwiki:Ice Climbers (SSBB)|Ice Climbers]] | ||
|''It's normally a pretty small robot... Is this even possible?'' (Take turns KOing the R.O.B.s, which are of varying sizes) | |''It's normally a pretty small robot... Is this even possible?'' (Take turns KOing the R.O.B.s, which are of varying sizes.) | ||
|[[Summit]] | |[[smashwiki:Summit|Summit]] | ||
|- | |- | ||
|11 | |||
|[[File:Event11.PNG|85px]] | |||
|The Great Remodeling Battle | |||
|[[Luigi]] and [[Princess Peach|Peach]] | |[[Luigi]] and [[Princess Peach|Peach]] | ||
|''Finally time for that remodel! Nab 300 coins without damaging the house.'' (Get 300 coins without damaging the mansion) | |''Finally time for that remodel! Nab 300 coins without damaging the house.'' (Get 300 coins without damaging the mansion.) | ||
|[[Luigi's Mansion ( | |[[Luigi's Mansion (stage)|Luigi's Mansion]] | ||
|- | |- | ||
|12 | |||
|[[File:Events24.png|85px]] | |||
|Come Back, Falcon Flyer! | |||
|[[Captain Falcon]] and [[ | |[[smashwiki:Captain Falcon (SSBB)]] and [[smashwiki:Olimar (SSBB)|Pikmin & Olimar]] | ||
|''Land the final blow before the Falcon Flyer leaves... in about thirty seconds!'' (KO two | |''Land the final blow before the Falcon Flyer leaves... in about thirty seconds!'' (KO two Samuses in 30 seconds.) | ||
|[[Big Blue]] | |[[smashwiki:Big Blue|Big Blue]] | ||
|- | |- | ||
|13 | |||
|[[File:Event13.PNG|85px]] | |||
|Blades of the Quick and Mighty | |||
|[[Marth]] and [[Ike]] | |[[smashwiki:Marth (SSBB)|Marth]] and [[smashwiki:Ike (SSBB)|Ike]] | ||
|''Two blades of vastly different styles. Combine them to grasp their true worth.'' (KO Link, Meta Knight, and Ganondorf) | |''Two blades of vastly different styles. Combine them to grasp their true worth.'' (KO Link, Meta Knight, and Ganondorf.) | ||
|[[ | |[[smashwiki:Temple|Temple]] | ||
|- | |- | ||
|14 | |||
|[[File:Event14.PNG|85px]] | |||
|The Dark Guardians | |||
|[[Ganondorf]] and [[Wolf | |[[smashwiki:Ganondorf (SSBB)|Ganondorf]] and [[smashwiki:Wolf (SSBB)|Wolf]] | ||
|''Two beasts appeared in the tyrant's town! How clever. See if you can't crush them.'' (KO Giant Charizard and Donkey Kong) | |''Two beasts appeared in the tyrant's town! How clever. See if you can't crush them.'' (KO Giant Charizard and Donkey Kong.) | ||
|[[New Pork City]] | |[[smashwiki:New Pork City|New Pork City]] | ||
|- | |- | ||
|15 | |||
|[[File:Event15.PNG|85px]] | |||
|Four Swords Brawl | |||
|Both play as [[Toon Link]] | |Both play as [[Link|Toon Link]] | ||
|''Four chase coins instead of Rupees! The first team to 500 coins wins!'' (Collect 500 coins before the foes do) | |''Four chase coins instead of Rupees! The first team to 500 coins wins!'' (Collect 500 coins before the foes do.) | ||
|[[Pirate Ship | |[[smashwiki:Pirate Ship|Pirate Ship]] | ||
|- | |- | ||
|16 | |||
|[[File:Co16.png|85px]] | |||
|Jigglypuff's Great Comeback | |||
|[[Jigglypuff]] and [[Mr. Game & Watch]] | |[[smashwiki:Jigglypuff (SSBB)|Jigglypuff]] and [[smashwiki:Mr. Game & Watch (SSBB)|Mr. Game & Watch]] | ||
|'' | |''Jigglypuff may be feeble at first, but if you can just hand on, then surely...'' (KO Lucas and Ness. Jigglypuff starts small - the equivalent of being lightning-struck, then grows to normal size when the stage changes once, then becomes big when it changes again.) | ||
|[[Castle Siege]] | |[[smashwiki:Castle Siege|Castle Siege]] | ||
|- | |- | ||
|17 | |||
|[[File:Co17.png|85px]] | |||
|Sonic and Mario | |||
|[[ | |[[Sonic]] and [[Mario]] | ||
|''No problem! It's nothing at all! Only a race can decide the true victors!'' (KO enemies Sonic and Mario) | |''No problem! It's nothing at all! Only a race can decide the true victors!'' (KO enemies Sonic and Mario.) | ||
|[[Green Hill Zone]] | |[[smashwiki:Green Hill Zone|Green Hill Zone]] | ||
|- | |- | ||
|18 | |||
|[[File:Co18.png|85px]] | |||
|The New Weapon of Shadow Moses | |||
|[[ | |[[smashwiki:Snake (SSBB)|Snake]] and [[R.O.B.]] | ||
|''The robotic weapons have been rolled out. Only one of them is an ally...'' (KO two R.O.B.s) | |''The robotic weapons have been rolled out. Only one of them is an ally...'' (KO two R.O.B.s.) | ||
|[[Shadow Moses Island]] | |[[smashwiki:Shadow Moses Island|Shadow Moses Island]] | ||
|- | |- | ||
|19 | |||
|[[File:Co19.png|85px]] | |||
|Shadow of Andross | |||
|[[Fox | |[[smashwiki:Fox (SSBB)|Fox]] and [[smashwiki:Falco (SSBB)|Falco]] | ||
|''It's a fierce attack by Andross and Wolf. Take them, Team Star Fox!'' (Avoid the attacks of Andross, while attempting to KO Wolf) | |''It's a fierce attack by Andross and Wolf. Take them, Team Star Fox!'' (Avoid the attacks of Andross, while attempting to KO Wolf.) | ||
|[[Lylat Cruise]] | |[[smashwiki:Lylat Cruise|Lylat Cruise]] | ||
|- | |- | ||
|20 | |||
|[[File:Co20.png|85px]] | |||
|The Final Battle for Two | |||
|Choose any Character | |Choose any Character | ||
|''A fierce battle with nasty rivals! You can't lose now!'' (KO Wario, King Dedede, Wolf, Meta Knight, Ganondorf and Bowser) | |''A fierce battle with nasty rivals! You can't lose now!'' (KO Wario, King Dedede, Wolf, Meta Knight, Ganondorf, and Bowser.) | ||
|[[Final Destination]] | |[[smashwiki:Final Destination (SSBB)|Final Destination]] | ||
|- | |- | ||
|21 | |||
|[[File:Co21.png|85px]] | |||
|The True All-Star Battle | |||
|Choose any Character | |Choose any Character | ||
|''Fight everyone without any breaks! It's endless, but a suitable final battle.'' (KO every | |''Fight everyone without any breaks! It's endless, but a suitable final battle.'' (KO every playable character.) | ||
|[[Battlefield]] | |[[smashwiki:Battlefield (SSBB)|Battlefield]] | ||
|} | |} | ||
====Stadium==== | ====Stadium==== | ||
{{main-wiki|SmashWiki|Stadium}} | |||
Various minigames are playable in the {{iw|smashwiki|Stadium}}, most of which return from ''[[Super Smash Bros. Melee]]''. | |||
= | {|class=wikitable | ||
!Image!!Mode!!Description | |||
|- | |||
|[[File:Break the Targets Brawl panorama.png|150px]] | |||
|{{iw|smashwiki|Target Smash!}} | |||
|[[Break the Targets!|Target Smash!!]] is a slightly altered mode of the Target Test from previous entries. It has five different levels to play on. It was possible to send {{iw|smashwiki|replay}}s to other players via [[Nintendo Wi-Fi Connection]] before the service discontinued. | |||
|- | |||
[[ | |[[File:Home-Run Contest Mario Brawl.png|150px]] | ||
|{{iw|smashwiki|Home-Run Contest}} | |||
|Another returning mode is [[Home-Run Contest]]. During countdown, the platform is surrounded by a shield, preventing the {{iw|smashwiki|Sandbag}} from falling off, although hitting the shield enough breaks it. After ten seconds, the shield disappears, which is when to swing the {{iw|smashwiki|Home-Run Bat}} to launch the Sandbag. The mode supports two players, either as co-op or alternating play. Before Nintendo Wi-Fi Connection was discontinued, both two-player modes were playable under {{iw|smashwiki|With Friends}}. | |||
|- | |||
|[[File:Multi-Man Brawl options.png|150px]] | |||
|{{iw|smashwiki|Multi-Man Smash|Multi-Man Brawl}} | |||
|Returning from ''Super Smash Bros. Melee'' (where it is titled Multi-Man Melee), players have to fight the {{iw|smashwiki|Fighting Alloy Team}}. The mode now supports not only single player but also co-op play with two players. Objectives include defeating a certain number of them, fighting them off for a set period of time, or an endless high-score match until the player gets KO'd. Various rewards from the challenges section are obtained in this mode. The following modes appear: | |||
{{columns|count=2| | |||
*'''{{iw|smashwiki|10-Man Smash|10-Man Brawl}}''' - KO 10 enemies | |||
*'''{{iw|smashwiki|100-Man Smash|100-Man Brawl}}''' - KO 100 enemies | |||
*'''{{iw|smashwiki|3-Minute Smash|3-Minute Brawl}}''' - Fight for 3 minutes | |||
*'''{{iw|smashwiki|15-Minute Smash|15-Minute Brawl}}''' - Fight for 15 minutes | |||
*'''{{iw|smashwiki|Endless Smash|Endless Brawl}}''' - Fight until being KO'd | |||
*'''{{iw|smashwiki|Cruel mode|Cruel Brawl}}''' - Fight until being KO'd | |||
}} | |||
|- | |||
|[[File:No image.png|100px]] | |||
|{{iw|smashwiki|Boss Battles}} | |||
|Boss Battles is the only Stadium mode original to ''Super Smash Bros. Brawl''. It is a variation of All-Star mode that involves fighting every boss from The Subspace Emissary and Classic Mode, both having to be completed before the mode becomes playable. Boss Battles can be played in single-player or in two-player co-op mode. The bosses are fought in no particular order, except the final boss, {{iw|smashwiki|Tabuu}}. There is a {{iw|smashwiki|All-Star Rest Area|rest area}} with three {{iw|smashwiki|Heart Container}}s. The player has only one {{iw|smashwiki|stock}}. When the player clears the mode, their high score is ranked by how long it took to complete, but if not, it is measured the number of bosses defeated. Players can choose one of the five {{iw|smashwiki|difficulty}} levels: Easy, Normal, Hard, Very Hard, or Intense. Each difficulty increases the speed of the bosses and how damaging their moves are. | |||
|} | |||
====Training==== | ====Training==== | ||
{{main-wiki|SmashWiki|Training Mode}} | |||
Training is a returning mode in which the player can learn basic controls or experiment with certain functions and items. One to three {{iw|smashwiki|Artificial intelligence|CPU}}-controlled {{iw|smashwiki|fighter}}s can be fought, but there is the option for them to be motionless. Any item can be spawned, which includes the {{iw|smashwiki|Smash Ball}} for practicing the character's {{iw|smashwiki|Final Smash}}. The hit damage of the CPU can be predefined. The player can set the mode in either slow or quick motion. | |||
===Group=== | ===Group=== | ||
====Brawl==== | ====Brawl==== | ||
[[ | {{main-wiki|SmashWiki|Versus Mode}} | ||
[[File:Brawl Brawl.jpg|left|thumb|Choosing alternate characters for the start of a match.]] | |||
[[File:Skyworld 4P match Brawl.png|thumb|Four characters (Donkey Kong, Pit, Falco, Snake) begin their battle in Skyworld.]] | |||
This is the game's iteration of Versus Mode, in which 2-4 players or computers may battle. Players can select their characters (and optionally an {{iw|smashwiki|alternate costume}}), and select the {{iw|smashwiki|stage}} to play on. When selecting a fighter with more than one form on the character select screen, the player can choose which form to begin with by clicking the other form, such as {{iw|smashwiki|Sheik (SSBB)|Sheik}} for {{iw|smashwiki|Zelda (SSBB)|Zelda}}. When starting a battle, as the {{iw|smashwiki|announcer}} counts down, each fighter appears onscreen with their own {{iw|smashwiki|On-screen appearance|animation}}, such as [[Mario]] emerging from a [[Warp Pipe]]. A {{iw|smashwiki|handicap}} can be set anywhere from 0% {{iw|smashwiki|damage}} to 300%, and the handicap has no effect the player's attack strength and {{iw|smashwiki|knockback}} resistance, unlike ''Super Smash Bros. Melee''. Even if a player with a handicap is KO'd, they return onscreen with the same handicap percentage of damage. | |||
{{br|left}} | |||
====Rules==== | |||
{{main-wiki|SmashWiki|Rules}} | |||
This feature allows the player to control a wide variety of settings for Group mode. The three most basic rules include: | |||
*Time: Fighters score a point for each KO and lose a point whenever they cross a {{iw|smashwiki|blast line}}. When time runs out, the fighter with the most points is determined the winner, though if there is a tie, the match will go into {{iw|smashwiki|Sudden Death}}, where each fighter has only one {{iw|smashwiki|stock}} and begins at 300% damage. The last one standing wins. | |||
*Stock: Players have a set number of lives and lose one if they cross the blast line. When a player loses all lives, they do not return. A stock battle can be won by whoever is the last player remaining. | |||
*Coin: A timed match where fighters collect {{iw|smashwiki|Smash Coins and Bills}} for points: Bronze coins are worth one point; silver coins are worth three; gold coins are worth six; and bills are worth ten. Coins and bills spawn whenever a fighter takes damage, and the value of the coins depends on how hard the player had been hit. When fighters fall of the stage, they lose half their points, but if they had 200 or more points, it always reduces to 100. When the timer ends, the person with the most coins wins, though if both end with the same number of coins, a Sudden Death occurs. | |||
Players can adjust not only the {{iw|smashwiki|handicap}}, but also the {{iw|smashwiki|damage ratio}}, which affects how far a damaged player is launched. The damage ratio is at 1.0 by default, but it can be adjusted to anywhere between 0.5 to 2.0. Players can also determine how the stages are selected, which is by choosing it themselves before each round, but there is a setting to make the loser of the previous battle pick the stage instead. It is possible to determine which items appear and at what frequency. | |||
More rules can be unlocked once at least 200 KOs have been done in Group mode: adjusting the time limit for a stock match; the ability to attack teammates; the inability to {{iw|smashwiki|pause}}; displaying the score; and hiding damage percentages. When every stage is unlocked, the player can have the game select a random stage for them to play on. | |||
====Special Brawl==== | ====Special Brawl==== | ||
{{main-wiki|SmashWiki|Special Smash}} | |||
[[File:Bunny Brawl option.png|thumb|The "Bunny Brawl" setting.]] | |||
Special Brawl allows for certain customizations before starting a battle. Players can attach items, set stats, and add appearance differences to every player from the start, without having to collect the items themselves. Unlike the Special Melee modes of ''Super Smash Bros. Melee'', the player can use more than one option in Special Brawl. For stamina battles, the player can decide to start anywhere from 1 HP to 300 HP. | |||
====Rotation==== | ====Rotation==== | ||
{{main-wiki|SmashWiki|Rotation}} | |||
Rotation is a multiplayer mode that expands upon the Winner Out/Loser Out Tournament modes of ''Super Smash Bros. Melee''. Up to sixteen players can play on the same system, with the controller being passed after each battle. Players can optionally use their {{iw|smashwiki|name}} and personal controller configuration. The option between Winner Out and Loser Out is still retained, where the controller is given over to the next player after winning or losing, respectively. Players can pause to move themselves at the end of a queue. It remains possible to change one's character in the middle of the mode, like in ''Super Smash Bros. Melee''. | |||
====Tourney==== | ====Tourney==== | ||
{{main-wiki|SmashWiki|Tourney (SSBB)}} | |||
The Tourney mode is the same as the Tournament Mode from ''Super Smash Bros. Melee''. Several players compete in the tourney, each fighting to compete in the championship and win. It is possible to play with friends, or battle CPU characters. Besides decreasing the number of players from 64 to 32 and allowing for more fighters to appear on stage than controllers, little of the mode has changed from ''Super Smash Bros. Melee''. | |||
===Nintendo Wi-Fi Connection=== | ===Nintendo Wi-Fi Connection=== | ||
[[ | {{main-wiki|Smashwiki|Nintendo Wi-Fi Connection}} | ||
[[File:BrawlWi-Fi.jpg|thumb|left|The main Wi-Fi menu.]] | |||
In the mode, players from different parts of the world could compete in a match in either {{iw|smashwiki|With Friends}} or {{iw|smashwiki|With Anyone}}. The farther apart they were, the slower the connection was. This mode became unavailable as of May 20, 2014, when Nintendo Wi-Fi Connection shut down. | |||
The With Friends mode was restricted only to players who had each other's {{iw|smashwiki|friend code}}. Players could choose an emblem, either of the {{iw|smashwiki|Universe|represented series}}, the characters' icons, or [[Mii]]s. Players could use [[taunt]]s to send across one of four messages by pressing up, left, right, or down on the {{button|wii|Pad}}. The {{iw|smashwiki|Home-Run Contest}} and {{iw|smashwiki|Multi-Man Smash|Multi-Man Brawl}} were both also available. | |||
[[ | [[File:Multimenbrawl.jpg|thumb|The With Friends mode selection screen]] | ||
The With Anyone setting was self-explanatory, though players could not send messages nor see the name or details of their opponent. It was not possible to record the results of a battle, unlike in With Friends. In Basic Brawl, players fought in a free for all with two-minute matches. The only setting that could be changed was which items would appear in battle, and the game would select either of the player's preferences. If fewer than four players were present, a {{iw|smashwiki|Artificial intelligence|CPU}} filled in for any missing fighter, including those who disconnected during a battle. In Team Brawl, either while the game was loading or players were waiting for opponents, they could practice by attacking the [[Sandbag]] from ''Super Smash Bros. Melee''. Players had the choice to spectate the battle and even bet coins on the winner of a match. | |||
===Vault=== | |||
{{main-wiki|SmashWiki|Vault}} | |||
The Vault features a variety of obtainable items. | |||
====Trophies & stickers==== | |||
=====Trophies===== | |||
{{main|List of trophies in Super Smash Bros. Brawl}} | |||
A different set of [[Trophy (Super Smash Bros. series)|trophies]] appear in ''Super Smash Bros. Brawl'' than in ''Super Smash Bros. Melee''. When a trophy is selected, a description of the character or object portrayed will be displayed, just like in the previous game. There are a total of 544 different trophies to collect. Many trophies can be placed as a part of dioramas, and there are more backgrounds to add to the feature. | |||
=== | =====Stickers===== | ||
[[ | [[Sticker (Super Smash Bros. Brawl)|Stickers]] are pieces of 2D game artwork that appear during a stage at random. They are single-use items that power up a {{iw|smashwiki|fighter}} in The Subspace Emissary. Unlike trophies, it is possible to obtain more than one sticker of the same type. Any collected stickers are stored in an album, and similarly to trophies, they can decorate a screen using different backgrounds. | ||
The | |||
=====Coin Launcher===== | |||
{{main-wiki|SmashWiki|Coin Launcher}} | |||
[[File:CoinLauncher.jpg|thumb|The Coin Launcher mode]] | |||
The de facto successor of the {{iw|smashwiki|Lottery}} from ''Super Smash Bros. Melee'', Coin Launcher involves using coins to obtain various trophies and stickers. The player controls the Coin Launcher, a cannon that shoots any collected coins. A few types of several moving objects show up regularly, and each type travels across the screen in a different formation and direction. Often, if every enemy has been shot in a particular group formation, the player will receive a sticker. Trophies move across the screen in a predetermined manner. A trophy can be collected upon hitting it with two or four coins. The main hazards are missiles, which are aimed towards the Coin Launcher, with each one taking two hits to destroy. Missiles move at varying speeds, and they sometimes show up in groups. The player loses ten coins any time a missile hits the Coin Launcher. A green gauge on the bottom left of the screen can be filled up completely to allow the player to rapid-fire coins for a short time. It is filled slightly whenever a missile is destroyed, or a certain number of moving objects, but decreases when hit by a missile. | |||
{{br|left}} | |||
====Stage Builder==== | |||
{{main-wiki|SmashWiki|Stage Builder}} | |||
[[File:Stage Builder Brawl.png|thumb|left|200px|The Stage Builder in action.]] | |||
[[File:CustomStage-Brawl.png|thumb|250px|[[Mario]] and [[Luigi]] battle on a stage, made by the Stage Builder.]] | |||
Stage Builder allows for the creation of custom {{iw|smashwiki|stage}}s. Players have to first choose the size of the stage, decide on the backdrop, and the background music. After doing so, the player can begin to add pieces to the stage, including platforms, ladders, and spikes. Pieces can be flipped, resized, zoomed, have their palettes swapped, or be erased. Once a fraction of the stage has been built, the player has the option of trying it out before saving. Once the stage is completed, the player can choose a name and comment, or change the background music. It was possible to send the custom stage to other players via Nintendo Wi-Fi Connection. It also used to be possible to send the stage to Nintendo using the "Submit" option on the Stage Builder screen, and every day through Nintendo Wi-Fi Connection, Nintendo would switch between a custom stage for players to try out. | |||
{{br|left}} | |||
====Challenges==== | ====Challenges==== | ||
{{main|Challenges ( | {{main|Challenges (Super Smash Bros. Brawl)}} | ||
[[File:BrawlChallenges.jpg|thumb|The Challenges screen.]] | |||
[[ | Challenges consists of 128 specific objectives that the player can fulfill to unlock trophies, stages, CDs, stickers, Stage Builder parts, and Masterpieces. Each of the unfinished challenges are locked behind a closed window. When the player unlocks an item by winning a challenge, any unobtained items to the left and right of it on the menu appears in a red silhouette, and their method of unlocking is displayed. [[Golden Hammer]]s could be won and used once on a window of the player's choice (excluding those involving boss battles), allowing the player to get the reward immediately without fulfilling the objective. | ||
====Album==== | ====Album==== | ||
{{main-wiki|SmashWiki|Album}} | |||
Screenshots can be taken by the player while pausing the game and saved either on the Wii's internal memory or an SD card. The feature was upgraded over the special camera mode from ''Super Smash Bros. Melee''. | |||
====Replays==== | ====Replays==== | ||
{{main-wiki|SmashWiki|Replays}} | |||
Replays allow players to rewatch a recorded battle. They are usable in a single Brawl in Group Mode, Target Smash!!, Home-Run Contest, or Multi-Man Brawl. A replay can be recorded by pressing the Z button within three minutes after the match or challenge has ended. Replays are saved to either the Vault or on an SD card directly. Target Smash!! and Home-Run Contest records could be submitted to Nintendo prior to June 30, 2009. | |||
====Masterpieces==== | ====Masterpieces==== | ||
{{main-wiki|SmashWiki|Masterpieces}} | |||
[[File:Ssbbmasterpiece.png|thumb|150px|The Masterpiece selection screen in ''Super Smash Bros. Brawl'']] | |||
The player can try out certain classical [[Nintendo]] games for a limited amount of time. The available demos are the following: | |||
{|class="wikitable"style="text-align:center" | |||
!Game!!Time!!Description | |||
[[ | |||
The following | |||
{|class= | |||
|- | |- | ||
|[[File:SMB Masterpiece in Brawl.jpg|100px]]<br>''[[Super Mario Bros.]]'' | |||
|1:00 | |||
|The player can only play in [[World 1-1 (Super Mario Bros.)|World 1-1]] and, if the player is fast enough, [[World 1-2 (Super Mario Bros.)|1-2]]. | |||
|- | |- | ||
|[[File:Ssbbmasterpiece-iceclimber.jpg|100px]]<br>''{{iw|nwiki|Ice Climber}}'' | |||
|0:40 | |||
|The player starts off on Stage 2 rather than from the beginning of the game. | |||
| | |||
|- | |- | ||
| | |[[File:Ssbbmasterpiece-tloz.jpg|100px]]<br>''{{iw|zeldawiki|The Legend of Zelda}}'' (NES) | ||
| | |2:00 | ||
| | |Gameplay starts in {{iw|zeldawiki|Hyrule}} immediately instead of from the file selection screen. | ||
| | |||
|- | |- | ||
| | |[[File:Ssbbmasterpiece-kidicarus.jpg|100px]]<br>''{{iw|icaruspedia|Kid Icarus}}'' | ||
|1:30 | |||
|Only the first section of the {{iw|icaruspedia|Underworld}} stage is playable. | |||
| | |||
|- | |- | ||
|[[File:Ssbbmasterpiece-kirbyadv.jpg|100px]]<br>''[[wikirby:Kirby's Adventure|Kirby's Adventure]]'' | |||
| | |2:00 | ||
|The player begins directly from the {{iw|wikirby|Vegetable Valley - Stage 1|first stage}} of [[wikirby:Vegetable Valley|Vegetable Valley]]. | |||
| | |||
|- | |- | ||
|[[File:Ssbbmasterpiece-fireemblem3.jpg|100px]]<br>''{{iw|fireemblem|Fire Emblem: Mystery of the Emblem}}''<ref name="jp">{{cite|url=www.smashbros.com/wii/jp/gamemode/various/various23.html|title=スマブラ拳!!|publisher=Nintendo|language=ja|accessdate=October 21, 2024}}</ref> (Japanese version only) | |||
| | |3:00 | ||
| | | | ||
| | |||
|- | |- | ||
| | |[[File:Ssbbmasterpiece-smetroid.jpg|100px]]<br>''{{iw|metroidwiki|Super Metroid}}'' | ||
| | |3:00 | ||
| | |There are two predetermined save files. The first file (Samus A) leads to the start, where Samus fights {{iw|metroidwiki|Ridley}} for the first time in {{iw|metroidwiki|Ceres Space Colony|Ceres Station}}. The second file (Samus B) leads to a save point in the depths of {{iw|smashwiki|Norfair}}, where Ridley is battled a second time. | ||
| | |||
|- | |- | ||
|[[File:Ssbbmasterpiece-mother2.jpg|100px]]<br>''[[wikibound:EarthBound|EarthBound]]''<ref name="jp"/> (Japanese version only) | |||
|5:00 | |||
| | |||
|- | |- | ||
| | |[[File:Ssbbmasterpiece-starfox64.jpg|100px]]<br>''[[lylatwiki:Star Fox 64|Star Fox 64]]'' | ||
| | |3:00 | ||
| | | | ||
| | |} | ||
Some of the Masterpieces are unlockable: | |||
{|class="wikitable"style="text-align:center" | |||
!Game!!Time!!Description!!Unlock | |||
|- | |- | ||
|[[File:Ssbbmasterpiece-donkeykong.jpg|100px]]<br>''[[Donkey Kong (game)|Donkey Kong]]'' | |||
| | |0:30 | ||
|Gameplay starts on [[75m]] | |||
| | |Play for 10 hours or more total. | ||
|- | |- | ||
| | |[[File:Ssbbmasterpiece-smw.jpg|100px]]<br>''[[Super Mario World]]'' | ||
|2:00 | |||
| | |The only playable level is [[Yoshi's Island 2]] | ||
| | |Play on Yoshi's Island (Melee) three times. | ||
|- | |- | ||
| | |[[File:Ssbbmasterpiece-smb2.jpg|100px]]<br>''[[Super Mario Bros. 2]]'' | ||
|1:30 | |||
|It is only possible to play as [[Princess Peach|Princess Toadstool]] in [[World 1-1 (Super Mario Bros. 2)|World 1-1]]. | |||
| | |Play as Peach and win five matches in VS Mode. | ||
|- | |- | ||
| | |[[File:Ssbbmasterpiece-tlozoot.jpg|100px]]<br>''[[zeldawiki:The Legend of Zelda: Ocarina of Time|The Legend of Zelda: Ocarina of Time]]'' | ||
| | |5:00 | ||
| | |There are two save files, each showing different aspects of the game. If Save File 1 is selected, the player will be {{iw|zeldawiki|Link|Young Link}} and begin in {{iw|zeldawiki|Kokiri Forest}}. If Save File 2 is chosen, the player starts as adult {{iw|zeldawiki|Link}} within the {{iw|zeldawiki|Temple of Time}}. | ||
| | |Play as Toon Link ten times in VS Mode. | ||
|- | |- | ||
|[[File:Ssbbmasterpiece-fzero.jpg|100px]]<br>''{{iw|fzerowiki|F-Zero}}'' | |||
| | |0:40 | ||
|The only course available is {{iw|fzerowiki|Mute City}} | |||
| | |Get Captain Falcon to join the party in The Subspace Emissary. | ||
| | |} | ||
| | |||
====Chronicle==== | |||
| | {{main-wiki|SmashWiki|Chronicle}} | ||
| | The player can look at a list of various video games from [[Nintendo]] as well as their release dates. The titles are organized by which systems they were released for. More titles are added to the Chronicle as more [[Trophy (Super Smash Bros. series)|trophies]] and [[Sticker (Super Smash Bros. Brawl)|Sticker]]s are collected from their games. | ||
|- | |||
| | ===Options=== | ||
{{main-wiki|SmashWiki|Options}} | |||
Various settings can be changed, including the {{wp|Aspect ratio (image)|aspect ratio}}, the graphics, the rumble feature, set control schemes to assign to {{iw|smashwiki|name}}s, and adjust the music and sound effect volume while having quick access to the {{iw|smashwiki|Sound Test}}. Lastly, there is the option to erase all data or of certain records only. | |||
| | |||
|- | ====My Music==== | ||
| | {{main-wiki|SmashWiki|My Music}} | ||
| | [[File:My Music Brawl.png|thumb|My Music for Delfino Plaza.]] | ||
| | Every stage has a selection of music tracks originating usually from the {{iw|smashwiki|universe|game series}}, and players can choose which music track to play on a stage using the My Music mode. It is not possible to play every existing track on any of the stages. The player can adjust how like a song is to play on a stage. More tracks become available as more {{iw|smashwiki|CD}}s are collected. | ||
| | |||
===Data=== | |||
| | {{main-wiki|SmashWiki|Data}} | ||
| | A variety of random content can be looked at from the Data section. There are four-page records of group matches: The first page is a chart showing the number of KOs fighters have performed on each other; the second page shows the top five fighters for each of several stats, such as {{iw|smashwiki|KO}}'s, falls, {{iw|smashwiki|self-destruct}}s, victories, losses, peak damage, walking distance, the time spent swimming, and more; the third page lists all the same stats for every fighter; and the fourth and final page similarly lists all the same stats for each name, including their first, second, and least commonly used fighters. Players can also view miscellaneous gameplay sections, such as the total time played, the number of matches played, the commonly used fighter, and number of trophies collected. {{iw|smashwiki|Milestone|Notices}} are also saved in the order in which they had been shown. Any cutscenes from The Subspace Emissary that have been played at least once can be rewatched from {{iw|smashwiki|Movies}}, as well as five other pre-rendered videos: {{iw|smashwiki|How to Play (SSBB)|How to Play}}, the {{iw|smashwiki|E3|E3 2006 trailer}}, another introductory video, and a video on the two third-party fighters each, {{iw|smashwiki|Sonic (SSBB)|Sonic}} and {{iw|smashwiki|Snake (SSBB)|Snake}}. From the {{iw|smashwiki|Sound Test}}, the player can hear different sound effects and listen to various songs, each showing which game they are from when selected. | ||
==Staff== | |||
[[File:GroupSSBB.jpg|thumb|Group artwork used on the box art.]] | |||
| | {{main|List of Super Smash Bros. Brawl staff}} | ||
| | [[Masahiro Sakurai]], the creator of the ''Kirby'' and the ''Super Smash Bros.'' series, was the game director, being heavily involved in its production. The game also uses the Havok game engine, a trait shared by various other non-Nintendo games, making it the first ''Super Smash Bros.'' game and the only Nintendo game to do so. Other companies have been involved in ''Super Smash Bros. Brawl'''s development, especially for its extensive soundtrack, including [[Camelot Software Planning|Camelot Co., Ltd.]], [[Namco Bandai Games|Namco Bandai Games Inc.]], and Monolith Software Inc. | ||
| | |||
| | ==Pre-release and unused content== | ||
|- | {{main|List of Super Smash Bros. Brawl pre-release and unused content}} | ||
| | <gallery> | ||
| | MetaBeta.jpg|Meta Knight's damaged mask after prolonged damage. | ||
| | BetaEye.jpg|Captain Falcon's broken visor after prolonged damage. | ||
| | </gallery> | ||
| | Early in development, a damage system would have been implemented that would cause characters to shown signs of visible damage and strain during prolonged battles. Among those found included Meta Knight's mask that would develop large cracks, or Captain Falcon's helmet whose visor would crack to reveal a part of his face. | ||
| | |||
| | ==Glitches== | ||
| | {{main|List of Super Smash Bros. Brawl glitches}} | ||
|align= | ===Infinite lightning glitch=== | ||
First, the player must choose Zelda/Sheik. The other player must use a lightning bolt to make them either shrink or grow. Once the player has changed size, they must use their Down+B special move to transform to Sheik/Zelda. The player can transform back to who they were before; this is optional. By doing this very simple glitch, Zelda/Sheik will stay at their size forever. However, this glitch will only keep working until Zelda/Sheik is affected by another size-changing item. | |||
This glitch will work with any mode, any color, any size (Mini or Mega Brawl) and any rule. As long as items are turned on and lightning bolts are able to spawn. | |||
===Play as Giant Jigglypuff=== | |||
First, the player must select the Bridge of Eldin stage. The player should also have a Final Smash prepared. King Bulbin will eventually come and destroy part of the bridge with a bomb. Soon after, a portal will restore that part of the bridge. When the matter begins to rebuild the bridge, the player has to use the Final Smash in midair in the gap. Jigglypuff will begin to inflate while the bridge is getting mended. When the bridge is completely fixed, Jigglypuff should bounce up onto the bridge and remain giant. Its attacks are completely the same, only that they have a much longer reach. Its movement seems to have slowed somewhat as well. It also becomes a very easy target and is simple to KO, as the slightest touch of the KO range will take it out. With this glitch activated, having Yoshi perform his Egg Lay attack will make Jigglypuff grow even bigger. | |||
<gallery> | |||
Giant Jiggly Puff.PNG|Giant Jigglypuff in action. | |||
Giant Jigglypuff Biggest.PNG|Jigglypuff about its biggest. | |||
</gallery> | |||
==Media== | |||
{{main-media}} | |||
{{media table | |||
|file1=SSBB Ground Theme SMB.oga | |||
|title1=Ground Theme (Super Mario Bros.) | |||
|length1=0:30 | |||
}} | |||
==References to other games== | |||
*''[[Donkey Kong (game)|Donkey Kong]]'': [[75m]] appears as a [[75 m (stage)|stage]], where [[Donkey Kong]] in his original sprite form appears as a major stage hazard; [[25m]]'s theme appears as a song in this stage. [[Mario]]'s red-and-blue costume also originates from this game. One of [[Wario]]'s alternate costumes is based on Mario's original outfit from this game. One of [[Princess Peach|Peach's]] alternate costumes is based on [[Pauline]]'s artwork from this game. | |||
*''[[Donkey Kong Jr. (game)|Donkey Kong Jr.]]'': When [[Diddy Kong]], [[Fox]], and [[Falco]] arrive at the barge taking the recently-trophified Donkey Kong to the Ancient Island, Donkey Kong's trophy is shown in chains on the arms and legs, referring to Donkey Kong's (or, technically, Cranky Kong's) captive status in the game, particularly the [[Chain Scene|final stage]] of the game. | |||
*''[[Mario Bros. (game)|Mario Bros.]]'': [[Mario Bros. (stage)|A stage]] based off this game appears, complete with the [[POW Block]] in the center and obstacles such as [[Shellcreeper]]s and [[Sidestepper]]s. The ''Mario Bros.'' title theme is arranged for this stage. Two of Wario's alternate costumes is based on Mario's outfit and [[Luigi]]'s outfit on the Japanese cover. | |||
*''[[Wrecking Crew]]'': The [[Golden Hammer]] appears as an item. One of Luigi's alternate costumes is based on his in-game sprite. One of Wario's alternate costumes is based on Foreman Spike. | |||
*''[[Super Mario Bros.]]'': [[Mushroomy Kingdom]] appears as a stage, taking the forms of [[World 1-1 (Super Mario Bros.)|World 1-1]] and [[World 1-2 (Super Mario Bros.)|World 1-2]] from the said game. The ground, underground, and underwater themes from this game are rearranged. | |||
*''[[Super Mario Bros. 3]]'': The [[Airship]] theme from this game is rearranged; additionally, the middle portion of "Castle / Boss Fortress (Super Mario World / SMB 3)" is an arrangement of the boss battle theme. [[Ludwig]]'s artwork from this game appears as a sticker. | |||
*''[[Super Mario Land]]'': An arrangement of this game's dungeon theme appears as a song in the World 1-2 portion of Mushroomy Kingdom. | |||
*''[[Super Mario World]]'': On the [[Delfino Plaza (stage)|Delfino Plaza]] stage, a medley of the title and ending themes from this game appears as a song. The beginning and ending portion of "Castle / Boss Fortress (Super Mario World / SMB 3)" are an arrangement of the [[Castle]] theme from this game. | |||
*[[Mario Kart (series)|''Mario Kart'' series]]: A [[Figure-8 Circuit (stage)|stage]] based off of [[Figure-8 Circuit]] from ''[[Mario Kart DS]]'' appears, while several music pieces across the ''Mario Kart'' games are rearranged. [[Shy Guy]]s appear as racers / stage hazards, with a lone one previously appearing as a playable racer in ''Mario Kart DS''. | |||
*''[[Wario Land: Super Mario Land 3]]'': The [[Dash Attack]] appears as Wario's forward smash, while his down throw somewhat resembles his [[Ground Pound]]. One of Wario's alternate costumes is based on his in-game sprite. | |||
*[[Donkey Kong Country (series)|''Donkey Kong Country'' series]]: Songs from the [[Donkey Kong Country|first]] [[Donkey Kong Country 2: Diddy's Kong Quest|two]] games have been rearranged or directly ported in ''Super Smash Bros. Brawl''. Diddy Kong's moveset is inspired from these games, including his signature cartwheel which appears as his dash attack. | |||
*''[[Super Mario 64]]'': The main theme from this game is directly ported, and appears as a song on Delfino Plaza. One of Princess Peach's [[smashwiki:File:Peach-VictoryUp-SSBB.gif|victory poses]] has her ending in a pose similar to how she appears on her castle's [[Media:Peach's Castle 64.png| stained glass portrait]] in this game. | |||
*''[[Donkey Kong 64]]'': The [[Popgun|Peanut Popgun]] and [[Rocket Barrel]] appear as Diddy Kong's standard and [[Rocketbarrel Boost|up]] specials; both moves are combined for Diddy's [[Final Smash]], [[Rocketbarrel Barrage]]. | |||
*''[[Luigi's Mansion]]'': [[Luigi's Mansion (location)|Luigi's Mansion]] appears as a [[Luigi's Mansion (stage)|stage]]. An arrangement of the main theme for the game plays as one of the songs on said stage. | |||
*''[[Super Mario Sunshine]]'': [[Delfino Plaza]] appears as a stage, with songs directly ported from ''Super Mario Sunshine''. [[F.L.U.D.D.]] appears as Mario's new down special. | |||
*[[WarioWare (series)|''WarioWare'' series]]: A [[WarioWare, Inc. (stage)|stage]] based off the ''WarioWare'' games appears, featuring snippets of various [[microgame]]s. Several songs from the ''WarioWare'' games are featured, including [[Ashley's Theme|Ashley's Song]] and [[Mona Pizza|Mona Pizza's Song]]. Additionally, the [[Wario Bike]] is featured as Wario's side special, while [[Wario-Man]] appears as his Final Smash. | |||
*''[[Wario World]]'': The [[Wild Swing Ding]] appears as Wario's forward throw. | |||
*''[[Donkey Kong Jungle Beat]]'': [[Rumble Falls]] appears as a [[Rumble Falls (stage)|stage]]. The song "Battle for Storm Hill" is directly ported from this game. | |||
*''[[Mario & Luigi: Partners in Time]]'': An arrangement of [[Gritzy Desert]]'s theme is featured as a song in Mushroomy Kingdom. | |||
*''[[New Super Mario Bros.]]'': An arrangement of the game's ground theme appears as a song in Delfino Plaza. | |||
==References in later games== | |||
*''[[Super Mario 3D World]]'': One of the [[Mystery House]]s is known as [[Mystery House Brawl]], which is found in World Mushroom. | |||
*''[[Super Smash Bros. for Nintendo 3DS]]'' / ''[[Super Smash Bros. for Wii U|Wii U]]'': A handful of enemies originating from the Subspace Emissary return in the former game's Smash Run mode, while many arrangements of ''Super Smash Bros. Brawl''{{'}}s theme song reappear in both games. | |||
*''[[Super Smash Bros. Ultimate]]'': When Petey Piranha appears in [[Piranha Plant]]'s [[Final Smash]] in this game, he uses his appearance from ''Super Smash Bros. Brawl'' and holds cages. A [[smashwiki:Primid|Primid]], [[Shadow Bug]], the [[smashwiki:Ancient Minister|Ancient Minister]], the [[smashwiki:Fighting Alloy Team|Fighting Alloy Team]], [[smashwiki:Duon|Duon]], and [[smashwiki:Tabuu|Tabuu]] also make appearances as [[Spirit (Super Smash Bros. Ultimate)|spirits]], while [[smashwiki:Galleom|Galleom]] reprises his role as a boss in the World of Light Adventure Mode. | |||
==Promotion== | |||
===Smash Bros. DOJO!!=== | |||
{{main-wiki|SmashWiki|Smash Bros. DOJO!! (SSBB)}} | |||
'''Smash Bros. DOJO!!''' is the game's official website, which provided constant public updates on the game for almost one year prior to its release. It was maintained by Masahiro Sakurai, who updated it one to three times every week day at 15:00 EDT. The website reported on new characters, items, stages, and game modes, and has official movies and music from the game. Its first post, which explains the basics of ''Super Smash Bros.'' games, was published on May 22, 2007.<ref>{{cite|date=May 22, 2007|url=www.smashbros.com/wii/en_us/howto/basic/basic01.html|title=The Basic Rules|publisher=smashbros.com|language=en|accessdate=October 18, 2024|archive=web.archive.org/web/20130703054337/http://www.smashbros.com/wii/en_us/howto/basic/basic01.html}}</ref><ref>{{cite|date=May 22, 2007|url=www.smashbros.com/jp/howto/basic/basic01.html|title=基本的なルール|publisher=smashbros.com|language=ja|accessdate=October 18, 2024|archive=web.archive.org/web/20090822071407/http://www.smashbros.com/jp/howto/basic/basic01.html|deadlink=y}}</ref> | |||
==Reception== | |||
''Super Smash Bros. Brawl'' received critical acclaim from most publications; receiving praise for its amount of play modes and its extensive soundtrack. Many songs in the game would be reused in future ''[[Super Smash Bros. (series)|Super Smash Bros.]]'' installments. As of March 31, 2020, the game sold 13.32 million units worldwide.<ref>{{cite|url=www.nintendo.co.jp/ir/en/finance/software/wii.html|title=IR Information > Financial Data - Nintendo|author=Nintendo|publisher=Nintendo.co.jp|language=en|accessdate=October 21, 2024}}</ref> | |||
{| class="wikitable reviews" | |||
!colspan="4"style="font-size:120%; text-align: center; background-color:silver"|Reviews | |||
|-style="background-color:#E6E6E6" | |||
|Release | |||
|Reviewer, Publication | |||
|Score | |||
|Comment | |||
|- | |- | ||
|[[Wii]] | |||
| | |Aaron Linde, [https://www.destructoid.com/destructoid-review-super-smash-bros-brawl-74217.phtml Destructoid] | ||
|align= | |9.5/10 | ||
|align="left"|"''In Brawl, Nintendo has handily produced one of the most compelling, rich and densely-packed experiences available on any console. A must-buy for Wii owners and a compelling lure for those who have yet to adopt the system, Super Smash Bros. Brawl is one of Nintendo's finest efforts yet.''" | |||
|- | |- | ||
| | |Wii | ||
| | |James Temperton, [http://www.cubed3.com/review/627/1/super-smash-bros-brawl-wii.html Cubed3] | ||
|align= | |9/10 | ||
|align="left"|"''We not going to score it a perfect ten as we managed to spend a good few paragraphs nit picking out things we don't like, that's not to say this game isn't totally brilliant. Its a bit like a total snob going to a really good restaurant and complaining that the sauce drizzled delicately over the perfectly cooked pork joint is just a bit too tangy and making a scene about it. We're the snobs, Brawl is the pork and oh so very slightly erroneous sauce. What's great about this game is the way in which anyone can enjoy it. Single player, multiplayer, online multiplayer, sitting-around-looking-at-trophies player, this game has it all. Epic, beautiful and quite wonderfully Nintendo in its almost sexual brilliance. Arousing stuff.''" | |||
|- | |- | ||
| | |Wii | ||
| | |Tom Bramwell, [https://www.eurogamer.net/articles/super-smash-bros-brawl-review Eurogamer] | ||
|align= | |9/10 | ||
|align="left"|"''However, control and structural quirks will struggle to compromise your long-term entertainment - and Brawl really does offer that. It's consistently satisfying over long periods, fulfilling its usual role of dominating a willing crowd's evening into the early hours, and now allowing you to sustain that after everyone's gone home using the Internet. Really the only reason you wouldn't feel that way would be if you didn't stick with it past the dizzying first quarter of an hour, or if you don't like Nintendo characters - and if you don't in either case then you probably aren't reading this anyway, and the prospect of Triforce-smashing your friends to death won't mean anything. Otherwise, persist, and enrich yourself, and wonder where on earth it all goes next.''" | |||
|- | |- | ||
!colspan="4"style="background-color:silver; font-size:120%; text-align: center;"|Aggregators | |||
| | |-style="background-color:#E6E6E6" | ||
| | |colspan=2|Compiler | ||
| | |colspan=2|Platform / Score | ||
|- | |- | ||
| | |colspan=2|Metacritic | ||
| | |colspan=2 style="background-color:LimeGreen"|[https://www.metacritic.com/game/wii/super-smash-bros-brawl 93] | ||
|- | |- | ||
|colspan=2|GameRankings | |||
|colspan=2|[https://www.gamerankings.com/wii/928518-super-smash-bros-brawl/index.html 92.84%] | |||
|} | |} | ||
{{br}} | |||
< | ==Gallery== | ||
{{main-gallery}} | |||
<gallery> | |||
SSBB Logo - Jap.png|Logo | |||
Mario - Super Smash Bros. Brawl (alt).png|[[Mario]] | |||
</gallery> | |||
=== | ==Names in other languages== | ||
{{foreign names | |||
|Jap=大乱闘スマッシュブラザーズX | |||
== | |JapR=Dairantō Sumasshu Burazāzu X | ||
|JapM=Great Brawl Smash Bros. X | |||
|ChiS=群星劲爆大乱斗X | |||
|ChiSR=Qúnxīng Jìngbào Dàluàndòu X | |||
|ChiSM=All-Stars Exciting Great Melee X | |||
|ChiSC=<ref>{{cite|author=chinesenintendo|date=March 9, 2018|url=x.com/chinesenintendo/status/971937010733563904|title=Post|publisher=Twitter|accessdate=August 4, 2018|archive=web.archive.org/web/20230518015034/https://twitter.com/chinesenintendo/status/971937010733563904}}</ref> | |||
|ChiSN=unused | |||
|ChiT=任天堂明星大亂鬥X | |||
|ChiTR=Rèntiāntáng Míngxīng Dàluàndòu X | |||
|ChiTM=Nintendo Stars: Great Melee X | |||
|ChiTC=<ref>{{cite|url=www.nintendo.tw/wii/wii_software.htm|title=Wii遊戲軟體|publisher=nintendo.tw|language=zh-hant|accessdate=October 18, 2024|archive=web.archive.org/web/20130122210132/http://www.nintendo.tw/wii/wii_software.htm|deadlink=y}}</ref> | |||
|Fre=''Super Smash Bros. Brawl'' | |||
|Ger=''Super Smash Bros. Brawl'' | |||
|Ita=''Super Smash Bros. Brawl'' | |||
|Kor=대난투 스매시브라더스 <span class=엣쿠스explain title="">X</span> | |||
|KorR=Daenantu Seumaesi-Beuradeoseu X | |||
|KorM=Great Brawl Smash Bros. X | |||
|Spa=''Super Smash Bros. Brawl'' | |||
}} | |||
==References== | ==References== | ||
<references/> | <references/> | ||
==External links== | |||
{{ | {{NIWA|Bulbapedia=1|FireEmblem=1|FZeroWiki=1|GoldenSun=1|Icaruspedia=1|LylatWiki=1|MetroidWiki=Metroid in Super Smash Bros. Brawl|NWiki=1|Nookipedia=1|Pikipedia=1|StarfyWiki=1|StrategyWiki=1|SmashWiki=1|WikiBound=1|WiKirby=1|ZeldaWiki=1}} | ||
{{TCRF}} | |||
*[http://www.smashbros.com/wii/en_us/index.html Smash Bros. DOJO!!] ([https://web.archive.org/web/20230407162505/https://www.smashbros.com/wii/en_us/index.html Archive]) | |||
*[https://www.nintendo.com/consumer/gameslist/manuals/Wii_Super_Smash_Brawl.pdf North American manual] | |||
{{SSBB}} | |||
{{Super Mario games}} | |||
{{Wii}} | {{Wii}} | ||
[[Category:Super Smash Bros. Games]] | [[de:Super Smash Bros. Brawl]] | ||
[[Category:Wii Games]] | [[it:Super Smash Bros. Brawl]] | ||
[[Category: | [[Category:Super Smash Bros. Brawl|*]] | ||
[[Category:Games]] | |||
[[Category:Crossover games]] | |||
[[Category:Wii games]] | |||
[[Category:Games with Nintendo Wi-Fi Connection]] | |||
[[Category:2008 games]] | |||
[[Category:2010 games]] | |||
[[Category:Nintendo Selects]] | |||
Latest revision as of 09:39, October 24, 2024
| Super Smash Bros. Brawl | |||||||||||||||
|---|---|---|---|---|---|---|---|---|---|---|---|---|---|---|---|
 For alternate box art, see the game's gallery. | |||||||||||||||
| Developer | Sora Ltd. HAL Laboratory Game Arts Monolith Soft Paon Intelligent Systems | ||||||||||||||
| Publisher | Nintendo | ||||||||||||||
| Platform(s) | Wii | ||||||||||||||
| Release date | Original release: Nintendo Selects: | ||||||||||||||
| Language(s) | English (United Kingdom) English (United States) French (France) German Spanish (Spain) Italian Japanese Korean | ||||||||||||||
| Genre | Fighting | ||||||||||||||
| Rating(s) |
| ||||||||||||||
| Mode(s) | Single player, 1-4 players simultaneous, multiplayer online | ||||||||||||||
| Format | Wii: | ||||||||||||||
| Input | Wii: | ||||||||||||||
| Serial code(s) | |||||||||||||||
Super Smash Bros. Brawl is a fighting game for the Wii. It is the third game within the Super Smash Bros. series, following after Super Smash Bros. Melee. The game was designed by Masahiro Sakurai and developed by a team that was specifically created for it.[citation needed] The game engine is titled Havok, provided by the Irish company of the same name, and it focuses mainly on the game physics.[4] After a planned release date of December 3, 2007 in North America, all regions had their release dates pushed back.[citation needed] It was then slated for release on February 10, 2008 in North America, and January 24, 2008 for Japan.[citation needed] However, on January 15, 2008, it was then delayed to January 31, 2008 for Japan[5] and March 9, 2008 for North America.[6] It was released in Oceania on June 26, 2008 and in Europe on June 27, 2008.[7]
Gameplay[edit]

The basic controls are essentially the same as in the previous two games. Fighters have to attack their opponents to increase their percentage. The amount of damage affects how far the players can be knocked back. The objective is to knock opponents off the blast line to score a KO. The ![]() involves basic moves while the
involves basic moves while the ![]() has the character perform special moves. Players can do several moves depending on where
has the character perform special moves. Players can do several moves depending on where ![]() is tilted. If players are knocked from the stage, they can use their midair jump and special moves, typically
is tilted. If players are knocked from the stage, they can use their midair jump and special moves, typically ![]() and tilting up on
and tilting up on ![]() to recover. Most attacks can be blocked by shielding, though it shrinks the longer from either the player holding the button or the shield blocking attacks. If the shield is too small, the player is vulnerable to shield stabs. If the shield breaks, the player is temporarily stunned. Grabbing allows the player to either pummel the opponent with the attack button or throw them with
to recover. Most attacks can be blocked by shielding, though it shrinks the longer from either the player holding the button or the shield blocking attacks. If the shield is too small, the player is vulnerable to shield stabs. If the shield breaks, the player is temporarily stunned. Grabbing allows the player to either pummel the opponent with the attack button or throw them with ![]() . An opponent can be released from a grab by moving the control stick and mashing buttons, though opponents at higher percentages struggle to release more. Characters can use one of three taunts, two more than in previous games. The tether recovery allows fighters to grab onto ledges using chain-like items, such as a Plasma Whip or a Hookshot. Even Natural combos are simpler, since holding it down is enough for the character to start a combo attack.
. An opponent can be released from a grab by moving the control stick and mashing buttons, though opponents at higher percentages struggle to release more. Characters can use one of three taunts, two more than in previous games. The tether recovery allows fighters to grab onto ledges using chain-like items, such as a Plasma Whip or a Hookshot. Even Natural combos are simpler, since holding it down is enough for the character to start a combo attack.
The game introduces a variety of moves and abilities. There is Footstool Jump technique, reminiscent of the different varieties of jumping within the Super Mario franchise, and it allows fighters to jump onto another fighter up to five times and spring up by pressing the jump button at the right time. Another added technique is gliding, available only to winged characters, as well as crawling for certain fighters. Gliding fighters can direct themselves upwards or downwards, depending on which direction the ![]() or the
or the ![]() is held. All fighters can slip, which has no benefit besides the invincibility frames given to them while getting up. Slipping occurs when players either try to run suddenly, go down slopes, turn around, or walk on a Banana Peel. Players are now able to walk and jump while using projectile-shooting items.
is held. All fighters can slip, which has no benefit besides the invincibility frames given to them while getting up. Slipping occurs when players either try to run suddenly, go down slopes, turn around, or walk on a Banana Peel. Players are now able to walk and jump while using projectile-shooting items.
The most major addition is the Final Smash, a powerful special move involving either a strong attack, character transformation, or stage hazard that most likely results in an opponent being KO'd.
Like previous games, items appear randomly. In Brawl mode only, the player can set certain items to not appear and adjust how commonly each type of item appears. Items are more common on stages representing the same franchise, such as Super Mushrooms in Super Mario stages.
Players can make customizable button configurations and save them on the Wii Remote's internal memory. They can insert names with up to five letters, as in Super Smash Bros. Melee, though names can now have custom button configurations applied to them by default. If the player is using a Nintendo GameCube Controller or a Classic Controller, tilting ![]() or
or ![]() while on the main menu will change the camera angle. There are four controller options, listed below with their default control configurations:
while on the main menu will change the camera angle. There are four controller options, listed below with their default control configurations:
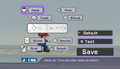
Wii Remote (Sideways)


Playable characters[edit]


- Main article: List of fighters debuting in Super Smash Bros. Brawl
Super Smash Bros. Brawl has 35 playable characters (39, if Sheik, Zero Suit Samus, and the Pokémon Trainer's three Pokémon are counted, each), ten more than in Super Smash Bros. Melee. 21 characters (25 if counting the four aforementioned characters) are playable directly from the start, while the other fourteen have to be unlocked to become playable; as new characters are unlocked, they can be seen amongst the fighters in the opening scene. Only five fighters from the previous game were not added to the roster: Roy, Dr. Mario, Young Link, Pichu, and Mewtwo. The game adds fifteen newcomers (18 counting Zero Suit Samus and the Pokémon Trainer's Pokémon). Super Smash Bros. Brawl is the first game with fighters from third-party franchises, particularly Sonic and Snake.
Of the roster, eight characters are from the Super Mario franchise: Mario, Luigi, Princess Peach, Bowser, Donkey Kong, Diddy Kong, Yoshi, and Wario.
Default characters[edit]
| Character | Description | Special moves |
|---|---|---|
 Mario |
Mario is a balanced character armed with a projectile, a fireball, a cape that reflects opposing projectiles and flips opponents, and F.L.U.D.D., which can spray water at targets. Mario is one of the characters who can wall jump. For his Final Smash, Mario blasts a giant fireball that moves slowly and horizontally. |
|
 Donkey Kong |
Donkey Kong is heavy and strong. He can not only grab enemies but also carry them. His speed is high compared to other heavy characters, but his recovery lacks vertical distance. |
|
 Link |
Link is a moderate fighter who uses various equipment while fighting. His Bombs affect himself and opponents alike. His Boomerang can damage and push opponents, as well as move items. Link's Bow can shoot Arrows. Link's Spin Attack counts as an extra jump for recovering, though he can still use it on the ground. Link's Claw Shot has a reach capable of grabbing opponents and ledges. Link can block projectiles using his own shield. Link uses his Final Smash to slash the opponent next to him several times, and lastly one powerful slash. |
|
 Samus |
Samus has great projectiles, is heavy, and falls at a floaty speed. After using her Final Smash, Samus loses her suit, becoming Zero Suit Samus. |
|
 Zero Suit Samus |
Zero Suit Samus is lighter and faster than when wearing a suit, although her attacks are weaker. Zero Suit Samus has no actual Final Smash other than transforming back into Samus. |
|
 Kirby |
Kirby is one of the lightest fighters, but this makes him vulnerable to being knocked away. Kirby can float upward multiple times for his recovery. He can inhale an opponent and copy their standard special move or spit them out. Kirby can use his Hammer not only on the ground but also in midair. Kirby can become a Stone to slam onto opponents, also giving him temporary protection from most attacks. With Final Cutter, Kirby takes out his sword and slashes upward then down, also forming a fast shockwave if it lands on the ground. |
|
 Fox |
Fox is very fast at attacking and running. He has high falling speed. Fox can use his Blaster to shoot quick lasers. The Fox Illusion does an immediate horizontal strike. Fox's Reflector can deflect most projectiles and even opponents if they are close enough. Fox can use Fire Fox to perform a fiery charge in any direction. For his Final Smash, Fox uses his Landmaster. |
|
 Pikachu |
Pikachu has fast movements but weak attacks. Pikachu can create small, damaging sparks of electricity that move around the stage. Pikachu's Skull Bash can be charged to ram into opponents or be used as another jump. Its Thunder attacks opponents directly above it. Pikachu's Quick Attack involves performing two quick jumps as a recovery. His Final Smash is Volt Tackle, causing Pikachu to move around in a large, purple electrical ball, though with little control. |
|
 Diddy Kong |
Diddy Kong is both light and agile. He can use the Peanut Popgun as a weapon and his rocketbarrel to launch upward, like in Donkey Kong 64. Diddy has the ability to latch on opponents, either to attack or jump off of them. Diddy can use banana peels on his own. Diddy's Final Smash involves using both his Rocketbarrel and Peanut Popgun to shoot several peanuts below rapidly. |
|
 Zelda |
Zelda is light and fairly slow. Her attacks are powerful magic, but there is little control while using them. |
|
 Sheik |
Sheik is whom Zelda becomes when using Transform. Sheik is a lot faster but has weaker moves than Zelda. |
|
 Pit |
Pit uses a bow, which can uniquely be divided into two usable blades. Pit can use very fast slashes. Pit's wings allow him to fly around for a period of time, also giving him longer recovery time. |
|
 Meta Knight |
Meta Knight can fly around briefly and has a very fast combo attack. He can spin around while bearing a tornado-like shape. However, Meta Knight is light and lacking in power. |
|
 Pokémon Trainer |
Pokémon Trainer uses three Pokémon to fight on his behalf: Squirtle, Ivysaur, and Charizard. The Pokémon Trainer cannot do much other than switch out the Pokémon in battle. |
Pokémon Trainer
|
 Ike |
Ike uses a two-handed blade in battle. He has some of the strongest and longest-ranged attacks, but they are very slow. Ike has a relatively slow speed in general. |
|
 Peach |
Princess Peach specializes in aerial techniques, has a good horizontal recovery, and her attacks have high priority. However, Peach is vulnerable to knockback and lacks strength. |
|
 Yoshi |
Yoshi is both fast and heavy, although he is weak. Yoshi's Egg Throw can be used as a third jump, unlike before. |
|
 Ice Climbers |
The Ice Climber duo, Popo and Nana, are controlled by the player and the CPU, respectively, or the inverse with certain costumes. They have a good range, but their normal attacks are weak, and they are rather light. |
|
 King Dedede |
King Dedede is a heavy character who uses his large hammer for close-range attacks, but he relies on Waddle Dees, Waddle Doos, or Gordos to damage distant opponents. King Dedede can inhale opponents and spit them back out. He has a long reach but very low speed and mobility. |
|
 Bowser |
Bowser is both heavier and larger than any other fighter. His attacks are powerful but slow to use. Bowser's speed is slightly higher than in Super Smash Bros. Melee. |
|
 Wario |
Wario is a small heavyweight skilled in aerial and recovery moves. His range is poor, and his attacks are somewhat slow. Despite being a heavyweight, Wario has average strength. Either his WarioWare series and usual outfit can be worn, each with color varieties of their own. Wario's Chomp involves him biting an opponent while keeping them trapped in his mouth. The potency of his Wario Waft depends on when it was last used, to the point of also functioning like an added jump. Wario can drive on his Wario Bike and ram into opponents with it. Wario's Final Smash transforms him into his superhero form, Wario-Man, who has greater movement and much stronger attacks. |
|
 Olimar |
Olimar relies largely on Pikmin while battling, but Olimar has to pluck them from the ground before he can use them. Each Pikmin has their own properties: Blue Pikmin are resistant to water; Red to fire; Yellow to electricity; White to darkness; and Purple Pikmin are strong. |
|
 Lucas |
Lucas' special moves are based around PSI attacks, much like Ness's. Lucas' PK Freeze can freeze opponents temporarily. His PK Fire explodes on contact. Lucas's PSI Magnet absorbs projectiles and heals him. Lucas's PK Thunder unleashes a controllable electric projectile, but it can hit Lucas to propel him upward as a recovery. Lucas can use PK Starstorm to unleash several fireballs rain in a fan formation, hurting players that touch them. |
|
Unlockable characters[edit]
| Character | Description | How to unlock | Special moves |
|---|---|---|---|
 Ness |
Ness has a similar yet distinct moveset from Lucas's. He is light but remains decently strong. |
|
|
 Marth |
Marth is quick yet slightly weak. His attacks are more damaging from the tip of his sword, but his grab range is much shorter than in Super Smash Bros. Melee. |
|
|
 Luigi |
Luigi is similar to Mario, but compared to him, Luigi can jump higher, move faster, and has higher strength. Luigi cannot wall jump, unlike Mario. |
|
|
 Falco |
Falco controls similarly to Fox, but his moves have different properties. Falco has the highest initial jump of any character, and he is skilled with aerial moves. |
|
|
 Captain Falcon |
Captain Falcon moves very fast, and he is the second fastest fighter overall. His moves inflict strong knockback and damage, but they are slow and short-ranged. |
|
|
 Lucario |
Lucario uses aura in most of his attacks, and he excels in speed. Lucario uses attacks that have good range. Lucario's attacks are stronger the more he is damaged. |
|
|
 Snake |
Snake uses a variety of explosives and weapons in battle. He is one of the heavier and stronger characters, but he lacks vertical jumping distance and has slow air speed. |
|
|
 R.O.B. |
R.O.B. is a heavy fighter, although he is still weak and is faster than most other heavy characters. |
|
|
 Ganondorf |
Ganondorf is a heavy character whose attacks are very powerful. However, Ganondorf is one of the slowest characters. |
|
|
 Mr. Game & Watch |
Mr. Game & Watch uses moves that reference the Game & Watch games. He can use fast and powerful attacks, though he is vulnerable to knockback. |
|
|
 Sonic |
Sonic is noted for being faster than any of the other characters. |
|
|
 Jigglypuff |
Jigglypuff is lighter than any of the other fighters. It has the slowest fall speed, the second fastest air speed, and the slowest dash speed. |
|
|
 Toon Link |
Toon Link is almost exactly like Link, but is quicker and floatier. |
|
|
 Wolf |
Wolf is one of the heavier characters, yet his speed and attacks are both average. His moves are similar to the other two Star Fox fighters. Wolf lacks accuracy when using his recovery. |
|
|
Stages[edit]
There are 41 total stages in Super Smash Bros. Brawl. 10 of these stages are returning stages from Super Smash Bros. Melee.
Default stages[edit]
| Image | Stage | Description | Songs |
|---|---|---|---|

|
Super Smash Bros. Brawl: Battlefield |
This iteration of Battlefield takes place on a green landscape at different times of day. It is intended to be the most basic stage and lacks any stage hazards. |
|

|
Super Smash Bros. Brawl: Final Destination |
This stage features a wide, flat platform in space, and there are no features besides a dynamically changing background. |
|

|
Super Mario Sunshine: Delfino Plaza |
Delfino Plaza is a moving stage with a series of platforms that carry characters to different areas of the location, comparable to Mute City. There is interactable water in some of the segments. |
|

|
Super Mario Bros.: Mushroomy Kingdom |
Mushroomy Kingdom is an autoscrolling stage with the exact layout of World 1-1 from Super Mario Bros., although World 1-2 is sometimes used instead. blocks can be hit to spawn its, like in the origin game. There are several pits that KO anyone who falls down them. There are a number of pipes to jump over along the way. | Ground:
|

|
Underground:
| ||

|
Mario Kart: Mario Circuit |
Mario Circuit takes place on the intersection of the Figure-8 Circuit stage of the Mario Kart series. The obstacles are Shy Guys that drive in from either behind or when driving from the side across the bridge. |
|

|
Donkey Kong Jungle Beat: Rumble Falls |
Rumble Falls is a stage that autoscrolls vertically at a slow speed before looping eventually, much like Icicle Mountain. Besides using platforms, there are usable switches and ladders, as well as highly damaging thorns. There are times when the stage speeds up, but gives notice of this, unlike Icicle Mountain. |
|

|
The Legend of Zelda: Twilight Princess: Bridge of Eldin |
A flat stage where the blast lines can be walked off from the sides. King Bulblin & Lord Bullbo destroy the bridge sometimes, creating a gap preventing fighters from accessing the middle part of the stage. After a while, a Portal arrives to fix the bridge. |
|

|
Metroid: Norfair |
This is a stage taking place in Planet Zebes. There are a few types of lava obstacles, including rising lava, lava falls appearing from the left or right, lava spurts, and a giant lava wave. When the giant wave approaches, players are forced to enter a capsule or jump high enough to dodge it. |
|

|
Metroid Prime: Frigate Orpheon |
Frigate Orpheon occasionally flips around, switching between two groups of platforms to fight on. Moving platforms can appear on the sides temporarily. A power outage may occur, darkening the stage. |
|

|
Yoshi's Island: Yoshi's Island |
Yoshi's Island changes seasons as the fight progresses. There are several Fly Guys that hold items, and they can be knocked away. A Blarggwich can appear on the side of the stage briefly to be used as a platform. |
|

|
Kirby: Halberd |
Takes place on a Battlefield-like platform that lands on the Halberd itself. On the ship is a laser cannon that can target fighters and shoot them, as well as a giant arm that targets a fighter. The platform rises and leaves the Halberd, restarting the loop. |
|

|
Star Fox: Lylat Cruise |
A stage that moves through various settings of the Lylat System. Besides different visuals, Lylat Cruise is essentially the same as the game's Final Destination. |
|

|
Pokémon: Pokémon Stadium 2 |
Taking place in a Pokémon-themed stadium, the stage changes temporarily into one of four terrains as time passes: Ice, Electric, Ground, and Flying. Each of the terrains have a different layout. |
|

|
F-Zero: Port Town Aero Dive |
The stage takes place on platforms hovering along a race course, stopping on occasion. Machines may zoom on the stage to hit fighters, dealing high knockback. |
|

|
Fire Emblem: Castle Siege |
The stage takes place around an unnamed castle. It goes through three different layouts before restarting. The second layout features destructible statues that hold platforms. A fight occurs in the background, but it does not affect the match. |
|

|
WarioWare: WarioWare, Inc. |
WarioWare, Inc. has the fighters play through various microgame, which is where the stage hazards are featured. Any players who clear a microgame successfully receive a reward, which can be temporary invincibility or growth, or having health restored. The intermission area between microgames has a few platforms, but they disappear while a microgame is being played. |
|

|
Pikmin: Distant Planet |
Fighters battle in an area around forest vegetation. A Bulborb can enter and leave the right side, KO'ing fighters if it manages to eat them, although the Bulborb can be stood on. Rainfall occurs intermittently, making the left slope too slippery to use. There are red, yellow, and blue Pellet Posies that release Pellets when hit. There are Onions where Pellets of the same color can be thrown into to produce the number of items stated on the pellet. |
|

|
Animal Crossing: Wild World: Smashville |
A stage without any hazards and a low moving platform on the top. Balloons with food appear sometimes. The events and time of day corresponds to the Wii's internal clock, such as how K.K. Slider does live performances on Saturdays at 8 P.M. |
|

|
EarthBound: New Pork City |
New Pork City is a very large and wide open stage, similarly to Temple. Its platforms are mostly stationary, with one platform swinging and a hovering car moving throughout the stage. The Ultimate Chimera may appear, and it deals very high damage and knockback on fighters on contact. |
|

|
Ice Climber: Summit |
A stage that takes place on a glacier. The only hazard at first is an icicle falling from the bottom of the stage. However, the glacier eventually detaches and travels down the water for a while before stopping, followed by the water level rising back. A fish can appear unexpectedly to eat nearby fighters, KO'ing them. |
|

|
Kid Icarus: Skyworld |
Skyworld has several breakable platforms atop cloud platforms. The breakable platforms are not semisoft platforms, but players can destroy them to make the cloud platforms accessible. A small platform sometimes hovers in the lower area of the stage. |
|

|
Nintendo DS: PictoChat |
Takes place in a setting themed after the Nintendo DS application. Several types of sketches appear and vanish, including ladders, platforms, and hazards. |
|

|
Metal Gear Solid: Shadow Moses Island |
Takes place just outside a helipad with walls that are breakable yet still regenerative. A Metal Gear sometimes appears in the background. |
|

|
The Legend of Zelda: Hyrule Temple |
A large and wide stage returning from Super Smash Bros. Melee, the Temple is same as before, with a cover of the old background music plus additional ones, including the original track. |
|

|
Super Mario World: Yoshi's Island |
Yoshi's Island is another stage returning from Super Smash Bros. Melee. The main gimmick is the Rotating Blocks. |
|

|
EarthBound: Onett |
A stage from Super Smash Bros. Melee with cars as the stage hazards and collapsible platforms attached to the middle building. |
|

|
Star Fox: Corneria |
A stage from Super Smash Bros. Melee set on the Great Fox. Arwings and Wolfens are the main stage hazards, but they are also makeshift platforms. The laser cannons from the Great Fox can damage fighters near it. |
|

|
Super Mario 64: Rainbow Cruise |
A scrolling stage from Super Smash Bros. Melee where players ride on the Rainbow Cruiser and magic carpets while encounter falling blocks, and other platforms themed after Super Mario 64 |
|

|
Metroid: Brinstar |
A stage from Super Smash Bros. Melee where acid rises in a set pattern. |
|
Unlockable stages[edit]
| Image | Stage | Description | Songs |
|---|---|---|---|

|
Luigi's Mansion: Luigi's Mansion |
Luigi's Mansion takes place at its namesake haunted mansion. The roof is held up by four poles that can be attacked, causing the mansion to collapse and then rebuild itself a while later.
This stage is unlocked by playing 3 matches as Luigi. |
|

|
The Legend of Zelda: The Wind Waker: Pirate Ship |
Players ride on a ship voyaging through the Great Sea from The Legend of Zelda series. Stage hazards include cannons firing at the ship, a rock that the ship crashes into, and a whirlwind that sends the ship flying. The King of Red Lions sometimes appears to follow the ship, and players can use it as a platform.
The stage is unlocked alongside Toon Link. |
|

|
Pokémon: Spear Pillar |
The stage takes place at the top of Spear Pillar. A few Legendary Pokémon are the stage hazards. Palkia can reverse the screen and tilt it upside-down. Dialga can alter the speed of the battle. Cresselia hurls a spinning light beam, damaging any fighters. Both Palkia and Dialga can generate giant beams capable of removing parts of the stage.
The stage is unlocked by winning Event 25: The Aura Is With Me. |
|

|
Donkey Kong: 75 m |
75 m takes place in the third stage of Donkey Kong. The only hazard not from the Donkey Kong iteration is Donkey Kong himself, who appears out of the background after an audio cue plays, alerting of it. While Donkey Kong is active, bouncing jacks appear to harm the player.
The stage is unlocked after platying twenty matches as Donkey Kong. |
|

|
Mario Bros.: Mario Bros. |
The stage is set in the location within the Mario Bros. game. Shellcreepers and Sidesteppers are the stage hazards, though fighters can immobilize the enemies to pick them up and throw them. However, any immobilized enemy gets up eventually, changes color, and moves even faster than before.
The stage is unlocked by winning Event 19: Wario Bros. |
|

|
Game & Watch: Flat Zone 2 |
An enhanced version of Flat Zone that has scenes based on the Game & Watch titles Fire, Chef, Oil Panic, and Lion. Each scene barring Fire has its own stage hazards. A figure with a bell appears whenever the scene is about to change.
The stage is unlocked alongside Mr. Game & Watch. |
|

|
Electroplankton: Hanenbow |
A leafy stage where Hanenbows fly around, hurting players on contact. Leaves tilt when attacked and change from green to red depending on the amount of damage inflicted. There is a swimmable pool of water at the bottom.
The stage is unlocked after winning Event 28: Flower Blooms in the Echoes. |
None |

|
Sonic the Hedgehog: Green Hill Zone |
The stage is based on the first stage of Sonic the Hedgehog. It has a breakable sloping dip that can break off in parts from damage, resulting in holes, until it regenerates eventually.
The stage is unlocked alongside Sonic. |
|

|
Donkey Kong Country: Jungle Japes |
Jungle Japes is a stage from Super Smash Bros. Melee with obstacles that include rapid downstream water and Klaptraps.
The stage is unlocked by playing in Melee stages ten times. |
|

|
Kirby's Dream Land: Green Greens |
A stage from Super Smash Bros. Melee featuring Whispy Woods, who blows strong wind that can push fighters. There are also blocks functioning as platforms and obstacles, as well as Bomb Blocks that can damage players and destroy items.
The stage is unlocked after playing twenty matches as Kirby. |
|

|
F-Zero: Big Blue |
A stage from Super Smash Bros. Melee set on a platform moving fast along a race course with several machines. Floating platforms commonly enter and exit the scene. Standing on the road quickly forces players towards the blast line.
It is unlocked by playing 10 matches as Captain Falcon. |
|

|
Pokémon: Pokémon Stadium |
A stage from Super Smash Bros. Melee that is similar to the succeeding Pokémon Stadium 2, but the four different layouts are based around Grass, Fire, Water, and Rock.
It is unlocked by playing 10 matches on Pokémon Stadium 2. |
|
Items[edit]
| Image | Name | Series | Description |
|---|---|---|---|

|
Assist Trophy | Super Smash Bros. |
A random character appears from the Assist Trophy to briefly assist whoever picked it up. |
| Banana Peel | Donkey Kong |
Banana Peels can be dropped on the stage, and any fighters who run on Banana Peels trip and fall, taking a bit of damage. | |

|
Barrel | Super Smash Bros. |
Barrels are similar to crates, except they can tip over and roll. Players receive damage when hit by a rolling crate. |
| Beam Sword | Super Smash Bros. |
A Beam Sword can be carried by a fighter. Its blade has good reach, but it improves more the longer the player charges a smash attack. | |
| Bike Pieces | Wario |
The Wario Bike can break into pieces, which players can pick up and throw. | |
| Blast Box | Super Smash Bros. |
An explosive crate that explodes when hit by a strong attack or a fire-based one. | |

|
Bob-omb | Super Mario |
If a Bob-omb is left alone for a while, it will get up and walk around on its own. If thrown at an opponent, the Bob-omb explodes, causing major knockback. During a Sudden Death, several Bob-ombs fall from the sky if enough time has passed. |
| Bumper | Super Smash Bros. |
A Bumper either lies on the ground or stays in midair after being thrown. Bumpers inflict high knockback to players who touch it. | |

|
Bunny Hood | The Legend of Zelda |
The Bunny Hood provides a substantial boost to the user's running speed and jumping height. |
| Capsule | Super Smash Bros. |
They are small containers that can be picked up and thrown, revealing items, but may sometimes explode instead. | |

|
CD | Super Smash Bros. |
Picking up a CD unlocks a random song. CDs no longer appear once every song is unlocked. |
| Cracker Launcher | Super Smash Bros. |
A weapon that shoots fireworks and has an adjustable aim. | |

|
Crate and Rolling Crate | Super Smash Bros. |
Players can damage Crates or simply throw one to break the Crate open and reveal the item contained. Crates appear in three designs, depending on the stage. Rolling Crates have dollies underneath them, and attacking these crates sends them rolling away. |
| Deku Nut | The Legend of Zelda |
A Deku Nut can be thrown near an enemy to create a flash that stuns foes temporarily. The Deku Nut inflicts a lot of knockback if used on an opponent in midair. | |
| Dragoon | Kirby |
A Dragoon comes in three parts, and when a player collects each one, they can aim the crosshair and launch the Dragoon at other players. | |
| Fan | Super Smash Bros. |
A Fan can whack opponents repeatedly, even breaking their shields. | |
| Fire Flower | Super Mario |
The Fire Flower can unleash a limited short stream of fire. | |
| Food | Super Smash Bros. |
Players can eat food items to restore damage received. There are 28 types of food, each restoring a different amount of health. | |
| Franlin Badge | EarthBound |
The Franlin Badge deflects an opponent's energy-based projectile back at the them, inflicting twice the damage output. | |
| Freezie | Super Mario |
A Freezie slides along the ground slowly, and throwing it at a target traps them in ice temporarily. | |

|
Golden Hammer | Super Mario |
A stronger variation of the Hammer that outputs more damage and gives the player the ability to float in mid-air, if the button is tapped rapidly. The item is sometimes a dud, the Golden Squeaky Hammer, which cannot damage opponents, similarly to if a Hammer has no head. |
| Gooey Bomb | Super Smash Bros. |
A sticky explosive that can attach to either the ground or a player and explode after a few seconds. | |
| Green Shell | Super Mario |
A Green Shell can be thrown, jumped on, or hit to slide along the ground. Green Shells can begin to move the opposite direction if they either bump into a wall or are hit by an attack. | |
| Hammer | Donkey Kong |
The player swings a Hammer up and down rapidly. The Hammer inflicts a lot of damage, but the player cannot perform midair jumps nor special moves while using the item. The head of the hammer may sometimes fall off, making the item useless. | |
| Heart Container | The Legend of Zelda |
Reduces a players damage percentage by up to 100 percent. | |
| Home-Run Bat | Super Smash Bros. |
If the player charges a Home-Run Bat before swinging and hitting an opponent, this almost guarantees the target witll be KO'd. | |
| Hothead | Super Mario |
Hotheads slide across the ground, damaging the opponents of whoever threw it. A Hothead grows even bigger if hit with fire or electric-based attacks. | |

|
Key | Super Smash Bros. |
Single-use items in The Subspace Emissary that can open a locked door. If lost, a key spawns back in its original location. |
| Lip's Stick | Super Smash Bros. |
Hitting an enemy with a Lip's Stick or throwing it causes a flower to bloom on the opponent's head, making them slowly accumulate damage. More hits from a Lip's Stick increases the size of the flower on their head. Shaking the control stick back and forth removes the flower from the player's head. | |

|
Lightning | Super Mario |
A Lightning shrinks every opponent briefly, but may sometimes have the opposite effect of shrinking only the player. On rare occasions, a Lightning can make fighters become giant temporarily. |
| Maxim Tomato | Kirby |
Maxim Tomatoes can be eaten to restore up to 50 percent of damage, making them half as effective as Heart Containers. | |
| Metal Box | Super Mario |
Makes the user become metal temporarily, granting complete resistance to flinching from lighter attacks while also causing them to fall faster. | |
| Motion-Sensor Bomb | Super Smash Bros. |
Small explosives that can be hidden on a surface, detonating when they detect the next nearby object. | |
| Mr. Saturn | EarthBound |
Mr. Saturn is a throwable item with a low damage output. | |
| Orange cube | Super Smash Bros. |
Exclusive to The Subspace Emissary, orange cubes drop valuable items, adding to the game's completion, and do not reappear after their items are collected. | |
| Party Ball | Super Smash Bros. |
When hit, Party Balls float up and then open, causing several items to fall out, but sometimes only Bob-ombs. | |
| Pellet | Pikmin |
Exclusive to the Distant Planet stage, Pellets appear in red, blue, and yellow varieties, and can be thrown into an Onion of the same color to release items. | |

|
Pitfall | Animal Crossing |
Pitfalls can be placed in the ground, trapping opponents, including if the item hits them directly. |
| Poison Mushroom | Super Mario |
A Poison Mushroom shrinks the player temporarily, leaving them more vulnerable to KOs. | |

|
Poké Ball | Pokémon |
A Poké Ball can be thrown on the ground to spawn a random Pokémon to assist the user. |
| Power Suit Pieces | Metroid |
The remnants of Samus' destroyed suit after she uses her Final Smash, Zero Laser. Power Suit Pieces can be picked up and thrown at opponents. | |
| Ray Gun | Super Smash Bros. |
A beam gun that shoots up to sixteen fast-moving blasts. | |

|
Sandbag | Super Smash Bros. |
Sandbag can be beaten to drop items, to an extent, and becomes easier to launch as it takes increased damage. |
| Screw Attack | Metroid |
While a Screw Attack is worn, the ability is added to the user's standard and midair jumps. | |
| Smash Ball | Super Smash Bros. |
Can be attacked repeatedly until breaking and allowing the user to perform their Final Smash. | |
| Smoke Ball | Super Smash Bros. |
A Smoke Ball emits a large cloud of colorful smoke, obscuring the view, and it can stick to a player. | |

|
Smart Bomb | Star Fox |
A Smart Bomb explodes with a large blast radius when thrown, but there there is still the possibility of it failing. |
| Soccer Ball | Super Mario |
A Soccer Ball cannot be picked up, but when it is hit with a strong attack, the Soccer Ball flies off, engulfed in flames. The angle of the attack determines which direction the Soccer Ball travels in. | |
| Spring | Donkey Kong |
A player can bounce on a Spring to perform an extra high jump. A Spring sometimes falls to the side, bouncing players similarly to a Bumper. | |
| Stock Ball | Super Smash Bros. |
Collecting one in The Subspace Emissary gives the player another stock | |
| Super Mushroom | Super Mario |
A Super Mushroom grows the player temporarily, the opposite of the Poison Mushroom does. | |
| Super Scope | Super Smash Bros. |
A beam gun that can use up to 48 rapid-fire shots or three fully charged blasts. | |
| Superspicy Curry | Kirby |
The player can eat a Superspicy Curry to start spewing flames temporarily, but they cannot while while its effects are active. | |

|
Starman | Super Mario |
Touching a Starman grants temporary invincibility for roughly ten seconds. |
| Star Rod | Kirby |
The Star Rod can be swung to shoot out a star-shaped projectile, and charged to unleash even stronger ones. Throwing a Star Rod at an opponent launches them sideways. | |
| Team Healer | Super Smash Bros. |
Usable only in Team Battles, a Team Healer can be thrown at a teammate to restore their health, but for opponents, it may either damage or heal them. | |

|
Timer | Super Smash Bros. |
A Timer can be picked up to slow the flow of time for certain players, usually opponents only, but it can sometimes slow only the user or every player. |
| Trophy Stand | Super Smash Bros. |
Exclusive to The Subspace Emissary, a Trophy Stand can be thrown at at enemy to turn it into a trophy, though stronger enemies have to be weakened sufficiently before they can become a trophy. | |
| Unira | Super Smash Bros. |
When thrown to the ground or attacked, a Unira's spikes extend, damaging players who touch it. When attacked again, the Unira retracts its spikes. | |
| Vegetables | Ice Climber |
A type of Food appearing only in the Summit | |

|
Warp Star | Kirby |
With a Warp Star, the user launches above before slamming down near the opponent, damaging them, though the control stick has some control over where the Warp Star lands. |
Assist Trophy characters[edit]

- Andross – Star Fox series
- Barbara – Daigasso! Band Brothers
- Devil – Devil World
- Dr. Wright – Sim City for SNES
- Excitebikes – Excitebike series
- Gray Fox – Metal Gear Solid series
- Hammer Bro – Super Mario franchise
- Helirin – Kururin series
- Infantry & Tanks – Famicom/Advance Wars series
- Isaac – Golden Sun series
- Jeff – EarthBound (Mother) series
- Jill – Drill Dozer
- Kat & Ana – WarioWare series
- Knuckle Joe – Kirby series
- Lakitu & Spinies – Super Mario franchise
- Little Mac – Punch-Out!! series
- Lyn – Fire Emblem series
- Metroid – Metroid series
- Mr. Resetti – Animal Crossing series
- Nintendog – Nintendogs series
- Ray Mk III – Custom Robo series
- Saki – Sin and Punishment series
- Samurai Goroh – F-Zero series
- Shadow – Sonic the Hedgehog series
- Stafy – Densetsu no Stafy series
- Tingle – The Legend of Zelda series
- Waluigi – Super Mario franchise
Poké Ball Pokémon[edit]

Game modes[edit]
Solo[edit]
The Subspace Emissary[edit]
- Main article: Adventure Mode: The Subspace Emissary

Adventure Mode: The Subspace Emissary is the game's adventure mode. Taking place in the World of Trophies, The Subspace Emissary has a full-length plot and several stages, being more advanced than its equivalent from Super Smash Bros. Melee. The main map shows the world map and which places can be entered, and when the player selects a stage, they can choose which characters in their team to use, with the number of options increasing as the storyline progresses. The player can use stickers, each granting a certain effect such as resistance or an increases statistic.
The mode features the following stages:
| # | Stage | Characters |
|---|---|---|
| 1 | Midair Stadium | Mario, Kirby, Peach, Zelda/Sheik (characters who join: Kirby, Peach/Zelda) |
| 2 | Skyworld | Mario, Pit (characters who join: Mario, Pit) |
| 3 | Sea of Clouds | Kirby and Peach/Zelda |
| 4 | The Jungle | Diddy Kong, Donkey Kong (characters who join: Diddy Kong) |
| 5 | The Plain | Mario, Pit |
| 6 | The Lake | Diddy Kong, Fox (characters who join: Fox) |
| 7 | The Ruined Zoo | Lucas, Ness, Pokémon Trainer (characters who join: Lucas, Pokémon Trainer) |
| 8 | The Battlefield Fortress | Marth, Meta Knight, Ike (characters who join: Marth, Meta Knight, Ike) |
| 9 | The Forest | Link, Yoshi (characters who join: Link, Yoshi) |
| 10 | The Research Facility (Part I) | Zero Suit Samus, Pikachu (characters who join: Zero Suit Samus, Pikachu) |
| 11 | The Lake Shore | Mario, Pit, Link, Yoshi, Kirby (Peach/Zelda leaves) |
| 12 | The Path to the Ruins | Lucas, Pokémon Trainer |
| 13 | The Cave | Mario, Pit, Link, Yoshi, Kirby |
| 14 | The Ruins | Lucas, Pokémon Trainer |
| 15 | The Wilds (Part I) | Marth, Meta Knight, Ike |
| 16 | The Ruined Hall | Lucas, Pokémon Trainer |
| 17 | The Wilds (Part II) | Mario, Pit, Link, Yoshi, Kirby |
| 18 | The Swamp | Diddy Kong, Fox, Falco (characters who join: Falco) |
| 19 | The Research Facility (Part II) | Zero Suit Samus, Samus, Pikachu (characters who join: Samus) (Zero Suit Samus remains selectable by choosing Samus and pressing the switch form button) |
| 20 | Outside the Ancient Ruins | Donkey Kong, Diddy Kong, Olimar, Captain Falcon (characters who join: Donkey Kong, Olimar, Captain Falcon) (Fox and Falco Leave) |
| 21 | The Glacial Peak | Meta Knight, Ice Climbers, Lucario (characters who join: Ice Climbers, Lucario) |
| 22 | The Canyon | Mario, Pit, Link, Yoshi, Kirby |
| 23 | Battleship Halberd Interior | Snake, Meta Knight, Lucario (characters who join: Snake) |
| 24 | Battleship Halberd Exterior | Peach, Zelda/Sheik (characters who join: Peach, Zelda/Sheik) (Zelda only available via Transform) |
| 25 | Battleship Halberd Bridge | Fox, Falco, Lucario, Peach, Zelda/Sheik, Snake (characters who join: Mr. Game & Watch) |
| 26 | The Subspace Bomb Factory (Part I) | Samus, Pikachu |
| 27 | The Subspace Bomb Factory (Part II) | Donkey Kong, Diddy Kong, Captain Falcon, Olimar, R.O.B., Samus, Pikachu, Zero Suit Samus (Meta Ridley battle only) (characters who join: R.O.B.) |
| 28 | Entrance to Subspace | All previously used (except Ness), Mr. Game & Watch (everyone leaves) |
| 29 | Subspace (Part I) | Luigi, Ness, King Dedede (characters who join: anyone saved from Subspace, Luigi, Ness, Bowser, King Dedede) |
| 30 | Subspace (Part II) | Kirby (characters who join: Any rescued characters, Ganondorf if Link and Zelda are saved, Wario if trophy is saved) |
| 31 | The Great Maze | Any characters rescued from Subspace, Luigi, Ness, Bowser, King Dedede, Kirby, Sonic (characters who join: Sonic) |
Classic mode[edit]
- SmashWiki article: Classic Mode (SSBB)

When starting Classic mode, the player chooses a character before going through a series of battles against other fighters. Players go through stages in a certain order, such as a Super Mario stage always being the eighth one. A few of the matches have certain conditions set, like in the mode's previous iteration in Super Smash Bros. Melee. A few examples are the player fighting a giant version of an opponent, either with two allies (only against Giant Yoshi), one ally, or none, or the player fighting a metal version of another player. A small heart appears next to a teammate's logo in matches with allies. When a level is finished, the score is added up, and the player earns coins, which can be used in the Coin Launcher.
Clearing this mode will give the player a trophy of the character used to complete it. When finishing it as Zelda or Sheik, the player can only get the trophy of her current form, like with Samus and Zero Suit Samus. For Pokémon Trainer, Classic Mode must be completed three separate times, each with one of his Pokémon, as clearing it only rewards the player with the trophies of the Trainer and the Pokémon in use when it was cleared.
| Classic Mode | |
|---|---|
| Stage 1 | The Legend of Zelda (Link, Toon Link, Zelda, Sheik, or Ganondorf) |
| Stage 2 | Yoshi (Yoshi) or Donkey Kong (Donkey Kong and Diddy Kong) |
| Stage 3 | Pokémon (Pokémon Trainer, Pikachu, Jigglypuff, or Lucario) |
| Stage 4 | Fire Emblem (Marth or Ike) or EarthBound (Ness or Lucas) |
| Bonus Stage 1 | Target Smash! (level corresponds to current difficulty) |
| Stage 5 | Kirby (Kirby, Meta Knight, or King Dedede) |
| Stage 6 | Metroid (Samus or Zero Suit Samus) or Pikmin (Olimar) |
| Stage 7 | Star Fox (Fox, Falco, and Wolf) or F-Zero (Captain Falcon) |
| Stage 8 | Super Mario (Mario, Peach, Luigi, or Bowser) |
| Stage 9 | Robot (R.O.B.), Kid Icarus (Pit), Ice Climber (Ice Climbers), or Game & Watch (Mr. Game & Watch) |
| Stage 10 | Wario (Wario), Metal Gear (Snake), or Sonic the Hedgehog (Sonic) |
| Bonus Stage 2 | Target Smash! (difficulty level is at one level higher than the current difficulty) |
| Stage 11 | Three random opponents |
| Final Stage | A boss fight against Master Hand as well as Crazy Hand under certain conditions |
Bosses[edit]
| Image | Name | Description | |
|---|---|---|---|

|
Master Hand |
The final boss of Classic Mode, Master Hand is a mysterious gloved right hand, vaguely referred to as the "manifestation of creative spirit." | 
|
| Crazy Hand |
The left-handed counterpart of Master Hand described as the "manifestation of destructive spirit." Crazy Hand appears in the battle alongside Master Hand under certain conditions: arriving at the final stage on Hard difficulty or higher with no continues and in under nine minutes. If the player loses against both Master Hand and Crazy Hand, the latter will not assist Master Hand. |
All-Star mode[edit]
- SmashWiki article: All-Star Mode
All-Star mode returns from Super Smash Bros. Melee. It is an unlockable mode that becomes available once all fighters have been unlocked. In addition to single player, the mode supports two players, unlike before, and opponents are sorted by series (and the chronology of their game releases) instead of at random. No more than two foes appear during a battle, excluding the Pokémon stage, because the Pokémon Trainer uses each Pokémon separately.
If All-Star is beaten in Co-op mode, the Final Smash trophies of both characters are unlocked. Similarly to Classic, finishing the mode with Zelda/Sheik or Samus/Zero Suit Samus does not also unlock the trophy of the other form, requiring the mode to be cleared twice. Unlike Classic mode, Pokémon Trainer has only one trophy unlocked for All-Star mode.
All-Star matches[edit]
| # | Series | Characters | Stages |
|---|---|---|---|

|
Game & Watch | Mr. Game & Watch | Flat Zone 2 |

|
Super Mario | Mario, Luigi, Peach, Bowser | Mushroomy Kingdom/Delfino Plaza/Mario Circuit/Luigi's Mansion |

|
Donkey Kong | Donkey Kong, Diddy Kong | 75 m/Rumble Falls |

|
Ice Climbers | Ice Climbers | Summit |

|
R.O.B. | R.O.B. | Mario Bros. |

|
Legend of Zelda | Link, Toon Link, Zelda/Sheik, Ganondorf | Bridge of Eldin/Pirate Ship |

|
Metroid | Samus/Zero Suit Samus | Frigate Orpheon/Norfair |

|
Kid Icarus | Pit | Skyworld |

|
Metal Gear Solid | Snake | Shadow Moses Island |

|
EarthBound | Ness, Lucas | New Pork City |

|
Fire Emblem | Marth, Ike | Castle Siege |

|
Yoshi's Island | Yoshi | Yoshi's Island |

|
F-Zero | Captain Falcon | Port Town Aero Dive |

|
Sonic the Hedgehog | Sonic | Green Hill Zone |

|
Kirby | Kirby, Meta Knight, King Dedede | Halberd |

|
Star Fox | Fox, Falco, Wolf | Lylat Cruise |

|
WarioWare | Wario | WarioWare, Inc. |

|
Pokémon | Pikachu, Pokémon Trainer, Lucario, Jigglypuff | Pokémon Stadium 2/Spear Pillar |

|
Pikmin | Olimar | Distant Planet |
Events[edit]
- SmashWiki article: Event match
Events return from Super Smash Bros. Melee, and they are battles with predefined objectives, many of which involve defeating a certain opponent. From the menu, each event is represented by a small preview screenshot, and every event has a selectable difficulty setting (Easy, Normal, or Hard). Several events are also available in two-player co-op mode. The events include:
Single-player mode[edit]
| # | Preview | Event | Playable characters | In-game description (objective) | Stage |
|---|---|---|---|---|---|
| 1 | 
|
Two Trouble Kings | Mario | Now there are TWO greedy kings? Having a buddy doesn't change their natures. (Mario must defeat Bowser and King Dedede.) | Delfino Plaza |
| 2 | 
|
Landmaster Ignition | Fox | Slippy! Send me a Landmaster! Show them Star Fox's Final Smash! (Fox must KO Zelda/Sheik and Meta Knight with the Landmaster as many times as possible within a time limit.) | Corneria |
| 3 | 
|
Pink Ball Repulsion | Meta Knight | Kirby must not board the Halberd! Repel him so the plans can succeed! (Meta Knight has to defeat Kirby before he reaches the Battleship Halberd (1:24).) | Halberd |
| 4 | 
|
Cleaning House in Skyworld | Pit | Destroy all the breakable terrain to remodel Skyworld! (Pit has to destroy all platforms in Skyworld, with Wario trying to fight him.) | Skyworld |
| 5 | 
|
Become the Champion! | Pokémon Trainer | The final Pokémon-tournament challenge. Do your Pokémon match up?! (Player must defeat all 3 of the rival Trainer's Pokémon.) | Pokémon Stadium 2 |
| 6 | 
|
Super Bowser Bros. | Bowser | Want to see what it's like to be Mario? Survive as you race to the flag! (Race 3 Marios to the end of Mushroomy Kingdom 1-1, without being KO'd.) | Mushroomy Kingdom 1-1 |
| 7 | 
|
Diddy Kong Panic | Donkey Kong | So many angry little Diddy Kongs. Did they lose a race or something? (KO the 15 Diddy Kongs.) | Mario Circuit |
| 8 | 
|
Go! Triple Finish! | Pikachu | Squirtle, Ivysaur and Charizard appear all at once in a Pokémon battle royale! (KO Squirtle, Ivysaur, and Charizard.) | Pokémon Stadium 2 |
| 9 | 
|
The Monster Beneath the Earth | Ike | A fearsome beast awaits in the dungeon. Pray you settle things before you see it. (KO two Diddy Kongs; if the player reaches the dungeon below, they will end up having to fight a Giant Donkey Kong.) | Castle Siege |
| 10 | 
|
All-Star Battle Regulars | Choose | The Smash Bros. perfect-attendance crew! Fight the eight regulars in order! (KO the 8 series regulars: Mario, DK, Link, Samus, Yoshi, Kirby, Fox, Pikachu.) | Final Destination |
| 11 | 
|
Yoshi's Rainbow | Ice Climbers | Yoshis everywhere! Beat 'em in order: red, pink, yellow, green, pale blue, blue. (KO the Yoshis in that particular order.) | Rainbow Cruise |
| 12 | 
|
Sleeping in the Eggs | Yoshi | These two can't seem to settle down. Maybe they will if you put them in eggs. (Simultaneously capture Kirby and Pikachu in Yoshi's eggs.) | Yoshi's Island |
| 13 | 
|
Dragoon Strike | Kirby | Reunite the three parts of the Dragoon! Aim well to launch your enemies! (KO three Warios with the Dragoon.) | Halberd |
| 14 | 
|
Sproutage of the Flower Pikmin | Pikmin & Olimar | In time, Pikmin blossom. Guard the six Pikmin until they all bloom into flowers! (Self-explanatory) | Distant Planet |
| 15 | 
|
Hammer of the King | King Dedede | We are the three Dededes! It's King Dedede times three! (With the help of two ally Dededes, KO a Giant Metal Dedede.) | Smashville |
| 16 | 
|
Power Suit ON! | Zero Suit Samus | Quickly! Regain the Power Suit you lost. You'll need a Smash Ball to do it. (Get the Smash Ball and use the Final Smash.) | Frigate Orpheon |
| 17 | 
|
Super Waterfall Climb | Zelda | I want to climb a waterfall at high speed. Why? Because it's there. (Make it to the top of the stage.) | Rumble Falls |
| 18 | 
|
Dark Link Duel | Link | A predestined battle with Dark Link. Nowhere to run, but no one in the way. (KO Dark Link in a match with hitpoints instead of damage percentages.) | Bridge of Eldin |
| 19 | 
|
Wario Bros. | Wario | I came to find the Mario Bros.' roots. What's this giant stage? (KO Mario and Luigi.) | Mario Bros. |
| 20 | 
|
All-Star Battle x 1 | Choose | Challengers approaching! Fight eight Brawl newcomers in all! (KO Wario, Meta Knight, Pit, Zero Suit Samus, Olimar, Lucas, Diddy Kong, and Pokémon Trainer.) | Battlefield |
| 21 | 
|
Visit to Onett | Lucas | In the legendary boy's town, even one as timid as I could become a warrior. (KO Ness.) | Onett |
| 22 | 
|
Monkeys Unite | Diddy Kong | Donkey Kong is under attack! Defeat his opponent! (KO Sheik and Lucario, with Giant Donkey Kong as an ally.) | Rumble Falls |
| 23 | 
|
Molten Norfair | Samus | Get inside the safety capsule before your foes to survive the lava of Norfair. (Enter the capsule when the huge wave of lava approaches.) | Norfair |
| 24 | 
|
Come On! Blue Falcon! | Captain Falcon | Dawdle too much and the race will end! Ride the Blue Falcon to victory! (KO the two R.O.B.s with the Final Smash within one lap.) | Port Town Aero Dive |
| 25 | 
|
The Aura is with Me | Lucario | When pushed to the limit, his power grows! Fight as Lucario at lethal damage! (KO Ness and Sheik; Lucario starts with 182% damage.) | Spear Pillar |
| 26 | 
|
The Slow and Easy Life | Ness | You want to enjoy K.K. Slider's show. But those guys keep gettin' in the way... (KO three Tiny Olimars.) | Smashville |
| 27 | 
|
Three-Beast Carnage | R.O.B. | Three beasts are in the tyrant's town! Facing them is a lone figure...R.O.B. (KO Giant Bowser, Giant Donkey Kong, and Giant Charizard.) | New Pork City |
| 28 | 
|
Flower Blooms in the Echoes | Peach | Wrapped in sound waves, flowers of joy bloom. Make all the leaves on the right tree red! (Hit all the leaves on the tree on the right, until they are all red at the same time.) | Hanenbow |
| 29 | 
|
All-Star Semifinal Regulars | Choose | Four hidden characters from the past game! They're secret perfect attendees. (KO Luigi, Captain Falcon, Ness, and Jigglypuff.) | Yoshi's Island |
| 30 | 
|
Sonic Boom | Sonic | Hey, guys! Is this some kind of joke? Isn't one Sonic enough? (KO 15 enemy Sonics.) | Green Hill Zone |
| 31 | 
|
The Ultimate Bodyguard | Marth | Ganondorfs attack Zelda as she focuses! Protect her at all costs! (Protect Zelda from 2 Ganondorfs until she transforms, then finish the battle.) | Castle Siege |
| 32 | 
|
Bird in Darkest Night | Falco | What's happening? It's getting darker! Today's just isn't my lucky day. (KO Mr. Game & Watch in a darker version of Brinstar.) | Brinstar |
| 33 | 
|
Advent of the Evil King | Ganondorf | The king of evil wants the Triforce, but the fated pair have help from above. (KO Link, Zelda, and Pit.) | Temple |
| 34 | 
|
All-Star Battle Melee | Choose | It's the eight challengers from Melee! What's different between then and now? (KO Bowser, Peach, Zelda, Ice Climbers, Marth, Mr. Game & Watch, Falco, and Ganondorf.) | Pokémon Stadium |
| 35 | 
|
The Visitor to Flat Zone | Mr. Game & Watch | Can anyone move well in this flat world? Maybe an ally?! Maybe not... (KO Peach, Jigglypuff, and Toon Link.) | Flat Zone 2 |
| 36 | 
|
High-Tech Special Forces | Snake | Colonel: Snake. Intel shows FOXHOUND has hired three bounty hunters to kill you. (KO Samus, Captain Falcon, and Wolf.) | Shadow Moses Island |
| 37 | 
|
The Pirate Airship | Toon Link | Your chance comes when the whirlwind lifts the pirate ship. Finish it in the sky! (KO the two Yoshis when the ship is in the sky.) | Pirate Ship |
| 38 | 
|
The Wolf Hunts the Fox | Wolf | Wolf will be the one to finish you! It's Star Fox's final battle. (KO Fox and Falco.) | Lylat Cruise |
| 39 | 
|
All-Star Battle x 2 | Choose | It's even more new Brawl challengers! There's a total of eight. Defeat them all. (KO King Dedede, Ike, Lucario, R.O.B, Toon Link, Snake, Sonic, and Wolf.) | Skyworld |
| 40 | 
|
The Final Battle | Choose | Bowser, King Dedede, and Ganondorf... A battle with the bossiest of bosses! (KO Bowser, King Dedede, and Ganondorf.) | Final Destination |
| 41 | 
|
The FINAL, Final Battle | Choose | It's the REAL final battle! (KO Snake, Sonic, and Giant Mario.) | Final Destination |
Co-Op mode[edit]
This mode requires two human players, and has different events from the single-player mode (excluding one which was also an event in Single-Player Mode).
| # | Preview | Event | Playable characters | In-game Description (objective) | Stage |
|---|---|---|---|---|---|
| 1 |
|
Two Trouble Kings | Mario and Kirby | Now there are TWO greedy kings? Having a buddy doesn't change their natures. (KO Bowser and King Dedede.) | Delfino Plaza |
| 2 | 
|
Master the Pokémon Tag Battle | Pokémon Trainer and Pikachu | The Pokémon tournament's final challenge. Your rivals have the same Pokémon! (KO rival Pokémon Trainer and Pikachu.) | Pokémon Stadium 2 |
| 3 | 
|
Fastest, Shortest, Sudden Death | Yoshi and King Dedede | Only ten seconds left?! Beat as many foes as you can in Super Sudden Death and live! (Survive 10 seconds at 300% damage.) | WarioWare, Inc. |
| 4 | 
|
The DK Tag Calamity | Donkey Kong and Diddy Kong | DK and Diddy got tiny! Use lightning to help deal the final blow! (Defeat all enemies while many Lightning Bolt items appear.) | Mario Circuit |
| 5 | 
|
The Yoshi Team of 50 | Meta Knight and Pit | It's a mountain of Yoshis! Take care of them all before completing one lap. (KO all 50 Yoshis in under one lap.) | Rainbow Cruise |
| 6 | 
|
Unwanted Suitors | Zelda and Zero Suit Samus | What do these guys want, anyway? Chase 'em off, will ya? (KO the invisible enemies.) | Port Town Aero Dive |
| 7 | 
|
Battle of the Dark Sides | Link and Samus | A predestined battle with their dark sides. Nowhere to run, but no one in the way. (KO Dark Link and Dark Samus; all players have 200 HP.) | Bridge of Eldin |
| 8 | 
|
All MINE! | Wario and Bowser | Money! Money makes the world go 'round! Gather 2,000 coins and eat something good. (Gather 2,000 coins.) | Skyworld |
| 9 | 
|
Those Who Wait in Onett | Lucas and Ness | A green combo has descended on Onett. And they don't seem to be leaving. (KO Luigi and Yoshi.) | Onett |
| 10 | 
|
The R.O.B.'s of Tomorrow | Lucario and Ice Climbers | It's normally a pretty small robot... Is this even possible? (Take turns KOing the R.O.B.s, which are of varying sizes.) | Summit |
| 11 | 
|
The Great Remodeling Battle | Luigi and Peach | Finally time for that remodel! Nab 300 coins without damaging the house. (Get 300 coins without damaging the mansion.) | Luigi's Mansion |
| 12 |
|
Come Back, Falcon Flyer! | smashwiki:Captain Falcon (SSBB) and Pikmin & Olimar | Land the final blow before the Falcon Flyer leaves... in about thirty seconds! (KO two Samuses in 30 seconds.) | Big Blue |
| 13 | 
|
Blades of the Quick and Mighty | Marth and Ike | Two blades of vastly different styles. Combine them to grasp their true worth. (KO Link, Meta Knight, and Ganondorf.) | Temple |
| 14 | 
|
The Dark Guardians | Ganondorf and Wolf | Two beasts appeared in the tyrant's town! How clever. See if you can't crush them. (KO Giant Charizard and Donkey Kong.) | New Pork City |
| 15 | 
|
Four Swords Brawl | Both play as Toon Link | Four chase coins instead of Rupees! The first team to 500 coins wins! (Collect 500 coins before the foes do.) | Pirate Ship |
| 16 | 
|
Jigglypuff's Great Comeback | Jigglypuff and Mr. Game & Watch | Jigglypuff may be feeble at first, but if you can just hand on, then surely... (KO Lucas and Ness. Jigglypuff starts small - the equivalent of being lightning-struck, then grows to normal size when the stage changes once, then becomes big when it changes again.) | Castle Siege |
| 17 | 
|
Sonic and Mario | Sonic and Mario | No problem! It's nothing at all! Only a race can decide the true victors! (KO enemies Sonic and Mario.) | Green Hill Zone |
| 18 | 
|
The New Weapon of Shadow Moses | Snake and R.O.B. | The robotic weapons have been rolled out. Only one of them is an ally... (KO two R.O.B.s.) | Shadow Moses Island |
| 19 | 
|
Shadow of Andross | Fox and Falco | It's a fierce attack by Andross and Wolf. Take them, Team Star Fox! (Avoid the attacks of Andross, while attempting to KO Wolf.) | Lylat Cruise |
| 20 | 
|
The Final Battle for Two | Choose any Character | A fierce battle with nasty rivals! You can't lose now! (KO Wario, King Dedede, Wolf, Meta Knight, Ganondorf, and Bowser.) | Final Destination |
| 21 | 
|
The True All-Star Battle | Choose any Character | Fight everyone without any breaks! It's endless, but a suitable final battle. (KO every playable character.) | Battlefield |
Stadium[edit]
- SmashWiki article: Stadium
Various minigames are playable in the Stadium, most of which return from Super Smash Bros. Melee.
| Image | Mode | Description |
|---|---|---|

|
Target Smash! | Target Smash!! is a slightly altered mode of the Target Test from previous entries. It has five different levels to play on. It was possible to send replays to other players via Nintendo Wi-Fi Connection before the service discontinued. |

|
Home-Run Contest | Another returning mode is Home-Run Contest. During countdown, the platform is surrounded by a shield, preventing the Sandbag from falling off, although hitting the shield enough breaks it. After ten seconds, the shield disappears, which is when to swing the Home-Run Bat to launch the Sandbag. The mode supports two players, either as co-op or alternating play. Before Nintendo Wi-Fi Connection was discontinued, both two-player modes were playable under With Friends. |

|
Multi-Man Brawl | Returning from Super Smash Bros. Melee (where it is titled Multi-Man Melee), players have to fight the Fighting Alloy Team. The mode now supports not only single player but also co-op play with two players. Objectives include defeating a certain number of them, fighting them off for a set period of time, or an endless high-score match until the player gets KO'd. Various rewards from the challenges section are obtained in this mode. The following modes appear:
|

|
Boss Battles | Boss Battles is the only Stadium mode original to Super Smash Bros. Brawl. It is a variation of All-Star mode that involves fighting every boss from The Subspace Emissary and Classic Mode, both having to be completed before the mode becomes playable. Boss Battles can be played in single-player or in two-player co-op mode. The bosses are fought in no particular order, except the final boss, Tabuu. There is a rest area with three Heart Containers. The player has only one stock. When the player clears the mode, their high score is ranked by how long it took to complete, but if not, it is measured the number of bosses defeated. Players can choose one of the five difficulty levels: Easy, Normal, Hard, Very Hard, or Intense. Each difficulty increases the speed of the bosses and how damaging their moves are. |
Training[edit]
- SmashWiki article: Training Mode
Training is a returning mode in which the player can learn basic controls or experiment with certain functions and items. One to three CPU-controlled fighters can be fought, but there is the option for them to be motionless. Any item can be spawned, which includes the Smash Ball for practicing the character's Final Smash. The hit damage of the CPU can be predefined. The player can set the mode in either slow or quick motion.
Group[edit]
Brawl[edit]
- SmashWiki article: Versus Mode


This is the game's iteration of Versus Mode, in which 2-4 players or computers may battle. Players can select their characters (and optionally an alternate costume), and select the stage to play on. When selecting a fighter with more than one form on the character select screen, the player can choose which form to begin with by clicking the other form, such as Sheik for Zelda. When starting a battle, as the announcer counts down, each fighter appears onscreen with their own animation, such as Mario emerging from a Warp Pipe. A handicap can be set anywhere from 0% damage to 300%, and the handicap has no effect the player's attack strength and knockback resistance, unlike Super Smash Bros. Melee. Even if a player with a handicap is KO'd, they return onscreen with the same handicap percentage of damage.
Rules[edit]
- SmashWiki article: Rules
This feature allows the player to control a wide variety of settings for Group mode. The three most basic rules include:
- Time: Fighters score a point for each KO and lose a point whenever they cross a blast line. When time runs out, the fighter with the most points is determined the winner, though if there is a tie, the match will go into Sudden Death, where each fighter has only one stock and begins at 300% damage. The last one standing wins.
- Stock: Players have a set number of lives and lose one if they cross the blast line. When a player loses all lives, they do not return. A stock battle can be won by whoever is the last player remaining.
- Coin: A timed match where fighters collect Smash Coins and Bills for points: Bronze coins are worth one point; silver coins are worth three; gold coins are worth six; and bills are worth ten. Coins and bills spawn whenever a fighter takes damage, and the value of the coins depends on how hard the player had been hit. When fighters fall of the stage, they lose half their points, but if they had 200 or more points, it always reduces to 100. When the timer ends, the person with the most coins wins, though if both end with the same number of coins, a Sudden Death occurs.
Players can adjust not only the handicap, but also the damage ratio, which affects how far a damaged player is launched. The damage ratio is at 1.0 by default, but it can be adjusted to anywhere between 0.5 to 2.0. Players can also determine how the stages are selected, which is by choosing it themselves before each round, but there is a setting to make the loser of the previous battle pick the stage instead. It is possible to determine which items appear and at what frequency.
More rules can be unlocked once at least 200 KOs have been done in Group mode: adjusting the time limit for a stock match; the ability to attack teammates; the inability to pause; displaying the score; and hiding damage percentages. When every stage is unlocked, the player can have the game select a random stage for them to play on.
Special Brawl[edit]
- SmashWiki article: Special Smash

Special Brawl allows for certain customizations before starting a battle. Players can attach items, set stats, and add appearance differences to every player from the start, without having to collect the items themselves. Unlike the Special Melee modes of Super Smash Bros. Melee, the player can use more than one option in Special Brawl. For stamina battles, the player can decide to start anywhere from 1 HP to 300 HP.
Rotation[edit]
- SmashWiki article: Rotation
Rotation is a multiplayer mode that expands upon the Winner Out/Loser Out Tournament modes of Super Smash Bros. Melee. Up to sixteen players can play on the same system, with the controller being passed after each battle. Players can optionally use their name and personal controller configuration. The option between Winner Out and Loser Out is still retained, where the controller is given over to the next player after winning or losing, respectively. Players can pause to move themselves at the end of a queue. It remains possible to change one's character in the middle of the mode, like in Super Smash Bros. Melee.
Tourney[edit]
- SmashWiki article: Tourney (SSBB)
The Tourney mode is the same as the Tournament Mode from Super Smash Bros. Melee. Several players compete in the tourney, each fighting to compete in the championship and win. It is possible to play with friends, or battle CPU characters. Besides decreasing the number of players from 64 to 32 and allowing for more fighters to appear on stage than controllers, little of the mode has changed from Super Smash Bros. Melee.
Nintendo Wi-Fi Connection[edit]
- Smashwiki article: Nintendo Wi-Fi Connection

In the mode, players from different parts of the world could compete in a match in either With Friends or With Anyone. The farther apart they were, the slower the connection was. This mode became unavailable as of May 20, 2014, when Nintendo Wi-Fi Connection shut down.
The With Friends mode was restricted only to players who had each other's friend code. Players could choose an emblem, either of the represented series, the characters' icons, or Miis. Players could use taunts to send across one of four messages by pressing up, left, right, or down on the ![]() . The Home-Run Contest and Multi-Man Brawl were both also available.
. The Home-Run Contest and Multi-Man Brawl were both also available.

The With Anyone setting was self-explanatory, though players could not send messages nor see the name or details of their opponent. It was not possible to record the results of a battle, unlike in With Friends. In Basic Brawl, players fought in a free for all with two-minute matches. The only setting that could be changed was which items would appear in battle, and the game would select either of the player's preferences. If fewer than four players were present, a CPU filled in for any missing fighter, including those who disconnected during a battle. In Team Brawl, either while the game was loading or players were waiting for opponents, they could practice by attacking the Sandbag from Super Smash Bros. Melee. Players had the choice to spectate the battle and even bet coins on the winner of a match.
Vault[edit]
- SmashWiki article: Vault
The Vault features a variety of obtainable items.
Trophies & stickers[edit]
Trophies[edit]
- Main article: List of trophies in Super Smash Bros. Brawl
A different set of trophies appear in Super Smash Bros. Brawl than in Super Smash Bros. Melee. When a trophy is selected, a description of the character or object portrayed will be displayed, just like in the previous game. There are a total of 544 different trophies to collect. Many trophies can be placed as a part of dioramas, and there are more backgrounds to add to the feature.
Stickers[edit]
Stickers are pieces of 2D game artwork that appear during a stage at random. They are single-use items that power up a fighter in The Subspace Emissary. Unlike trophies, it is possible to obtain more than one sticker of the same type. Any collected stickers are stored in an album, and similarly to trophies, they can decorate a screen using different backgrounds.
Coin Launcher[edit]
- SmashWiki article: Coin Launcher

The de facto successor of the Lottery from Super Smash Bros. Melee, Coin Launcher involves using coins to obtain various trophies and stickers. The player controls the Coin Launcher, a cannon that shoots any collected coins. A few types of several moving objects show up regularly, and each type travels across the screen in a different formation and direction. Often, if every enemy has been shot in a particular group formation, the player will receive a sticker. Trophies move across the screen in a predetermined manner. A trophy can be collected upon hitting it with two or four coins. The main hazards are missiles, which are aimed towards the Coin Launcher, with each one taking two hits to destroy. Missiles move at varying speeds, and they sometimes show up in groups. The player loses ten coins any time a missile hits the Coin Launcher. A green gauge on the bottom left of the screen can be filled up completely to allow the player to rapid-fire coins for a short time. It is filled slightly whenever a missile is destroyed, or a certain number of moving objects, but decreases when hit by a missile.
Stage Builder[edit]
- SmashWiki article: Stage Builder


Stage Builder allows for the creation of custom stages. Players have to first choose the size of the stage, decide on the backdrop, and the background music. After doing so, the player can begin to add pieces to the stage, including platforms, ladders, and spikes. Pieces can be flipped, resized, zoomed, have their palettes swapped, or be erased. Once a fraction of the stage has been built, the player has the option of trying it out before saving. Once the stage is completed, the player can choose a name and comment, or change the background music. It was possible to send the custom stage to other players via Nintendo Wi-Fi Connection. It also used to be possible to send the stage to Nintendo using the "Submit" option on the Stage Builder screen, and every day through Nintendo Wi-Fi Connection, Nintendo would switch between a custom stage for players to try out.
Challenges[edit]
- Main article: Challenges (Super Smash Bros. Brawl)

Challenges consists of 128 specific objectives that the player can fulfill to unlock trophies, stages, CDs, stickers, Stage Builder parts, and Masterpieces. Each of the unfinished challenges are locked behind a closed window. When the player unlocks an item by winning a challenge, any unobtained items to the left and right of it on the menu appears in a red silhouette, and their method of unlocking is displayed. Golden Hammers could be won and used once on a window of the player's choice (excluding those involving boss battles), allowing the player to get the reward immediately without fulfilling the objective.
Album[edit]
- SmashWiki article: Album
Screenshots can be taken by the player while pausing the game and saved either on the Wii's internal memory or an SD card. The feature was upgraded over the special camera mode from Super Smash Bros. Melee.
Replays[edit]
- SmashWiki article: Replays
Replays allow players to rewatch a recorded battle. They are usable in a single Brawl in Group Mode, Target Smash!!, Home-Run Contest, or Multi-Man Brawl. A replay can be recorded by pressing the Z button within three minutes after the match or challenge has ended. Replays are saved to either the Vault or on an SD card directly. Target Smash!! and Home-Run Contest records could be submitted to Nintendo prior to June 30, 2009.
Masterpieces[edit]
- SmashWiki article: Masterpieces

The player can try out certain classical Nintendo games for a limited amount of time. The available demos are the following:
| Game | Time | Description |
|---|---|---|
 Super Mario Bros. |
1:00 | The player can only play in World 1-1 and, if the player is fast enough, 1-2. |
 Ice Climber |
0:40 | The player starts off on Stage 2 rather than from the beginning of the game. |
 The Legend of Zelda (NES) |
2:00 | Gameplay starts in Hyrule immediately instead of from the file selection screen. |
 Kid Icarus |
1:30 | Only the first section of the Underworld stage is playable. |
 Kirby's Adventure |
2:00 | The player begins directly from the first stage of Vegetable Valley. |
 Fire Emblem: Mystery of the Emblem[8] (Japanese version only) |
3:00 | |
 Super Metroid |
3:00 | There are two predetermined save files. The first file (Samus A) leads to the start, where Samus fights Ridley for the first time in Ceres Station. The second file (Samus B) leads to a save point in the depths of Norfair, where Ridley is battled a second time. |
 EarthBound[8] (Japanese version only) |
5:00 | |
 Star Fox 64 |
3:00 |
Some of the Masterpieces are unlockable:
| Game | Time | Description | Unlock |
|---|---|---|---|
 Donkey Kong |
0:30 | Gameplay starts on 75m | Play for 10 hours or more total. |
 Super Mario World |
2:00 | The only playable level is Yoshi's Island 2 | Play on Yoshi's Island (Melee) three times. |
 Super Mario Bros. 2 |
1:30 | It is only possible to play as Princess Toadstool in World 1-1. | Play as Peach and win five matches in VS Mode. |
 The Legend of Zelda: Ocarina of Time |
5:00 | There are two save files, each showing different aspects of the game. If Save File 1 is selected, the player will be Young Link and begin in Kokiri Forest. If Save File 2 is chosen, the player starts as adult Link within the Temple of Time. | Play as Toon Link ten times in VS Mode. |
 F-Zero |
0:40 | The only course available is Mute City | Get Captain Falcon to join the party in The Subspace Emissary. |
Chronicle[edit]
- SmashWiki article: Chronicle
The player can look at a list of various video games from Nintendo as well as their release dates. The titles are organized by which systems they were released for. More titles are added to the Chronicle as more trophies and Stickers are collected from their games.
Options[edit]
- SmashWiki article: Options
Various settings can be changed, including the aspect ratio, the graphics, the rumble feature, set control schemes to assign to names, and adjust the music and sound effect volume while having quick access to the Sound Test. Lastly, there is the option to erase all data or of certain records only.
My Music[edit]
- SmashWiki article: My Music

Every stage has a selection of music tracks originating usually from the game series, and players can choose which music track to play on a stage using the My Music mode. It is not possible to play every existing track on any of the stages. The player can adjust how like a song is to play on a stage. More tracks become available as more CDs are collected.
Data[edit]
- SmashWiki article: Data
A variety of random content can be looked at from the Data section. There are four-page records of group matches: The first page is a chart showing the number of KOs fighters have performed on each other; the second page shows the top five fighters for each of several stats, such as KO's, falls, self-destructs, victories, losses, peak damage, walking distance, the time spent swimming, and more; the third page lists all the same stats for every fighter; and the fourth and final page similarly lists all the same stats for each name, including their first, second, and least commonly used fighters. Players can also view miscellaneous gameplay sections, such as the total time played, the number of matches played, the commonly used fighter, and number of trophies collected. Notices are also saved in the order in which they had been shown. Any cutscenes from The Subspace Emissary that have been played at least once can be rewatched from Movies, as well as five other pre-rendered videos: How to Play, the E3 2006 trailer, another introductory video, and a video on the two third-party fighters each, Sonic and Snake. From the Sound Test, the player can hear different sound effects and listen to various songs, each showing which game they are from when selected.
Staff[edit]

- Main article: List of Super Smash Bros. Brawl staff
Masahiro Sakurai, the creator of the Kirby and the Super Smash Bros. series, was the game director, being heavily involved in its production. The game also uses the Havok game engine, a trait shared by various other non-Nintendo games, making it the first Super Smash Bros. game and the only Nintendo game to do so. Other companies have been involved in Super Smash Bros. Brawl's development, especially for its extensive soundtrack, including Camelot Co., Ltd., Namco Bandai Games Inc., and Monolith Software Inc.
Pre-release and unused content[edit]
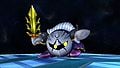
Meta Knight's damaged mask after prolonged damage.
Captain Falcon's broken visor after prolonged damage.


Early in development, a damage system would have been implemented that would cause characters to shown signs of visible damage and strain during prolonged battles. Among those found included Meta Knight's mask that would develop large cracks, or Captain Falcon's helmet whose visor would crack to reveal a part of his face.
Glitches[edit]
- Main article: List of Super Smash Bros. Brawl glitches
Infinite lightning glitch[edit]
First, the player must choose Zelda/Sheik. The other player must use a lightning bolt to make them either shrink or grow. Once the player has changed size, they must use their Down+B special move to transform to Sheik/Zelda. The player can transform back to who they were before; this is optional. By doing this very simple glitch, Zelda/Sheik will stay at their size forever. However, this glitch will only keep working until Zelda/Sheik is affected by another size-changing item.
This glitch will work with any mode, any color, any size (Mini or Mega Brawl) and any rule. As long as items are turned on and lightning bolts are able to spawn.
Play as Giant Jigglypuff[edit]
First, the player must select the Bridge of Eldin stage. The player should also have a Final Smash prepared. King Bulbin will eventually come and destroy part of the bridge with a bomb. Soon after, a portal will restore that part of the bridge. When the matter begins to rebuild the bridge, the player has to use the Final Smash in midair in the gap. Jigglypuff will begin to inflate while the bridge is getting mended. When the bridge is completely fixed, Jigglypuff should bounce up onto the bridge and remain giant. Its attacks are completely the same, only that they have a much longer reach. Its movement seems to have slowed somewhat as well. It also becomes a very easy target and is simple to KO, as the slightest touch of the KO range will take it out. With this glitch activated, having Yoshi perform his Egg Lay attack will make Jigglypuff grow even bigger.
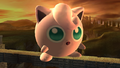
Giant Jigglypuff in action.
Jigglypuff about its biggest.


Media[edit]
- For a complete list of media for this subject, see List of Super Smash Bros. Brawl media. For this subject's sound test, see Super Smash Bros. Brawl sound test.
| File info 0:30 |
References to other games[edit]
- Donkey Kong: 75m appears as a stage, where Donkey Kong in his original sprite form appears as a major stage hazard; 25m's theme appears as a song in this stage. Mario's red-and-blue costume also originates from this game. One of Wario's alternate costumes is based on Mario's original outfit from this game. One of Peach's alternate costumes is based on Pauline's artwork from this game.
- Donkey Kong Jr.: When Diddy Kong, Fox, and Falco arrive at the barge taking the recently-trophified Donkey Kong to the Ancient Island, Donkey Kong's trophy is shown in chains on the arms and legs, referring to Donkey Kong's (or, technically, Cranky Kong's) captive status in the game, particularly the final stage of the game.
- Mario Bros.: A stage based off this game appears, complete with the POW Block in the center and obstacles such as Shellcreepers and Sidesteppers. The Mario Bros. title theme is arranged for this stage. Two of Wario's alternate costumes is based on Mario's outfit and Luigi's outfit on the Japanese cover.
- Wrecking Crew: The Golden Hammer appears as an item. One of Luigi's alternate costumes is based on his in-game sprite. One of Wario's alternate costumes is based on Foreman Spike.
- Super Mario Bros.: Mushroomy Kingdom appears as a stage, taking the forms of World 1-1 and World 1-2 from the said game. The ground, underground, and underwater themes from this game are rearranged.
- Super Mario Bros. 3: The Airship theme from this game is rearranged; additionally, the middle portion of "Castle / Boss Fortress (Super Mario World / SMB 3)" is an arrangement of the boss battle theme. Ludwig's artwork from this game appears as a sticker.
- Super Mario Land: An arrangement of this game's dungeon theme appears as a song in the World 1-2 portion of Mushroomy Kingdom.
- Super Mario World: On the Delfino Plaza stage, a medley of the title and ending themes from this game appears as a song. The beginning and ending portion of "Castle / Boss Fortress (Super Mario World / SMB 3)" are an arrangement of the Castle theme from this game.
- Mario Kart series: A stage based off of Figure-8 Circuit from Mario Kart DS appears, while several music pieces across the Mario Kart games are rearranged. Shy Guys appear as racers / stage hazards, with a lone one previously appearing as a playable racer in Mario Kart DS.
- Wario Land: Super Mario Land 3: The Dash Attack appears as Wario's forward smash, while his down throw somewhat resembles his Ground Pound. One of Wario's alternate costumes is based on his in-game sprite.
- Donkey Kong Country series: Songs from the first two games have been rearranged or directly ported in Super Smash Bros. Brawl. Diddy Kong's moveset is inspired from these games, including his signature cartwheel which appears as his dash attack.
- Super Mario 64: The main theme from this game is directly ported, and appears as a song on Delfino Plaza. One of Princess Peach's victory poses has her ending in a pose similar to how she appears on her castle's stained glass portrait in this game.
- Donkey Kong 64: The Peanut Popgun and Rocket Barrel appear as Diddy Kong's standard and up specials; both moves are combined for Diddy's Final Smash, Rocketbarrel Barrage.
- Luigi's Mansion: Luigi's Mansion appears as a stage. An arrangement of the main theme for the game plays as one of the songs on said stage.
- Super Mario Sunshine: Delfino Plaza appears as a stage, with songs directly ported from Super Mario Sunshine. F.L.U.D.D. appears as Mario's new down special.
- WarioWare series: A stage based off the WarioWare games appears, featuring snippets of various microgames. Several songs from the WarioWare games are featured, including Ashley's Song and Mona Pizza's Song. Additionally, the Wario Bike is featured as Wario's side special, while Wario-Man appears as his Final Smash.
- Wario World: The Wild Swing Ding appears as Wario's forward throw.
- Donkey Kong Jungle Beat: Rumble Falls appears as a stage. The song "Battle for Storm Hill" is directly ported from this game.
- Mario & Luigi: Partners in Time: An arrangement of Gritzy Desert's theme is featured as a song in Mushroomy Kingdom.
- New Super Mario Bros.: An arrangement of the game's ground theme appears as a song in Delfino Plaza.
References in later games[edit]
- Super Mario 3D World: One of the Mystery Houses is known as Mystery House Brawl, which is found in World Mushroom.
- Super Smash Bros. for Nintendo 3DS / Wii U: A handful of enemies originating from the Subspace Emissary return in the former game's Smash Run mode, while many arrangements of Super Smash Bros. Brawl's theme song reappear in both games.
- Super Smash Bros. Ultimate: When Petey Piranha appears in Piranha Plant's Final Smash in this game, he uses his appearance from Super Smash Bros. Brawl and holds cages. A Primid, Shadow Bug, the Ancient Minister, the Fighting Alloy Team, Duon, and Tabuu also make appearances as spirits, while Galleom reprises his role as a boss in the World of Light Adventure Mode.
Promotion[edit]
Smash Bros. DOJO!![edit]
- SmashWiki article: Smash Bros. DOJO!! (SSBB)
Smash Bros. DOJO!! is the game's official website, which provided constant public updates on the game for almost one year prior to its release. It was maintained by Masahiro Sakurai, who updated it one to three times every week day at 15:00 EDT. The website reported on new characters, items, stages, and game modes, and has official movies and music from the game. Its first post, which explains the basics of Super Smash Bros. games, was published on May 22, 2007.[9][10]
Reception[edit]
Super Smash Bros. Brawl received critical acclaim from most publications; receiving praise for its amount of play modes and its extensive soundtrack. Many songs in the game would be reused in future Super Smash Bros. installments. As of March 31, 2020, the game sold 13.32 million units worldwide.[11]
| Reviews | |||
|---|---|---|---|
| Release | Reviewer, Publication | Score | Comment |
| Wii | Aaron Linde, Destructoid | 9.5/10 | "In Brawl, Nintendo has handily produced one of the most compelling, rich and densely-packed experiences available on any console. A must-buy for Wii owners and a compelling lure for those who have yet to adopt the system, Super Smash Bros. Brawl is one of Nintendo's finest efforts yet." |
| Wii | James Temperton, Cubed3 | 9/10 | "We not going to score it a perfect ten as we managed to spend a good few paragraphs nit picking out things we don't like, that's not to say this game isn't totally brilliant. Its a bit like a total snob going to a really good restaurant and complaining that the sauce drizzled delicately over the perfectly cooked pork joint is just a bit too tangy and making a scene about it. We're the snobs, Brawl is the pork and oh so very slightly erroneous sauce. What's great about this game is the way in which anyone can enjoy it. Single player, multiplayer, online multiplayer, sitting-around-looking-at-trophies player, this game has it all. Epic, beautiful and quite wonderfully Nintendo in its almost sexual brilliance. Arousing stuff." |
| Wii | Tom Bramwell, Eurogamer | 9/10 | "However, control and structural quirks will struggle to compromise your long-term entertainment - and Brawl really does offer that. It's consistently satisfying over long periods, fulfilling its usual role of dominating a willing crowd's evening into the early hours, and now allowing you to sustain that after everyone's gone home using the Internet. Really the only reason you wouldn't feel that way would be if you didn't stick with it past the dizzying first quarter of an hour, or if you don't like Nintendo characters - and if you don't in either case then you probably aren't reading this anyway, and the prospect of Triforce-smashing your friends to death won't mean anything. Otherwise, persist, and enrich yourself, and wonder where on earth it all goes next." |
| Aggregators | |||
| Compiler | Platform / Score | ||
| Metacritic | 93 | ||
| GameRankings | 92.84% | ||
Gallery[edit]
- For this subject's image gallery, see Gallery:Super Smash Bros. Brawl.
Logo
.png)
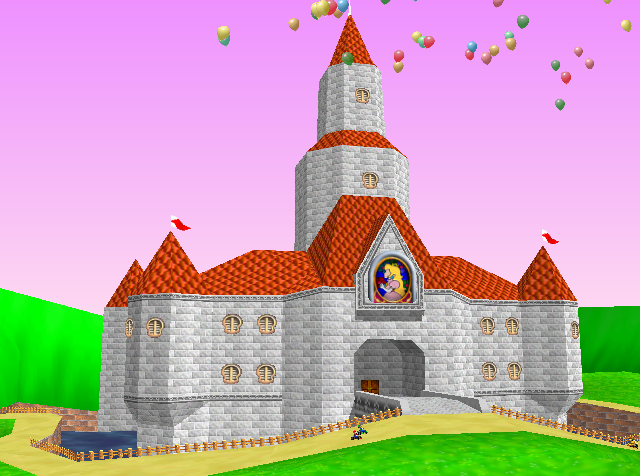
Names in other languages[edit]
| Language | Name | Meaning | Notes |
|---|---|---|---|
| Japanese | 大乱闘スマッシュブラザーズX[?] Dairantō Sumasshu Burazāzu X |
Great Brawl Smash Bros. X | |
| Chinese (simplified) | 群星劲爆大乱斗X[12] Qúnxīng Jìngbào Dàluàndòu X |
All-Stars Exciting Great Melee X | unused |
| Chinese (traditional) | 任天堂明星大亂鬥X[13] Rèntiāntáng Míngxīng Dàluàndòu X |
Nintendo Stars: Great Melee X | |
| French | Super Smash Bros. Brawl[?] | - | |
| German | Super Smash Bros. Brawl[?] | - | |
| Italian | Super Smash Bros. Brawl[?] | - | |
| Korean | 대난투 스매시브라더스 X[?] Daenantu Seumaesi-Beuradeoseu X |
Great Brawl Smash Bros. X | |
| Spanish | Super Smash Bros. Brawl[?] | - |
References[edit]
- ^ Club Nintendo (MX) issue 197. Page 60.
- ^ Super Smash Bros. Brawl. Nintendo of South Africa (British English). Retrieved October 21, 2024.
- ^ Nintendo. Wii専用ソフト「大乱闘スマッシュブラザーズX」のディスクが読み取れない症状についてのお知らせ. Nintendo.co.jp. Archived February 4, 2008, 08:43:47 UTC from the original via Wayback Machine. Retrieved October 21, 2024.
- ^ rawmeatcowboy (January 28, 2008). Super Smash Bros. Brawl: Havok engine confirmed. GoNintendo (English). Retrieved October 21, 2024.
- ^ Nintendo (January 15, 2008). ニュースリリース : 2008年1月15日. Nintendo.co.jp (Japanese). Retrieved October 21, 2024.
- ^ Smash Bros. DOJO!!. Nintendo of America (American English). Retrieved October 21, 2024.
- ^ Smash Bros. DOJO!!. Nintendo of Europe (British English). Retrieved October 21, 2024.
- ^ a b スマブラ拳!!. Nintendo (Japanese). Retrieved October 21, 2024.
- ^ May 22, 2007. The Basic Rules. smashbros.com (English). Retrieved October 18, 2024. (Archived July 3, 2013, 05:43:37 UTC via Wayback Machine.)
- ^ May 22, 2007. 基本的なルール. smashbros.com (Japanese). Archived August 22, 2009, 07:14:07 UTC from the original via Wayback Machine. Retrieved October 18, 2024.
- ^ Nintendo. IR Information > Financial Data - Nintendo. Nintendo.co.jp (English). Retrieved October 21, 2024.
- ^ chinesenintendo (March 9, 2018). Post. Twitter. Retrieved August 4, 2018. (Archived May 18, 2023, 01:50:34 UTC via Wayback Machine.)
- ^ Wii遊戲軟體. nintendo.tw (Traditional Chinese). Archived January 22, 2013, 21:01:32 UTC from the original via Wayback Machine. Retrieved October 18, 2024.