User:Doc von Schmeltwick/Projects/SMB3 sprites: Difference between revisions
(→Mario and Luigi: And there indeed was some palette shenanigans with Luigi in the same situations as Hammer Mario, using the map palette rather than the typical gameplay one.) |
(→Obstacles: And their projectiles, I did get all of these animations.) |
||
| (33 intermediate revisions by the same user not shown) | |||
| Line 1: | Line 1: | ||
===Mario and Luigi=== | ===Mario and Luigi=== | ||
<gallery class="rawsize x2" style="--bg:#B5EBF2;--bg1:#9290FF;--bg2:#FFCCC5;--bg3:#4240FF;--bg4:#F7D8A5;--bg5:#B3F3CC;--bg6:#C0DFFF;" widths=64px heights=64px> | <gallery class="rawsize x2" style="--bg:#B5EBF2;--bg1:#9290FF;--bg2:#FFCCC5;--bg3:#4240FF;--bg4:#F7D8A5;--bg5:#B3F3CC;--bg6:#C0DFFF;--darkbg:#B5EBF2;--darkbg1:#9290FF;--darkbg2:#FFCCC5;--darkbg3:#4240FF;--darkbg4:#F7D8A5;--darkbg5:#B3F3CC;--darkbg6:#C0DFFF"" widths=64px heights=64px> | ||
SMB3 Smallmario.png|[[Small Mario]] standing | SMB3 Smallmario.png|[[Small Mario]] standing | ||
Small Mario SMB3.gif|Small Mario walking | Small Mario SMB3.gif|Small Mario walking | ||
| Line 141: | Line 141: | ||
SMB3 Fire Mario shoe.gif|Fire Mario/Luigi in Kuribo's shoe | SMB3 Fire Mario shoe.gif|Fire Mario/Luigi in Kuribo's shoe | ||
SMB3 Fire Mario fireball normal.gif|[[Fireball]] (normal) | SMB3 Fire Mario fireball normal.gif|[[Fireball]] (normal) | ||
SMB3 Fire Mario fireball artillery boss.gif|Fireball (artillery boss) | SMB3 Fire Mario fireball artillery boss.gif|Fireball (artillery boss){{class|blackbg}} | ||
SMB3 Fire Mario fireball Mushroom House.gif|Fireball (Mushroom House) | SMB3 Fire Mario fireball Mushroom House.gif|Fireball (Mushroom House) | ||
| Line 236: | Line 236: | ||
SMB3 Tanooki Mario fly.gif|Tanooki Mario/Luigi flying | SMB3 Tanooki Mario fly.gif|Tanooki Mario/Luigi flying | ||
SMB3 Tanooki Mario fly fall.png|Tanooki Mario/Luigi falling after flight{{class|bg5}} | SMB3 Tanooki Mario fly fall.png|Tanooki Mario/Luigi falling after flight{{class|bg5}} | ||
Tanooki Mario Sprite SMB3 Running.png|Tanooki/Luigi | Tanooki Mario Sprite SMB3 Running.png|Tanooki Mario/Luigi skidding{{class|bg5}} | ||
SMB3 Tanooki Mario pipe.png|Tanooki Mario/Luigi entering a vertical pipe{{class|bg5}} | SMB3 Tanooki Mario pipe.png|Tanooki Mario/Luigi entering a vertical pipe{{class|bg5}} | ||
SMB3 Tanooki Mario spin.gif|Tanooki Mario/Luigi spinning | SMB3 Tanooki Mario spin.gif|Tanooki Mario/Luigi spinning | ||
| Line 313: | Line 313: | ||
====Overworld map sprites==== | ====Overworld map sprites==== | ||
<gallery class="rawsize x3" style="--bg:#B5EBF2;--bg1:#9290FF;--bg2:#FFCCC5;--bg3:#4240FF;--bg4:#F7D8A5;--bg5:#B3F3CC;--bg6:#C0DFFF;" widths=64px heights=64px> | <gallery class="rawsize x3" style="--bg:#B5EBF2;--bg1:#9290FF;--bg2:#FFCCC5;--bg3:#4240FF;--bg4:#F7D8A5;--bg5:#B3F3CC;--bg6:#C0DFFF;--darkbg:#B5EBF2;--darkbg1:#9290FF;--darkbg2:#FFCCC5;--darkbg3:#4240FF;--darkbg4:#F7D8A5;--darkbg5:#B3F3CC;--darkbg6:#C0DFFF"" widths=64px heights=64px> | ||
SMB3 Small Mario map.gif|[[Small Mario]] | SMB3 Small Mario map.gif|[[Small Mario]] | ||
SMB3 Small Mario map spin.gif|Small Mario | SMB3 Small Mario map spin.gif|Small Mario | ||
| Line 325: | Line 325: | ||
SMB3 Small Luigi map invincible.gif|Invincible Small Luigi ({{file link|SMB3 Player flash diagram.png|alternatives}}) | SMB3 Small Luigi map invincible.gif|Invincible Small Luigi ({{file link|SMB3 Player flash diagram.png|alternatives}}) | ||
SMB3 Super Mario map.gif|[[Super Mario (form)|Super Mario]]{{class|bg1}} | SMB3 Super Mario map.gif|[[Super Mario (form)|Super Mario]]{{class|bg1}} | ||
SMB3 Super Mario map invincible.gif|Invincible Super Mario | SMB3 Super Mario map invincible.gif|Invincible Super Mario ({{file link|SMB3 Player flash diagram.png|alternatives}}) | ||
SMB3 Super Luigi map.gif|[[Super Mario (form)|Super Luigi]]{{class|bg1}} | SMB3 Super Luigi map.gif|[[Super Mario (form)|Super Luigi]]{{class|bg1}} | ||
SMB3 Super Luigi map invincible.gif|Invincible Super Luigi | SMB3 Super Luigi map invincible.gif|Invincible Super Luigi ({{file link|SMB3 Player flash diagram.png|alternatives}}) | ||
SMB3 Fire Mario map.gif|[[Fire Mario|Fire Mario/Luigi]]{{class|bg2}} | SMB3 Fire Mario map.gif|[[Fire Mario|Fire Mario/Luigi]]{{class|bg2}} | ||
SMB3 Fire Mario map invincible.gif|Invincible Fire Mario/Luigi | SMB3 Fire Mario map invincible.gif|Invincible Fire Mario/Luigi ({{file link|SMB3 Player flash diagram.png|alternatives}}) | ||
Raccoon Mario Map SMB3.gif|[[Raccoon Mario]]{{class|bg3}} | Raccoon Mario Map SMB3.gif|[[Raccoon Mario]]{{class|bg3}} | ||
SMB3 Raccoon Mario map invincible.gif|Invincible Raccoon Mario | SMB3 Raccoon Mario map invincible.gif|Invincible Raccoon Mario ({{file link|SMB3 Player flash diagram.png|alternatives}}) | ||
SMB3 Raccoon Luigi map.gif|[[Raccoon Mario|Raccoon Luigi]] | SMB3 Raccoon Luigi map.gif|[[Raccoon Mario|Raccoon Luigi]] | ||
SMB3 Raccoon Luigi map invincible.gif|Invincible Raccoon Luigi | SMB3 Raccoon Luigi map invincible.gif|Invincible Raccoon Luigi ({{file link|SMB3 Player flash diagram.png|alternatives}}) | ||
MarioPWingSMB3.gif|Raccoon Mario with a [[P-Wing]]{{class|bg3}} | MarioPWingSMB3.gif|Raccoon Mario with a [[P-Wing]]{{class|bg3}} | ||
SMB3 P-Wing Mario map invincible.gif|Invincible Raccoon Mario with a P-Wing | SMB3 P-Wing Mario map invincible.gif|Invincible Raccoon Mario with a P-Wing ({{file link|SMB3 Player flash diagram.png|alternatives}}) | ||
SMB3 P-Wing Luigi map.gif|Raccoon Luigi with a P-Wing | SMB3 P-Wing Luigi map.gif|Raccoon Luigi with a P-Wing | ||
SMB3 P-Wing Luigi map invincible.gif|Invincible Raccoon Luigi with a P-Wing | SMB3 P-Wing Luigi map invincible.gif|Invincible Raccoon Luigi with a P-Wing ({{file link|SMB3 Player flash diagram.png|alternatives}}) | ||
SMB3 Frog Mario map.gif|[[Frog Mario|Frog Mario/Luigi]]{{class|bg4}} | SMB3 Frog Mario map.gif|[[Frog Mario|Frog Mario/Luigi]]{{class|bg4}} | ||
SMB3 Frog Mario map invincible.gif|Invincible Frog Mario/Luigi | SMB3 Frog Mario map invincible.gif|Invincible Frog Mario/Luigi ({{file link|SMB3 Player flash diagram.png|alternatives}}) | ||
SMB3 Tanooki Mario map.gif|[[Tanooki Mario|Tanooki Mario/Luigi]]{{class|bg5}} | SMB3 Tanooki Mario map.gif|[[Tanooki Mario|Tanooki Mario/Luigi]]{{class|bg5}} | ||
SMB3 Tanooki Mario map invincible.gif|Invincible Tanooki Mario/Luigi | SMB3 Tanooki Mario map invincible.gif|Invincible Tanooki Mario/Luigi ({{file link|SMB3 Player flash diagram.png|alternatives}}) | ||
SMB3 Hammer Mario map.gif|[[Hammer Mario|Hammer Mario/Luigi]]{{class|bg6}} | SMB3 Hammer Mario map.gif|[[Hammer Mario|Hammer Mario/Luigi]]{{class|bg6}} | ||
SMB3 Hammer Mario map invincible.gif|Invincible Hammer Mario/Luigi | SMB3 Hammer Mario map invincible.gif|Invincible Hammer Mario/Luigi ({{file link|SMB3 Player flash diagram.png|alternatives}}) | ||
SMB3 Jugem's Cloud map.png|[[Lakitu's Cloud|Jugem's Cloud]] | SMB3 Jugem's Cloud map.png|[[Lakitu's Cloud|Jugem's Cloud]] | ||
SMB3 Jugem's Cloud map invincible.gif|Invincible Jugem's Cloud | SMB3 Jugem's Cloud map invincible.gif|Invincible Jugem's Cloud ({{file link|SMB3 Player flash diagram.png|alternatives}}) | ||
</gallery> | </gallery> | ||
====Map popup sprites==== | ====Map popup sprites==== | ||
<gallery class="rawsize x3" style="--bg:#B5EBF2;--bg1:#9290FF;--bg2:#FFCCC5;--bg3:#4240FF;--bg4:#F7D8A5;--bg5:#B3F3CC;--bg6:#C0DFFF;" widths=64px heights=64px> | <gallery class="rawsize x3" style="--bg:#B5EBF2;--bg1:#9290FF;--bg2:#FFCCC5;--bg3:#4240FF;--bg4:#F7D8A5;--bg5:#B3F3CC;--bg6:#C0DFFF;--darkbg:#B5EBF2;--darkbg1:#9290FF;--darkbg2:#FFCCC5;--darkbg3:#4240FF;--darkbg4:#F7D8A5;--darkbg5:#B3F3CC;--darkbg6:#C0DFFF"" widths=64px heights=64px> | ||
SMB3-NES-SmallMarioMap.png|[[Small Mario]], [[Super Mario (form)|Super Mario]], and [[Raccoon Mario]] | SMB3-NES-SmallMarioMap.png|[[Small Mario]], [[Super Mario (form)|Super Mario]], and [[Raccoon Mario]] | ||
SMB3 Small Mario fail.png|Small Mario | SMB3 Small Mario fail.png|Small Mario | ||
| Line 373: | Line 373: | ||
===Non-playable characters=== | ===Non-playable characters=== | ||
<gallery class="rawsize x2" widths=64px heights=64px style="--bg:#B5EBF2;--bg1:#9290FF;--bg2:#FFCCC5;--bg3:#4240FF;--bg4:#F7D8A5;--bg5:#B3F3CC;--bg6:#C0DFFF"> | <gallery class="rawsize x2" widths=64px heights=64px style="--bg:#B5EBF2;--bg1:#9290FF;--bg2:#FFCCC5;--bg3:#4240FF;--bg4:#F7D8A5;--bg5:#B3F3CC;--bg6:#C0DFFF;--darkbg:#B5EBF2;--darkbg1:#9290FF;--darkbg2:#FFCCC5;--darkbg3:#4240FF;--darkbg4:#F7D8A5;--darkbg5:#B3F3CC;--darkbg6:#C0DFFF"> | ||
PrincessCryingR.png|[[Princess Peach|Princess Toadstool]]{{class|blackbg}} | PrincessCryingR.png|[[Princess Peach|Princess Toadstool]]{{class|blackbg}} | ||
SMB3Peach.gif|Princess Toadstool{{class|blackbg}} | SMB3Peach.gif|Princess Toadstool{{class|blackbg}} | ||
| Line 385: | Line 385: | ||
SMB3 Unused Koopa Troopa lobby.png|[[Koopa Troopa]] (game lobby, [[List of Super Mario Bros. 3 pre-release and unused content|unused]]){{class|whitebg}} | SMB3 Unused Koopa Troopa lobby.png|[[Koopa Troopa]] (game lobby, [[List of Super Mario Bros. 3 pre-release and unused content|unused]]){{class|whitebg}} | ||
SMB3 Unused Hammer Bro lobby.png|[[Hammer Bro]]ther (game lobby, unused){{class|whitebg}} | SMB3 Unused Hammer Bro lobby.png|[[Hammer Bro]]ther (game lobby, unused){{class|whitebg}} | ||
SMB3 Grass Land Dog King Sprite.png|[[Kings|King]] of [[Grass Land]] (transformed) | SMB3 Grass Land Dog King Sprite.png|[[Kings|King]] of [[Grass Land]] (transformed) | ||
SMB3 King W1 changed crowned.gif|King of Grass Land (transformed) | SMB3 King W1 changed crowned.gif|King of Grass Land (transformed) | ||
| Line 393: | Line 394: | ||
SMB3 King W1 normal wandless unused.gif|King of Grass Land ([[List of Super Mario Bros. 3 pre-release and unused content|unused]]) | SMB3 King W1 normal wandless unused.gif|King of Grass Land ([[List of Super Mario Bros. 3 pre-release and unused content|unused]]) | ||
SMB3 King W1 normal wanded unused.gif|King of Grass Land (unused) | SMB3 King W1 normal wanded unused.gif|King of Grass Land (unused) | ||
SMB3-NES-DesertKingTransformed.png|King of [[Desert Land]] (transformed){{class|bg1}} | SMB3-NES-DesertKingTransformed.png|King of [[Desert Land]] (transformed){{class|bg1}} | ||
SMB3 King W2 changed.gif|King of Desert Land (transformed){{class|bg1}} | SMB3 King W2 changed.gif|King of Desert Land (transformed){{class|bg1}} | ||
| Line 398: | Line 400: | ||
SMB3 King W2 normal wandless.gif|King of Desert Land{{class|bg1}} | SMB3 King W2 normal wandless.gif|King of Desert Land{{class|bg1}} | ||
SMB3 King W2 normal wanded.gif|King of Desert Land{{class|bg1}} | SMB3 King W2 normal wanded.gif|King of Desert Land{{class|bg1}} | ||
SMB3-NES-WaterKingTransformed.png|King of [[Water Land]] (transformed){{class|bg4}} | SMB3-NES-WaterKingTransformed.png|King of [[Water Land]] (transformed){{class|bg4}} | ||
SMB3 King W3 changed crowned.gif|King of Water Land (transformed){{class|bg4}} | SMB3 King W3 changed crowned.gif|King of Water Land (transformed){{class|bg4}} | ||
| Line 404: | Line 407: | ||
SMB3 King W3 normal wandless.gif|King of Water Land{{class|bg4}} | SMB3 King W3 normal wandless.gif|King of Water Land{{class|bg4}} | ||
SMB3 King W3 normal wanded.gif|King of Water Land{{class|bg4}} | SMB3 King W3 normal wanded.gif|King of Water Land{{class|bg4}} | ||
SMB3-NES-GiantKingTransformed.png|King of [[Giant Land]] (transformed){{class|bg5}} | SMB3-NES-GiantKingTransformed.png|King of [[Giant Land]] (transformed){{class|bg5}} | ||
SMB3 King W4 changed crowned.gif|King of Giant Land (transformed){{class|bg5}} | SMB3 King W4 changed crowned.gif|King of Giant Land (transformed){{class|bg5}} | ||
| Line 410: | Line 414: | ||
SMB3 King W4 normal wandless.gif|King of Giant Land{{class|bg5}} | SMB3 King W4 normal wandless.gif|King of Giant Land{{class|bg5}} | ||
SMB3 King W4 normal wanded.gif|King of Giant Land{{class|bg5}} | SMB3 King W4 normal wanded.gif|King of Giant Land{{class|bg5}} | ||
SMB3-NES-SkyKingTransformed.png|King of [[Sky Land]] (transformed) | SMB3-NES-SkyKingTransformed.png|King of [[Sky Land]] (transformed) | ||
SMB3 King W5 changed crowned.gif|King of Sky Land (transformed) | SMB3 King W5 changed crowned.gif|King of Sky Land (transformed) | ||
| Line 416: | Line 421: | ||
SMB3 King W5 normal wandless.gif|King of Sky Land | SMB3 King W5 normal wandless.gif|King of Sky Land | ||
SMB3 King W5 normal wanded.gif|King of Sky Land | SMB3 King W5 normal wanded.gif|King of Sky Land | ||
SMB3-NES-IceKingTransformed.png|King of [[Ice Land]] (transformed){{class|bg6}} | SMB3-NES-IceKingTransformed.png|King of [[Ice Land]] (transformed){{class|bg6}} | ||
SMB3 King W6 changed.gif|King of Ice Land (transformed){{class|bg6}} | SMB3 King W6 changed.gif|King of Ice Land (transformed){{class|bg6}} | ||
| Line 421: | Line 427: | ||
SMB3 King W6 normal wandless.gif|King of Ice Land{{class|bg6}} | SMB3 King W6 normal wandless.gif|King of Ice Land{{class|bg6}} | ||
SMB3 King W6 normal wanded.gif|King of Ice Land{{class|bg6}} | SMB3 King W6 normal wanded.gif|King of Ice Land{{class|bg6}} | ||
SMB3-NES-PipeKingTransformed.png|King of [[Pipe Land]] (transformed){{class|bg4}} | SMB3-NES-PipeKingTransformed.png|King of [[Pipe Land]] (transformed){{class|bg4}} | ||
SMB3 King W7 changed crowned.gif|King of Pipe Land (transformed){{class|bg4}} | SMB3 King W7 changed crowned.gif|King of Pipe Land (transformed){{class|bg4}} | ||
| Line 430: | Line 437: | ||
===Enemies=== | ===Enemies=== | ||
<gallery widths=64px heights=64px style="--bg:#B5EBF2;--bg1:#9290FF;--bg2:#FFCCC5;--bg3:#4240FF;--bg4:#F7D8A5;--bg5:#B3F3CC;--bg6:#C0DFFF"> | <gallery widths=64px heights=64px style="--bg:#B5EBF2;--bg1:#9290FF;--bg2:#FFCCC5;--bg3:#4240FF;--bg4:#F7D8A5;--bg5:#B3F3CC;--bg6:#C0DFFF;--darkbg:#B5EBF2;--darkbg1:#9290FF;--darkbg2:#FFCCC5;--darkbg3:#4240FF;--darkbg4:#F7D8A5;--darkbg5:#B3F3CC;--darkbg6:#C0DFFF"> | ||
SMB3 | SMB3 Goomba title.png||[[Goomba|Little Goomba]] (title) | ||
SMB3 Goomba Sprite.gif|Little Goomba | SMB3 Goomba title.gif|Little Goomba (title) | ||
SMB3 Squished Goomba.png|Little Goomba | SMB3 Goomba squished title.png|Little Goomba (title) | ||
SMB3 Red Goomba.png|Red Goomba | SMB3 Sprite Goomba.png|Little Goomba (land) | ||
SMB3 Goomba Sprite.gif|Little Goomba (land) | |||
SMB3 Squished Goomba.png|Little Goomba (land) | |||
SMB3 Goomba brown cave.png|Little Goomba (cave) | |||
SMB3 Goomba cave.gif|Little Goomba (cave) | |||
SMB3 Goomba brown squished cave.png|Little Goomba (cave) | |||
SMB3 Red Goomba.png|Red Goomba (land) | |||
SMB3 Goomba red land.gif|Red Goomba (land) | |||
SMB3 Goomba red squished land.png|Red Goomba (land) | |||
SMB3 Goomba tipped credits.png|Little Goomba (credits){{class|bg4}} | SMB3 Goomba tipped credits.png|Little Goomba (credits){{class|bg4}} | ||
SMB3 Unused Goomba Closed Eyes.png|Little Goomba (credits, [[List of Super Mario Bros. 3 pre-release and unused content|unused]]){{class|bg4}} | SMB3 Unused Goomba Closed Eyes.png|Little Goomba (credits, [[List of Super Mario Bros. 3 pre-release and unused content|unused]]){{class|bg4}} | ||
SMB3 Sprite Paragoomba.png|[[Paragoomba|Para-Goomba]] | SMB3 Sprite Paragoomba.png|[[Paragoomba|Para-Goomba]] (land) | ||
Ani smb3 paragoomba.gif|Para-Goomba | SMB3 Paragoomba brown walk land.gif|Para-Goomba (land) | ||
SMB3 Sprite Paragoomba (Red).png|Red Para-Goomba | SMB3 Paragoomba brown liftoff land.gif|Para-Goomba (land) | ||
Paragoombared.gif|Red Para-Goomba | SMB3 Paragoomba brown fly land.gif|Para-Goomba (land) | ||
SMB3 Micro-Goomba.png|[[Mini Goomba|Mugger Micro-Goomba]] | SMB3 Paragoomba brown cave.png|Para-Goomba (cave) | ||
SMB3 Sprite Pile Driver Micro-Goomba.png|[[Pile Driver Micro-Goomba]]{{class|bg1}} | SMB3 Paragoomba brown walk cave.gif|Para-Goomba (cave) | ||
SMB3 Pile Driver Micro-Goomba.gif|Pile Driver Micro-Goomba{{class|bg1}} | SMB3 Paragoomba brown liftoff cave.gif|Para-Goomba (cave) | ||
SMB3 Sprite Big Goomba.png|[[Big Goomba|Grand Goomba]]{{class|bg5}} | Ani smb3 paragoomba.gif|Para-Goomba (cave) | ||
GrandGoombaSMB3.gif|Grand Goomba{{class|bg5}} | SMB3 Sprite Paragoomba (Red).png|Red Para-Goomba (land) | ||
SMB3 Shoe Goomba.png|[[Shoe Goomba|Kuribo's Goomba]] | SMB3 Paragoomba red walk land.gif|Red Para-Goomba (land) | ||
SMB3 Sprite Koopa Troopa (Green).png| | Paragoombared.gif|Red Para-Goomba|Red Para-Goomba (land) | ||
Green Koopa SMB3.gif|Green Koopa Troopa | SMB3 Paragoomba red jump land.gif|Red Para-Goomba (land) | ||
SMB3 Sprite Koopa Troopa (Red).png|Red Koopa Troopa | SMB3 Micro-Goomba.png|[[Mini Goomba|Mugger Micro-Goomba]] (land) | ||
Red Koopa SMB3.gif|Red Koopa Troopa | SMB3 Mugger Micro-Goomba land.gif|Mugger Micro-Goomba (land) | ||
SMB3 Mugger Micro-Goomba cave.png|Mugger Micro-Goomba (cave) | |||
SMB3 Mugger Micro-Goomba cave.gif|Mugger Micro-Goomba (cave) | |||
SMB3 Brick Block Sprite.png|[[Pile Driver Micro-Goomba]] (land){{class|bg1}} | |||
SMB3 Sprite Pile Driver Micro-Goomba.png|[[Pile Driver Micro-Goomba]] (land){{class|bg1}} | |||
SMB3 Pile Driver Micro-Goomba.gif|Pile Driver Micro-Goomba (land){{class|bg1}} | |||
SMB3 Sprite Big Goomba.png|[[Big Goomba|Grand Goomba]] (land){{class|bg5}} | |||
GrandGoombaSMB3.gif|Grand Goomba (land){{class|bg5}} | |||
SMB3 Grand Goomba squished land.png|Grand Goomba (land){{class|bg5}} | |||
SMB3 Shoe Goomba.png|[[Shoe Goomba|Kuribo's Goomba]] (land) | |||
SMB3 Kuribo's Goomba land.gif|Kuribo's Goomba (land) | |||
SMB3 Koopa Troopa title.png|[[Koopa Troopa|Green Koopa Troopa]] (title) | |||
SMB3 Koopa Troopa walk title.gif|Green Koopa Troopa (title) | |||
SMB3 Koopa Troopa run title.gif||Green Koopa Troopa (title) | |||
SMB3 Sprite Koopa Troopa (Green).png|Green Koopa Troopa (land) | |||
Green Koopa SMB3.gif|Green Koopa Troopa (land) | |||
SMB3 Koopa Troopa green wobble land.gif|Green Koopa Troopa (land) | |||
SMB3 Koopa Troopa green cave.png|Green Koopa Troopa (cave) | |||
SMB3 Koopa Troopa green cave walk.gif|Green Koopa Troopa (cave) | |||
SMB3 Koopa Troopa green cave wobble.gif|Green Koopa Troopa (cave) | |||
SMB3 Sprite Koopa Troopa (Red).png|Red Koopa Troopa (land) | |||
Red Koopa SMB3.gif|Red Koopa Troopa (land) | |||
SMB3 Koopa Troopa red land wobble.gif|Red Koopa Troopa (land) | |||
SMB3 Koopa Troopa red cave.png|Red Koopa Troopa (cave) | |||
SMB3 Koopa Troopa red cave walk.gif|Red Koopa Troopa (cave) | |||
SMB3 Koopa Troopa red cave wobble.gif|Red Koopa Troopa (cave) | |||
SMB3 Koopa Troopa credits.png|Koopa Troopa (credits){{class|bg4}} | SMB3 Koopa Troopa credits.png|Koopa Troopa (credits){{class|bg4}} | ||
SMB3 Sprite Koopa Paratroopa (Green).png|[[Koopa Paratroopa|Green Koopa Paratroopa]] | SMB3 Sprite Koopa Paratroopa (Green).png|[[Koopa Paratroopa|Green Koopa Paratroopa]] (land) | ||
SMB3 KoopaParatroopaGreenL.gif|Green Koopa Paratroopa | SMB3 Koopa Paratroopa green land hop.gif|Green Koopa Paratroopa (land) | ||
SMB3 Red Koopa Paratroopa.png|Red Koopa Paratroopa | SMB3 KoopaParatroopaGreenL.gif|Green Koopa Paratroopa (land) | ||
SMB3 Sprite Big Koopa Troopa (Green).png|[[Big Koopa Troopa|Green Gargantua Koopa Troopa]]{{class|bg5}} | SMB3 Koopa Paratroopa green cave.png|Green Koopa Paratroopa (cave) | ||
SMB3 BigKoopaTroopaGreenL.gif|Green Gargantua Koopa Troopa{{class|bg5}} | SMB3 Koopa Paratroopa green cave hop.gif|Green Koopa Paratroopa (cave) | ||
SMB3 Red Giant Koopa Troopa.png| | SMB3 Koopa Paratroopa green cave fly.gif|Green Koopa Paratroopa (cave) | ||
SMB3 Colossal Koopa Paratroopa.png|[[Big Koopa Paratroopa|Colossal Koopa Paratroopa]]{{class|bg5}} | SMB3 Red Koopa Paratroopa.png|Red Koopa Paratroopa (land) | ||
SMB3 Dry Bones.png|[[Dry Bones]]{{class|blackbg}} | SMB3 Koopa Paratroopa red land fly.gif|Red Koopa Paratroopa (land) | ||
SMB3 | SMB3 Koopa Paratroopa red cave.png|Red Koopa Paratroopa (cave) | ||
SMB3 Dry Bones Sprite.gif|Dry Bones{{class|blackbg}} | SMB3 Koopa Paratroopa red cave fly.gif|Red Koopa Paratroopa (cave) | ||
Calapso Koopa 12.gif|Dry Bones{{class|blackbg}} | SMB3 Sprite Big Koopa Troopa (Green).png|[[Big Koopa Troopa|Green Gargantua Koopa Troopa]] (land){{class|bg5}} | ||
Hammer Bro SMB3 NES sprite.png|[[Hammer Bro]]ther | SMB3 BigKoopaTroopaGreenL.gif|Green Gargantua Koopa Troopa (land){{class|bg5}} | ||
HammerBroSMB3.gif|Hammer Brother | SMB3 Red Giant Koopa Troopa.png|Red Giant Koopa Troopa (land){{class|bg5}} | ||
BoomerangBroSMB3.png|[[Boomerang Bro]]ther | SMB3 Gargantua Koopa Troopa red land walk.gif|Red Giant Koopa Troopa (land){{class|bg5}} | ||
SMB3 Boomerang Bro vehicle.png|Boomerang Brother ( | SMB3 Colossal Koopa Paratroopa.png|[[Big Koopa Paratroopa|Colossal Koopa Paratroopa]] (land){{class|bg5}} | ||
SMB3 Sprite Fire Bro.png|[[Fire Bro]]ther{{class|bg2}} | SMB3 Colossal Koopa Paratroopa green land hop.gif|Colossal Koopa Paratroopa (land){{class|bg5}} | ||
SMB3 Dry Bones.png|[[Dry Bones]] (fortress) | |||
SMB3-SledgeBro sprite.png|[[Sledge Bro]]ther{{class|bg5}} | SMB3 Dry Bones crumbled fort.png|Dry Bones (fortress) | ||
SMB3 Dry Bones fort walk.gif|Dry Bones (fortress) | |||
SMB3 Dry Bones fort fall.gif|Dry Bones (fortress) | |||
SMB3 Sprite Dry Bones.png|Dry Bones (desert fortress){{class|blackbg}} | |||
SMB3 Dry Bones crumbled fort dark.png|Dry Bones (desert fortress){{class|blackbg}} | |||
SMB3 Dry Bones Sprite.gif|Dry Bones (desert fortress){{class|blackbg}} | |||
Calapso Koopa 12.gif|Dry Bones (desert fortress){{class|blackbg}} | |||
SMB3 Dry Bones fort cave.png|Dry Bones (cave fortress){{class|blackbg}} | |||
SMB3 Dry Bones crumbled fort cave.png|Dry Bones (cave fortress){{class|blackbg}} | |||
SMB3 Dry Bones fort cave walk.gif|Dry Bones (cave fortress){{class|blackbg}} | |||
SMB3 Dry Bones fort cave fall.gif|Dry Bones (cave fortress){{class|blackbg}} | |||
SMB3 Dry Bones fort light.png|Dry Bones (ice fortress){{class|blackbg}} | |||
SMB3 Dry Bones crumbled fort light.png|Dry Bones (ice fortress){{class|blackbg}} | |||
SMB3 Dry Bones fort light walk.gif|Dry Bones (ice fortress){{class|blackbg}} | |||
SMB3 Dry Bones fort light fall.gif|Dry Bones (ice fortress){{class|blackbg}} | |||
Hammer Bro SMB3 NES sprite.png|[[Hammer Bro]]ther (land) | |||
SMB3 Hammer Bro walk land.gif|Hammer Brother (land) | |||
HammerBroSMB3.gif|Hammer Brother (land) | |||
SMB3 Hammer Bro walk cave.gif|Hammer Brother (cave) | |||
BoomerangBroSMB3.png|[[Boomerang Bro]]ther (land) | |||
SMB3 Boomerang Bro walk land.gif|Boomerang Brother (land) | |||
SMB3 Boomerang Bro throw land.gif|Boomerang Brother (land) | |||
SMB3 Boomerang Bro walk cave.gif|Boomerang Brother (cave) | |||
SMB3 Boomerang Bro throw cave.gif|Boomerang Brother (cave) | |||
SMB3 Boomerang Bro vehicle.png|Boomerang Brother (artillery) | |||
SMB3 Boomerang Bro walk artillery.gif|Boomerang Brother (artillery) | |||
SMB3 Boomerang Bro throw artillery.gif|Boomerang Brother (artillery) | |||
SMB3 Sprite Fire Bro.png|[[Fire Bro]]ther (land){{class|bg2}} | |||
SMB3 Fire Bro walk land.gif|Fire Brother (land){{class|bg2}} | |||
Firebro.gif|Fire Brother (land) | |||
SMB3 Fire Bro walk cave.gif|Fire Brother (land) | |||
SMB3-SledgeBro sprite.png|[[Sledge Bro]]ther (land){{class|bg5}} | |||
SMB3 Sledge Bro walk land.gif|Sledge Brother (land) | |||
SMB3 Sledge Bro walk cave.gif|Sledge Brother (cave) | |||
Buzzy Beetle SMB3.png|[[Buzzy Beetle]]{{class|blackbg}} | Buzzy Beetle SMB3.png|[[Buzzy Beetle]]{{class|blackbg}} | ||
BuzzyBeetleDL.gif|Buzzy Beetle{{class|blackbg}} | BuzzyBeetleDL.gif|Buzzy Beetle{{class|blackbg}} | ||
| Line 478: | Line 554: | ||
ParabeetleSMB3.gif|Para-Beetle | ParabeetleSMB3.gif|Para-Beetle | ||
Smb3 gparabeetle ani.gif|Para-Beetle ([[List of Super Mario Bros. 3 pre-release and unused content|unused]]) | Smb3 gparabeetle ani.gif|Para-Beetle ([[List of Super Mario Bros. 3 pre-release and unused content|unused]]) | ||
SMB3LakituSprite.png|[[Lakitu]]{{class|bg4}} | SMB3LakituSprite.png|[[Lakitu]]{{class|bg4}} | ||
SMB3 Sprite Spiny Egg (Green).png|[[Spiny Egg|Green Spiny Egg]]{{class|bg4}} | SMB3 Sprite Spiny Egg (Green).png|[[Spiny Egg|Green Spiny Egg]]{{class|bg4}} | ||
| Line 485: | Line 562: | ||
SpinySMB3.gif|Spiny{{class|bg5}} | SpinySMB3.gif|Spiny{{class|bg5}} | ||
SMB3 Sprite Upside-down Spiny.png|Upside-down Spiny{{class|blackbg}} | SMB3 Sprite Upside-down Spiny.png|Upside-down Spiny{{class|blackbg}} | ||
SMB3 Sprite Rocky Wrench.png|[[Rocky Wrench]]{{class|bg3}} | SMB3 Sprite Rocky Wrench.png|[[Rocky Wrench]]{{class|bg3}} | ||
RockyWrenchSMB3.gif|Rocky Wrench{{class|bg3}} | RockyWrenchSMB3.gif|Rocky Wrench{{class|bg3}} | ||
| Line 491: | Line 569: | ||
SMB3 Sprite Spike.png|[[Spike]]{{class|bg4}} | SMB3 Sprite Spike.png|[[Spike]]{{class|bg4}} | ||
SpikeSMB3.gif|Spike{{class|bg4}} | SpikeSMB3.gif|Spike{{class|bg4}} | ||
SMB3 Sprite Piranha Plant.png|[[Piranha Plant]] | SMB3 Sprite Piranha Plant.png|[[Piranha Plant]] | ||
PiranhaPlantRed.gif|Piranha Plant | PiranhaPlantRed.gif|Piranha Plant | ||
| Line 506: | Line 585: | ||
SMB3 Sprite Ptooie.png|[[Ptooie]]{{class|bg6}} | SMB3 Sprite Ptooie.png|[[Ptooie]]{{class|bg6}} | ||
PtooieSMB3.gif|Ptooie{{class|bg6}} | PtooieSMB3.gif|Ptooie{{class|bg6}} | ||
SMB3 Nipper Plant.png|[[Nipper Plant|Walking Piranha]] | SMB3 Nipper Plant.png|[[Nipper Plant|Walking Piranha]] | ||
Fire Nipper Plant.png|[[Fire Nipper Plant|Fiery Walking Piranha]]{{class|bg4}} | Fire Nipper Plant.png|[[Fire Nipper Plant|Fiery Walking Piranha]]{{class|bg4}} | ||
| Line 519: | Line 599: | ||
SMB3 Muncher piped interior.png|Muncher (inside pipes){{class|blackbg}} | SMB3 Muncher piped interior.png|Muncher (inside pipes){{class|blackbg}} | ||
SMB3 Muncher piped interior.gif|Muncher (inside pipes){{class|blackbg}} | SMB3 Muncher piped interior.gif|Muncher (inside pipes){{class|blackbg}} | ||
SMB3 Lava Bubble.gif|[[Lava Bubble|Podoboo]]{{class|blackbg}} | SMB3 Lava Bubble.gif|[[Lava Bubble|Podoboo]]{{class|blackbg}} | ||
SMB3 Sprite Roto-Disc.png|[[Roto-Disc]]{{class|blackbg}} | SMB3 Sprite Roto-Disc.png|[[Roto-Disc]]{{class|blackbg}} | ||
| Line 530: | Line 611: | ||
SMB3 Missile Bill e.gif|Missile Bill ({{file link|SMB3 Missile Bill flash diagram.png|alternatives}}){{class|bg5}} | SMB3 Missile Bill e.gif|Missile Bill ({{file link|SMB3 Missile Bill flash diagram.png|alternatives}}){{class|bg5}} | ||
Fire snake.png|[[Fire Snake|Firesnake]]{{class|bg1}} | Fire snake.png|[[Fire Snake|Firesnake]]{{class|bg1}} | ||
CheepCheepSMB3.png|[[Cheep Cheep|Cheep-Cheep]]{{class|bg4}} | |||
SMB3 Cheep Cheep green.png|Green Cheep-Cheep{{class|bg1}} | |||
SMB3 Cheep Cheep green fortress.png|Green Cheep-Cheep{{class|blackbg}} | |||
Smb3 gcheep ani.gif|Cheep-Cheep ([[List of Super Mario Bros. 3 pre-release and unused content|unused]]){{class|bg3}} | |||
SMB3 Big Bertha.png|[[Big Cheep Cheep|Boss Bass]]{{class|bg4}} | |||
SMB3 Boss Bass credits.png|Boss Bass (credits){{class|bg4}} | |||
SMB3 Sprite Big Bertha.png|[[Big Cheep Cheep|Big Bertha]]{{class|bg3}} | |||
SMB3 Baby Cheep.png|[[Baby Cheep]]{{class|bg3}} | |||
SMB3 Spiny Cheep Cheep.png|[[Spiny Cheep Cheep|Spiny Cheep-Cheep]]{{class|bg3}} | |||
SMB3Boo.png|[[Boo|"Boo" Diddly]]{{class|blackbg}} | SMB3Boo.png|[[Boo|"Boo" Diddly]]{{class|blackbg}} | ||
SMB3 Boo normal.png|"Boo" Diddly{{class|blackbg}} | SMB3 Boo normal.png|"Boo" Diddly{{class|blackbg}} | ||
| Line 542: | Line 634: | ||
Ani smb3 chainchomp.gif|Chain Chomp{{class|bg2}} | Ani smb3 chainchomp.gif|Chain Chomp{{class|bg2}} | ||
SMB3 Chain Chomp escape.gif|Chain Chomp{{class|bg2}} | SMB3 Chain Chomp escape.gif|Chain Chomp{{class|bg2}} | ||
SMB3 Sprite Blooper.png|[[Blooper|Bloober]]{{class|bg3}} | SMB3 Sprite Blooper.png|[[Blooper|Bloober]]{{class|bg3}} | ||
SMB3 Blooper.gif|Bloober{{class|bg3}} | SMB3 Blooper.gif|Bloober{{class|bg3}} | ||
| Line 550: | Line 643: | ||
SMB3 Sprite Lava Lotus.png|[[Lava Lotus]]{{class|bg3}} | SMB3 Sprite Lava Lotus.png|[[Lava Lotus]]{{class|bg3}} | ||
LavaLotus.gif|Lava Lotus{{class|bg3}} | LavaLotus.gif|Lava Lotus{{class|bg3}} | ||
SMB3 Sprite Jelectro.png|[[Jelectro]] (sea){{class|bg3}} | SMB3 Sprite Jelectro.png|[[Jelectro]] (sea){{class|bg3}} | ||
Jelectro.gif|Jelectro (sea){{class|bg3}} | Jelectro.gif|Jelectro (sea){{class|bg3}} | ||
SMB3 Jelectro blue unused.png|Jelectro (ice - [[List of Super Mario Bros. 3 pre-release and unused content|unused]]){{class|bg6}} | SMB3 Jelectro blue unused.png|Jelectro (ice - [[List of Super Mario Bros. 3 pre-release and unused content|unused]]){{class|bg6}} | ||
SMB3 Unused Jelectro anim.gif|Jelectro (ice - unused){{class|bg6}} | SMB3 Unused Jelectro anim.gif|Jelectro (ice - unused){{class|bg6}} | ||
SMB3 Sprite Bob-omb.png|[[Bob-omb]] | SMB3 Sprite Bob-omb.png|[[Bob-omb]] | ||
BobOmbSMB3.gif|Bob-omb | BobOmbSMB3.gif|Bob-omb | ||
| Line 569: | Line 654: | ||
SMB3 Hot Foot.gif|Hot Foot{{class|blackbg}} | SMB3 Hot Foot.gif|Hot Foot{{class|blackbg}} | ||
SMB3 Fire Chomp.png|[[Flame Chomp|Fire Chomp]] | SMB3 Fire Chomp.png|[[Flame Chomp|Fire Chomp]] | ||
MBSMB3 Spiny.png|Spiny{{class|blackbg}} | |||
MBSMB3 Spiny blue.png|Spiny{{class|blackbg}} | |||
SMB3 Sidestepper.png|[[Sidestepper|Crab]]{{class|blackbg}} | SMB3 Sidestepper.png|[[Sidestepper|Crab]]{{class|blackbg}} | ||
SMB3 Sidestepper angry.png|Crab{{class|blackbg}} | SMB3 Sidestepper angry.png|Crab{{class|blackbg}} | ||
| Line 579: | Line 667: | ||
===Obstacles=== | ===Obstacles=== | ||
<gallery style="--bg:#B5EBF2;--bg1:#9290FF;--bg2:#FFCCC5;--bg3:#4240FF;--bg4:#F7D8A5;--bg5:#B3F3CC;--bg6:#C0DFFF" widths=64px heights=64px> | <gallery style="--bg:#B5EBF2;--bg1:#9290FF;--bg2:#FFCCC5;--bg3:#4240FF;--bg4:#F7D8A5;--bg5:#B3F3CC;--bg6:#C0DFFF;--darkbg:#B5EBF2;--darkbg1:#9290FF;--darkbg2:#FFCCC5;--darkbg3:#4240FF;--darkbg4:#F7D8A5;--darkbg5:#B3F3CC;--darkbg6:#C0DFFF" widths=64px heights=64px> | ||
SMB3 Boomerang land.gif|[[Boomerang]] (land) | |||
SMB3 Boomerang cave.gif|Boomerang (cave) | |||
SMB3 GrayBowserStatue.png|[[Bowser Statue]]{{class|blackbg}} | SMB3 GrayBowserStatue.png|[[Bowser Statue]]{{class|blackbg}} | ||
SMB3 Bowser Fireball.gif|[[Bowser's Flame|Bowser's flame]]{{class|blackbg}} | SMB3 Bowser Fireball.gif|[[Bowser's Flame|Bowser's flame]]{{class|blackbg}} | ||
SMB3 Bowser's flame diagonal.gif|Bowser's flame{{class|blackbg}} | |||
SMB3 Bowser's flame credits.png|Bowser's flame (credits){{class|bg4}} | SMB3 Bowser's flame credits.png|Bowser's flame (credits){{class|bg4}} | ||
SMB3 Candle red.png|[[Candle]]{{class|blackbg}} | SMB3 Candle red.png|[[Candle]]{{class|blackbg}} | ||
SMB3 Candle gray.png|Candle{{class|blackbg}} | SMB3 Candle gray.png|Candle{{class|blackbg}} | ||
SMB3 Candy Ring.png|[[Ring (projectile)|Candy ring]]{{class|blackbg}} | SMB3 Candy Ring.png|[[Ring (projectile)|Candy ring]]{{class|blackbg}} | ||
SMB3 Wendy ring.gif|Candy ring{{class|blackbg}} | |||
SMB3 Cannon.png|[[Cannon]] | SMB3 Cannon.png|[[Cannon]] | ||
SMB3 Cannon diagonal NE.png|Cannon | SMB3 Cannon diagonal NE.png|Cannon | ||
| Line 593: | Line 685: | ||
SMB3 Cannon double NE-SW.png|[[Diagonal cannon]]{{class|bg3}} | SMB3 Cannon double NE-SW.png|[[Diagonal cannon]]{{class|bg3}} | ||
SMB3 Cannon double NW-SE.png|Diagonal cannon{{class|bg4}} | SMB3 Cannon double NW-SE.png|Diagonal cannon{{class|bg4}} | ||
SMB3 Hammer obstacle land.gif|[[Hammer]] (land) | |||
SMB3 Hammer obstacle cave.gif|Hammer (cave) | |||
SMB3 Fire Mario fireball normal.gif|[[Fireball]] | |||
SMB3 Cannon big.png|[[Giant cannon]]{{class|blackbg}} | SMB3 Cannon big.png|[[Giant cannon]]{{class|blackbg}} | ||
SMB3 GiantCannonBall.png|[[Giant cannonball|Huge bullet]]{{class|blackbg}} | SMB3 GiantCannonBall.png|[[Giant cannonball|Huge bullet]]{{class|blackbg}} | ||
| Line 599: | Line 694: | ||
SMB3 Lava.gif|Lava{{class|blackbg}} | SMB3 Lava.gif|Lava{{class|blackbg}} | ||
SMB3 Koopa Ball.png|[[Magical ball]]{{class|blackbg}} | SMB3 Koopa Ball.png|[[Magical ball]]{{class|blackbg}} | ||
SMB3 Lemmy ball.gif|Magical ball{{class|blackbg}} | |||
SMB3 Lemmy ball flash.gif|Magical ball ({{file link|SMB3 Magical ball flash diagram.png|alternatives}}){{class|blackbg}} | |||
SMB3 Cannon spinning cardinal.png|[[Quartet-cannon]] | SMB3 Cannon spinning cardinal.png|[[Quartet-cannon]] | ||
SMB3 Cannon spinning ordinal.png|Quartet-cannon | SMB3 Cannon spinning ordinal.png|Quartet-cannon | ||
| Line 610: | Line 707: | ||
SMB3 Roto-Ball gray.png|Roto-Disc cog{{class|blackbg}} | SMB3 Roto-Ball gray.png|Roto-Disc cog{{class|blackbg}} | ||
SMB3 Roto-Ball green.png|Roto-Disc cog{{class|blackbg}} | SMB3 Roto-Ball green.png|Roto-Disc cog{{class|blackbg}} | ||
SMB3 Spell.png|[[Spell]]{{class|blackbg}} | |||
SMB3 Spell.gif|Spell{{class|blackbg}} | |||
SMB3 Spikes up short gray.png|[[Spike Trap|Spikes]] (fortress){{class|blackbg}} | SMB3 Spikes up short gray.png|[[Spike Trap|Spikes]] (fortress){{class|blackbg}} | ||
SMB3 Spikes down short gray.png|Spikes (fortress){{class|blackbg}} | SMB3 Spikes down short gray.png|Spikes (fortress){{class|blackbg}} | ||
| Line 633: | Line 732: | ||
===Bosses=== | ===Bosses=== | ||
<gallery class="blackbg rawsize x2" style="--bg4:#F7D8A5" widths=64px heights=64px> | <gallery class="blackbg rawsize x2" style="--bg4:#F7D8A5;--darkbg4:#F7D8A5" widths=64px heights=64px> | ||
SMB3 Boom Boom fort normal spikes.png|[[Boom Boom]] | SMB3 Boom Boom fort normal spikes.png|[[Boom Boom]] (fortress) | ||
Boomboom.gif|Boom Boom | SMB3 Boom Boom fort normal emerge.gif|Boom Boom (fortress) | ||
SMB3 Boom Boom fort normal hurt.gif|Boom Boom | Boomboom.gif|Boom Boom (fortress) | ||
SMB3 Boom Wing fort.gif|Boom Boom | SMB3 Boom Boom fort normal flail alt.gif|Boom Boom (fortress) | ||
SMB3 Boom Wing fort hurt.gif|Boom Boom | SMB3 Boom Boom fort normal hurt.gif|Boom Boom (fortress) | ||
SMB3 Boom Boom fort dark spikes.png|Boom Boom | SMB3 Boom Boom fort normal jump.gif|Boom Boom (fortress) | ||
GreyBoomBoom.gif|Boom Boom | SMB3 Boom Wing fort normal emerge.gif|Boom Boom (fortress) | ||
SMB3 Boom Boom fort dark hurt.gif|Boom Boom | SMB3 Boom Wing fort normal emerge unused.gif|Boom Boom (fortress, [[List of Super Mario Bros. 3 pre-release and unused content|unused]]) | ||
SMB3 Boom Boom fort light spikes.png|Boom Boom | SMB3 Boom Wing fort.gif|Boom Boom (fortress) | ||
Boom-boom.gif|Boom Boom | SMB3 Boom Wing fort hurt.gif|Boom Boom (fortress) | ||
SMB3 Boom Boom fort light hurt.gif|Boom Boom | SMB3 Boom Boom fort normal panic.gif|Boom Boom (fortress) | ||
SMB3 Boom Boom vehicle spikes.png|Boom Boom | SMB3 Boom Boom fort normal panic alt.gif|Boom Boom (fortress) | ||
SMB3 Boom Boom vehicle.gif|Boom Boom | SMB3 Boom Boom fort normal flash.gif|Boom Boom (fortress, {{file link|SMB3 Boom Boom flash diagram.png|alternatives}}) | ||
SMB3 Boom Boom vehicle hurt.gif|Boom Boom | SMB3 Boom Boom fort dark spikes.png|Boom Boom (desert fortress) | ||
SMB3 Boom Wing vehicle.gif|Boom Boom | SMB3 Boom Boom fort dark emerge.gif|Boom Boom (desert fortress) | ||
SMB3 Boom Wing vehicle hurt.gif|Boom Boom | GreyBoomBoom.gif|Boom Boom (desert fortress) | ||
SMB3 Boom Boom fort dark flail alt.gif|Boom Boom (desert fortress) | |||
SMB3 Boom Boom fort dark hurt.gif|Boom Boom (desert fortress) | |||
SMB3 Boom Boom fort dark jump.gif|Boom Boom (desert fortress) | |||
SMB3 Boom Boom fort dark panic.gif|Boom Boom (desert fortress) | |||
SMB3 Boom Boom fort dark panic alt.gif|Boom Boom (desert fortress) | |||
SMB3 Boom Boom fort light spikes.png|Boom Boom (ice fortress) | |||
SMB3 Boom Boom fort light emerge.gif|Boom Boom (ice fortress) | |||
Boom-boom.gif|Boom Boom (ice fortress) | |||
SMB3 Boom Boom fort light flail alt.gif|Boom Boom (ice fortress) | |||
SMB3 Boom Boom fort light hurt.gif|Boom Boom (ice fortress) | |||
SMB3 Boom Boom fort light jump.gif|Boom Boom (ice fortress) | |||
SMB3 Boom Boom fort light panic.gif|Boom Boom (ice fortress) | |||
SMB3 Boom Boom fort light panic alt.gif|Boom Boom (ice fortress) | |||
SMB3 Boom Boom vehicle spikes.png|Boom Boom (artillery) | |||
SMB3 Boom Boom vehicle emerge.gif|Boom Boom (artillery) | |||
SMB3 Boom Boom vehicle.gif|Boom Boom (artillery) | |||
SMB3 Boom Boom vehicle flail alt.gif|Boom Boom (artillery) | |||
SMB3 Boom Boom vehicle hurt.gif|Boom Boom (artillery) | |||
SMB3 Boom Boom vehicle jump.gif|Boom Boom (artillery) | |||
SMB3 Boom Wing vehicle emerge.gif|Boom Boom (artillery) | |||
SMB3 Boom Wing vehicle emerge unused.gif|Boom Boom (artillery) | |||
SMB3 Boom Wing vehicle.gif|Boom Boom (artillery) | |||
SMB3 Boom Wing vehicle hurt.gif|Boom Boom (artillery) | |||
SMB3 Boom Boom vehicle panic.gif|Boom Boom (artillery) | |||
SMB3 Boom Boom vehicle panic alt.gif|Boom Boom (artillery) | |||
SMB3 Larry static.png|[[Larry|Larry Koopa]] | |||
SMB3 Larry wandless walk.gif|Larry Koopa | |||
SMB3LarryKoopaSprite.gif|Larry Koopa | |||
SMB3 Larry wandless cast.gif|Larry Koopa | |||
SMB3 Larry wanded cast.gif|Larry Koopa | |||
SMB3 Larry wandless hit.gif|Larry Koopa | |||
SMB3 Larry wanded hit.gif|Larry Koopa | |||
SMB3 Larry spin.gif|Larry Koopa | |||
SMB3 Larry escape.gif|Larry Koopa | SMB3 Larry escape.gif|Larry Koopa | ||
SMB3 | SMB3 Morton static.png|[[Morton|Morton Koopa Jr.]] | ||
SMB3 Morton walk.gif| | SMB3 Morton wandless walk.gif|Morton Koopa Jr. | ||
SMB3 Morton walk.gif|Morton Koopa Jr. | |||
SMB3 Morton wandless cast.gif|Morton Koopa Jr. | |||
SMB3 Morton wanded cast.gif|Morton Koopa Jr. | |||
SMB3 Morton wandless hit.gif|Morton Koopa Jr. | |||
SMB3 Morton wanded hit.gif|Morton Koopa Jr. | |||
SMB3 Morton spin.gif|Morton Koopa Jr. | |||
SMB3 Morton escape.gif|Morton Koopa Jr. | SMB3 Morton escape.gif|Morton Koopa Jr. | ||
SMB3 | SMB3 Wendy static.png|[[Wendy|Wendy O. Koopa]] | ||
SMB3 Wendy wandless walk.gif|Wendy O. Koopa | |||
WendySMB3Ani.gif|Wendy O. Koopa | |||
SMB3 Wendy wandless cast.gif|Wendy O. Koopa | |||
SMB3 Wendy wanded cast.gif|Wendy O. Koopa | |||
SMB3 Wendy wandless hit.gif|Wendy O. Koopa | |||
SMB3 Wendy wanded hit.gif|Wendy O. Koopa | |||
SMB3 Wendy spin.gif|Wendy O. Koopa | |||
SMB3 Wendy escape.gif|Wendy O. Koopa | SMB3 Wendy escape.gif|Wendy O. Koopa | ||
SMB3 | SMB3 Iggy static.png|[[Iggy|Iggy Koopa]] | ||
SMB3 Iggy wandless walk.gif|Iggy Koopa | |||
IggySMB3Ani.gif|Iggy Koopa | |||
SMB3 Iggy wandless cast.gif|Iggy Koopa | |||
SMB3 Iggy wanded cast.gif|Iggy Koopa | |||
SMB3 Iggy wandless hit.gif|Iggy Koopa | |||
SMB3 Iggy wanded hit.gif|Iggy Koopa | |||
SMB3 Iggy spin.gif|Iggy Koopa | |||
SMB3 Iggy escape.gif|Iggy Koopa | SMB3 Iggy escape.gif|Iggy Koopa | ||
SMB3 | SMB3 Roy static.png|[[Roy|Roy Koopa]] | ||
SMB3 Roy Sprite.gif| | SMB3 Roy wandless walk.gif|Roy Koopa | ||
SMB3 Roy Sprite.gif|Roy Koopa | |||
SMB3 Roy wandless cast.gif|Roy Koopa | |||
SMB3 Roy wanded cast.gif|Roy Koopa | |||
SMB3 Roy wandless hit.gif|Roy Koopa | |||
SMB3 Roy wanded hit.gif|Roy Koopa | |||
SMB3 Roy spin.gif|Roy Koopa | |||
SMB3 Roy escape.gif|Roy Koopa | SMB3 Roy escape.gif|Roy Koopa | ||
SMB3 | SMB3 Lemmy static.png|[[Lemmy|Lemmy Koopa]] | ||
LemmySMB3Ani.gif| | SMB3 Lemmy wandless idle.gif|Lemmy Koopa | ||
SMB3 Lemmy wanded idle.gif|Lemmy Koopa | |||
SMB3 Lemmy wandless walk.gif|Lemmy Koopa | |||
LemmySMB3Ani.gif|Lemmy Koopa | |||
SMB3 Lemmy wandless hit.gif|Lemmy Koopa | |||
SMB3 Lemmy wanded hit.gif|Lemmy Koopa | |||
SMB3 Lemmy spin.gif|Lemmy Koopa | |||
SMB3 Lemmy escape.gif|Lemmy Koopa | SMB3 Lemmy escape.gif|Lemmy Koopa | ||
SMB3 | SMB3 Ludwig static.png|[[Ludwig|Ludwig von Koopa]] | ||
LudwigSMB3Ani.gif| | SMB3 Ludwig wandless walk.gif|Ludwig von Koopa | ||
LudwigSMB3Ani.gif|Ludwig von Koopa | |||
SMB3 Ludwig wandless cast.gif|Ludwig von Koopa | |||
SMB3 Ludwig wanded cast.gif|Ludwig von Koopa | |||
SMB3 Ludwig wandless hit.gif|Ludwig von Koopa | |||
SMB3 Ludwig wanded hit.gif|Ludwig von Koopa | |||
SMB3 Ludwig spin.gif|Ludwig von Koopa | |||
SMB3 Ludwig escape.gif|Ludwig von Koopa | SMB3 Ludwig escape.gif|Ludwig von Koopa | ||
BowserSMB3.png|[[Bowser]] | BowserSMB3.png|[[Bowser]] | ||
SMB3 Bowser hop.gif|Bowser | |||
SMB3 Bowser breath.gif|Bowser | |||
SMB3 Bowser crush.gif|Bowser | |||
SMB3 Bowser turn.gif|Bowser | |||
SMB3 Bowser credits.png|Bowser (credits){{class|bg4}} | SMB3 Bowser credits.png|Bowser (credits){{class|bg4}} | ||
</gallery> | </gallery> | ||
===Items=== | ===Items=== | ||
<gallery style="--bg:#B5EBF2;--bg1:#9290FF;--bg2:#FFCCC5;--bg3:#4240FF;--bg4:#F7D8A5;--bg5:#B3F3CC;--bg6:#C0DFFF" widths=64px heights=64px> | <gallery style="--bg:#B5EBF2;--bg1:#9290FF;--bg2:#FFCCC5;--bg3:#4240FF;--bg4:#F7D8A5;--bg5:#B3F3CC;--bg6:#C0DFFF;--darkbg:#B5EBF2;--darkbg1:#9290FF;--darkbg2:#FFCCC5;--darkbg3:#4240FF;--darkbg4:#F7D8A5;--darkbg5:#B3F3CC;--darkbg6:#C0DFFF" widths=64px heights=64px> | ||
SMB3 Coin tile normal.png|[[Coin]] (background layer, normal) | SMB3 Coin tile normal.png|[[Coin]] (background layer, normal) | ||
SMB3 Coin Sprite.gif|Coin (background layer, normal) | SMB3 Coin Sprite.gif|Coin (background layer, normal) | ||
| Line 703: | Line 873: | ||
SMB3 Pure White 1up Mushroom.png|1-Up Mushroom (ice-with-vine){{class|bg6}} | SMB3 Pure White 1up Mushroom.png|1-Up Mushroom (ice-with-vine){{class|bg6}} | ||
SMB3 Green Shell Sprite.png|[[Koopa Shell|Green Koopa Shell]] (land) | SMB3 Green Shell Sprite.png|[[Koopa Shell|Green Koopa Shell]] (land) | ||
SMB3 Koopa Shell green wobble land.gif|Green Koopa Shell (land) | |||
Green Koopa Shell SMB3.gif|Green Koopa Shell (land) | Green Koopa Shell SMB3.gif|Green Koopa Shell (land) | ||
SMB3 Koopa Shell green cave.png|Green Koopa Shell (cave){{class|blackbg}} | SMB3 Koopa Shell green cave.png|Green Koopa Shell (cave){{class|blackbg}} | ||
SMB3 Koopa Shell green cave wobble.gif|Green Koopa Shell (cave){{class|blackbg}} | |||
SMB3 Koopa Shell green cave.gif|Green Koopa Shell (cave){{class|blackbg}} | SMB3 Koopa Shell green cave.gif|Green Koopa Shell (cave){{class|blackbg}} | ||
SMB3 Red Shell Sprite.png|Red Koopa Shell (land) | SMB3 Red Shell Sprite.png|Red Koopa Shell (land) | ||
SMB3 Koopa Shell red land wobble.gif|Red Koopa Shell (land) | |||
Red shell smb3.gif|Red Koopa Shell (land) | Red shell smb3.gif|Red Koopa Shell (land) | ||
SMB3 Koopa Shell red cave.png|Red Koopa Shell (cave){{class|blackbg}} | SMB3 Koopa Shell red cave.png|Red Koopa Shell (cave){{class|blackbg}} | ||
SMB3 Koopa Shell red cave wobble.gif|Red Koopa Shell (cave){{class|blackbg}} | |||
SMB3 Koopa Shell red cave.gif|Red Koopa Shell (cave){{class|blackbg}} | SMB3 Koopa Shell red cave.gif|Red Koopa Shell (cave){{class|blackbg}} | ||
Giant Green Shell SMB3 sprite.png|(Green) [[big shell|Giant Shell]]{{class|bg5}} | Giant Green Shell SMB3 sprite.png|(Green) [[big shell|Giant Shell]]{{class|bg5}} | ||
SMB3 Giant Shell green land wobble.gif|(Green) Giant Shell{{class|bg5}} | |||
Giant Red Shell SMB3 sprite.png|(Red) Giant Shell{{class|bg5}} | Giant Red Shell SMB3 sprite.png|(Red) Giant Shell{{class|bg5}} | ||
SMB3 Giant Shell red land wobble.gif|(Red) Giant Shell{{class|bg5}} | |||
SMB3 Buzzy Shell title.png|[[Buzzy Shell]] (title){{class|bg4}} | SMB3 Buzzy Shell title.png|[[Buzzy Shell]] (title){{class|bg4}} | ||
SMB3BuzzyShell.png|Buzzy Shell (cave){{class|blackbg}} | SMB3BuzzyShell.png|Buzzy Shell (cave){{class|blackbg}} | ||
| Line 773: | Line 949: | ||
====Power-ups==== | ====Power-ups==== | ||
<gallery style="--bg:#B5EBF2;--bg1:#9290FF;--bg2:#FFCCC5;--bg3:#4240FF;--bg4:#F7D8A5;--bg5:#B3F3CC;--bg6:#C0DFFF" widths=64px heights=64px> | <gallery style="--bg:#B5EBF2;--bg1:#9290FF;--bg2:#FFCCC5;--bg3:#4240FF;--bg4:#F7D8A5;--bg5:#B3F3CC;--bg6:#C0DFFF;--darkbg:#B5EBF2;--darkbg1:#9290FF;--darkbg2:#FFCCC5;--darkbg3:#4240FF;--darkbg4:#F7D8A5;--darkbg5:#B3F3CC;--darkbg6:#C0DFFF" widths=64px heights=64px> | ||
SMB3 Super Mushroom sprite title.png|[[Super Mushroom]] (title){{class|bg4}} | SMB3 Super Mushroom sprite title.png|[[Super Mushroom]] (title){{class|bg4}} | ||
Mushroomsmb3.png|Super Mushroom (land) | Mushroomsmb3.png|Super Mushroom (land) | ||
| Line 812: | Line 988: | ||
===Objects=== | ===Objects=== | ||
<gallery style="--bg:#B5EBF2;--bg1:#9290FF;--bg2:#FFCCC5;--bg3:#4240FF;--bg4:#F7D8A5;--bg5:#B3F3CC;--bg6:#C0DFFF" widths=64px heights=64px> | <gallery style="--bg:#B5EBF2;--bg1:#9290FF;--bg2:#FFCCC5;--bg3:#4240FF;--bg4:#F7D8A5;--bg5:#B3F3CC;--bg6:#C0DFFF;--darkbg:#B5EBF2;--darkbg1:#9290FF;--darkbg2:#FFCCC5;--darkbg3:#4240FF;--darkbg4:#F7D8A5;--darkbg5:#B3F3CC;--darkbg6:#C0DFFF" widths=64px heights=64px> | ||
SMB3 Anchor ship.png|[[Anchor]] | SMB3 Anchor ship.png|[[Anchor]] | ||
SMB3 Coral sea pink.png|[[Coral]] (sea){{class|bg3}} | SMB3 Coral sea pink.png|[[Coral]] (sea){{class|bg3}} | ||
| Line 898: | Line 1,074: | ||
====Blocks and bricks==== | ====Blocks and bricks==== | ||
<gallery style="--bg:#B5EBF2;--bg1:#9290FF;--bg2:#FFCCC5;--bg3:#4240FF;--bg4:#F7D8A5;--bg5:#B3F3CC;--bg6:#C0DFFF;" widths=64px heights=64px> | <gallery style="--bg:#B5EBF2;--bg1:#9290FF;--bg2:#FFCCC5;--bg3:#4240FF;--bg4:#F7D8A5;--bg5:#B3F3CC;--bg6:#C0DFFF;--darkbg:#B5EBF2;--darkbg1:#9290FF;--darkbg2:#FFCCC5;--darkbg3:#4240FF;--darkbg4:#F7D8A5;--darkbg5:#B3F3CC;--darkbg6:#C0DFFF" widths=64px heights=64px> | ||
SMB3 Empty Block.png|[[Empty Block]] (background and sprite layers, normal) | SMB3 Empty Block.png|[[Empty Block]] (background and sprite layers, normal) | ||
SMB3 Empty Block tile cave.png|Empty Block (background layer, cave){{class|blackbg}} | SMB3 Empty Block tile cave.png|Empty Block (background layer, cave){{class|blackbg}} | ||
| Line 1,038: | Line 1,214: | ||
====Pipes==== | ====Pipes==== | ||
<gallery style="--bg:#B5EBF2;--bg1:#9290FF;--bg2:#FFCCC5;--bg3:#4240FF;--bg4:#F7D8A5;--bg5:#B3F3CC;--bg6:#C0DFFF;" widths=64px heights=64px> | <gallery style="--bg:#B5EBF2;--bg1:#9290FF;--bg2:#FFCCC5;--bg3:#4240FF;--bg4:#F7D8A5;--bg5:#B3F3CC;--bg6:#C0DFFF;--darkbg:#B5EBF2;--darkbg1:#9290FF;--darkbg2:#FFCCC5;--darkbg3:#4240FF;--darkbg4:#F7D8A5;--darkbg5:#B3F3CC;--darkbg6:#C0DFFF" widths=64px heights=64px> | ||
WarpPipeSMB3.png|[[Warp Pipe|Pipe]] (standard) | WarpPipeSMB3.png|[[Warp Pipe|Pipe]] (standard) | ||
SMB3 Pipe common horizontal.png|Pipe (standard) | SMB3 Pipe common horizontal.png|Pipe (standard) | ||
| Line 1,062: | Line 1,238: | ||
SMB3 Pipe sea vertical.png|Pipe (sea){{class|bg3}} | SMB3 Pipe sea vertical.png|Pipe (sea){{class|bg3}} | ||
SMB3 Pipe sea horizontal.png|Pipe (sea){{class|bg3}} | SMB3 Pipe sea horizontal.png|Pipe (sea){{class|bg3}} | ||
SMB3 Pipe sewer foreground vertical.png|Pipe (sewer){{class|blackbg}} | SMB3 Pipe sewer foreground vertical.png|Pipe (sewer and fortress){{class|blackbg}} | ||
SMB3 Pipe sewer foreground horizontal.png|Pipe (sewer){{class|blackbg}} | SMB3 Pipe sewer foreground horizontal.png|Pipe (sewer){{class|blackbg}} | ||
SMB3 Pipe sewer background vertical.png|Pipe (sewer){{class|blackbg}} | SMB3 Pipe sewer background vertical.png|Pipe (sewer){{class|blackbg}} | ||
| Line 1,090: | Line 1,266: | ||
====Platforms==== | ====Platforms==== | ||
<gallery style="--bg:#B5EBF2;--bg1:#9290FF;--bg2:#FFCCC5;--bg3:#4240FF;--bg4:#F7D8A5;--bg5:#B3F3CC;--bg6:#C0DFFF;" widths=64px heights=64px> | <gallery style="--bg:#B5EBF2;--bg1:#9290FF;--bg2:#FFCCC5;--bg3:#4240FF;--bg4:#F7D8A5;--bg5:#B3F3CC;--bg6:#C0DFFF;--darkbg:#B5EBF2;--darkbg1:#9290FF;--darkbg2:#FFCCC5;--darkbg3:#4240FF;--darkbg4:#F7D8A5;--darkbg5:#B3F3CC;--darkbg6:#C0DFFF" widths=64px heights=64px> | ||
SMB3 Bolt Lift.png|[[Bolt Lift]]{{class|bg4}} | SMB3 Bolt Lift.png|[[Bolt Lift]]{{class|bg4}} | ||
SMB3 Bolt Lift.gif|Bolt Lift{{class|bg4}} | SMB3 Bolt Lift.gif|Bolt Lift{{class|bg4}} | ||
| Line 1,183: | Line 1,359: | ||
===Background details=== | ===Background details=== | ||
<gallery style="--bg:#B5EBF2;--bg1:#9290FF;--bg2:#FFCCC5;--bg3:#4240FF;--bg4:#F7D8A5;--bg5:#B3F3CC;--bg6:#C0DFFF;" widths=64px heights=64px> | <gallery style="--bg:#B5EBF2;--bg1:#9290FF;--bg2:#FFCCC5;--bg3:#4240FF;--bg4:#F7D8A5;--bg5:#B3F3CC;--bg6:#C0DFFF;--darkbg:#B5EBF2;--darkbg1:#9290FF;--darkbg2:#FFCCC5;--darkbg3:#4240FF;--darkbg4:#F7D8A5;--darkbg5:#B3F3CC;--darkbg6:#C0DFFF" widths=64px heights=64px> | ||
SMB3 Bush general.png|Bush (plains and athletic) | SMB3 Bush general.png|Bush (plains and athletic) | ||
SMB3 Bush plains bonus.png|Bush (secret area){{class|blackbg}} | SMB3 Bush plains bonus.png|Bush (secret area){{class|blackbg}} | ||
| Line 1,269: | Line 1,445: | ||
SMB3 Puff hammer.gif|Puff (fireball or hammer disappearing) | SMB3 Puff hammer.gif|Puff (fireball or hammer disappearing) | ||
SMB3 Puff laser.gif|Puff (laser firing) | SMB3 Puff laser.gif|Puff (laser firing) | ||
SMB3 Puff Bowser.gif|Puff (Bowser's flame) | |||
SMB3 Shine item.gif|Shine (coin and card) | SMB3 Shine item.gif|Shine (coin and card) | ||
SMB3 Shine obstacle.gif|Shine (arcade fireball) | SMB3 Shine obstacle.gif|Shine (arcade fireball) | ||
| Line 1,328: | Line 1,505: | ||
SMB3 Map Stage 10.png|Stage 10 | SMB3 Map Stage 10.png|Stage 10 | ||
SMB3 Map Stage 10 alt.png|Stage 10 | SMB3 Map Stage 10 alt.png|Stage 10 | ||
SMB3 Map Rock 1-3.png|Rock (Worlds 1 and 3) | SMB3 Map Rock 1-3.png|[[Rock (map)|Rock]] (Worlds 1 and 3) | ||
SMB3 Map Rock 2.png|Rock (World 2) | SMB3 Map Rock 2.png|Rock (World 2) | ||
SMB3 Map Rock 4.png|Rock (World 4) | SMB3 Map Rock 4.png|Rock (World 4) | ||
| Line 1,350: | Line 1,527: | ||
SMB3 Map Lock 7.png|Locked Door (World 7) | SMB3 Map Lock 7.png|Locked Door (World 7) | ||
SMB3 Map Lock 8.png|Locked Door (World 8) | SMB3 Map Lock 8.png|Locked Door (World 8) | ||
SMB3 Map Bridge 1-3.png|Bridge (Worlds 1 and 3) | SMB3 Map Bridge 1-3.png|[[Bridge (Super Mario Bros. 3)|Bridge]] (Worlds 1 and 3) | ||
SMB3 Map Bridge 4.png|Bridge (World 4) | SMB3 Map Bridge 4.png|Bridge (World 4) | ||
SMB3 Map Bridge 5.png|Bridge (World 5) | SMB3 Map Bridge 5.png|Bridge (World 5) | ||
| Line 1,363: | Line 1,540: | ||
SMB3 Map Pipe 8.png|Pipe (World 8) | SMB3 Map Pipe 8.png|Pipe (World 8) | ||
SMB3 Map Pipe 9.png|Pipe (World 9) | SMB3 Map Pipe 9.png|Pipe (World 9) | ||
SMB3 Map Drawbridge vertical default 3.png|Drawbridge | SMB3 Map Drawbridge vertical default 3.png|[[Drawbridge]] | ||
SMB3 Map Drawbridge vertical alternate 3.png|Drawbridge | SMB3 Map Drawbridge vertical alternate 3.png|Drawbridge | ||
SMB3 Map Drawbridge horizontal default 3.png|Drawbridge | SMB3 Map Drawbridge horizontal default 3.png|Drawbridge | ||
SMB3 Map Drawbridge horizontal alternate 3.png|Drawbridge | SMB3 Map Drawbridge horizontal alternate 3.png|Drawbridge | ||
SMB3 Map Dock 3.png|Dock | SMB3 Map Dock 3.png|[[Boat (Super Mario Bros. 3)|Dock]] | ||
SMB3 Map Fort 1-3.png|[[Fortress]] (Worlds 1 and 3) | SMB3 Map Fort 1-3.png|[[Fortress]] (Worlds 1 and 3) | ||
SMB3 Map Fort 2.png|Fortress (World 2) | SMB3 Map Fort 2.png|Fortress (World 2) | ||
| Line 1,407: | Line 1,584: | ||
AirForceSMB3.gif|Air Force{{class|graybg}} | AirForceSMB3.gif|Air Force{{class|graybg}} | ||
SMB3 Map Hand.gif|[[World 8-Hand Traps|Hand]]{{class|graybg}} | SMB3 Map Hand.gif|[[World 8-Hand Traps|Hand]]{{class|graybg}} | ||
Boat.gif|Boat{{class|graybg}} | Boat.gif|[[Boat (Super Mario Bros. 3)|Boat]]{{class|graybg}} | ||
SMB3 Map Spark.gif|Spark{{class|graybg}} | SMB3 Map Spark.gif|Spark{{class|graybg}} | ||
SMB3 Map Help.gif|Help{{class|graybg}} | SMB3 Map Help.gif|Help{{class|graybg}} | ||
| Line 1,547: | Line 1,724: | ||
===On-screen text=== | ===On-screen text=== | ||
<gallery style="--bg:#B5EBF2" widths=64px heights=64px> | <gallery style="--bg:#B5EBF2;--darkbg:#B5EBF2" widths=64px heights=64px> | ||
SMB3 Points 100 land.png|100 [[point]]s (land) | SMB3 Points 100 land.png|100 [[point]]s (land) | ||
SMB3 Points 200 land.png|200 points (land) | SMB3 Points 200 land.png|200 points (land) | ||
| Line 1,582: | Line 1,759: | ||
SMB3 5up battle.png|5UP (battle game){{class|blackbg}} | SMB3 5up battle.png|5UP (battle game){{class|blackbg}} | ||
</gallery> | </gallery> | ||
<gallery style="--bg:#B5EBF2;--bg1:#9290FF;--bg2:#FFCCC5;--bg3:#4240FF;--bg4:#F7D8A5;--bg5:#B3F3CC;--bg6:#C0DFFF;" widths=144px heights=32px> | <gallery style="--bg:#B5EBF2;--bg1:#9290FF;--bg2:#FFCCC5;--bg3:#4240FF;--bg4:#F7D8A5;--bg5:#B3F3CC;--bg6:#C0DFFF;--darkbg:#B5EBF2;--darkbg1:#9290FF;--darkbg2:#FFCCC5;--darkbg3:#4240FF;--darkbg4:#F7D8A5;--darkbg5:#B3F3CC;--darkbg6:#C0DFFF" widths=144px heights=32px> | ||
SMB3 Pause land.png|Pause (land) | SMB3 Pause land.png|Pause (land) | ||
SMB3 Pause cave.png|Pause (cave){{class|blackbg}} | SMB3 Pause cave.png|Pause (cave){{class|blackbg}} | ||
| Line 1,612: | Line 1,789: | ||
===Miscellaneous unused graphics=== | ===Miscellaneous unused graphics=== | ||
<gallery style="--bg:#B5EBF2;--bg1:#9290FF;--bg2:#FFCCC5;--bg3:#4240FF;--bg4:#F7D8A5;--bg5:#B3F3CC;--bg6:#C0DFFF;" widths=64px heights=64px> | <gallery style="--bg:#B5EBF2;--bg1:#9290FF;--bg2:#FFCCC5;--bg3:#4240FF;--bg4:#F7D8A5;--bg5:#B3F3CC;--bg6:#C0DFFF;--darkbg:#B5EBF2;--darkbg1:#9290FF;--darkbg2:#FFCCC5;--darkbg3:#4240FF;--darkbg4:#F7D8A5;--darkbg5:#B3F3CC;--darkbg6:#C0DFFF" widths=64px heights=64px> | ||
SMB3 Unused wobble bridge anim.gif|Bridge (general) | SMB3 Unused wobble bridge anim.gif|Bridge (general) | ||
SMB3 Unused particle anim.gif|Particles (general){{class|blackbg}} | SMB3 Unused particle anim.gif|Particles (general){{class|blackbg}} | ||
Revision as of 01:55, April 1, 2025
Mario and Luigi

Small Mario standing

Small Mario walking

Small Mario running

Small Mario jumping

Small Mario dashing

Small Mario jumping after a dash

Small Mario skidding

Small Mario entering a vertical pipe

Small Mario spinning

Small Mario carrying something

Small Mario walking while carrying something

Small Mario running while carrying something

Small Mario jumping while carrying something

Small Mario dashing while carrying something

Small Mario kicking

Small Mario sliding

Small Mario swimming

Small Mario swimming forward

Small Mario stroking

Small Mario climbing

Small Mario losing a life

Small Mario becoming Super Mario

Small Mario in Kuribo's shoe

Small Luigi standing

Small Luigi standing (alternate palette)

Small Luigi walking

Small Luigi running

Small Luigi jumping

Small Luigi jumping (alternate palette)

Small Luigi dashing

Small Luigi jumping after a dash

Small Luigi skidding

Small Luigi entering a vertical pipe

Small Luigi spinning

Small Luigi carrying something

Small Luigi walking while carrying something

Small Luigi running while carrying something

Small Luigi jumping while carrying something

Small Luigi dashing while carrying something

Small Luigi kicking

Small Luigi sliding

Small Luigi swimming

Small Luigi swimming forward

Small Luigi stroking

Small Luigi climbing

Small Luigi losing a life

Small Luigi becoming Super Luigi

Invincible Small Luigi (alternatives)

Small Luigi in Kuribo's shoe

Super Mario standing

Super Mario walking

Super Mario running

Super Mario crouching

Super Mario jumping

Super Mario falling after a jump

Super Mario dashing

Super Mario jumping after a dash

Super Mario skidding

Super Mario entering a vertical pipe

Super Mario spinning

Super Mario carrying something

Super Mario walking while carrying something

Super Mario running while carrying something

Super Mario jumping while carrying something

Super Mario dashing while carrying something

Super Mario kicking

Super Mario sliding

Super Mario swimming

Super Mario swimming forward

Super Mario stroking

Super Mario climbing

Super Mario somersaulting

Super Mario becoming Small Mario

Super Mario becoming Fire Mario (alternatives)

Super Mario being bonked in the intro

Super Mario looking up in the intro

Super Mario swimming in the credits

Invincible Super Mario (alternatives)

Super Mario in Kuribo's shoe

Super Luigi standing

Super Luigi standing (alternate palette)

Super Luigi walking

Super Luigi running

Super Luigi crouching

Super Luigi jumping

Super Luigi falling after a jump

Super Luigi falling after a jump (alternate palette)

Super Luigi dashing

Super Luigi jumping after a dash

Super Luigi skidding

Super Luigi entering a vertical pipe

Super Luigi spinning

Super Luigi carrying something

Super Luigi walking while carrying something

Super Luigi running while carrying something

Super Luigi jumping while carrying something

Super Luigi dashing while carrying something

Super Luigi kicking

Super Luigi sliding

Super Luigi swimming

Super Luigi swimming forward

Super Luigi stroking

Super Luigi climbing

Super Luigi somersaulting

Super Luigi becoming Small Luigi

Super Luigi becoming Fire Luigi (alternatives)

Invincible Super Luigi (alternatives)

Super Luigi in Kuribo's shoe

Fire Mario/Luigi standing

Fire Mario/Luigi walking

Fire Mario/Luigi running

Fire Mario/Luigi crouching

Fire Mario/Luigi jumping

Fire Mario/Luigi falling after a jump

Fire Mario/Luigi dashing

Fire Mario/Luigi jumping after a dash

Fire Mario/Luigi skidding

Fire Mario/Luigi entering a vertical pipe

Fire Mario/Luigi spinning

Fire Mario/Luigi carrying something

Fire Mario/Luigi walking while carrying something

Fire Mario/Luigi running while carrying something

Fire Mario/Luigi jumping while carrying something

Fire Mario/Luigi dashing while carrying something

Fire Mario/Luigi kicking

Fire Mario/Luigi sliding

Fire Mario/Luigi swimming

Fire Mario/Luigi swimming forward

Fire Mario/Luigi stroking

Fire Mario/Luigi climbing

Fire Mario/Luigi somersaulting

Fire Mario/Luigi throwing

Invincible Fire Mario/Luigi (alternatives)

Fire Mario/Luigi in Kuribo's shoe

Fireball (normal)

Fireball (artillery boss)

Fireball (Mushroom House)

Raccoon Mario standing

Raccoon Mario walking

Raccoon Mario running

Raccoon Mario crouching

Raccoon Mario jumping

Raccoon Mario floating

Raccoon Mario falling after a jump

Raccoon Mario dashing

Raccoon Mario flying

Raccoon Mario falling after flight

Raccoon Mario skidding

Raccoon Mario entering a vertical pipe

Raccoon Mario spinning

Raccoon Mario carrying something

Raccoon Mario walking while carrying something

Raccoon Mario running while carrying something

Raccoon Mario jumping or flying while carrying something

Raccoon Mario dashing while carrying something

Raccoon Mario kicking

Raccoon Mario sliding

Raccoon Mario swimming

Raccoon Mario swimming forward

Raccoon Mario stroking

Raccoon Mario climbing

Raccoon Mario somersaulting

Invincible Raccoon Mario (alternatives)

Raccoon Mario in Kuribo's shoe

Raccoon Luigi standing

Raccoon Luigi standing (alternate palette)

Raccoon Luigi walking

Raccoon Luigi running

Raccoon Luigi crouching

Raccoon Luigi jumping

Raccoon Luigi floating

Raccoon Luigi falling after a jump

Raccoon Luigi falling after a jump (alternate palette)

Raccoon Luigi dashing

Raccoon Luigi flying

Raccoon Luigi falling after flight

Raccoon Luigi skidding

Raccoon Luigi entering a vertical pipe

Raccoon Luigi spinning

Raccoon Luigi carrying something

Raccoon Luigi walking while carrying something

Raccoon Luigi running while carrying something

Raccoon Luigi jumping or flying while carrying something

Raccoon Luigi dashing while carrying something

Raccoon Luigi kicking

Raccoon Luigi sliding

Raccoon Luigi swimming

Raccoon Luigi swimming forward

Raccoon Luigi stroking

Raccoon Luigi climbing

Raccoon Luigi somersaulting

Invincible Raccoon Luigi (alternatives)

Raccoon Luigi in Kuribo's shoe

Frog Mario/Luigi standing

Frog Mario/Luigi walking

Frog Mario/Luigi running

Frog Mario/Luigi jumping

Frog Mario/Luigi entering a vertical pipe

Frog Mario/Luigi entering a vertical pipe (unused)

Frog Mario/Luigi spinning (unused)

Frog Mario/Luigi carrying something

Frog Mario/Luigi walking while carrying something

Frog Mario/Luigi running while carrying something

Frog Mario/Luigi jumping while carrying something

Frog Mario/Luigi dashing while carrying something

Frog Mario/Luigi kicking

Frog Mario/Luigi swimming

Frog Mario/Luigi swimming upward

Frog Mario/Luigi stroking upward

Frog Mario/Luigi swimming downward

Frog Mario/Luigi stroking downward

Frog Mario/Luigi swimming forward

Frog Mario/Luigi stroking forward

Frog Mario/Luigi climbing

Invincible Frog Mario/Luigi (alternatives)

Frog Mario/Luigi in Kuribo's shoe

Tanooki Mario/Luigi standing

Tanooki Mario/Luigi walking

Tanooki Mario/Luigi running

Tanooki Mario/Luigi crouching

Tanooki Mario/Luigi jumping

Tanooki Mario/Luigi floating

Tanooki Mario/Luigi falling after a jump

Tanooki Mario/Luigi dashing

Tanooki Mario/Luigi flying

Tanooki Mario/Luigi falling after flight

Tanooki Mario/Luigi skidding

Tanooki Mario/Luigi entering a vertical pipe

Tanooki Mario/Luigi spinning

Tanooki Mario/Luigi switching to Statue Mario/Luigi

Tanooki Mario/Luigi carrying something

Tanooki Mario/Luigi walking while carrying something

Tanooki Mario/Luigi running while carrying something

Tanooki Mario/Luigi jumping or flying while carrying something

Tanooki Mario/Luigi dashing while carrying something

Tanooki Mario/Luigi kicking

Tanooki Mario/Luigi sliding

Tanooki Mario/Luigi swimming

Tanooki Mario/Luigi swimming forward

Tanooki Mario/Luigi stroking

Tanooki Mario/Luigi climbing

Tanooki Mario/Luigi somersaulting

Invincible Tanooki Mario/Luigi (alternatives)

Tanooki Mario/Luigi in Kuribo's shoe

Statue Mario/Luigi standing

Invincible Statue Mario/Luigi (alternatives)

Statue Mario/Luigi in Kuribo's shoe (glitch)

Hammer Mario/Luigi standing

Hammer Mario/Luigi standing (alternate palette)

Hammer Mario/Luigi walking

Hammer Mario/Luigi running

Hammer Mario/Luigi crouching

Hammer Mario/Luigi crouching (alternate palette)

Hammer Mario/Luigi jumping

Hammer Mario/Luigi falling after a jump

Hammer Mario/Luigi falling after a jump (alternate palette)

Hammer Mario/Luigi dashing

Hammer Mario/Luigi jumping after a dash

Hammer Mario/Luigi skidding

Hammer Mario/Luigi entering a vertical pipe

Hammer Mario/Luigi spinning (unused)

Hammer Mario/Luigi carrying something

Hammer Mario/Luigi walking while carrying something

Hammer Mario/Luigi running while carrying something

Hammer Mario/Luigi jumping while carrying something

Hammer Mario/Luigi dashing while carrying something

Hammer Mario/Luigi kicking

Hammer Mario/Luigi sliding

Hammer Mario/Luigi swimming

Hammer Mario/Luigi swimming forward

Hammer Mario/Luigi stroking

Hammer Mario/Luigi climbing

Hammer Mario/Luigi somersaulting

Hammer Mario/Luigi throwing

Invincible Hammer Mario/Luigi (alternatives)

Hammer Mario/Luigi in Kuribo's shoe

Hammer

Battle Mode Mario standing

Battle Mode Mario walking

Battle Mode Mario running

Battle Mode Mario jumping

Battle Mode Mario being stomped

Battle Mode Mario skidding

Battle Mode Mario kicking

Battle Mode Mario losing

Battle Mode Mario climbing

Battle Mode Mario being stomped (unused)

Battle Mode Luigi standing

Battle Mode Luigi walking

Battle Mode Luigi running

Battle Mode Luigi jumping

Battle Mode Luigi being stomped

Battle Mode Luigi skidding

Battle Mode Luigi kicking

Battle Mode Luigi losing

Battle Mode Luigi climbing

Battle Mode Luigi being stomped (unused)


Overworld map sprites

Small Mario

Small Mario (unused)

Small Mario (unused)

Invincible Small Mario (alternatives)

Small Luigi

Small Luigi (unused)

Small Luigi (unused)

Invincible Small Luigi (alternatives)

Invincible Super Mario (alternatives)

Invincible Super Luigi (alternatives)

Invincible Fire Mario/Luigi (alternatives)

Invincible Raccoon Mario (alternatives)

Invincible Raccoon Luigi (alternatives)

Raccoon Mario with a P-Wing

Invincible Raccoon Mario with a P-Wing (alternatives)

Raccoon Luigi with a P-Wing

Invincible Raccoon Luigi with a P-Wing (alternatives)

Invincible Frog Mario/Luigi (alternatives)

Invincible Tanooki Mario/Luigi (alternatives)

Invincible Hammer Mario/Luigi (alternatives)

Invincible Jugem's Cloud (alternatives)


Map popup sprites
Small Mario

Small Luigi


Minigame lobby

Small Luigi

Small Mario (unused)

Small Luigi (unused)

Super Luigi

Raccoon Luigi
Non-playable characters

Princess Toadstool

Princess Toadstool

Princess Toadstool (letter)

Princess Toadstool (letter)

Toad

Toad

Toad (game lobby)

Koopa Troopa (game lobby, unused)

Hammer Brother (game lobby, unused)

King of Grass Land (transformed)

King of Grass Land (transformed)

King of Grass Land (transformed)

King of Grass Land

King of Grass Land

King of Grass Land

King of Grass Land (unused)

King of Grass Land (unused)

King of Desert Land (transformed)

King of Desert Land (transformed)

King of Desert Land

King of Desert Land

King of Desert Land

King of Water Land (transformed)

King of Water Land (transformed)

King of Water Land (transformed)

King of Water Land

King of Water Land

King of Water Land

King of Giant Land (transformed)

King of Giant Land (transformed)

King of Giant Land (transformed)

King of Giant Land

King of Giant Land

King of Giant Land

King of Sky Land (transformed)

King of Sky Land (transformed)

King of Sky Land (transformed)

King of Sky Land

King of Sky Land

King of Sky Land

King of Ice Land (transformed)

King of Ice Land (transformed)

King of Ice Land

King of Ice Land

King of Ice Land

King of Pipe Land (transformed)

King of Pipe Land (transformed)

King of Pipe Land (transformed)

King of Pipe Land

King of Pipe Land

King of Pipe Land


Enemies

Little Goomba (title)

Little Goomba (title)

Little Goomba (title)

Little Goomba (land)

Little Goomba (land)

Little Goomba (land)

Little Goomba (cave)

Little Goomba (cave)

Little Goomba (cave)

Red Goomba (land)

Red Goomba (land)

Red Goomba (land)

Little Goomba (credits)

Little Goomba (credits, unused)

Para-Goomba (land)

Para-Goomba (land)

Para-Goomba (land)

Para-Goomba (land)

Para-Goomba (cave)

Para-Goomba (cave)

Para-Goomba (cave)

Para-Goomba (cave)

Red Para-Goomba (land)

Red Para-Goomba (land)

Red Para-Goomba (land)

Red Para-Goomba (land)

Mugger Micro-Goomba (land)

Mugger Micro-Goomba (land)

Mugger Micro-Goomba (cave)

Mugger Micro-Goomba (cave)

Pile Driver Micro-Goomba (land)

Pile Driver Micro-Goomba (land)

Pile Driver Micro-Goomba (land)

Grand Goomba (land)

Grand Goomba (land)

Grand Goomba (land)

Kuribo's Goomba (land)

Kuribo's Goomba (land)

Green Koopa Troopa (title)

Green Koopa Troopa (title)

Green Koopa Troopa (title)

Green Koopa Troopa (land)

Green Koopa Troopa (land)

Green Koopa Troopa (land)

Green Koopa Troopa (cave)

Green Koopa Troopa (cave)

Green Koopa Troopa (cave)

Red Koopa Troopa (land)

Red Koopa Troopa (land)

Red Koopa Troopa (land)

Red Koopa Troopa (cave)

Red Koopa Troopa (cave)

Red Koopa Troopa (cave)

Koopa Troopa (credits)

Green Koopa Paratroopa (land)

Green Koopa Paratroopa (land)

Green Koopa Paratroopa (land)

Green Koopa Paratroopa (cave)

Green Koopa Paratroopa (cave)

Green Koopa Paratroopa (cave)

Red Koopa Paratroopa (land)

Red Koopa Paratroopa (land)

Red Koopa Paratroopa (cave)

Red Koopa Paratroopa (cave)

Green Gargantua Koopa Troopa (land)

Green Gargantua Koopa Troopa (land)

Red Giant Koopa Troopa (land)

Red Giant Koopa Troopa (land)

Colossal Koopa Paratroopa (land)

Colossal Koopa Paratroopa (land)

Dry Bones (fortress)

Dry Bones (fortress)

Dry Bones (fortress)

Dry Bones (fortress)

Dry Bones (desert fortress)

Dry Bones (desert fortress)

Dry Bones (desert fortress)

Dry Bones (desert fortress)

Dry Bones (cave fortress)

Dry Bones (cave fortress)

Dry Bones (cave fortress)

Dry Bones (cave fortress)

Dry Bones (ice fortress)

Dry Bones (ice fortress)

Dry Bones (ice fortress)

Dry Bones (ice fortress)

Hammer Brother (land)

Hammer Brother (land)

Hammer Brother (land)

Hammer Brother (cave)

Boomerang Brother (land)

Boomerang Brother (land)

Boomerang Brother (land)

Boomerang Brother (cave)

Boomerang Brother (cave)

Boomerang Brother (artillery)

Boomerang Brother (artillery)

Boomerang Brother (artillery)

Fire Brother (land)

Fire Brother (land)

Fire Brother (land)

Fire Brother (land)

Sledge Brother (land)

Sledge Brother (land)

Sledge Brother (cave)

Buzzy Beetle

Upside-down Buzzy Beetle

Buster Beetle

Para-Beetle

Para-Beetle (unused)

Green Spiny Egg

Spiny Egg

Spiny

Upside-down Spiny

Rocky Wrench

Rocky Wrench

Rocky Wrench

Spike

Piranha Plant

Piranha Plant

Piranha Plant

Green Piranha Plant

Green Piranha Plant

Green Piranha Plant

Green Piranha Plant

Venus Fire Trap

Green Venus Fire Trap

Green Piranhacus Giganticus

Ptooie

Muncher (normal)

Muncher (normal)

Muncher (cave)

Muncher (cave)

Muncher (ice)

Muncher (ice)

Muncher (frozen)

Muncher (outside pipes)

Muncher (outside pipes)

Muncher (inside pipes)

Muncher (inside pipes)

Roto-Disc

Missile Bill (alternatives)

Missile Bill (alternatives)

Missile Bill (alternatives)

Missile Bill (alternatives)

Missile Bill (alternatives)

Green Cheep-Cheep

Green Cheep-Cheep

Cheep-Cheep (unused)

Boss Bass (credits)

"Boo" Diddly

Stretch

Thwomp

Thwomp

Angry Sun

Chain Chomp

Chain Chomp

Bloober

Bloober with kids

Scattering Bloober

Lava Lotus

Jelectro (sea)

Jelectro (sea)

Jelectro (ice - unused)

Jelectro (ice - unused)

Bob-omb

Bob-omb (keyless)

Hot Foot

Spiny

Spiny

Crab

Crab

Crab

Fighter Fly


Obstacles

Boomerang (land)

Boomerang (cave)

Bowser's flame

Bowser's flame (credits)

Candle

Candy ring

Cannon

Cannon

Cannon

Diagonal cannon

Hammer (land)

Hammer (cave)

Lava

Magical ball

Magical ball (alternatives)

Quartet-cannon

Quartet-cannon

Quicksand

Rocket Engine

Rocket Engine

Roto-Disc cog

Roto-Disc cog

Roto-Disc cog

Spell

Spikes (fortress)

Spikes (fortress)

Spikes (fortress)

Spikes (fortress)

Spikes (desert fortress)

Spikes (desert fortress)

Spikes (sewer)

Spikes (sewer)

Stretch platform

Tornado

Turtle Cannon

Turtle Cannon

Turtle Cannon

Turtle Cannon

Turtle Cannon

Turtle Cannon (airship)

Turtle Cannon (airship)


Bosses

Boom Boom (fortress)

Boom Boom (fortress)

Boom Boom (fortress)

Boom Boom (fortress)

Boom Boom (fortress)

Boom Boom (fortress)

Boom Boom (fortress)

Boom Boom (fortress, unused)

Boom Boom (fortress)

Boom Boom (fortress)

Boom Boom (fortress)

Boom Boom (fortress)

Boom Boom (fortress, alternatives)

Boom Boom (desert fortress)

Boom Boom (desert fortress)

Boom Boom (desert fortress)

Boom Boom (desert fortress)

Boom Boom (desert fortress)

Boom Boom (desert fortress)

Boom Boom (desert fortress)

Boom Boom (desert fortress)

Boom Boom (ice fortress)

Boom Boom (ice fortress)

Boom Boom (ice fortress)

Boom Boom (ice fortress)

Boom Boom (ice fortress)

Boom Boom (ice fortress)

Boom Boom (ice fortress)

Boom Boom (ice fortress)

Boom Boom (artillery)

Boom Boom (artillery)

Boom Boom (artillery)

Boom Boom (artillery)

Boom Boom (artillery)

Boom Boom (artillery)

Boom Boom (artillery)

Boom Boom (artillery)

Boom Boom (artillery)

Boom Boom (artillery)

Boom Boom (artillery)

Boom Boom (artillery)

Larry Koopa

Larry Koopa

Larry Koopa

Larry Koopa

Larry Koopa

Larry Koopa

Larry Koopa

Larry Koopa

Morton Koopa Jr.

Morton Koopa Jr.

Morton Koopa Jr.

Morton Koopa Jr.

Morton Koopa Jr.

Morton Koopa Jr.

Morton Koopa Jr.

Morton Koopa Jr.

Wendy O. Koopa

Wendy O. Koopa

Wendy O. Koopa

Wendy O. Koopa

Wendy O. Koopa

Wendy O. Koopa

Wendy O. Koopa

Wendy O. Koopa

Iggy Koopa

Iggy Koopa

Iggy Koopa

Iggy Koopa

Iggy Koopa

Iggy Koopa

Iggy Koopa

Iggy Koopa

Roy Koopa

Roy Koopa

Roy Koopa

Roy Koopa

Roy Koopa

Roy Koopa

Roy Koopa

Roy Koopa

Lemmy Koopa

Lemmy Koopa

Lemmy Koopa

Lemmy Koopa

Lemmy Koopa

Lemmy Koopa

Lemmy Koopa

Lemmy Koopa

Ludwig von Koopa

Ludwig von Koopa

Ludwig von Koopa

Ludwig von Koopa

Ludwig von Koopa

Ludwig von Koopa

Ludwig von Koopa

Ludwig von Koopa

Bowser

Bowser

Bowser

Bowser

Bowser (credits)


Items

Coin (background layer, normal)

Coin (background layer, normal)

Coin (background layer, cave)

Coin (background layer, cave)

Coin (background layer, fortress)

Coin (background layer, fortress)

Coin (background layer, ice)

Coin (background layer, ice)

Coin (background layer, sea - unused)

Coin (background layer, ice - unused)

Coin (background layer, Battle Mode - unused)

Coin (background layer, Treasure Ship)

Coin (sprite layer, land)

Coin (sprite layer, cave)

Coin (sprite layer, fortress)

Coin (sprite layer, sea)

Coin (sprite layer, cave fortress)

Coin (sprite layer, Battle Mode)

1-Up Mushroom (land)

1-Up Mushroom (cave)

1-Up Mushroom (fortress)

1-Up Mushroom (airship/artillery)

1-Up Mushroom (ice-with-vine)

Green Koopa Shell (land)

Green Koopa Shell (land)

Green Koopa Shell (land)

Green Koopa Shell (cave)

Green Koopa Shell (cave)

Green Koopa Shell (cave)

Red Koopa Shell (land)

Red Koopa Shell (land)

Red Koopa Shell (land)

Red Koopa Shell (cave)

Red Koopa Shell (cave)

Red Koopa Shell (cave)

(Green) Giant Shell

(Green) Giant Shell

(Red) Giant Shell

(Red) Giant Shell

Buzzy Shell (title)

Buzzy Shell (cave)

Buzzy Shell (cave)

Spiny Shell (land)

Spiny Shell (land)

Spiny Shell (cave)

Spiny Shell (cave)

White Block (background layer)

White Block (background layer)

White Block (sprite layer, land; held by player) (alternatives)

White Block (sprite layer, land; held by Buster Beetle) (alternatives)

White Block (sprite layer, land; thrown) (alternatives)

Goomba's shoe

Goomba's shoe (loss in Japanese version)

Card (Mushroom)

Card (Mushroom)

Card (Mushroom)

Card (Mushroom, unused)

Card (Flower)

Card (Flower)

Card (Flower)

Card (Flower, unused)

Card (Star)

Card (Star)

Card (Star)

Card (Star, unused)

Card (glitch)

Card (glitch)

Magic ball (fortress)

Magic ball (desert fortress)

Magic ball (ice fortress)

Magic ball (airship/artillery)

Magic Wand (Larry)

Magic Wand (Larry) (alternatives)

Magic Wand (Morton)

Magic Wand (Morton)

Magic Wand (Wendy)

Magic Wand (Wendy)

Magic Wand (Iggy)

Magic Wand (Iggy)

Magic Wand (Roy)

Magic Wand (Roy)

Magic Wand (Lemmy)

Magic Wand (Lemmy)

Magic Wand (Ludwig)

Magic Wand (Ludwig)

Magic Wand (king)

Magic Wand (king)

Magic Wand (Ice Land king)

Magic Wand (Ice Land king)


Power-ups

Super Mushroom (title)

Super Mushroom (land)

Super Mushroom (cave)

Super Mushroom (fortress)

Fire Flower (land)

Fire Flower (cave)

Fire Flower (fortress)

Fire Flower (airship/artillery)

Fire Flower (cave fortress)

Fire Flower (ice-with-vine)

Fire Flower (beaten enemy course)

Fire Flower (inventory)

Fire Flower (minigame lobby and credits - unused)

Super Leaf (title and land)

Super Leaf (cave)

Super Leaf (fortress)

Super Leaf (inventory)

Starman (title and inventory)
Starman (land) (alternatives)

Starman (cave) (alternatives)

Starman (fortress) (alternatives)

Frog Suit (loss in Japanese version, land)

Frog Suit (loss in Japanese version, cave)

Frog Suit (loss in Japanese version, fortress)

Tanooki Suit (inventory)

Tanooki Suit (loss in Japanese version, land)

Tanooki Suit (loss in Japanese version, cave)

Tanooki Suit (loss in Japanese version, fortress)

Hammer Suit (inventory)

Hammer Suit (loss in Japanese version, land)

Hammer Suit (loss in Japanese version, cave)

Hammer Suit (loss in Japanese version, fortress)


Objects

Coral (sea)

Coral (sea)

Coral (giant)

Door (background layer, plains)

Door (background layer, fortress)

Door (background layer, desert, cave, and ice fortress)

Door (background layer, desert fortress)

Door (background layer, sewer)

Door (background layer, Bowser's Castle)

Door (sprite layer, Bowser's Castle)

Fireworks

Fireworks

Fireworks

Fireworks

Fireworks

Goal (background layer)

Goal (sprite layer, land)

Goal (sprite layer, desert-with-vine)

Goal (sprite layer, ice-with-vine)

Goal (sprite layer, cave)

Goal (assembled)

Nut

Nut

Rail (athletic)

Rail (ice)

Rail (fortress)

Rail motor (athletic)

Rail motor (athletic)

Rail motor (ice)

Rail motor (ice)

Screw

Screw

Treasure chest (background layer)

Treasure chest (background layer)

Treasure chest (sprite layer)

Treasure chest (sprite layer)

Treasure chest (sprite layer - unused)

Vine (background layer, normal)

Vine (background layer, normal)

Vine (background layer, desert)

Vine (background layer, desert)

Vine (background layer, cloud)

Vine (background layer, cloud)

Vine (background layer, ice)

Vine (background layer, ice)

Vine (sprite layer, normal)

Vine (sprite layer, desert)

Vine (sprite layer, cloud)

Vine (sprite layer, ice)

Water (desert)

Water (hills)

Water (cave)

Water (cave)

Water (ice cave)

Water (plains, desert, and giant)

Water (plains, desert, and giant; static)

Water / Tide (secret area and plains)

Water (secret area, static)

Water / Tide (plains; static)

Water / Tide (hills)

Water / Tide (hills, static)

Water (athletic)

Water (athletic, static)

Water (ice)

Water (giant)

Water (sewer)

Water (fortress)

Water (sea)

Water (artillery)

Waterfall (giant)

Waterfall (giant)

Waterfall (cave)

Waterfall (cave)

Waterfall (cloud)

Waterfall (cloud)

Waterfall (sewer - unused)

Waterfall (sewer - unused)


Blocks and bricks

Empty Block (background and sprite layers, normal)

Empty Block (background layer, cave)

Empty Block (background and sprite layers, fortress)

Empty Block (background layer, desert fortress)

Empty Block (background layer, Treasure Ship)

Empty Block (sprite layer, cave)

Empty Block (sprite layer, desert fortress)

Empty Block (sprite layer, ice fortress)

Empty Block (sprite layer, Bowser's Castle)

Empty Block (sprite layer, Battle game)

(Large) Empty Block (background layer)

(Large) Empty Block (sprite layer, bumped)

(Large) Empty Block (sprite layer, secret area)

Vine Block
Brick (background and sprite layers, normal)

Brick (background layer, normal)

Brick (background layer, cave)

Brick (background layer, cave)

Brick (background and sprite layers, fortress)

Brick (background layer, fortress)

Brick (background layer, desert fortress)

Brick (background layer, desert fortress)

Brick (background layer, ice)

Brick (background layer, ice)

Brick (sprite layer, cave)

Big Block (background layer)

Big Block (sprite layer)

? Block (background layer, normal)

? Block (background layer, normal)

? Block (background layer, cave)

? Block (background layer, cave)

? Block (background layer, fortress)

? Block (background layer, fortress)

? Block (background layer, ice)

? Block (background layer, ice)

? Block (background layer, ice fortress)

? Block (background layer, ice fortress)

? Block (background layer, artillery)

? Block (background layer, battle game)

Mega ? Block (background layer)

Mega ? Block (sprite layer)

Hard Block (background layer, plains, desert, and giant)

Hard Block (background layer, secret area)

Hard Block (background layer, plains)

Hard Block (background layer, maze)

Hard Block (background layer, trap)

Hard Block (background layer, hills)

Hard Block (background layer, secret area)

Hard Block (background layer, secret area)

Hard Block (background layer, fortress)

Hard Block (background layer, fortress)

Hard Block (background layer, fortress)

Hard block (background layer, Mushroom House)

Wood Block (background layer, normal)

Wood Block (background layer, cave)

Wood Block (background layer, desert fortress)

Wood Block (background layer, ice)

Wood Block (background layer, blue)

Wood Block (sprite layer, land)

Wood Block (sprite layer, cave)

(Large) Wood Block (background layer)

Cloud Block (background layer, plains)

Cloud Block (background layer, hills and desert)

Cloud Block (background layer, giant)

Switch Block (plains, desert, and giant)

Switch Block (plains, desert, and giant)

Switch Block (plains, desert, and giant, pressed)

Switch Block (secret area)

Switch Block (secret area)

Switch Block (secret area, pressed)

Switch Block (plains and hills)

Switch Block (plains and hills)

Switch Block (plains and hills, pressed)

Switch Block (hills)

Switch Block (hills)

Switch Block (hills, pressed)

Switch Block (desert hills)

Switch Block (desert hills)

Switch Block (desert hills, pressed)

Switch Block (hills)

Switch Block (hills)

Switch Block (hills, pressed)

Switch Block (athletic)

Switch Block (athletic)

Switch Block (athletic, pressed)

Switch Block (fortress)

Switch Block (fortress)

Switch Block (fortress, pressed)

Switch Block (fortress)

Switch Block (fortress)

Switch Block (fortress, pressed)

Switch Block (ice cave)

Switch Block (ice cave)

Switch Block (ice cave, pressed)

Switch Block (desert)

Switch Block (desert)

Switch Block (desert, pressed)

Switch Block (cloud and ice)

Switch Block (cloud and ice)

Switch Block (cloud and ice, pressed)

Switch Block (ice, pressed)

Jump Block (background layer)

Jump Block (background layer)

Jump Block (sprite layer, land)

Jump Block (sprite layer, cave)

Magic Note Block (background layer, normal)

Magic Note Block (background layer, normal)

Magic Note Block (background layer, cave)

Magic Note Block (background layer, cave)
Magic Note Block (background layer, ice)
Magic Note Block (background layer, ice)

Donut Lift (background and sprite layer, normal)

Donut Lift (background layer, cave)

Donut Lift (background layer, fortress)

Donut Lift (background layer, ice)

Donut Lift (sprite layer, cave)

Donut Lift (sprite layer, fortress)

Donut Lift (sprite layer, Bowser's Castle)

Elevator blocks (fortress)

Elevator blocks (Bowser's Castle)

Ice Block (large)

Ice Blocks (credits)

Brick floor (Bowser's Castle)

Brick floor (castle)

Rubble (land)

Rubble (cave)

Rubble (fortress)

Rubble (Bowser's Castle)

Rubble (flashing, land) (alternatives)

Floor (background and sprite layers)

Floor (background layer - unused)

Floor (sprite layer - unused)

POW

POW


Pipes

Pipe (standard)

Pipe (standard)

Pipe (secret area)

Pipe (secret area)

Pipe (maze)

Pipe (desert and desert hills)

Pipe (desert hills)

Pipe (dark hills and secret area)

Pipe (athletic)

Pipe (athletic)

Pipe (cave)

Pipe (cave)

Pipe (dry cave)

Pipe (secret area)

Pipe (ice cave)

Pipe (ice cave)

Pipe (desert fortress)

Pipe (cloud-with-vine)

Pipe (ice)

Pipe (ice)

Pipe (trap)

Pipe (sea)

Pipe (sea)

Pipe (sewer and fortress)

Pipe (sewer)

Pipe (sewer)

Pipe (sewer)

Pipe (outside pipes)

Pipe (outside pipes)

Pipe (inside pipes)

Pipe (inside pipes)

Pipe (fortress)

Pipe (fortress)

Pipe (fortress)

Pipe (fortress)

Pipe (airship and artillery)

Pipe (battle game)

Pipe (battle game)

Pipe (credits)

Small pipe (sewer)

Small pipe (sewer)

Small pipe (sewer)

Small pipe (sewer)

Small pipe (outside pipes)

Small pipe (inside pipes)

Small pipe (plains - unused)

Pipe connector


Platforms

Bolt Lift

Bridge (standard)

Bridge (plains)

Bridge (trap)

Bridge (fortress)

Cloud Lift (background layer)

Cloud Lift (background layer)

Cloud Lift (background layer)

Cloud Lift (sprite layer)

Conveyor belt

Conveyor belt

Directional Lift (background layer)

Directional Lift (background layer)

Directional Lift (background layer)

Directional Lift (background layer)

Directional Lift (sprite layer)

Directional Lift (sprite layer)

Directional Lift (sprite layer)

Directional Lift (sprite layer)

Ground (title and credits)

Ground (plains)

Ground (plains)

Ground (secret area)

Ground (plains)

Ground (hills)

Ground (desert hills)

Ground (dark hills)

Ground (cave outside)

Ground (cave)

Ground (dry cave)

Ground (cave)

Ground (ice cave)

Ground (desert)

Ground (desert fortress)

Ground (cloud)

Ground (cloud)

Ground (cloud)

Ground (cloud)

Ground (ice)

Ground (giant)

Ground (sea)

Ground (sea)

Ground (battle game)

Ground (fortress boss)

Ground (airship and artillery)

Ground (airship and artillery)

Ground (airship)

Ground (airship)

Ground (airship)

Ground (airship)

Ground (minigame lobby)

Ground (castle)

Ground (princess keep)

Island (athletic)

Island (athletic)

Island (ice)

Lift (hanging)

Pipe maze

Pipe maze

Rotary Lift (normal)

Rotary Lift (normal)

Rotary Lift (normal)

Rotary Lift (ice-with-vine)

Semisolid Platform (plains)

Semisolid Platform (plains)

Semisolid Platform (plains)

Semisolid Platform (plains)

Semisolid Platform (secret area)

Semisolid Platform (plains - type 2)

Semisolid platform (athletic)

Semisolid platform (athletic, goal)

Semisolid platform (desert)

Semisolid platform (ice)

Semisolid platform (ice, goal)

Semisolid platform (airship)

Semisolid platform (airship)

Slope (hills)

Slope (desert hills)

Slope (dark hills)

Slope (cave outside)

Slope (cave)

Slope (dry cave)

Slope (cave)

Slope (ice cave)


Background details

Bush (plains and athletic)

Bush (secret area)

Bush (athletic)

Cactus

Cloud (background layer, title)

Cloud (background layer, title)

Cloud (background layer, title)

Cloud (background layer, title)

Cloud (background layer, plains and hills)

Cloud (background layer, plains)

Cloud (background layer, plains)

Cloud (background layer, plains)

Cloud (background layer, plains)

Cloud (background layer, plains)

Cloud (background layer, athletic)

Cloud (background layer, athletic)

Cloud (background layer, desert)

Cloud (background layer, cave)

Cloud (background layer, cloud, goal)

Cloud (background layer, ice)

Cloud (background layer, credits)

Cloud (sprite layer, airship)

Cloud (sprite layer, airship)

Cloud (sprite layer, boss)

Cloud (sprite layer, boss)

Curtain (intro)

Curtain (intro)

Curtain (credits)

Fence

Fence

Fence

Fence

Fence

Hanging lamp

Hawsehole

Hawsehole

Hawsehole

Hawsehole

Hawsehole

Hills (title)

Hills (plains)

Hills (secret area)

Hills (plains and hills, goal)

Hills (hills, large)

Hills (dark hills, large)

Hills (hills, small)

Hills (desert hills, small)

Hills (dark hills, small)

Hills (credits)

Hill (giant)

Mound (credits)

Pillar (fortress)

Pillar (fortress)

Pillar (castle)

Propeller (sprite layer)

Propeller (background layer)

Pyramid

Pyramid (goal)

Pyramids (credits)

Seaweed

Table

Throne (Japanese releases)

Throne (international releases)

Treads

Tree

Window (fortress)

Window (airship)

Window (airship)

Window (airship)

Window (airship)

Window (airship)

Window (airship)


Particle effects

Puff (title screen)

Puff (changing form)

Puff (enemy or White Block disappearing)

Puff (cannon firing and item appearing)

Puff (fireball or hammer disappearing)

Puff (laser firing)

Puff (Bowser's flame)

Shine (coin and card)

Shine (arcade fireball)

Whack (land) (alternatives)

Splash

Splash

Splash

Bubble

Waterfall spray

Waterfall spray

Waterfall spray

Waterfall spray

Waterfall spray

Waterfall spray

Waterfall spray

Waterfall spray

Enemy explosion (land) (alternatives)

Miniboss explosion (fortress) (alternatives)

Boss sweat


Overworld map icons

Start Panel (Worlds 1, 2, 3, 4, and 7)

Start Panel (World 5)

Start Panel (World 6)

Start Panel (World 8)

Paths and spaces (Worlds 1 and 3)

Paths and spaces (World 2)

Paths and spaces (World 3)

Paths and spaces (World 3)

Paths and spaces (World 4)

Paths and spaces (World 4)

Paths and spaces (World 5)

Paths and spaces (World 5)

Paths and spaces (World 6)

Paths and spaces (World 7)

Paths and spaces (World 8)

Paths and spaces (World 8)

Paths and spaces (World 9)

Stage 1

Stage 1

Stage 2

Stage 2

Stage 3

Stage 3

Stage 4

Stage 4

Stage 5

Stage 5

Stage 6

Stage 6

Stage 7

Stage 7

Stage 8

Stage 8

Stage 9

Stage 9

Stage 10

Stage 10

Rock (Worlds 1 and 3)

Rock (World 2)

Rock (World 4)

Rock (World 6)

Mushroom House (Worlds 1 and 3)

Mushroom House (World 2)

Mushroom House (World 4)

Mushroom House (World 4)

Mushroom House (World 5)

Mushroom House (World 5)

Mushroom House (World 6)

Mushroom House (World 7)

Spade Panel (Worlds 1, 2, 3, 4, 6, and 7)

Spade Panel (World 5)

Locked Door (Worlds 1 and 3)

Locked Door (World 2)

Locked Door (World 4)

Locked Door (World 5)

Locked Door (World 5)

Locked Door (World 6)

Locked Door (World 7)

Locked Door (World 8)

Bridge (Worlds 1 and 3)

Bridge (World 4)

Bridge (World 5)

Bridge (World 6)

Bridge (World 7)

Pipe (World 2)

Pipe (World 3)

Pipe (World 4)

Pipe (World 5)

Pipe (World 6)

Pipe (World 7)

Pipe (World 8)

Pipe (World 9)

Drawbridge

Drawbridge

Drawbridge

Fortress (Worlds 1 and 3)

Fortress (World 2)

Fortress (World 4)

Fortress (World 5)

Fortress (World 5)

Fortress (World 6)

Fortress (World 7)

Fortress (World 8)

Cleared fortress (Worlds 1 and 3)

Cleared fortress (World 2)

Cleared fortress (World 4)

Cleared fortress (World 5)

Cleared fortress (World 5)

Cleared fortress (World 6)

Cleared fortress (World 7)

Cleared fortress (World 8)

Castle (Worlds 1 and 3)

Castle (World 2)

Castle (World 4)

Castle (World 5)

Castle (World 6)

Castle (World 7)

Quicksand

Pyramid

Tower

Hand Trap

Castle (unused)

Mario's position

Luigi's position

Hammer Brother

Piranha Plant

Navy

Air Force

Spark

Help

Poof

Cloud

Spotlight

Warp indicator

Warp indicator

Warp indicator

Warp indicator

Warp indicator

Warp indicator

Warp indicator

Cleared space

Cleared space

Cleared space

Cleared space

Cleared space (Worlds 1 and 3)

Cleared space (Worlds 1 and 3)

Cleared space (World 2)

Cleared space (World 2)

Cleared space (World 4)

Cleared space (World 4)

Cleared space (World 5)

Cleared space (World 5)

Cleared space (World 7)

Cleared space (World 7)

Cleared space (Worlds 1 and 3)

Cleared space (Worlds 1 and 3)

Cleared space (World 2)

Cleared space (World 2)

Cleared space (World 4)

Cleared space (World 4)

Cleared space (World 5)

Cleared space (World 5)

Cleared space (World 6)

Cleared space (World 6)

Cleared space (World 7)

Cleared space (World 7)

Cleared space (World 8)

Cleared space (World 8)

Water (World 2)

Water (World 3)

Water (World 3)

Water (World 4)

Water (World 5)

Water (World 6)

Water (World 7)

Water (World 8)

Water (World 9)

Hills (World 1)

Hills (World 3)

Hills (World 3)

Hills (World 5)

Hills (World 6)

Tree (World 2)

Tree (World 3)

Tree (World 3)

Tree (World 4)

Sand

Flower (World 4)

Flower (World 7)

Star

Ice

Piranha Plant

Flame

Skull

Mushroom

Wall

Skull (unused)

White ship (unused)

White ship (unused)

White ship (unused)

White ship (unused)

White ship (unused)

Particle (unused)


Minigame cards

Super Mushroom (Spade Panel)

Fire Flower (Spade Panel)

Starman (Spade Panel)

Back (N-Mark Spade Panel)

10 coins (N-Mark Spade Panel)

20 coins (N-Mark Spade Panel)

Super Mushroom (N-Mark Spade Panel)

Fire Flower (N-Mark Spade Panel)

Starman (N-Mark Spade Panel)

1Up (N-Mark Spade Panel)

1Up (N-Mark Spade Panel - unused)

Selector


Interface

Heads-up display (Japanese releases; there is a transparent pixel over the "R" in "WORLD")

Heads-up display (international releases; the transparent pixel is now solid black)

Inventory (Japanese releases; the same difference applies. Note the Hammer Suit is solid rather than transparent like the other items.)

Inventory (international releases; the same difference applies)

Flip animation (Japanese, map screen; the display turns pink before it actually flips)

Flip animation (international, map screen; the same detail and regional difference applies)

Flip animation (Japanese, Mushroom House; the display only turns pink once it has flipped)

Flip animation (international, Mushroom House; the same differences apply)

Coin counter

Score counter

Life counter (Mario)

Life counter (Luigi)

World counter (Japanese)

World counter (international)

Timer

Super Mushroom (inventory)

Fire Flower (inventory)

Super Leaf (inventory)

Frog Suit (inventory)

Tanooki Suit (inventory)

Hammer Suit (inventory)

Jugem's Cloud (inventory)

P-Wing (inventory)

Starman (inventory)

Anchor (inventory)

Hammer (inventory)

Magic Whistle (inventory)

Music Box (inventory)

Question mark (inventory, unused)

Mushroom card

Flower card

Star card

Glitch card

Glitch card


On-screen text

100 points (land)

200 points (land)

400 points (land)

800 points (land)

1000 points (land)

2000 points (land)

4000 points (land)

8000 points (land)

100 points (cave)

200 points (cave)

400 points (cave)

800 points (cave)

1000 points (cave)

2000 points (cave)

4000 points (cave)

8000 points (cave)

100 points (fortress)

200 points (fortress)

400 points (fortress)

800 points (fortress)

1000 points (fortress)

2000 points (fortress)

4000 points (fortress)

8000 points (fortress)

1UP (gameplay)

1UP (stage end or minigame match)

2UP (stage end or minigame match)

3UP (stage end or minigame match)

5UP (stage end or minigame match)

1UP (battle game)

2UP (battle game)

3UP (battle game)

5UP (battle game)

Pause (land)

Pause (cave)

Pause (fortress)

Pause (artillery boss)

Pause (sea and castle)

Pause (desert fortress)

Pause (cave fortress)

Pause (ice fortress)

Pause (Bowser's Castle)

Pause (World 6 castle)

Time-up (land)

Time-up (cave)

Time-up (fortress)

The End
Credits images
World 1: Grass Land
World 2: Desert Hill

World 3: Ocean Side

World 4: Big Island
World 5: The Sky
World 6: Iced Land
World 7: Pipe Maze
World 8: Castle of Koopa


Miscellaneous unused graphics

Bridge (general)

Particles (general)

Tide (general)

Tide (general)

Rocky ceiling (general)

Background lines (plains)

Layered bushes (plains and athletic)

Slope tiles (hills)

Slope tiles (hills)

Edge tiles (hills)

Edge tiles (hills)

Edge tiles (hills)

Water (hills)

Cloud (athletic)

Platform (athletic)

Water (athletic and ice)

Cloud (cave)

Hills (cave)

Hills (cave)

Slope tiles (cave)

Slope tiles (cave)

Water (cave)

Bricks (desert)

Bricks (desert)

Unknown (desert)

Block (desert)

Pillar (desert)

Pipe connector (desert)

Platform (desert)

Chains (desert)

Ladder (desert)

Layered clouds (cloud)

Gradient (cloud)

Cloud Lift (cloud)

Hard Block (cloud)

Track (ice)

Plants (ice)

Pillar (miscellaneous)

Pipes (miscellaneous)

Pipes (miscellaneous)

Track (fortress)

Window (fortress)

Elevator block base (fortress)

Hard Block (fortress)

Doorframe top to Princess's chamber (fortress)

Conveyor (airship and artillery)

Wood (airship)

Wood (airship)

Unknown (airship and artillery)

Metal frame (airship)

Metal frame (airship)

Drills (artillery)

Propeller (artillery)

Treads (artillery)

Tire (artillery)

? (minigame lobby)

? (minigame lobby)

? (minigame lobby)

Block (minigame lobby)

Block (minigame lobby)

Toad statue (castle)

P crest (castle)

Bricks (castle, Japan)

Bricks (castle, international)

Mound (credits)

Underwater propeller (sprite)

Unassembled tiles of the underwater propeller

Desert pipe piece (sprite)

Desert pipe piece (sprite)

Desert pipe piece (sprite)

Target (sprite)


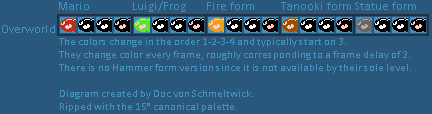
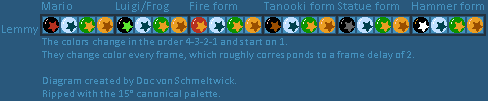
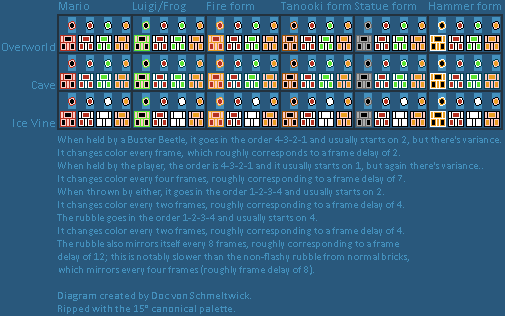
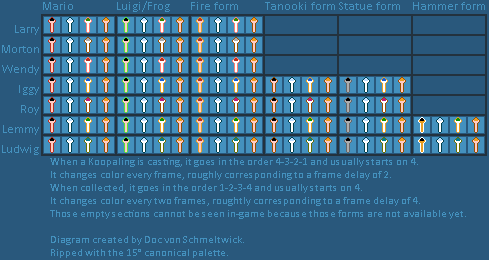
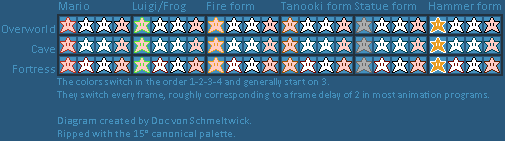
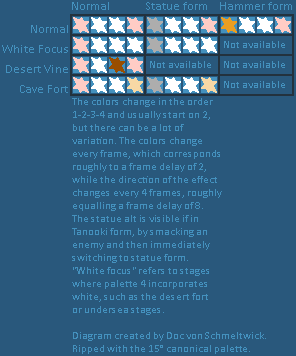
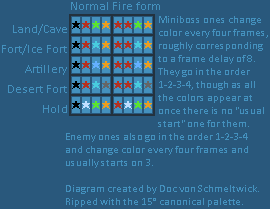