Kleever's Kiln: Difference between revisions
No edit summary |
|||
| (4 intermediate revisions by 3 users not shown) | |||
| Line 7: | Line 7: | ||
|boss=[[Kleever]] | |boss=[[Kleever]] | ||
|track=Boss Bossanova | |track=Boss Bossanova | ||
|before=[[Squawks's Shaft (Donkey Kong Country 2 | |before=[[Squawks's Shaft (Donkey Kong Country 2)|<<]] | ||
|after=[[Barrel Bayou (Donkey Kong Country 2 | |after=[[Barrel Bayou (Donkey Kong Country 2)|>>]] | ||
}} | }} | ||
'''Kleever's Kiln''' is the boss level of [[Crocodile Cauldron]] | '''Kleever's Kiln''' is the boss level of [[Crocodile Cauldron]] and the place where [[Kleever]] is fought in ''[[Donkey Kong Country 2: Diddy's Kong Quest]]''. | ||
Concept drawings show that [[Squawks]] would originally fight Kleever, and his Animal Barrel would have been hidden in an area behind the starting point. This was changed to Squawks fighting another boss instead, King Zing, in the boss level [[King Zing Sting]]. | |||
[[ | |||
==Layout== | |||
[[File:Kleever-GBA.png|thumb|left|Kleever's Kiln in the Game Boy Advance version]] | |||
After | Kleever's Kiln takes place in a volcanic area with a ledge on each side and a wide [[lava]] pit in the middle. Two [[Banana Coin]]s are hidden at the top right of the area, and they can be reached by either jumping from [[hook]]s at the top right or from Dixie using her [[Helicopter Spin]] from the same position. The battle starts with Kleever rising from the lava, held by an arm made of fire. Kleever throws three individual [[Fireball (obstacle)|fireballs]] at [[Diddy Kong]] and [[Dixie Kong]]. After this, the [[Kong]]s have to throw a [[Cannonball|kannonball]] at it. When Kleever is hit, a set of hooks fall from the sky, and as the Kongs cross to the rightmost part of the arena, Kleever follows them there while throwing more fireballs in their direction. After a third hit, Kleever retreats back into the lava before suddenly charging back out, now hovering in midair independently, without the fiery arm. Kleever moves around faster and starts by horizontally charging himself at Diddy and Dixie. Kleever can be dodged by jumping over him. Many rows of hooks drop above the pool of lava, allowing Diddy and Dixie to cross over to the right side. Kleever uses his charging attack again, and after having another kannonball thrown at it, Kleever begins to violently slash for a few seconds. After six hits, Kleever is defeated, his blade shattered into pieces as he spins around for a few seconds before falling into the lava. Diddy and Dixie are rewarded with a [[Kremkoin]] and can continue on to [[Krem Quay]]. | ||
==Gallery== | ==Gallery== | ||
| Line 24: | Line 22: | ||
Kleever's Kiln DKC2 crossing hooks.png|Dixie jumping from hooks | Kleever's Kiln DKC2 crossing hooks.png|Dixie jumping from hooks | ||
Kleever defeated DKC2.png|Kleever shatters, signaling his defeat. | Kleever defeated DKC2.png|Kleever shatters, signaling his defeat. | ||
Kleever concept.jpg|Concept of the boss battle against Kleever at Kleever's Kiln | |||
</gallery> | </gallery> | ||
==Names in other languages== | ==Names in other languages== | ||
{{foreign names | {{foreign names | ||
|Jap= | |Jap=げきとつ!ボス クリーバー | ||
|JapR=Gekitotsu! Bosu Kurībā | |JapR=Gekitotsu! Bosu Kurībā | ||
|JapM=Clash! Boss | |JapM=Clash! Boss Kleaver | ||
|Fre=Fournil de Kleever | |Fre=Fournil de Kleever | ||
|FreM=Kleever's Bakery | |FreM=Kleever's Bakery | ||
Revision as of 19:59, June 22, 2024
- This article is about the boss level in Donkey Kong Country 2: Diddy's Kong Quest. For the similarly-named boss level from Donkey Kong Land 2, see Kleaver's Kiln.
| Level | |
|---|---|
| Kleever's Kiln | |

| |
| Level code | 2 - BOSS |
| World | Crocodile Cauldron |
| Game | Donkey Kong Country 2: Diddy's Kong Quest |
| Boss | Kleever |
| Music track | Boss Bossanova |
| << Directory of levels >> | |
Kleever's Kiln is the boss level of Crocodile Cauldron and the place where Kleever is fought in Donkey Kong Country 2: Diddy's Kong Quest.
Concept drawings show that Squawks would originally fight Kleever, and his Animal Barrel would have been hidden in an area behind the starting point. This was changed to Squawks fighting another boss instead, King Zing, in the boss level King Zing Sting.
Layout
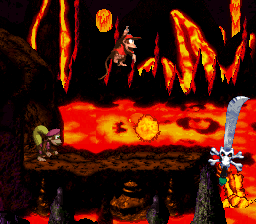
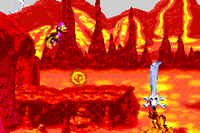
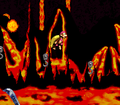
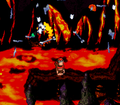
Kleever's Kiln takes place in a volcanic area with a ledge on each side and a wide lava pit in the middle. Two Banana Coins are hidden at the top right of the area, and they can be reached by either jumping from hooks at the top right or from Dixie using her Helicopter Spin from the same position. The battle starts with Kleever rising from the lava, held by an arm made of fire. Kleever throws three individual fireballs at Diddy Kong and Dixie Kong. After this, the Kongs have to throw a kannonball at it. When Kleever is hit, a set of hooks fall from the sky, and as the Kongs cross to the rightmost part of the arena, Kleever follows them there while throwing more fireballs in their direction. After a third hit, Kleever retreats back into the lava before suddenly charging back out, now hovering in midair independently, without the fiery arm. Kleever moves around faster and starts by horizontally charging himself at Diddy and Dixie. Kleever can be dodged by jumping over him. Many rows of hooks drop above the pool of lava, allowing Diddy and Dixie to cross over to the right side. Kleever uses his charging attack again, and after having another kannonball thrown at it, Kleever begins to violently slash for a few seconds. After six hits, Kleever is defeated, his blade shattered into pieces as he spins around for a few seconds before falling into the lava. Diddy and Dixie are rewarded with a Kremkoin and can continue on to Krem Quay.
Gallery
Names in other languages
| Language | Name | Meaning | Notes |
|---|---|---|---|
| French | Fournil de Kleever[?] | Kleever's Bakery | |
| German | Kleevers Feuerschwert[?] | Kleever's Fire Sword | |
| Italian | La Fucina di Koltel[?] | The Forge of Kleever | |
| Spanish | El Horno de Kleever[?] | Kleever's Furnace |


