Bramble Blast (Donkey Kong Country 2): Difference between revisions
Fawfulfury65 (talk | contribs) |
Fawfulfury65 (talk | contribs) m (→Gallery: I don't like fragments) |
||
| Line 48: | Line 48: | ||
<center><gallery> | <center><gallery> | ||
Image:65Bramble Blast65.png|Near the start of the level. | Image:65Bramble Blast65.png|Near the start of the level. | ||
Image:Bramble_Blast.png| | Image:Bramble_Blast.png|The Kongs while shooting through some barrels. | ||
Image:BBDKC65.png|The monkeys blast between the brambles. | Image:BBDKC65.png|The monkeys blast between the brambles. | ||
Image:ScrambledBrambles65.jpg|The Kongs with Squawks. | Image:ScrambledBrambles65.jpg|The Kongs with Squawks. | ||
Revision as of 08:01, October 9, 2010
Template:LevelboxDKL2 Bramble Blast is the sixteenth level of Donkey Kong Country 2: Diddy's Kong Quest, and the sixth area of Krem Quay. This level appeared again as the eighteenth level of Donkey Kong Land 2, with a similar layout. Here, it was the third area of Krazy Kremland.
This is the game's first bramble level. The Kongs must navigate through the thorns via many series of Barrel Cannons. One wrong move will blast the Kongs into the brambles, so they need to watch their timing. Klampons, Zingers, Click-Clacks and Flitters will also impede on the Kongs' progress. Squawks can also be found near the end of the level, and he'll help the Kongs nab a DK Coin, as well as reach a Bonus Barrel.
Level Layout
Donkey Kong Country 2
Starting from the beginning, the heroes jump into a Barrel Cannon and shoot through the other barrels to the top right corner, where they go to another section of barrels. Again, they shoot barrel-to-barrel to the right side. Close by, a Zinger waits for the right time to attack. Later on, they enter a barrel that will blast them between the brambles and past a Zinger. It launches the monkeys to the third section of barrels, where they bounce through each barrel to a gap hidden up north. If aimed carefully enough, they can rocket to the next barrel safely, but if not, a Zinger will be able to hurt one of the monkeys. When they manage to get to this barrel, it shoots the Kongs to the fourth barrel-filled section. These barrels are placed in the shape of a diamond, in which they go around the perimeter of. Soon after, they will get to a spinning barrel. Using this, they blast to a few other spinning barrels, but with careful aim; one bad move will land them in the sharp brambles. Later, they will get to the fifth barrel section. With the help of some bananas leading the way, the heroes can escape out of here, and be shot to three barrels in an open space. With these barrels, the group blasts through the gap below and get into a spinning barrel. This is followed by more spinning barrels. With cautious aim, they will eventually get to more barrels, but these ones tilt left and right. When the barrel turns right, the monkeys blast out of it, and get to the next barrel. Close by is the Star Barrel.
At this point, the heroes arrive at the sixth area filled with barrels. Again, the barrels are place in the form of a diamond, and the Kongs traverse around the perimeter of it by blasting through the barrels, without hitting the Zinger in the center. After this, they enter a tight space, and carefully aim their launch to each of the spinning barrels. Soon, they will get to some barrels which tilt left and right again. When the time comes, the Kongs shoot to the next barrel, and being careful to avoid the Zinger in between the two. Afterwords, they blast to a platform with a Klampon on it. Once this foe is passed, the monkeys jump into the abyss and shoot through the barrels back to another platform, with two Click-Clacks on it. At this point, they defeat the enemies and shoot through more barrels. One cannon will aim to another section of barrels, where the group rely on the bananas to lead them to the bottom right corner. Here, they launch through more barrels, and later some spinning barrels. These barrels help to move them between the dangerous brambles. After this, the Kongs enter a tilting barrel, which they must use to blast to a Flitter, bounce off of it, and land into another barrel. This barrel blasts them to three more Flitters to bounce off of. Shortly after, the group will make it to a platform, where the end of the level is.
Donkey Kong Land 2
At the start of the level, the Kongs jump into a barrel and shoot to the lower right hand side through several barrels. There are bananas to help lead the way. They continue downwards, until they reach the north-facing barrel and climb in. They keep blasting through each barrel up between the brambles and soon land on a safe platform. After this, the monkeys climb down a rope to reach another barrel. In it, they shoot themselves east until a dead-end is reached. They continue through the barrels all the way around the outside of the area, with the aid of bananas to lead the way. Soon, the group arrive at a stationary barrel. It is already aiming in the right direction, but there is a Zinger in the way. When the enemy moves past, they carefully shoot to the next barrel, where they'll repeat the same thing again. They will get to a nearby platform after that, and the Star Barrel in the air above it.
Halfway through the level, the group will get into the next barrel and shoot north. They will land in several spinning barrels, still going up. Eventually, they make it to a platform, where they leap into another barrel. This will shoot them to another platform, where they'll hop into the next barrel. It will blast them to more barrels, and the monkeys will bounce off a Flitter to yet another barrel. They continue moving through each of the barrels for quite some time, but there are still bananas taking them to the correct path. Zingers also lurk around, though, and get in the Kongs' path. After shooting barrel-to-barrel going west, and also follow the banana trails, they will make it to a platform with a spring on it. If the heroes leap on it, they will bounce out of the level.
Secrets
Donkey Kong Country 2
Bonus Level(s)
- In the fifth section of barrels (located past the first few spinning barrel) the group should go to the far west side. Here, they might notice a banana floating in the distance. If they shoot to that banana, they land in a Bonus Barrel, leading to the Bonus Level. Here, the heroes must blast through several barrels in a large maze. They need to reach the end of the stage in less than forty seconds to get the Kremkoin.
- From where the DK Coin is found, the heroes must travel east with Squawks. They bird must fly the heroes through tight spaces between the brambles while dodging some red Zingers, who can not be defeated. Eventually, the group gets to barrel that can blast them to a Bonus Barrel. This special barrel takes the primates to a Bonus Level, where they need to simply fly around the bramble obstacles with their parrot buddy. Bananas are placed throughout the area to direct them. When the group reaches the end of the bonus, they pass a No Animal Sign, making their Animal Buddy, Squawks, disappear. The sign is followed by a Kremkoin, which makes the bonus end when collected.
DK Coin
- To find the DK Coin, the Kongs must jump in the gap located before the final three Flitters at the end of the level. Here, they fall into a barrel that can blast them high in the air to Squawks, who is waiting above. On the parrot, the group needs to fly along the brambles going west, until they see a Zinger. After they defeat it, they can snatch the coin nearby.
Golden Feather (GBA Only)
- In the last section of barrels, the monkeys should travel through the barrels to the right side of the area. A Golden Feather is placed around here. They have to get in one of the barrels to shoot to it, and then get back on track via another barrel.
Donkey Kong Land 2
Bonus Level(s)
- When the heroes see the first Flitter in the level, they should bounce off of it and grab onto the rope nearby. Then, they need to climb along it and avoid some Zingers, until they get to the Bonus Barrel, which takes them to the Bonus Level. Here, they must jump to each platform over the brambles. Soon, the monkeys get into a barrel and shoot to other barrels, eventually reaching a Kremkoin.
- Near the end of the level, the group gets to a barrel in which there is a banana to the left of it, and another barrel to the right. They should blast to the right and land on a platform. Here, they need to climb up some ropes and dodge a Flitter, until they get to the Bonus Barrel. In its Bonus Level, they must get in an Animal Barrel to turn into Squawks. With him, they can fly around and defeat the many Zingers in the area, without touching any of the spikes on the outskirts of the stage. When all the foes are beat, the Kremkoin appears.
DK Coin
- After the Kongs get past the Star Barrel and shoot upwards through all the spinning barrels, they need to hop to the left across the wooden platforms. When they get to the next barrel, they should ignore it and instead jump over the brambles to the left. At this point, they are shot through some barrels, until they get to the DK Coin.
Gallery
- 65Bramble Blast65.png
Near the start of the level.
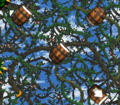
The Kongs while shooting through some barrels.
- BBDKC65.png
The monkeys blast between the brambles.
- ScrambledBrambles65.jpg
The Kongs with Squawks.

Trivia
- A remix of the background music of Bramble Blast appears as a selectable Donkey Kong song that can be played in Super Smash Bros. Brawl. In Brawl, the song is entitled "Bramble Blast" to match the actual level. However, the song's title, as evidenced by the Donkey Kong Country 2 official soundtrack, is known as "Stickerbrush Symphony."
Names in Other Languages