User:Time Turner/unfinished: Difference between revisions
Time Turner (talk | contribs) m (→Anamaes) |
Time Turner (talk | contribs) |
||
| Line 48: | Line 48: | ||
====Comments==== | ====Comments==== | ||
== | ===Eytens=== | ||
{| | {|width=100% cellspacing=0 border=1 cellpadding=3 style="border-collapse:collapse; background:#FFFFFF; text-align:center;" | ||
|-style="background | |-style="background:#79BAEC;" | ||
! | !colspan=5 |Collectibles | ||
|- | |- | ||
|[[ | |width=20% |[[File:Coin SMO.jpg|200px]] | ||
|width=20% |[[File:Heart SMO.jpg|90px]] | |||
|width=20% |[[File:Life-Up Heart SMO.jpg|90px]] | |||
|width=20% |[[File:Moon Shard SMO.png|200px]] | |||
|width=20% |[[File:Power Moon SMO.jpg|90px]] | |||
|- | |- | ||
|[[ | |'''[[Coin]]'''<br>[description] | ||
|'''[[Heart]]'''<br>[description] | |||
|'''[[Life-Up Heart]]'''<br>[description] | |||
|'''[[Moon Shard]]'''<br>[description] | |||
|'''[[Power Moon]]'''<br>[description] | |||
|- | |- | ||
|[[ | |[[File:Coin Stack Artwork - Super Mario 3D World.png|90px]] | ||
|[[File:Green Star Artwork - Super Mario 3D World.png|90px]] | |||
|[[File:Stamp Artwork - Super Mario 3D World.png|90px]] | |||
|- | |- | ||
|[[ | |'''[[Coin Stack]]'''<br>Coin Stacks are stacks of several coins that can be collected. They give the player many coins at once. | ||
|'''[[Green Star]]'''<br>Green Stars are used to unlock some levels. There are three per level, and all must be collected for 100% game completion. | |||
|'''[[Stamp]]'''<br>Stamps can be collected and used in [[Miiverse]] posts. There is one per level, and all must be collected for 100% game completion. | |||
|-style="background:#79BAEC;" | |||
!colspan=5 |Blocks and platforms | |||
|- | |- | ||
|[[ | |[[File:Question Block SMO.jpg|90px]] | ||
|[[File:Beanstalk SMO.png|200px]] | |||
|[[File:Brick Block SMO.jpg|90px]] | |||
|[[File:Cap Cloud SMO.jpg|180px]] | |||
|[[File:Hat Trampoline SMO.jpg|180px]] | |||
|- | |- | ||
|[[ | |'''[[? Block]]'''<br>[description] | ||
|'''[[Beanstalk]]'''<br>[description] | |||
|'''[[Brick Block]]'''<br>[description] | |||
|'''[[Cap Cloud]]'''<br>[description] | |||
|'''[[Hat Trampoline]]'''<br>[description] | |||
|- | |- | ||
|[[File:Steel Block SMO.jpg|90px]] | |||
|- | |- | ||
|[[ | |'''[[Empty Block|Steel Block]]'''<br>[description] | ||
|-style="background:#79BAEC;" | |||
!colspan=5 |Obstacles | |||
|- | |- | ||
| | |¯\_(ツ)_/¯ | ||
|¯\_(ツ)_/¯ | |||
|¯\_(ツ)_/¯ | |||
|¯\_(ツ)_/¯ | |||
|¯\_(ツ)_/¯ | |||
|- | |- | ||
|[[ | |[[Boulder]]-like low-poly bell peppers<br>[description] | ||
|[[Spiked Ball]]-like shells<br>[description] | |||
|[[Floating Mine]]-like shells<br>[description] | |||
|[[Oil Drum]]s<br>[description] | |||
|[[Spike Bar]]s<br>[description] | |||
|-style="background:#79BAEC;" | |||
!colspan=5 |Other objects | |||
|- | |- | ||
|[[ | |[[File:8-Bit Pipe SMO.jpg|90px]] | ||
|[[File:Checkpoint Flag SMO.jpg|90px]] | |||
|[[File:Hat Launcher SMO.jpg|180px]] | |||
|[[File:Moon Pipe SMO.jpg|120px]] | |||
|[[File:Mysterious Cube SMO.jpg|120px]] | |||
|- | |- | ||
|[[ | |'''[[8-Bit Pipe]]'''<br>[description] | ||
|'''[[Checkpoint Flag]]'''<br>[description] | |||
|'''[[Hat Launcher]]'''<br>[description] | |||
|'''[[Moon Pipe]]'''<br>[description] | |||
|'''[[Mysterious Cube]]'''<br>[description] | |||
|- | |- | ||
|[[ | |[[File:P-Switch SMO.jpg|150px]] | ||
|[[File:Rocket Flower SMO.jpg|45px]] | |||
|[[File:Scarecrow SMO.jpg|90px]] | |||
|[[File:Slingshot SMO.jpg|120px]] | |||
|[[File:Warp Pipe SMO.jpg|45px]] | |||
|- | |- | ||
|[[ | |'''[[P-Switch]]'''<br>[description] | ||
|'''[[Rocket Flower]]'''<br>[description] | |||
|'''[[Scarecrow (object)|Scarecrow]]'''<br>[description] | |||
|'''[[Slingshot]]'''<br>[description] | |||
|[[ | |'''[[Warp Pipe]]'''<br>[description] | ||
| | |||
|[[ | |||
| | |||
|} | |} | ||
Revision as of 20:43, October 29, 2017
Humans
Proposals
Remove categories and lists relating to allies
Before going into the meat of the proposal, the issues of allies has been dicussed in the past here, here, and here. Less bulldozer-y approaches have been suggested, but to be frank, none of them are particularly satisfactory for me.
Simply put, I don't see the justification in having the List of allies and the various categories (Donkey Kong, Paper Mario: Sticker Star, Super Paper Mario, Wario, Yoshi, and of course the main Allies). First, take into consideration the basic categories of the wiki: characters, enemies, items, levels, abilities, and so on. All of them are distinct from each other, and in turn, there should be no overlap between them. Measures have been taken to ensure this, with one proposal ensuring that species occupy a separate space and a currently running proposal that is set to split items and objects. Now, take a look at the list of main categories outlined on MarioWiki:Categories, and you'll notice that "allies" are also listed up there. This ends up colliding into the same issue faced by the items and objects: how can a category be considered the broadest category possible when, by definition as a subcategory, there exists something above it? All allies are necessarily either characters or species, so as is, there's an uncomfortable contradiction here. You might say that this is grounds to remove the allies from that list, but not to outright delete it, and I might have agreed if I didn't have other issues with the allies.
This is something that partially builds on the recent deletion of Category:Heroes: we don't have a definition for an ally in the slightest. List of allies says that it includes everyone that has "at one point or another stood against the various enemies", but that's laughably vague and entirely unapplicable to situations in which there aren't any enemies invovled. You might have a vague idea of which characters are and are not allies, but that idea almost certainly goes counter to everyone else's idea. Even then, our current implementation of the term "ally" is shaky at best and nonsensical at worst. To use the Yoshi Allies category as an example, all of the playable characters are listed as allies. The actual people going on the adventure and doing all of the action are merely allies. If they're considered as allies because they help each other, is Mario an ally in every game he's in just because people help him? I could go on in this fashion: why is King Fret an ally when he's nothing more than a hostage, why is KP Pete an ally when he, at best, acts friendly with Mario and nothing more, why is Fire Mini Mario an ally when it's a form of the main playable character, why is Mad Scienstein an ally when most of his encounters feature him as a villain and he is only helpful to the player on a few occasions by happenstance (and not by his own volition, no less)? That last point also touches on another issue, with many of these completely varied characters and species being grouped together because of, at best, one of their actions, and these actions can vary wildly. Characters who act as nothing but roadblocks to the heroes for the vast majority of their appearances, such as Bowser Jr., get to be tagged as allies because of a single instance of helpfulness, and that just doesn't make sense to me (also, I can't even tell when Bowser Jr. is supposed to be an ally). There are echoes of Category:Hostages in this: offbeat, tenuous connections are of little functional use to the wiki.
The idea of allies for the wiki is such a messy, ambiguous, easily muddled grouping that I don't think that any possible solution beyond nuking the entire concept of allies would be satisfactory. Even if somehow, the community came together and unanimously decided on a rigorous definition for allies, what then? What value is there in grouping together characters and species with an arbitrary definition? What do I get from this that I don't get from other categories? What reason do I have to care about the fact that this one NPC gave Mario a couple of coins one time, especially to the point where it elevates them to a unique category? I'll be just as redundant as the category and say that there's no point in having them on the wiki.
Proposer: Time Turner (talk)
Deadline: [insert a deadline here, 7 days after the proposal was created (14 for writing guidelines and talk page proposals), at 23:59 GMT, in the format: "August 8, 2011, 23:59 GMT"]
Support
- Time Turner (talk) Per proposal.
Oppose
Comments
Eytens
| Collectibles | ||||
|---|---|---|---|---|
| File:Coin SMO.jpg | File:Heart SMO.jpg | File:Life-Up Heart SMO.jpg | File:Moon Shard SMO.png | File:Power Moon SMO.jpg |
| Coin [description] |
Heart [description] |
Life-Up Heart [description] |
Moon Shard [description] |
Power Moon [description] |

|

|

| ||
| Coin Stack Coin Stacks are stacks of several coins that can be collected. They give the player many coins at once. |
Green Star Green Stars are used to unlock some levels. There are three per level, and all must be collected for 100% game completion. |
Stamp Stamps can be collected and used in Miiverse posts. There is one per level, and all must be collected for 100% game completion. | ||
| Blocks and platforms | ||||
| File:Question Block SMO.jpg | 
|

|

|

|
| ? Block [description] |
Beanstalk [description] |
Brick Block [description] |
Cap Cloud [description] |
Hat Trampoline [description] |

| ||||
| Steel Block [description] | ||||
| Obstacles | ||||
| ¯\_(ツ)_/¯ | ¯\_(ツ)_/¯ | ¯\_(ツ)_/¯ | ¯\_(ツ)_/¯ | ¯\_(ツ)_/¯ |
| Boulder-like low-poly bell peppers [description] |
Spiked Ball-like shells [description] |
Floating Mine-like shells [description] |
Oil Drums [description] |
Spike Bars [description] |
| Other objects | ||||

|
File:Checkpoint Flag SMO.jpg | File:Hat Launcher SMO.jpg | 
|

|
| 8-Bit Pipe [description] |
Checkpoint Flag [description] |
Hat Launcher [description] |
Moon Pipe [description] |
Mysterious Cube [description] |

|
File:Scarecrow SMO.jpg | 
|
||
| P-Switch [description] |
Rocket Flower [description] |
Scarecrow [description] |
Slingshot [description] |
Warp Pipe [description] |
DKC:TF
Hazards
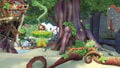
Carnivorous Plantlife
Collapsible Wooden Platform
Decaying Vine
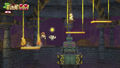
Electrified Anemone
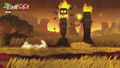
Fire Floor
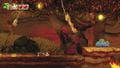
Flaming Falling Totem Pole
Flaming Vine
Giant Spiked Nut

Giant Underwater Fan
Hanging TNT
Lightning Bolt
Proximity Mine
Spiked Floor
- DKCTF Tornado Prima.jpg
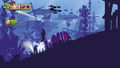
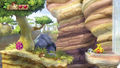
Tornado


- Carnivorous Plantlife: "The local plantlife in Donkey Kong Country is aggressive, to put it plainly. These angry fellows are much like the tooth-toting carnivorous plants that sport platforms at their base. The main difference here is that these hungry plants do not help you access routes or gain entry to secret areas. They pretty much just want to devour your entire body whole."
- Collapsible Wooden Platforms: "These wood-plank platforms start to shiver and shake the second you step your hairy foot upon them. Be sure to take care of your business and make haste before the planks give way and you fall to your doom."
- Decaying Vines: "These vines at first sight can blend in with the regular structurally sound vines. At a closer look, they can be identified by the brown discoloring at the top of the vine. When you grab onto these vines, you will only have a limited time before they break under your intense weight. This is a grab-and-go situation, so grab hold of the vine and jump to the next before the old vine makes fools of the lot of you."
- Electrified Anemones: "While they look beautiful in the dark of the ocean, these will shock DK to the core. They hold items beneath them, and at first glance, you may not know how to defeat these anemones. Close by are smaller fish that will glow if you Corkscrew through their school, which will cause the anemone arms to retract finally allow you to access the items below."
- Fire Floor: "These fire floors can be identified by the hot coals burning just below the surface. The real danger is standing in one spot for too long, as that agitates the earth, allowing flames to come to the surface that will most certainly burn you. Usually there are Water Sacks around; throw them at the ground to extinguish the flames and create a much more safer walkway. "
- Flaming Falling Totem Poles: "These totem poles are intent on crushing the bananas out of you. They have a flaming core with fire that flickers out from the eye and mouth holes. Besides adding to the incredible tension, these are another hazard to keep you on your toes. Quickly jump back or roll forward to avoid a crushing defeat."
- Flaming Vines: "These vines look like the decaying vines, but they will immediately ignite and burn up rather quickly. Other vines will already be on fire when you approach. Extinguish them before climbing. These vines can also be connected to platforms, making it much simpler to quickly jump to safety. Remember to act swiftly and be light on your feet!"
- Giant Spiked Nuts: "A form of this type of hazard is introduced in the third island and will become a headache-inducing nuisance. These large spiked nuts drop from trees and roll towards you, with the intention of filling you full of holes. They cannot be destroyed by any means, so leap over the obstacles and continue on your way as best you can."
- Giant Underwater Fans: "The giant fans certainly make traversing through underwater levels difficult. In some instances, the current they produce is too powerful to Kong to swim through on his own. Grab Dixie Kong if you can and use her Ponytail Propeller move to easily pass through the strong currents."
- Hanging TNT: "This is quite simple really. Touch the dangling cluster of concentrated destruction to go BOOM! Avoid the dangling destruction and live to tell the tale."
- Lightning Bolts: "When you encounter lightning bolts, they may give you a hard time at first, but they can be avoided quite easily if you follow the pattern. Before the real shock comes from the main bolt, several lesser bolts will strike in quick succession; they are harmless. Use that time to run or roll past the strike zone before the actual bolt rains down on your parade."
- Proximity Mines: "The mines underwater pack a punch and will begin to time their detonation the closer you get. Some secret areas must be opened by the mines, so you may need to carefully draw near one to time the charge, then quickly swim away before it explodes. Remember that these mines eject pieces of shrapnel that will take a heart away if they come in contact with you, so be careful!"
- Spiked Floor: "Spiked floors can be a real pain in the buttocks—literally. The best way to traverse this hazard is to bring old man Cranky Kong along with you and pogo across the spikes with his cane. This will also help you access the items lying on the spikes and to get to hidden areas to collect Puzzle Pieces."
- Tornados: "These wind tunnels can either help or hinder your path to the end of the level. At times these tornados can launch you upward to access certain items, but get too close to an edge and the wonder of nature might just launch you like a rag doll. Tip: The trick to using the tornado to spring you forward is to jump into it at the very top of the funnel. Jumping into the lowest portion or the middle causes it to shoot you backward and possibly straight into harm’s way."
SSB4 Images
- Barrel
- Crate
- Daybreak
- Dragoon
- Food
- Party Ball
- Rocket Belt
- Rolling Crate
- Spring
- Team Healer
- Treasure chest
- Trophy
Look for official English names
<See talk page.>