Monkey Museum: Difference between revisions
(reorganizing (putting objects into a list)) |
No edit summary |
||
| (71 intermediate revisions by 29 users not shown) | |||
| Line 1: | Line 1: | ||
[[ | {{location infobox | ||
|image=[[File:Monkey Museum DKC2.png|200px]]<br>[[Cranky Kong|Cranky]] talking to [[Diddy Kong|Diddy]] and [[Dixie Kong|Dixie]]<br>[[File:Cranky's Hut DKC2 GBA.png|200px]]<br>The menu in the Game Boy Advance version | |||
|first_appearance=''[[Donkey Kong Country 2: Diddy's Kong Quest]]'' ([[List of games by date#1995|1995]]) | |||
|latest_appearance=''[[Donkey Kong Country 2 (Game Boy Advance)|Donkey Kong Country 2]]'' ([[Game Boy Advance]]) ([[List of games by date#2004|2004]]) | |||
|greater_location=[[Crocodile Isle]] | |||
|owner=[[Cranky Kong]] | |||
}} | |||
{{quote|Look at all this junk in here! Treat my home like a trash can they do! No respect for their elders, that's the trouble...|[[Cranky Kong]]|[[Donkey Kong Country 2: Diddy's Kong Quest]]}} | |||
The '''Monkey Museum''', alternatively '''Cranky's Monkey Museum'''<ref name=manual>{{cite|language=en-us|title=''Donkey Kong Country 2: Diddy's Kong Quest'' instruction booklet|page=26|date=1995|publisher=Nintendo of America}}</ref> and renamed '''[[Cranky's Hut]]''' in the [[Donkey Kong Country 2 (Game Boy Advance)|remake]], is a site where [[Cranky Kong]] has taken up residence in ''[[Donkey Kong Country 2: Diddy's Kong Quest]]''. There is an establishment in every area of [[Crocodile Isle]] except [[The Flying Krock]]. Like its predecessor, [[Cranky's Cabin]], the main purpose of the Monkey Museum is for [[Diddy Kong|Diddy]] and [[Dixie Kong|Dixie]] receive tips and advice from Cranky, with even the background music being a rearrangement of that of Cranky's Cabin. Cranky does not rant as frequently in Monkey Museum, usually only doing so when the Kongs enter and exit the location. The Kongs can now choose which advice to hear from Cranky, differing between each world as it involves their levels, and is either free or priced anywhere between one to three [[Banana Coin]]s. | |||
Various artifacts appear in the background of the Monkey Museum, including [[Banana]]s, a [[Rare]] symbol, a [[Nintendo]] logo, an oversized [[Super Nintendo Entertainment System]] controller, a ''{{iw|strategywiki|Killer Instinct}}'' arcade cabinet, a [[Donkey Kong]] statue above the arcade cabinet, a poster of {{wp|List of Killer Instinct characters#Chief Thunder|Chief Thunder}} from ''Killer Instinct'', [[Funky Kong]]'s surfboard, a mounted [[Kruncha]] head, a motionless [[Winky]] figure, a "[[Donkey Kong|DK]]" symbol, a golden [[Expresso]] statue, a [[Banana Coin]], two [[barrel]]s, a tipped over [[Mine Cart]], two pirate swords, and game cartridges. | |||
Cranky occasionally asks the Kongs if they have tried the game "Cranky Kong Country," mentioning it was on sale a year ago. In reality, this is directly based on ''Donkey Kong Country'' releases one year prior in real life. Even though he dislikes the game, Cranky takes credit for causing its popularity instead of Donkey Kong. In the [[Donkey Kong Country 3 (Game Boy Advance)|remake]] of ''[[Donkey Kong Country 3: Dixie Kong's Double Trouble!]]'', Cranky has a [[Cranky's Dojo|dojo]], where he trains himself for the same adventure, ''Cranky Kong Country'', likely hoping for a successful game starring himself. | |||
In the remake, Cranky keeps his pet, [[Expresso]], caged up in the hut for the players to raise and enhance his stats using [[golden feather]]s for the [[minigame]], [[Expresso Racing]]. The shelves display trophies from winning the Expresso Racing minigame in their usual gold, silver, and bronze colors for if the player wins first, second, and third place, respectively. The outside is more clearly seen, due to the zoomed-in world map compared to the original version The interior is completely different, especially from no longer featuring cameos from other Rare-owned properties, not including the Rare logo atop Expresso's cage. | |||
== | ==Inventory== | ||
{|class="wikitable dk" | |||
!Menu title!!Advice!!Cost | |||
|- | |||
!colspan=3|[[Gangplank Galleon (world)|Gangplank Galleon]] | |||
|- | |||
|[[Pirate Panic (Donkey Kong Country 2)|Pirate Panic]] A | |||
|Try using your team throw at the start. | |||
|Free | |||
|- | |||
|[[Lockjaw's Locker (Donkey Kong Country 2)|Lockjaw's Locker]] | |||
|Below the letter K, you'll find a reward if you avoid the danger. | |||
|Free | |||
|- | |||
|[[Mainbrace Mayhem (Donkey Kong Country 2)|Mainbrace Mayhem]] | |||
|Jump for joy when crossing the longest horizontal rope. | |||
|Free | |||
|- | |||
|[[Pirate Panic (Donkey Kong Country 2)|Pirate Panic]] B | |||
|I reckon the door at the bottom of the tall wall looks flimsy to me. | |||
|1 [[File:Banana Coin.png|link=Banana Coin|Banana Coin]] | |||
|- | |||
|[[Gangplank Galley (Donkey Kong Country 2)|Gangplank Galley]] | |||
|Those big blue goons ain't guarding that huge stack of barrels for nuthin'! Knock 'em off and get up there! | |||
|2 [[File:Banana Coin.png|link=Banana Coin|Banana Coins]] | |||
|- | |||
|[[Topsail Trouble (Donkey Kong Country 2)|Topsail Trouble]] | |||
|A hook, step and jump is all you need to look for near the two dragonflies above you. | |||
|3 [[File:Banana Coin.png|link=Banana Coin|Banana Coins]] | |||
|- | |||
!colspan=3|[[Crocodile Cauldron]] | |||
|- | |||
|[[Lava Lagoon (Donkey Kong Country 2)|Lava Lagoon]] | |||
|Below the first seal, you'll find something worth getting your fur burnt for. | |||
|Free | |||
|- | |||
|[[Hot Head Hop]] A | |||
|Is it my eyes, or is there just one chest at the start? | |||
|Free | |||
|- | |||
|[[Red-Hot Ride]] | |||
|Take it easy, let [[Rambi|the rhino]] use his head to get you through the first half. | |||
|Free | |||
|- | |||
|[[Hot-Head Hop]] B | |||
|A trek towards the [[Klobber]] with [[Squitter|the spider]] is worth looking up. | |||
|1 [[File:Banana Coin.png|link=Banana Coin|Banana Coin]] | |||
|- | |||
|[[Kannon's Klaim (Donkey Kong Country 2)|Kannon's Klaim]] | |||
|Right is right, right at the start. | |||
|2 [[File:Banana Coin.png|link=Banana Coin|Banana Coins]] | |||
|- | |||
|[[Squawks's Shaft (Donkey Kong Country 2)|Squawks's Shaft]] | |||
|Those two hook-throwing villains opposite each other are protecting something. I'm sure of it! | |||
|3 [[File:Banana Coin.png|link=Banana Coin|Banana Coins]] | |||
|- | |||
!colspan=3|[[Krem Quay]] | |||
|- | |||
|[[Barrel Bayou (Donkey Kong Country 2)|Barrel Bayou]] | |||
|Find the only [[Krockhead]] stepping stone and you'll find your buddy Rambi. | |||
|Free | |||
|- | |||
|[[Bramble Blast (Donkey Kong Country 2)|Bramble Blast]] A | |||
|With only the dragonflies left, I'm sure you'll be alright. | |||
|Free | |||
|- | |||
|[[Slime Climb (Donkey Kong Country 2)|Slime Climb]] | |||
|When nearing the top, the ability to walk on water reveals all. | |||
|Free | |||
|- | |||
|[[Glimmer's Galleon (Donkey Kong Country 2)|Glimmer's Galleon]] | |||
|It might be dark and spooky, but don't let it get you down immediately. | |||
|1 [[File:Banana Coin.png|link=Banana Coin|Banana Coin]] | |||
|- | |||
|[[Rattle Battle (Donkey Kong Country 2)|Rattle Battle]] | |||
|Are you up to it at the start? | |||
|2 [[File:Banana Coin.png|link=Banana Coin|Banana Coins]] | |||
|- | |||
|[[Bramble Blast (Donkey Kong Country 2)|Bramble Blast]] B | |||
|After four spinning barrels, all that's left is left itself. | |||
|3 [[File:Banana Coin.png|link=Banana Coin|Banana Coins]] | |||
|- | |||
!colspan=3|[[Krazy Kremland]] | |||
|- | |||
|[[Hornet Hole (Donkey Kong Country 2)|Hornet Hole]] A | |||
|An eight-legged friend would help you go halfway to helping you here. | |||
|Free | |||
|- | |||
|[[Rambi Rumble (Donkey Kong Country 2)|Rambi Rumble]] A | |||
|Don't be in a hurry to enter Rambi's room. Think things over. | |||
|Free | |||
|- | |||
|[[Bramble Scramble (Donkey Kong Country 2)|Bramble Scramble]] | |||
|The fruit is always fresher on the other side of the thorns. Jump to it! | |||
|Free | |||
|- | |||
|[[Target Terror (Donkey Kong Country 2)|Target Terror]] | |||
|It's his track, so watch the [[Kremling]] car carefully. He might be down, but he's on his way out. | |||
|1 [[File:Banana Coin.png|link=Banana Coin|Banana Coin]] | |||
|- | |||
|[[Rambi Rumble (Donkey Kong Country 2)|Rambi Rumble]] B | |||
|A charge down the last straight with Rambi will ensure a crushing victory. | |||
|2 [[File:Banana Coin.png|link=Banana Coin|Banana Coins]] | |||
|- | |||
|[[Hornet Hole (Donkey Kong Country 2)|Hornet Hole]] B | |||
|Start with a hook, stick and jumps, and you're bonus bound! | |||
|3 [[File:Banana Coin.png|link=Banana Coin|Banana Coins]] | |||
|- | |||
!colspan=3|[[Gloomy Gulch]] | |||
|- | |||
|[[Ghostly Grove (Donkey Kong Country 2)|Ghostly Grove]] A | |||
|Things are starting to look up on this level. | |||
|Free | |||
|- | |||
|[[Parrot Chute Panic (Donkey Kong Country 2)|Parrot Chute Panic]] A | |||
|Here's a tip that I think's great, the door is by the [[Klampon]] and so is the crate. | |||
|Free | |||
|- | |||
|[[Web Woods (Donkey Kong Country 2)|Web Woods]] | |||
|Finishing this level is cause for celebration. By all means go over the top. | |||
|Free | |||
|- | |||
|[[Haunted Hall]] | |||
|Where you find one, there may be two. | |||
|1 [[File:Banana Coin.png|link=Banana Coin|Banana Coin]] | |||
|- | |||
|[[Parrot Chute Panic (Donkey Kong Country 2)|Parrot Chute Panic]] B | |||
|To the left of the letter 'O' is where you should go. | |||
|2 [[File:Banana Coin.png|link=Banana Coin|Banana Coins]] | |||
|- | |||
|[[Ghostly Grove (Donkey Kong Country 2)|Ghostly Grove]] B | |||
|K. Rool is no fool. He has got two big blue goons watching his horde near half-way. | |||
|3 [[File:Banana Coin.png|link=Banana Coin|Banana Coins]] | |||
|- | |||
!colspan=3|[[K. Rool's Keep]] | |||
|- | |||
|[[Arctic Abyss (Donkey Kong Country 2)|Arctic Abyss]] | |||
|After the start, a long jump and then a high jump will win you more than just a gold medal. | |||
|Free | |||
|- | |||
|[[Chain Link Chamber (Donkey Kong Country 2)|Chain Link Chamber]] A | |||
|Brave an early attack of barrels and their hidden treasure is yours. | |||
|Free | |||
|- | |||
|[[Toxic Tower (Donkey Kong Country 2)|Toxic Tower]] | |||
|Watch very carefully at the end. There's something going down that could give you a new life. | |||
|Free | |||
|- | |||
|[[Clapper's Cavern (Donkey Kong Country 2)|Clapper's Cavern]] | |||
|I ain't helping you with this one. It's up to you to start looking yourself. | |||
|1 [[File:Banana Coin.png|link=Banana Coin|Banana Coin]] | |||
|- | |||
|[[Castle Crush]] | |||
|I've left a couple of animal buddies for you in here, but it's left for you to find.{{sic}} them. | |||
|2 [[File:Banana Coin.png|link=Banana Coin|Banana Coins]] | |||
|- | |||
|[[Chain Link Chamber (Donkey Kong Country 2)|Chain Link Chamber]] B | |||
|When cannon balls are raining down on you, I suggest you look for a way past who's responsible. | |||
|3 [[File:Banana Coin.png|link=Banana Coin|Banana Coins]] | |||
|- | |||
!colspan=3|[[Lost World (Donkey Kong Country 2)|Lost World]] | |||
|- | |||
|[[Jungle Jinx (Donkey Kong Country 2)|Jungle Jinx]] | |||
|Just before halfway, take time to look back at what you've done. | |||
|2 [[File:Banana Coin.png|link=Banana Coin|Banana Coins]] | |||
|- | |||
|[[Black Ice Battle (Donkey Kong Country 2)|Black Ice Battle]] | |||
|After the slope with the letter 'N', press right as you fall and you'll have a ball. | |||
|2 [[File:Banana Coin.png|link=Banana Coin|Banana Coins]] | |||
|- | |||
|[[Klobber Karnage (Donkey Kong Country 2)|Klobber Karnage]] | |||
|Down may be out, but right picks you up. | |||
|2 [[File:Banana Coin.png|link=Banana Coin|Banana Coins]] | |||
|- | |||
|[[Fiery Furnace (Donkey Kong Country 2)|Fiery Furnace]] | |||
|The bananas point the way. | |||
|2 [[File:Banana Coin.png|link=Banana Coin|Banana Coins]] | |||
|- | |||
|[[Animal Antics (Donkey Kong Country 2)|Animal Antics]] | |||
|The end is not the end. | |||
|2 [[File:Banana Coin.png|link=Banana Coin|Banana Coins]] | |||
|} | |||
==Profiles== | |||
*'''Instruction booklet:''' ''Even old Cranky Kong is getting on the entrepreneurial spirit. He’s opened a Monkey Museum where inquisitive monkeys can go to learn about the lore of Crocodile Isle. Prepare to pay to get the best hints!''<ref name=manual/> | |||
*'''[[Nintendo Power|Player's Guide]]:''' ''The Kong clan’s resident curmudgeon returns to dispense his pearls of wisdom to the next generation of video game heroes, whether they like it or not! Cranky gives you scouting reports on the current area, including tips on beating major enemies and finding secret Bonus Areas. Tips can cost up to three Banana Coins, but they're worth it. Of course, wise cracks are always available free of charge.''<ref>{{cite|author=Miller, Kent and Paul Shinoda|title=''Donkey Kong Country 2: Diddy's Kong Quest'' [[Nintendo Power|Player's Guide]]|page=6|date=1995|publisher=Nintendo of America|language=en-us}}</ref> | |||
*'''Instruction booklet ([[Donkey Kong Country 2 (Game Boy Advance)|Game Boy Advance version]]):''' ''Even old Cranky Kong is getting in on the entrepreneurial spirit! He’s opened a small outlet where you can learn more about the "history" and "culture" of Crocodile Isle.''<ref>{{cite|language=en-us|date=2004|publisher=Nintendo of America|title=''Donkey Kong Country 2'' (Game Boy Advance) instruction booklet|page=18}}</ref> | |||
==Gallery== | |||
<gallery> | |||
Monkey Museum background NTSC.png|Background in the North American release, featuring purple and lavender buttons on the Super Nintendo controller | |||
Monkey Museum background PAL.png|Background in the PAL release, featuring red, blue, yellow, and green buttons on the Super Nintendo controller, consistent with the actual controller | |||
Monkey Museum Beta.png|Pre-release image of the Monkey Museum in the Player's Guide. A [[Rambi]] and [[Enguarde]] each appear in place of Expresso and Winky. This can also be seen in the manual, obscured. | |||
Monkey Museum design.jpg|Concept of the Monkey Museum, called "Cranky's Mobile Museum" | |||
</gallery> | |||
==Names in other languages== | |||
{{foreign names | |||
|Jpn=クランキーの{{ruby|小屋|こや}} | |||
|JpnC=<ref>{{cite|language=ja|title=''Super Donkey Kong 2: Dixie & Diddy'' instruction booklet|page=31|date=1995|publisher=Nintendo}}</ref> | |||
|JpnR=Kurankī no Koya | |||
|JpnM=Cranky's Cabin; see [[Cranky's Cabin#Names in other languages|Cranky's Cabin]] | |||
|Ita=Museo delle Scimmie | |||
|ItaN=SNES | |||
|Ita2=Capanna di Cranky | |||
|Ita2N=GBA | |||
|ItaM=Monkey Museum | |||
|Ita2M=Cranky's Cabin | |||
}} | |||
==References== | |||
<references/> | |||
{{DKC2}} | {{DKC2}} | ||
[[Category:Museums]] | |||
[[Category:Shops]] | |||
[[Category: | |||
[[Category: | |||
[[Category:Crocodile Isle]] | [[Category:Crocodile Isle]] | ||
[[Category:Homes]] | |||
[[Category:Donkey Kong Country 2: Diddy's Kong Quest]] | |||
Latest revision as of 19:53, February 4, 2025
| Monkey Museum | |
|---|---|
 Cranky talking to Diddy and Dixie  The menu in the Game Boy Advance version | |
| First appearance | Donkey Kong Country 2: Diddy's Kong Quest (1995) |
| Latest appearance | Donkey Kong Country 2 (Game Boy Advance) (2004) |
| Greater location | Crocodile Isle |
| Owner | Cranky Kong |
- “Look at all this junk in here! Treat my home like a trash can they do! No respect for their elders, that's the trouble...”
- —Cranky Kong, Donkey Kong Country 2: Diddy's Kong Quest
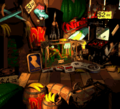
The Monkey Museum, alternatively Cranky's Monkey Museum[1] and renamed Cranky's Hut in the remake, is a site where Cranky Kong has taken up residence in Donkey Kong Country 2: Diddy's Kong Quest. There is an establishment in every area of Crocodile Isle except The Flying Krock. Like its predecessor, Cranky's Cabin, the main purpose of the Monkey Museum is for Diddy and Dixie receive tips and advice from Cranky, with even the background music being a rearrangement of that of Cranky's Cabin. Cranky does not rant as frequently in Monkey Museum, usually only doing so when the Kongs enter and exit the location. The Kongs can now choose which advice to hear from Cranky, differing between each world as it involves their levels, and is either free or priced anywhere between one to three Banana Coins.
Various artifacts appear in the background of the Monkey Museum, including Bananas, a Rare symbol, a Nintendo logo, an oversized Super Nintendo Entertainment System controller, a Killer Instinct arcade cabinet, a Donkey Kong statue above the arcade cabinet, a poster of Chief Thunder from Killer Instinct, Funky Kong's surfboard, a mounted Kruncha head, a motionless Winky figure, a "DK" symbol, a golden Expresso statue, a Banana Coin, two barrels, a tipped over Mine Cart, two pirate swords, and game cartridges.
Cranky occasionally asks the Kongs if they have tried the game "Cranky Kong Country," mentioning it was on sale a year ago. In reality, this is directly based on Donkey Kong Country releases one year prior in real life. Even though he dislikes the game, Cranky takes credit for causing its popularity instead of Donkey Kong. In the remake of Donkey Kong Country 3: Dixie Kong's Double Trouble!, Cranky has a dojo, where he trains himself for the same adventure, Cranky Kong Country, likely hoping for a successful game starring himself.
In the remake, Cranky keeps his pet, Expresso, caged up in the hut for the players to raise and enhance his stats using golden feathers for the minigame, Expresso Racing. The shelves display trophies from winning the Expresso Racing minigame in their usual gold, silver, and bronze colors for if the player wins first, second, and third place, respectively. The outside is more clearly seen, due to the zoomed-in world map compared to the original version The interior is completely different, especially from no longer featuring cameos from other Rare-owned properties, not including the Rare logo atop Expresso's cage.
Inventory[edit]
| Menu title | Advice | Cost |
|---|---|---|
| Gangplank Galleon | ||
| Pirate Panic A | Try using your team throw at the start. | Free |
| Lockjaw's Locker | Below the letter K, you'll find a reward if you avoid the danger. | Free |
| Mainbrace Mayhem | Jump for joy when crossing the longest horizontal rope. | Free |
| Pirate Panic B | I reckon the door at the bottom of the tall wall looks flimsy to me. | 1 |
| Gangplank Galley | Those big blue goons ain't guarding that huge stack of barrels for nuthin'! Knock 'em off and get up there! | 2 |
| Topsail Trouble | A hook, step and jump is all you need to look for near the two dragonflies above you. | 3 |
| Crocodile Cauldron | ||
| Lava Lagoon | Below the first seal, you'll find something worth getting your fur burnt for. | Free |
| Hot Head Hop A | Is it my eyes, or is there just one chest at the start? | Free |
| Red-Hot Ride | Take it easy, let the rhino use his head to get you through the first half. | Free |
| Hot-Head Hop B | A trek towards the Klobber with the spider is worth looking up. | 1 |
| Kannon's Klaim | Right is right, right at the start. | 2 |
| Squawks's Shaft | Those two hook-throwing villains opposite each other are protecting something. I'm sure of it! | 3 |
| Krem Quay | ||
| Barrel Bayou | Find the only Krockhead stepping stone and you'll find your buddy Rambi. | Free |
| Bramble Blast A | With only the dragonflies left, I'm sure you'll be alright. | Free |
| Slime Climb | When nearing the top, the ability to walk on water reveals all. | Free |
| Glimmer's Galleon | It might be dark and spooky, but don't let it get you down immediately. | 1 |
| Rattle Battle | Are you up to it at the start? | 2 |
| Bramble Blast B | After four spinning barrels, all that's left is left itself. | 3 |
| Krazy Kremland | ||
| Hornet Hole A | An eight-legged friend would help you go halfway to helping you here. | Free |
| Rambi Rumble A | Don't be in a hurry to enter Rambi's room. Think things over. | Free |
| Bramble Scramble | The fruit is always fresher on the other side of the thorns. Jump to it! | Free |
| Target Terror | It's his track, so watch the Kremling car carefully. He might be down, but he's on his way out. | 1 |
| Rambi Rumble B | A charge down the last straight with Rambi will ensure a crushing victory. | 2 |
| Hornet Hole B | Start with a hook, stick and jumps, and you're bonus bound! | 3 |
| Gloomy Gulch | ||
| Ghostly Grove A | Things are starting to look up on this level. | Free |
| Parrot Chute Panic A | Here's a tip that I think's great, the door is by the Klampon and so is the crate. | Free |
| Web Woods | Finishing this level is cause for celebration. By all means go over the top. | Free |
| Haunted Hall | Where you find one, there may be two. | 1 |
| Parrot Chute Panic B | To the left of the letter 'O' is where you should go. | 2 |
| Ghostly Grove B | K. Rool is no fool. He has got two big blue goons watching his horde near half-way. | 3 |
| K. Rool's Keep | ||
| Arctic Abyss | After the start, a long jump and then a high jump will win you more than just a gold medal. | Free |
| Chain Link Chamber A | Brave an early attack of barrels and their hidden treasure is yours. | Free |
| Toxic Tower | Watch very carefully at the end. There's something going down that could give you a new life. | Free |
| Clapper's Cavern | I ain't helping you with this one. It's up to you to start looking yourself. | 1 |
| Castle Crush | I've left a couple of animal buddies for you in here, but it's left for you to find.[sic] them. | 2 |
| Chain Link Chamber B | When cannon balls are raining down on you, I suggest you look for a way past who's responsible. | 3 |
| Lost World | ||
| Jungle Jinx | Just before halfway, take time to look back at what you've done. | 2 |
| Black Ice Battle | After the slope with the letter 'N', press right as you fall and you'll have a ball. | 2 |
| Klobber Karnage | Down may be out, but right picks you up. | 2 |
| Fiery Furnace | The bananas point the way. | 2 |
| Animal Antics | The end is not the end. | 2 |
Profiles[edit]
- Instruction booklet: Even old Cranky Kong is getting on the entrepreneurial spirit. He’s opened a Monkey Museum where inquisitive monkeys can go to learn about the lore of Crocodile Isle. Prepare to pay to get the best hints![1]
- Player's Guide: The Kong clan’s resident curmudgeon returns to dispense his pearls of wisdom to the next generation of video game heroes, whether they like it or not! Cranky gives you scouting reports on the current area, including tips on beating major enemies and finding secret Bonus Areas. Tips can cost up to three Banana Coins, but they're worth it. Of course, wise cracks are always available free of charge.[2]
- Instruction booklet (Game Boy Advance version): Even old Cranky Kong is getting in on the entrepreneurial spirit! He’s opened a small outlet where you can learn more about the "history" and "culture" of Crocodile Isle.[3]
Gallery[edit]
Background in the North American release, featuring purple and lavender buttons on the Super Nintendo controller

Background in the PAL release, featuring red, blue, yellow, and green buttons on the Super Nintendo controller, consistent with the actual controller
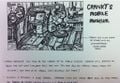
Concept of the Monkey Museum, called "Cranky's Mobile Museum"


Names in other languages[edit]
| Language | Name | Meaning | Notes |
|---|---|---|---|
| Japanese | クランキーの Kurankī no Koya |
Cranky's Cabin; see Cranky's Cabin | |
| Italian | Museo delle Scimmie[?] | Monkey Museum | SNES |
| Capanna di Cranky[?] | Cranky's Cabin | GBA |
References[edit]
- ^ a b 1995. Donkey Kong Country 2: Diddy's Kong Quest instruction booklet. Nintendo of America (American English). Page 26.
- ^ Miller, Kent and Paul Shinoda (1995). Donkey Kong Country 2: Diddy's Kong Quest Player's Guide. Nintendo of America (American English). Page 6.
- ^ 2004. Donkey Kong Country 2 (Game Boy Advance) instruction booklet. Nintendo of America (American English). Page 18.
- ^ 1995. Super Donkey Kong 2: Dixie & Diddy instruction booklet. Nintendo (Japanese). Page 31.