Mad-Bomber: Difference between revisions
From the Super Mario Wiki, the Mario encyclopedia
Jump to navigationJump to search
LinkTheLefty (talk | contribs) mNo edit summary |
m (Text replacement - "(\| *)Jap([RMCN\d]* *=)" to "$1Jpn$2") |
||
| (6 intermediate revisions by 4 users not shown) | |||
| Line 2: | Line 2: | ||
{{character infobox | {{character infobox | ||
|image=[[File:Death Bomber Bomberman GB.jpg|200px]] | |image=[[File:Death Bomber Bomberman GB.jpg|200px]] | ||
|first_appearance=''{{wp|Bomberman GB}}'' ([[List of games by date#1994|1994]], ''Bomberman'' franchise)<br>''[[Wario Blast: Featuring Bomberman!]]'' (1994, ''Super Mario'' | |species=[[Madbomber]]s | ||
|first_appearance=''{{wp|Bomberman GB}}'' ([[List of games by date#1994|1994]], ''Bomberman'' franchise)<br>''[[Wario Blast: Featuring Bomberman!]]'' (1994, ''[[Super Mario (franchise)|Super Mario]]'' franchise) | |||
}} | }} | ||
[[File:DeathBomber.png|frame|left]] | [[File:DeathBomber.png|frame|left]] | ||
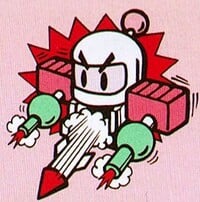
The '''Mad-Bomber'''<ref>''[[Nintendo Power]]'' Volume 67 | The '''Mad-Bomber'''<ref>{{cite|date=December 1994|title=''[[Nintendo Power]]'' Volume 67|page=95|publisher=Nintendo of America|language=en-us}}</ref> is a [[List of bosses|boss]] in ''[[Wario Blast: Featuring Bomberman!]]''. He is the boss of [[Power Zone|Round 8]], formed out of three [[Madbomber]]s. He is the final boss of the game, and has three phases. In his initial form, the Mad-Bomber will fly around the room firing lasers and missiles at [[Bomberman]] or [[Wario]]. In the second configuration, the Mad-Bomber will fire two fiery balls. Lastly, the Mad-Bomber will have his head remaining and will fire four projectiles. At this point, the Mad-Bomber will finally explode after three [[bomb]] blasts. | ||
{{br|left}} | {{br|left}} | ||
==Names in other languages== | ==Names in other languages== | ||
{{foreign names | {{foreign names | ||
| | |Jpn=デスボンバー<ref>{{cite|date=1994|publisher=Nintendo|title=''Bomberman GB'' instruction booklet|page=15}}</ref> | ||
| | |JpnR=Desu Bonbā | ||
| | |JpnM=Death Bomber | ||
}} | }} | ||
==Trivia== | ==Trivia== | ||
*Regardless of | *Regardless of whom the player chooses, the Mad-Bomber's head will always be based on Bomberman. | ||
==References== | ==References== | ||
<references/> | <references/> | ||
{{Crossover characters}} | |||
{{WBFB}} | {{WBFB}} | ||
[[Category:Robots]] | [[Category:Robots]] | ||
[[Category:Final bosses]] | [[Category:Final bosses]] | ||
[[Category:Wario Blast: Featuring Bomberman! bosses]] | [[Category:Wario Blast: Featuring Bomberman! bosses]] | ||
[[it:Mad-Bomber]] | [[it:Mad-Bomber]] | ||
Latest revision as of 11:48, January 7, 2025
- This article is about the final boss of Wario Blast: Featuring Bomberman! For the main enemy of the same game, see Madbomber.
| Mad-Bomber | |
|---|---|

| |
| Species | Madbombers |
| First appearance | Bomberman GB (1994, Bomberman franchise) Wario Blast: Featuring Bomberman! (1994, Super Mario franchise) |
The Mad-Bomber[1] is a boss in Wario Blast: Featuring Bomberman!. He is the boss of Round 8, formed out of three Madbombers. He is the final boss of the game, and has three phases. In his initial form, the Mad-Bomber will fly around the room firing lasers and missiles at Bomberman or Wario. In the second configuration, the Mad-Bomber will fire two fiery balls. Lastly, the Mad-Bomber will have his head remaining and will fire four projectiles. At this point, the Mad-Bomber will finally explode after three bomb blasts.
Names in other languages[edit]
| Language | Name | Meaning | Notes |
|---|---|---|---|
| Japanese | デスボンバー[2] Desu Bonbā |
Death Bomber |
Trivia[edit]
- Regardless of whom the player chooses, the Mad-Bomber's head will always be based on Bomberman.
References[edit]
- ^ December 1994. Nintendo Power Volume 67. Nintendo of America (American English). Page 95.
- ^ 1994. Bomberman GB instruction booklet. Nintendo. Page 15.
| Wario Blast: Featuring Bomberman! | |||
|---|---|---|---|
| Characters | Wario • Bomberman • Madbombers | ||
| Bosses | Cup King • Top Man • T-Bear • P-Flower • Thunder Cloud • Pukupuku • Gururin Knight • Mad-Bomber | ||
| Rounds | Normal Zone • Warp Zone • Arrow Zone • Fire Zone • Coma Zone • Ice Zone • Burn Zone • Power Zone | ||
| Normal Items | Explosion Expander • Extra Bomb • Skull | ||
| Special Items | Kicks • Dashin • The Trouncer • Liner • Moto | ||
| Objects | Block (Regenerating Wall) • Bomb • Bomb-Guiding block • Heated Vent • Warp Hole | ||
| Other | Bomberland • Staff • The Battle | ||