K. Rool Duel (Donkey Kong Country 2): Difference between revisions
m (Text replacement - "{{(I|i)talic title\|[^(}\n]+ \(''[^)}\n]+''\)}}" to "{{italic title|id=yes}}") |
(→Layout) |
||
| (17 intermediate revisions by 7 users not shown) | |||
| Line 1: | Line 1: | ||
{{italic title|id=yes}} | {{italic title|id=yes}} | ||
{{ | {{level infobox | ||
|image=[[File:KRoolDuel.png]] | |image=[[File:KRoolDuel.png]] | ||
|code=7 - BOSS | |code=7 - BOSS | ||
| Line 7: | Line 6: | ||
|game=''[[Donkey Kong Country 2: Diddy's Kong Quest]]'' | |game=''[[Donkey Kong Country 2: Diddy's Kong Quest]]'' | ||
|boss=[[King K. Rool|Kaptain K. Rool]] | |boss=[[King K. Rool|Kaptain K. Rool]] | ||
| | |track=Crocodile Cacophony | ||
|before=[[Screech's Sprint (Donkey Kong Country 2 | |before=[[Screech's Sprint (Donkey Kong Country 2)|<<]] | ||
|after= | |after=>> | ||
}} | }} | ||
'''K. Rool Duel''' is the final boss level of ''[[Donkey Kong Country 2: Diddy's Kong Quest]]''. In this level, [[Diddy Kong|Diddy]] and [[Dixie Kong]] face [[King K. Rool|Kaptain K. Rool]] in order to save [[Donkey Kong]]. The battle takes place inside K. Rool's airship, [[the Flying Krock]]. | '''K. Rool Duel''' is the first final boss level of ''[[Donkey Kong Country 2: Diddy's Kong Quest]]''. In this level, [[Diddy Kong|Diddy]] and [[Dixie Kong]] face [[King K. Rool|Kaptain K. Rool]] in order to save [[Donkey Kong]]. The battle takes place inside K. Rool's airship, [[the Flying Krock]]. | ||
==Layout== | |||
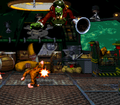
[[File:TheFlyingKrockFight.png|thumb|left|Diddy fighting Kaptain K. Rool]] | |||
Upon entering the ship, Kaptain K. Rool is seen attacking the tied-up Donkey Kong with his [[blunderbuss]]. Once he notices Diddy and Dixie, Donkey Kong is raised offscreen and K. Rool turns his attention to them. This is only seen the first time the stage is accessed; on repeat playthroughs, the battle begins immediately. | |||
The fight starts with Kaptain K. Rool shooting a [[Cannonball|kannonball]] out of his blunderbuss. The Kongs must jump over K. Rool when he propels himself forward, and then throw the kannonball into his blunderbuss when its suction is active. If successful, he will fire the kannonball back, while the blunderbuss explodes in his face, causing him to take damage. Afterwards, K. Rool fires a spiked kannonball onto the middle of the battlefield, and then slides across the stage twice. After this, the kannonball's spikes will retract, and K. Rool can be attacked again. After being damaged a second time, K. Rool fires two spiked kannonballs on the floor, and slides across the stage three times. After this, only one of the kannonballs retracts its spikes. | |||
After the third hit, K. Rool will fall briefly. During this, both the tied-up Donkey Kong and a [[DK Barrel]] will appear just before K. Rool gets back up. Following this, K. Rool will shoot nine spiked kannonballs and a [[barrel]], which has a non-spiked kannonball that can be used against him. After K. Rool is damaged a fourth time, he will propel himself forward, and then shoots nine spiked kannonballs that bounce at high, low, and moderate heights alike, followed by a bouncing barrel that contains another non-spiked kannonball. After the fifth hit, K. Rool will propel himself forward again, and then shoots nine spiked kannonballs that move slowly and circle through the air (with the last six coming out in pairs), followed by a circular-moving barrel that contains a non-spiked kannonball. | |||
After six hits, K. Rool will fall over again, revealing both Donkey Kong and another DK Barrel until he gets back up again. Following this, K. Rool will propel himself forward, and then shoots three blue gas clouds that can freeze the Kongs. After that, K. Rool will slowly propel himself across the floor, then he does it again while being partially invisible, and then a third time while fully invisible, though the dust treading across the floor shows his current position. Afterwards, a kannonball will appear, and after being damaged by it, K. Rool will propel himself forward, and then shoots three bouncing red gas clouds that can temporarily slow the Kongs if they touch them. Following this, K. Rool shoots three spiked kannonballs before another regular kannonball appears. After the eighth hit, K. Rool will propel himself again, and then shoots three slow, rotating, purple gas clouds, which invert the directional controls. Then, he will start vanishing and reappearing next to the Kongs in an attempt to pull them toward him. Once he does this four times, a kannonball will spawn before he reappears again. | |||
After nine hits, K. Rool falls over and the [[Kremkoin]] is obtained. K. Rool gets back up yet again, but this time, Donkey Kong breaks loose and punches him, knocking him out of the Flying Krock. He lands in [[Krem Quay]] and ends up in [[Krocodile Kore (Donkey Kong Country 2)|Krocodile Kore]]. | |||
[[ | |||
==Gallery== | ==Gallery== | ||
| Line 27: | Line 27: | ||
K Rool Duel start.png|Dixie witnesses K. Rool attacking Donkey Kong with his blunderbuss. | K Rool Duel start.png|Dixie witnesses K. Rool attacking Donkey Kong with his blunderbuss. | ||
K Rool Duel blunderbuss smoke.png|K. Rool being covered in gunpowder from the blunderbuss after Diddy throws a kannonball into it. | K Rool Duel blunderbuss smoke.png|K. Rool being covered in gunpowder from the blunderbuss after Diddy throws a kannonball into it. | ||
K Rool defeated DKC2 Flying Krock.png|Donkey Kong uppercuts Kaptain K. Rool out through the roof | |||
</gallery> | </gallery> | ||
==Names in other languages== | ==Names in other languages== | ||
{{foreign names | {{foreign names | ||
| | |Jpn=けっせん!キャプテンクルール | ||
| | |JpnR=Kessen! Kyaputen Kurūru | ||
| | |JpnM=Decisive Battle! Kaptain K. Rool | ||
| | |Fre=Duel Avec K. Rool | ||
| | |Ger=K. Rool-Duell | ||
|GerM=K. Rool Duel | |||
|FreM=Duel with K. Rool | |||
|Ita=Duello con K. Rool | |Ita=Duello con K. Rool | ||
|ItaM=Duel with K. Rool | |ItaM=Duel with K. Rool | ||
|Spa=Duelo con K. Rool | |||
|SpaM=Duel with K. Rool | |||
}} | }} | ||
== | ==Notes== | ||
*When Diddy or Dixie lose a life in the boss battle, their theme for losing a life does not play. The "Crocodile Cacophony" theme continues playing until returning to the world map. This reason behind this is due to a programming bug that keeps the tune from playing.{{ref needed}} This also applies to Diddy's and Dixie's victory themes. The theme for losing a life does play during the [[Game Boy Advance]] version. | *When Diddy or Dixie lose a life in the boss battle, their theme for losing a life does not play. The "Crocodile Cacophony" theme continues playing until returning to the world map. This reason behind this is due to a programming bug that keeps the tune from playing.{{ref needed}} This also applies to Diddy's and Dixie's victory themes. The theme for losing a life does play during the [[Game Boy Advance]] version. | ||
*In | *In ''Donkey Kong Country 2: Diddy's Kong Quest'', a few things notably appear in the scenery: | ||
**A giant Super Nintendo controller. Similar to [[Monkey Museum]], the buttons had a different color based on the regional release: purple in the North American version and red, blue, yellow, and green each for the PAL and Japanese releases. | **A giant Super Nintendo controller. Similar to [[Monkey Museum]], the buttons had a different color based on the regional release: purple in the North American version and red, blue, yellow, and green each for the PAL and Japanese releases. | ||
**A black flag with the Kremling Krew symbol. | **A black flag with the Kremling Krew symbol. | ||
**A few [[Giant Banana]]s, which are large [[banana]]s originating from completing a boss stage in ''[[Donkey Kong Country]]''. | **A few [[Giant Banana]]s, which are large [[banana]]s originating from completing a boss stage in ''[[Donkey Kong Country]]''. | ||
**A few oil containers, also as seen in ''Donkey Kong Country'' is found in the ship's far left corner | **A few oil containers, also as seen in ''Donkey Kong Country'' is found in the ship's far left corner | ||
**A black floaty tube | **A black floaty tube | ||
*The door located to the far left is bust open in the PAL release, but remains | *The door located to the far left is bust open in the PAL release, but remains undamaged in the North American release as well as the Game Boy Advance version. | ||
{{DKC2}} | {{DKC2}} | ||
[[Category:Donkey Kong Country 2: Diddy's Kong Quest | [[Category:Airship areas]] | ||
[[Category:Donkey Kong Country 2: Diddy's Kong Quest levels]] | |||
Latest revision as of 19:30, February 18, 2025
| Level | |
|---|---|
| K. Rool Duel | |

| |
| Level code | 7 - BOSS |
| World | The Flying Krock |
| Game | Donkey Kong Country 2: Diddy's Kong Quest |
| Boss | Kaptain K. Rool |
| Music track | Crocodile Cacophony |
| << Directory of levels >> | |
K. Rool Duel is the first final boss level of Donkey Kong Country 2: Diddy's Kong Quest. In this level, Diddy and Dixie Kong face Kaptain K. Rool in order to save Donkey Kong. The battle takes place inside K. Rool's airship, the Flying Krock.
Layout[edit]

Upon entering the ship, Kaptain K. Rool is seen attacking the tied-up Donkey Kong with his blunderbuss. Once he notices Diddy and Dixie, Donkey Kong is raised offscreen and K. Rool turns his attention to them. This is only seen the first time the stage is accessed; on repeat playthroughs, the battle begins immediately.
The fight starts with Kaptain K. Rool shooting a kannonball out of his blunderbuss. The Kongs must jump over K. Rool when he propels himself forward, and then throw the kannonball into his blunderbuss when its suction is active. If successful, he will fire the kannonball back, while the blunderbuss explodes in his face, causing him to take damage. Afterwards, K. Rool fires a spiked kannonball onto the middle of the battlefield, and then slides across the stage twice. After this, the kannonball's spikes will retract, and K. Rool can be attacked again. After being damaged a second time, K. Rool fires two spiked kannonballs on the floor, and slides across the stage three times. After this, only one of the kannonballs retracts its spikes.
After the third hit, K. Rool will fall briefly. During this, both the tied-up Donkey Kong and a DK Barrel will appear just before K. Rool gets back up. Following this, K. Rool will shoot nine spiked kannonballs and a barrel, which has a non-spiked kannonball that can be used against him. After K. Rool is damaged a fourth time, he will propel himself forward, and then shoots nine spiked kannonballs that bounce at high, low, and moderate heights alike, followed by a bouncing barrel that contains another non-spiked kannonball. After the fifth hit, K. Rool will propel himself forward again, and then shoots nine spiked kannonballs that move slowly and circle through the air (with the last six coming out in pairs), followed by a circular-moving barrel that contains a non-spiked kannonball.
After six hits, K. Rool will fall over again, revealing both Donkey Kong and another DK Barrel until he gets back up again. Following this, K. Rool will propel himself forward, and then shoots three blue gas clouds that can freeze the Kongs. After that, K. Rool will slowly propel himself across the floor, then he does it again while being partially invisible, and then a third time while fully invisible, though the dust treading across the floor shows his current position. Afterwards, a kannonball will appear, and after being damaged by it, K. Rool will propel himself forward, and then shoots three bouncing red gas clouds that can temporarily slow the Kongs if they touch them. Following this, K. Rool shoots three spiked kannonballs before another regular kannonball appears. After the eighth hit, K. Rool will propel himself again, and then shoots three slow, rotating, purple gas clouds, which invert the directional controls. Then, he will start vanishing and reappearing next to the Kongs in an attempt to pull them toward him. Once he does this four times, a kannonball will spawn before he reappears again.
After nine hits, K. Rool falls over and the Kremkoin is obtained. K. Rool gets back up yet again, but this time, Donkey Kong breaks loose and punches him, knocking him out of the Flying Krock. He lands in Krem Quay and ends up in Krocodile Kore.
Gallery[edit]
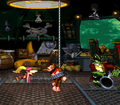
Dixie witnesses K. Rool attacking Donkey Kong with his blunderbuss.
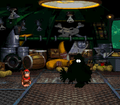
K. Rool being covered in gunpowder from the blunderbuss after Diddy throws a kannonball into it.
Donkey Kong uppercuts Kaptain K. Rool out through the roof


Names in other languages[edit]
| Language | Name | Meaning | Notes |
|---|---|---|---|
| Japanese | けっせん!キャプテンクルール[?] Kessen! Kyaputen Kurūru |
Decisive Battle! Kaptain K. Rool | |
| French | Duel Avec K. Rool[?] | Duel with K. Rool | |
| German | K. Rool-Duell[?] | K. Rool Duel | |
| Italian | Duello con K. Rool[?] | Duel with K. Rool | |
| Spanish | Duelo con K. Rool[?] | Duel with K. Rool |
Notes[edit]
- When Diddy or Dixie lose a life in the boss battle, their theme for losing a life does not play. The "Crocodile Cacophony" theme continues playing until returning to the world map. This reason behind this is due to a programming bug that keeps the tune from playing.[citation needed] This also applies to Diddy's and Dixie's victory themes. The theme for losing a life does play during the Game Boy Advance version.
- In Donkey Kong Country 2: Diddy's Kong Quest, a few things notably appear in the scenery:
- A giant Super Nintendo controller. Similar to Monkey Museum, the buttons had a different color based on the regional release: purple in the North American version and red, blue, yellow, and green each for the PAL and Japanese releases.
- A black flag with the Kremling Krew symbol.
- A few Giant Bananas, which are large bananas originating from completing a boss stage in Donkey Kong Country.
- A few oil containers, also as seen in Donkey Kong Country is found in the ship's far left corner
- A black floaty tube
- The door located to the far left is bust open in the PAL release, but remains undamaged in the North American release as well as the Game Boy Advance version.