Target Terror (Donkey Kong Country 2): Difference between revisions
m (Text replacement - "(\| *)Jap([RMCN\d]* *=)" to "$1Jpn$2") |
|||
| (68 intermediate revisions by 29 users not shown) | |||
| Line 1: | Line 1: | ||
{{ | {{italic title|id=yes}} | ||
| | {{level infobox | ||
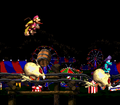
|image=[[ | |image=[[File:Target Terror.png]] | ||
|code=4 - 2 | |code=4 - 2 | ||
|game=''[[Donkey Kong Country 2: Diddy's Kong Quest | |world=[[Krazy Kremland]] | ||
| | |game=''[[Donkey Kong Country 2: Diddy's Kong Quest]]'' | ||
| | |track=Disco Train | ||
| | |before=[[Hornet Hole (Donkey Kong Country 2)|<<]] | ||
|after=[[Bramble Scramble (Donkey Kong Country 2)|>>]] | |||
}} | }} | ||
'''Target Terror''' is the eighteenth level of ''[[Donkey Kong Country 2: Diddy's Kong Quest]]'' and | '''Target Terror''' is the eighteenth level of ''[[Donkey Kong Country 2: Diddy's Kong Quest]]'' and the second level of [[Krazy Kremland]]. It is the first level where [[Diddy Kong]] and [[Dixie Kong]] ride in a [[Roller Coaster]], which is the game's equivalent to [[Mine Cart]]s from ''[[Donkey Kong Country]]''. Throughout the level, there are gates that the [[Kong]]s can open or close by using [[Check and X Barrels]] respectively. If Diddy and Dixie crash into a closed gate, the player loses a Kong, so the Kongs must jump at every Check Barrel but avoid every X Barrel. Target Terror is the first of two levels to feature [[Klank]]s, who appear in a later Krazy Kremland level, [[Rickety Race (Donkey Kong Country 2)|Rickety Race]]. The Kongs must jump over any barrel that a Klank throws at them. There are two aerial enemies in the level: [[Zinger]]s and [[Flitter]]s; the former only serve as obstacles while the Kongs can jump from the latter to reach a Check Barrel. [[Squawks the Parrot]] assists the Kongs only during the first [[Bonus Level]]. | ||
==Layout== | |||
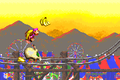
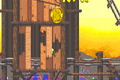
[[File:Target Terror DKC2 GBA.png|thumb|left|Target Terror in the Game Boy Advance version]] | |||
At the start of the level, the heroes can find a pathway over a wooden tunnel that they must travel across to reach a [[Blast Barrel]]. The barrel can shoot them into a [[Roller Coaster]]. The cart begins to move as soon as they land on it, and then travels a short distance east, where there are some enemies. Shortly after riding down a large hill, the heroes drive towards a Zinger above a lower track. The track curves into a small hill ahead of here and leads the hero towards a tunnel that contains a hidden [[golden feather]]. A Flitter is above the track near here that can bounce the primates to the [[KONG Letters|letter K]]. A barrel with a check mark on it is immediately after the tunnel, opening the gate that follows. Once they get through this gate, they travel over a large hill and cross over a gap. They must hop out of their cart at the gap so they can access the second Roller Coaster waiting at the other end of the abyss. This cart leads them to a second gate. A check marked barrel is immediately before it that can open it, but the primates must bounce on a Flitter to hit it. | |||
The | After this gate, the Kongs ride up and down some hills and soon meet a Klank riding ahead. The Klank drops off the track shortly after they find it, but it manages to hurl a barrel at them before falling. A check marked barrel is above the gap that it falls in, opening the next gate, which they must go through. This is shortly after followed by the fourth gate. This door is already open, and they need to avoid hitting the X Barrel immediately before it to continue safely. A large hill is after the gate, followed by some more small hills. As they ride over the hills, they approach a [[Bonus Barrel]] that is placed in the air. A gap follows here with another Roller Coaster at the other side of it. The cart leads them to the letter O, as well as towards a pair of Flitters that can be bounced on to reach another check marked barrel. A gate ahead is opened when it is hit. On the other side of the gate, the heroes ride towards another gap, which has a Flitter in it. There is an additional Roller Coaster waiting at the other side of the gap. The [[Star Barrel]] floats above it. | ||
Two open gates with a [[DK Barrel]] between them follow the Star Barrel. Two small gaps are ahead, and a Roller Coaster sits at the other side of each abyss to drive the Kong forward. After the second abyss, they land in a cart that rides them towards an X barrel that they must jump over to ride under another open gate. This gate is followed by two more gates, which have check marked barrels to open them. The first barrel is surrounded by a Zinger, while the second one is after a gap following it. They pass the letter N on the way between these gates. After this, the group travels up and down a large hill and rides through a small tunnel, which contains a hidden [[DK Coin|Video Game Hero Coin]]. Upon exiting, a Klank appears, who throws barrels at them. The Klank soon falls into a small gap, which has a check marked barrel near it. The barrel must be hit to open a nearby gate. There is an additional gate shortly ahead, but it is already open. While trying not to jump into a Zinger, they must jump over an X marked barrel to keep it open so they can drive through safely. | |||
[[ | |||
After this | After another gap ahead of this, the Kongs ride down a large hill and, on the way, find a check marked barrel near a Zinger. The heroes approach a large gap once they pass this gate. They must bounce on Flitters to cross it and reach the next cart. This cart leads them towards a gate, which must be opened with a check marked barrel found in the air between two Zingers. Another check marked barrel is ahead in an abyss. The primates must drop into the abyss and jump out of their cart to grab it safely. Once they hit the barrel, they can land back in a Roller Coaster waiting on the track and ride through the now-opened gate. Finally, the heroes approach another X marked barrel as they ride ahead. They must jump over it to keep the gate following it open to pass through. A tunnel is after the gate that leads the Kongs into a small area, where they find themselves on foot again. The [[End of Level Target]] is just ahead of here, and once it is hit the level is completed. If the Kongs use a nearby Barrel Cannon, they can either win a [[banana]], [[Banana Bunch]], [[Banana Coin]], or a [[Red Balloon]] from landing onto the target. | ||
==Enemies== | |||
The following enemies appear in the following quantities: | |||
[[ | <gallery> | ||
Flitter DKC2.png|[[Flitter]] (7) | |||
Klank DKC2 blue.png|[[Klank]] (2) | |||
Zinger DKC2 yellow.png|[[Zinger]] (yellow) (16) | |||
</gallery> | |||
== | ==Items and objects== | ||
[[ | The following items and objects appear in the following quantities: | ||
The level | |||
<gallery> | |||
Banana Bunch DKC SNES.png|[[Banana Bunch]] (1) | |||
DK Barrel.png|[[DK Barrel]] (4) | |||
</gallery> | |||
===KONG Letters=== | |||
*'''K:''' The Kongs can obtain the letter by bouncing from the first Flitter in the level. | |||
*'''O:''' After the first Bonus Level, the Kongs must jump onto the next Roller Coaster. Just after doing so, the letter O appears hovering slightly above the tracks, and the Kongs can obtain the letter by jumping at it. | |||
*'''N:''' After passing the first X Barrel after the Star Barrel, the Kongs must open the next gate from a Check Barrel, which a Zinger hovers around. After leaving the gate, the Kongs must jump across a gap, collect the letter N, and land into the next Roller Coaster. | |||
*'''G:''' After exiting the second Bonus Level, the Kongs must jump into a [[Blast Barrel]] to return to the main level. The letter G is hovering midway during their jump back into the Blast Barrel. | |||
===Key items=== | |||
*'''[[DK Coin|Cranky's Video Game Hero Coin]]:''' After the letter N, the Kongs must jump into the next Roller Coaster and continue through a tall, wooden tunnel. The Video Game Hero Coin can be obtained by jumping while inside of the tunnel. | |||
*'''[[Golden feather]] ([[Donkey Kong Country 2 (Game Boy Advance)|Game Boy Advance version]] only):''' The golden feather appears in the center of the level's first wooden tunnel, which is right next to the letter K. The Kongs can obtain the golden feather by jumping at it. | |||
==Bonus Levels== | |||
{{multiframe|[[File:Target Terror Bonus Level 1.png|200px]] [[File:Target Terror Bonus Area 2.png|200px]]|size=420|The first and second Bonus Levels respectively}} | |||
Target Terror has two Bonus Levels, listed by type: | |||
*'''Destroy them All!''': Right after the Klank drives off the rails, the Kongs must jump into the next Roller Coaster. After going through the next gate, the Kongs descend a hill, then go up a smaller one. Just before reaching the bottom of the second hill, Diddy and Dixie must jump forward to land into a [[Bonus Barrel]]. The Bonus Level takes place in an enclosed area between two long [[bramble]]s. Their objective is to defeat nine Zingers within 30 seconds. At the start, the Kongs must grab onto [[Squawks the Parrot]], who flies them through the area. Squawks must spit a coconut at every Zinger to defeat them. After doing so, the [[Kremkoin]] appears on a platform consisting of wooden planks. A [[No Animal Sign]] is left of where the Kremkoin appears, and by crossing it, Squawks turns into a [[Banana Bunch]]. | |||
*'''Find the Token!:''' Just after the Video Game Hero Coin, Diddy and Dixie encounter the second Klank of the level. Shortly after the Kongs encounter the Klank, it falls down a gap. Instead of jumping into the next Roller Coaster, the Kongs must follow Klank down the gap. They fall onto a small, hidden track. When they reach the end, Diddy and Dixie must jump at an arch of bananas, which guide them into the next Roller Coaster, which goes straight into a wooden tunnel where the Kongs enter the second Bonus Level. Here, the Kongs have only 15 seconds to obtain the Kremkoin. There are ten small tracks that Diddy and Dixie must jump from, each with a fast-moving Roller Coaster at the start. A banana is floating above each gap, except the first jump, which has an arch of bananas from the end of the first track to the second Roller Coaster. The final Roller Coaster directly goes into the Kremkoin, followed by the exit. | |||
==Gallery== | ==Gallery== | ||
===Super Nintendo Entertainment System=== | |||
<gallery> | |||
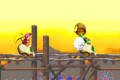
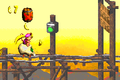
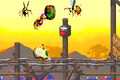
Target Terror DKC2 start.png|Diddy holding a barrel at a Zinger at the start of the level | |||
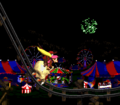
TargetTerrorSNES.png|The primates ride up a large hill | |||
Target Terror DKC2 shot.png|The Kongs reach the bottom of a hill | |||
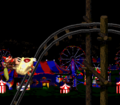
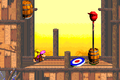
Target Terror DKC2 shot 2.png|The Kongs ride towards a closed gate | |||
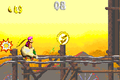
Target Terror DKC2 letter N.png|The Kongs jump at the letter N | |||
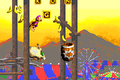
Target Terror DKC2 Klank barrel.png|The Kongs avoid a barrel thrown by a Klank | |||
</gallery> | </gallery> | ||
==Names in | |||
{{ | ===Game Boy Advance=== | ||
<gallery> | |||
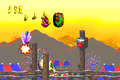
Target Terror GBA Banana Bunch.png|The Kongs jump at a Banana Bunch at the start of the level | |||
Target Terror DKC2 GBA.png|The Kongs ride behind a Klank | |||
Target Terror GBA second Flitter.png|The Kongs jump off a Flitter to reach the Check Barrel | |||
Target Terror GBA gate.png|The Kongs go beneath an X Barrel and toward the gate | |||
Target Terror GBA DK Coin.png|Location of the Video Game Hero Coin | |||
Target Terror GBA Bonus Level 2.png|Dixie reaching the Kremkoin at the end of the second Bonus Level | |||
Target Terror GBA letter G.png|Dixie collects the letter G | |||
Target Terror GBA two Zingers.png|Dixie jumps at a Check Barrel between two Zingers | |||
Target Terror GBA end.png|Dixie finds the End of Level Target | |||
</gallery> | |||
==Names in other languages== | |||
{{foreign names | |||
|Jpn=どくろコースター | |||
|JpnR=Dokuro Kōsutā | |||
|JpnM=Skull Coaster | |||
|Spa=Horror de Dianas | |Spa=Horror de Dianas | ||
|SpaM= | |SpaM=Target Terror | ||
| | |Fre=Objectif Epouvante | ||
| | |FreM=Objective Horror | ||
|Ger=Volltreffer | |Ger=Volltreffer | ||
|GerM=Direct Hit / Bull's Eye}} | |GerM=Direct Hit / Bull's Eye | ||
|Ita=Trenino Assassino | |||
|ItaM=Killer Train | |||
}} | |||
{{DKC2}} | {{DKC2}} | ||
[[Category:Amusement parks]] | |||
[[Category: | |||
[[Category:Crocodile Isle]] | [[Category:Crocodile Isle]] | ||
[[Category:Railways]] | [[Category:Railways]] | ||
[[ | [[Category:Donkey Kong Country 2: Diddy's Kong Quest levels]] | ||
Latest revision as of 16:40, January 7, 2025
| Level | |
|---|---|
| Target Terror | |

| |
| Level code | 4 - 2 |
| World | Krazy Kremland |
| Game | Donkey Kong Country 2: Diddy's Kong Quest |
| Music track | Disco Train |
| << Directory of levels >> | |
Target Terror is the eighteenth level of Donkey Kong Country 2: Diddy's Kong Quest and the second level of Krazy Kremland. It is the first level where Diddy Kong and Dixie Kong ride in a Roller Coaster, which is the game's equivalent to Mine Carts from Donkey Kong Country. Throughout the level, there are gates that the Kongs can open or close by using Check and X Barrels respectively. If Diddy and Dixie crash into a closed gate, the player loses a Kong, so the Kongs must jump at every Check Barrel but avoid every X Barrel. Target Terror is the first of two levels to feature Klanks, who appear in a later Krazy Kremland level, Rickety Race. The Kongs must jump over any barrel that a Klank throws at them. There are two aerial enemies in the level: Zingers and Flitters; the former only serve as obstacles while the Kongs can jump from the latter to reach a Check Barrel. Squawks the Parrot assists the Kongs only during the first Bonus Level.
Layout[edit]

At the start of the level, the heroes can find a pathway over a wooden tunnel that they must travel across to reach a Blast Barrel. The barrel can shoot them into a Roller Coaster. The cart begins to move as soon as they land on it, and then travels a short distance east, where there are some enemies. Shortly after riding down a large hill, the heroes drive towards a Zinger above a lower track. The track curves into a small hill ahead of here and leads the hero towards a tunnel that contains a hidden golden feather. A Flitter is above the track near here that can bounce the primates to the letter K. A barrel with a check mark on it is immediately after the tunnel, opening the gate that follows. Once they get through this gate, they travel over a large hill and cross over a gap. They must hop out of their cart at the gap so they can access the second Roller Coaster waiting at the other end of the abyss. This cart leads them to a second gate. A check marked barrel is immediately before it that can open it, but the primates must bounce on a Flitter to hit it.
After this gate, the Kongs ride up and down some hills and soon meet a Klank riding ahead. The Klank drops off the track shortly after they find it, but it manages to hurl a barrel at them before falling. A check marked barrel is above the gap that it falls in, opening the next gate, which they must go through. This is shortly after followed by the fourth gate. This door is already open, and they need to avoid hitting the X Barrel immediately before it to continue safely. A large hill is after the gate, followed by some more small hills. As they ride over the hills, they approach a Bonus Barrel that is placed in the air. A gap follows here with another Roller Coaster at the other side of it. The cart leads them to the letter O, as well as towards a pair of Flitters that can be bounced on to reach another check marked barrel. A gate ahead is opened when it is hit. On the other side of the gate, the heroes ride towards another gap, which has a Flitter in it. There is an additional Roller Coaster waiting at the other side of the gap. The Star Barrel floats above it.
Two open gates with a DK Barrel between them follow the Star Barrel. Two small gaps are ahead, and a Roller Coaster sits at the other side of each abyss to drive the Kong forward. After the second abyss, they land in a cart that rides them towards an X barrel that they must jump over to ride under another open gate. This gate is followed by two more gates, which have check marked barrels to open them. The first barrel is surrounded by a Zinger, while the second one is after a gap following it. They pass the letter N on the way between these gates. After this, the group travels up and down a large hill and rides through a small tunnel, which contains a hidden Video Game Hero Coin. Upon exiting, a Klank appears, who throws barrels at them. The Klank soon falls into a small gap, which has a check marked barrel near it. The barrel must be hit to open a nearby gate. There is an additional gate shortly ahead, but it is already open. While trying not to jump into a Zinger, they must jump over an X marked barrel to keep it open so they can drive through safely.
After another gap ahead of this, the Kongs ride down a large hill and, on the way, find a check marked barrel near a Zinger. The heroes approach a large gap once they pass this gate. They must bounce on Flitters to cross it and reach the next cart. This cart leads them towards a gate, which must be opened with a check marked barrel found in the air between two Zingers. Another check marked barrel is ahead in an abyss. The primates must drop into the abyss and jump out of their cart to grab it safely. Once they hit the barrel, they can land back in a Roller Coaster waiting on the track and ride through the now-opened gate. Finally, the heroes approach another X marked barrel as they ride ahead. They must jump over it to keep the gate following it open to pass through. A tunnel is after the gate that leads the Kongs into a small area, where they find themselves on foot again. The End of Level Target is just ahead of here, and once it is hit the level is completed. If the Kongs use a nearby Barrel Cannon, they can either win a banana, Banana Bunch, Banana Coin, or a Red Balloon from landing onto the target.
Enemies[edit]
The following enemies appear in the following quantities:


Items and objects[edit]
The following items and objects appear in the following quantities:

Banana Bunch (1)

DK Barrel (4)


KONG Letters[edit]
- K: The Kongs can obtain the letter by bouncing from the first Flitter in the level.
- O: After the first Bonus Level, the Kongs must jump onto the next Roller Coaster. Just after doing so, the letter O appears hovering slightly above the tracks, and the Kongs can obtain the letter by jumping at it.
- N: After passing the first X Barrel after the Star Barrel, the Kongs must open the next gate from a Check Barrel, which a Zinger hovers around. After leaving the gate, the Kongs must jump across a gap, collect the letter N, and land into the next Roller Coaster.
- G: After exiting the second Bonus Level, the Kongs must jump into a Blast Barrel to return to the main level. The letter G is hovering midway during their jump back into the Blast Barrel.
Key items[edit]
- Cranky's Video Game Hero Coin: After the letter N, the Kongs must jump into the next Roller Coaster and continue through a tall, wooden tunnel. The Video Game Hero Coin can be obtained by jumping while inside of the tunnel.
- Golden feather (Game Boy Advance version only): The golden feather appears in the center of the level's first wooden tunnel, which is right next to the letter K. The Kongs can obtain the golden feather by jumping at it.
Bonus Levels[edit]


Target Terror has two Bonus Levels, listed by type:
- Destroy them All!: Right after the Klank drives off the rails, the Kongs must jump into the next Roller Coaster. After going through the next gate, the Kongs descend a hill, then go up a smaller one. Just before reaching the bottom of the second hill, Diddy and Dixie must jump forward to land into a Bonus Barrel. The Bonus Level takes place in an enclosed area between two long brambles. Their objective is to defeat nine Zingers within 30 seconds. At the start, the Kongs must grab onto Squawks the Parrot, who flies them through the area. Squawks must spit a coconut at every Zinger to defeat them. After doing so, the Kremkoin appears on a platform consisting of wooden planks. A No Animal Sign is left of where the Kremkoin appears, and by crossing it, Squawks turns into a Banana Bunch.
- Find the Token!: Just after the Video Game Hero Coin, Diddy and Dixie encounter the second Klank of the level. Shortly after the Kongs encounter the Klank, it falls down a gap. Instead of jumping into the next Roller Coaster, the Kongs must follow Klank down the gap. They fall onto a small, hidden track. When they reach the end, Diddy and Dixie must jump at an arch of bananas, which guide them into the next Roller Coaster, which goes straight into a wooden tunnel where the Kongs enter the second Bonus Level. Here, the Kongs have only 15 seconds to obtain the Kremkoin. There are ten small tracks that Diddy and Dixie must jump from, each with a fast-moving Roller Coaster at the start. A banana is floating above each gap, except the first jump, which has an arch of bananas from the end of the first track to the second Roller Coaster. The final Roller Coaster directly goes into the Kremkoin, followed by the exit.
Gallery[edit]
Super Nintendo Entertainment System[edit]
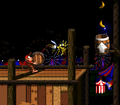
Diddy holding a barrel at a Zinger at the start of the level
The primates ride up a large hill
The Kongs reach the bottom of a hill

The Kongs ride towards a closed gate
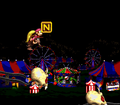
The Kongs jump at the letter N
The Kongs avoid a barrel thrown by a Klank


Game Boy Advance[edit]
The Kongs jump at a Banana Bunch at the start of the level
The Kongs ride behind a Klank
The Kongs jump off a Flitter to reach the Check Barrel
The Kongs go beneath an X Barrel and toward the gate
Location of the Video Game Hero Coin
Dixie reaching the Kremkoin at the end of the second Bonus Level
Dixie collects the letter G
Dixie jumps at a Check Barrel between two Zingers
Dixie finds the End of Level Target


Names in other languages[edit]
| Language | Name | Meaning | Notes |
|---|---|---|---|
| Japanese | どくろコースター[?] Dokuro Kōsutā |
Skull Coaster | |
| French | Objectif Epouvante[?] | Objective Horror | |
| German | Volltreffer[?] | Direct Hit / Bull's Eye | |
| Italian | Trenino Assassino[?] | Killer Train | |
| Spanish | Horror de Dianas[?] | Target Terror |