Breezy Tunnel: Difference between revisions
From the Super Mario Wiki, the Mario encyclopedia
Jump to navigationJump to search
m (Text replacement - "(\| *)Jap([RMCN\d]* *=)" to "$1Jpn$2") |
|||
| (3 intermediate revisions by 2 users not shown) | |||
| Line 39: | Line 39: | ||
!width="20%"|Image | !width="20%"|Image | ||
|-style="background: #cbc689;font-size:120%;color:#202122" | |-style="background: #cbc689;font-size:120%;color:#202122" | ||
!colspan=3|[[List of hidden Toads in Paper Mario: The Origami King|{{color|2 Hidden Toads | !colspan=3|[[List of hidden Toads in Paper Mario: The Origami King|{{color|#202122|2 Hidden Toads}}]] | ||
|- | |- | ||
![[File:Toad engineer PMTOK sprite.png|75px]]<br>{{color|# 1 | ![[File:Toad engineer PMTOK sprite.png|75px]]<br>{{color|red|# 1}} | ||
|In the second area of Breezy Tunnel, a [[Toad mechanic]] is stuck under a [[Boot Car]]. Mario must pull the mechanic out, who gives Mario a [[Boot Whistle]] and the Boot Car in exchange. | |In the second area of Breezy Tunnel, a [[Toad mechanic]] is stuck under a [[Boot Car]]. Mario must pull the mechanic out, who gives Mario a [[Boot Whistle]] and the Boot Car in exchange. | ||
|[[File:PMTOK Toads Automoboots.jpg|250px]] | |[[File:PMTOK Toads Automoboots.jpg|250px]] | ||
| Line 57: | Line 57: | ||
!width=20%|Image | !width=20%|Image | ||
|-style="background: #cbc689;font-size:120%;color:#202122" | |-style="background: #cbc689;font-size:120%;color:#202122" | ||
!colspan=4|[[List of Collectible Treasures in Paper Mario: The Origami King|{{color|2 treasures | !colspan=4|[[List of Collectible Treasures in Paper Mario: The Origami King|{{color|#202122|2 treasures}}]] | ||
|- | |- | ||
!style="background-color:#372500;"|[[File:PMTOK Collectible Treasure 57 (Huge Rock).jpg|80px|link=Sweetpaper Valley]]<br><br>[[Sweetpaper Valley|{{color|Huge Rock | !style="background-color:#372500;"|[[File:PMTOK Collectible Treasure 57 (Huge Rock).jpg|80px|link=Sweetpaper Valley]]<br><br>[[Sweetpaper Valley|{{color|white|Huge Rock}}]] | ||
|At the end of the secret area reached by destroying the cracked wall. | |At the end of the secret area reached by destroying the cracked wall. | ||
|[[File:PMTOK Breezy Tunnel Collectible Treasure 1.png|250px]] | |[[File:PMTOK Breezy Tunnel Collectible Treasure 1.png|250px]] | ||
|- | |- | ||
!style="background-color:#372500;"|[[File:PMTOK Collectible Treasure 58 (Important Box).jpg|80px|link=The Princess Peach]]<br><br>[[The Princess Peach|{{color|Important Box | !style="background-color:#372500;"|[[File:PMTOK Collectible Treasure 58 (Important Box).jpg|80px|link=The Princess Peach]]<br><br>[[The Princess Peach|{{color|white|Important Box}}]] | ||
|On the ledge in the room reached by the most western door. | |On the ledge in the room reached by the most western door. | ||
|[[File:PMTOK Breezy Tunnel Collectible Treasure 2.png|250px]] | |[[File:PMTOK Breezy Tunnel Collectible Treasure 2.png|250px]] | ||
| Line 76: | Line 76: | ||
!width=20%|Image | !width=20%|Image | ||
|-style="background: #cbc689;font-size:120%;color:#202122" | |-style="background: #cbc689;font-size:120%;color:#202122" | ||
!colspan=4|[[List of ? Blocks in Paper Mario: The Origami King|{{color|1 block | !colspan=4|[[List of ? Blocks in Paper Mario: The Origami King|{{color|#202122|1 block}}]] | ||
|- | |- | ||
| | | | ||
| Line 83: | Line 83: | ||
|[[File:PMTOK Breezy Tunnel Question Block.png|250px]] | |[[File:PMTOK Breezy Tunnel Question Block.png|250px]] | ||
|} | |} | ||
==Media== | |||
{{media table | |||
|file1=PMTOK Breezy Tunnel.oga | |||
|title1=Breezy Tunnel | |||
|description1=Plays in Breezy Tunnel. | |||
|file2=PMTOK Boot Car Superboost.oga | |||
|title2=Boot Car - Superboost | |||
|description2=Plays when Mario uses the Boot Car in Breezy Tunnel. | |||
|file3=PMTOK Bob-omb's Encouragement.oga | |||
|title3=Bob-omb's Encouragement | |||
|description3=Plays when Bob-omb's ghost appears in Breezy Tunnel. | |||
|file4=PMTOK Sad Olivia.oga | |||
|title4=Sad Olivia | |||
|description4=Plays in Breezy Tunnel before cheering up Olivia. | |||
}} | |||
==Names in other languages== | ==Names in other languages== | ||
{{Foreign names | {{Foreign names | ||
| | |Jpn=かぜぬけるトンネル | ||
| | |JpnR=Kazenukeru tonneru | ||
| | |JpnM=Windy Pass-Through Tunnel | ||
|Spa=Túnel del Fresco | |Spa=Túnel del Fresco | ||
|SpaM=Cool Tunnel | |SpaM=Cool Tunnel | ||
| | |Fre=Passage bourrasque | ||
| | |FreM=Gusty Passage | ||
|Ger=Zugige Zeche | |Ger=Zugige Zeche | ||
|GerM=Drafty Mine | |GerM=Drafty Mine | ||
Revision as of 12:04, January 7, 2025
| Breezy Tunnel | |
|---|---|
| |
| Toads | 2 |
| Collectible Treasures | 2 |
| ? Blocks | 1 |
| Enemies | Spinies Buzzy Beetles Shoe Goombas |
- “Whoa, hey there. Us Monty Moles don't get many guests down here in our little tunnel. Ah, we could do a better job advertisin'...”
- —Monty Mole, Paper Mario: The Origami King
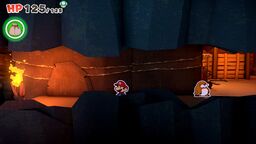
Breezy Tunnel is a mining tunnel run by Monty Moles in Paper Mario: The Origami King. It connects Sweetpaper Valley to Scorching Sandpaper Desert. When Mario first arrives at Breezy Tunnel, Olivia had run off crying to the western mole den after Bob-omb sacrificed himself to save her from being crushed beneath a boulder. Once Olivia rejoins Mario, they can continue onward to the desert. Mario receives a Boot Whistle from a Toad mechanic who runs Toad's Automoboots. The mechanic also lends Mario the Boot Car.
Shop
| Image | Item | Price |
|---|---|---|
| Shiny Iron Boots | 480 | |
| Shiny Hammer | 576 | |
| Shiny Mushroom | 240 |
Collectibles
Hidden Toads
| Form | Description | Image |
|---|---|---|
| 2 Hidden Toads | ||
# 1 |
In the second area of Breezy Tunnel, a Toad mechanic is stuck under a Boot Car. Mario must pull the mechanic out, who gives Mario a Boot Whistle and the Boot Car in exchange. | 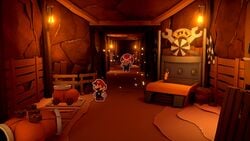
|
 # 2 |
Further down the tunnel is yellow Toad, disguised as an origami shovel. Mario can either hammer the Toad or ram full speed into the shovel with the Boot Car. | 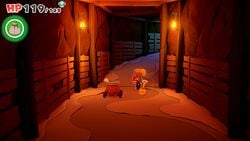
|
Collectible Treasures
| Treasure | Description | Image | |
|---|---|---|---|
| 2 treasures | |||
 Huge Rock |
At the end of the secret area reached by destroying the cracked wall. | 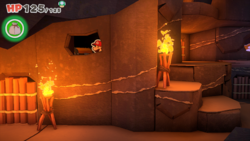
| |
 Important Box |
On the ledge in the room reached by the most western door. | 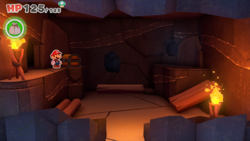
| |
? Block
| Hidden | Item | Description | Image |
|---|---|---|---|
| 1 block | |||
Coin Bag |
There is a block in the central cavern of the Monty Moles, resting on the ground beside the campfire. | 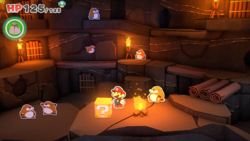
| |
Media
| File info |
| File info |
| File info |
| File info |
Names in other languages
| Language | Name | Meaning | Notes |
|---|---|---|---|
| Japanese | かぜぬけるトンネル[?] Kazenukeru tonneru |
Windy Pass-Through Tunnel | |
| Chinese (simplified) | 透风隧道[?] Tòufēng Suìdào |
Ventilation tunnel | |
| Chinese (traditional) | 透風隧道[?] Tòufēng Suìdào |
Ventilation tunnel | |
| Dutch | Turbulente tunnel[?] | Turbulent Tunnel | |
| French | Passage bourrasque[?] | Gusty Passage | |
| German | Zugige Zeche[?] | Drafty Mine | |
| Italian | Galleria del vento[?] | Wind Tunnel | |
| Korean | 바람길 터널[?] Baramgil Teoneol |
Wind Path Tunnel | |
| Spanish | Túnel del Fresco[?] | Cool Tunnel |