Level 1-6 (Mario vs. Donkey Kong): Difference between revisions
mNo edit summary |
LinkTheLefty (talk | contribs) mNo edit summary |
||
| (17 intermediate revisions by 4 users not shown) | |||
| Line 1: | Line 1: | ||
{{italic title| | {{italic title|id=yes}} | ||
{{ | {{level infobox | ||
|image=[[File:MarioVsDKSwitch1-6 1.jpg|250px]] | |||
|image = [[File: | |code=Level 1-6 | ||
|code= Level 1-6 | |world=[[Mario Toy Company]] | ||
|world= [[Mario Toy Company]] | |game=''[[Mario vs. Donkey Kong]]''<br>''[[Mario vs. Donkey Kong (Nintendo Switch)|Mario vs. Donkey Kong]]'' ([[Nintendo Switch]]) | ||
|game= ''[[Mario vs. Donkey Kong]]'' | |limit=150 (first area)<br>120 (second area) | ||
|limit= 150 (first area)<br>120 (second area) | |before=[[Level 1-5 (Mario vs. Donkey Kong)|<<]] | ||
|after=[[Level 1-mm|>>]] | |||
|before= [[Level 1-5 (Mario vs. Donkey Kong)|<<]] | |||
|after= [[Level 1-mm|>>]] | |||
}} | }} | ||
'''Level 1-6''' is the sixth level of [[Mario Toy Company]] in ''[[Mario vs. Donkey Kong]]''. The high score for this level is 27500. | '''Level 1-6''' is the sixth level of [[Mario Toy Company]] in ''[[Mario vs. Donkey Kong]]'' and its [[Mario vs. Donkey Kong (Nintendo Switch)|remake]]. The high score for this level in the original version is 27500. In the [[Nintendo Switch]] remake, the target time for this level's [[Time Attack (Mario vs. Donkey Kong for Nintendo Switch)|Time Attack]] is 58.00. | ||
==Overview== | ==Overview== | ||
[[File: | [[File:MarioVsDKSwitch1-6 2.jpg|250px|thumb|left|The second area]] | ||
In the GBA version only, the level starts with a cinematic showing [[Mario]] doing a [[handstand]] to block falling cement blocks. | |||
The player starts under a | The player starts under a [[Message Block|Help Box]] showing the player how to perform a Handstand Jump, which is needed in order to jump up the platforms. Activating the yellow [[Color Switch]] on the upper platform will cause a ladder to appear, at the top of which is another Help Box showing the player how to perform a Handstand Double Jump, used to reach the platform just above. At the far right side of the next platforms is a blue Color Switch, which will activate a blue ladder. After climbing down, the player then needs to activate the yellow then the red Color Switches in order to fall to the platform with the locked door. Climbing down the ladder, the player will find a Help Box telling the player that Handstands prevent damage from falling bricks, which can be utilized against the [[Brickman]] ahead. Pressing the blue Color Switch, the player has to make it past the Brickman to collect the [[key]], use the [[trampoline|spring]]s, and press the yellow then the red Color Switches again to return to the locked door. | ||
In the second area, the player starts next to another Brickman. At the far left are two | In the second area, the player starts next to another Brickman. At the far left are two Help Boxes showing how to toss items up and perform a [[Backflip]], both can be done with the [[Trash Can|Garbage Can]] and getting onto the above platform. The player can then use the Garbage Can to climb the next platform or do a Handstand Jump if the Garbage Can was used to defeat the [[Shy Guy]]. By using a spring, the player can reach some platforms with a Garbage Can and a Shy Guy. Across the gap is a [[Bucket Man]] and a couple of [[Oil]]s, along with a [[Hammer]] that can be used to defeat them. Between the two Oils is the [[Mini Mario (toy)|Mini-Mario]]. | ||
==Enemies== | ==Enemies== | ||
*[[Brickman|Brickmen]] | *[[Brickman|Brickmen]] | ||
*[[ | *[[Shy Guy]]s | ||
*[[ | *[[Bucket Man]] | ||
*[[Oil]]s | *[[Oil]]s | ||
==Present locations== | ==Present locations== | ||
*'''Red:''' In the first area, above the locked door. The yellow Color Switch needs to be activated in order to collect it. | *'''Red:''' In the first area, above the locked door. The yellow Color Switch needs to be activated in order to collect it. | ||
*'''Yellow:''' In the second area, before the Mini Mario. | *'''Yellow:''' In the second area, before the Mini-Mario. | ||
*'''Blue:''' In the second area, after the Mini Mario. | *'''Blue:''' In the second area, after the Mini-Mario. | ||
{{MVDK | ==Gallery== | ||
[[Category:Mario vs. Donkey Kong | <gallery> | ||
File:MVDK 1-6 1.png|The first area of Level 1-6 in the GBA version | |||
File:MVDK 1-6 2.png|The second area of Level 1-6 in the GBA version | |||
</gallery> | |||
{{MVDK levels}} | |||
[[Category:Mario vs. Donkey Kong levels]] | |||
Revision as of 03:30, August 19, 2024
| Level | |
|---|---|
| Level 1-6 | |

| |
| Level code | Level 1-6 |
| World | Mario Toy Company |
| Game | Mario vs. Donkey Kong Mario vs. Donkey Kong (Nintendo Switch) |
| Time limit | 150 (first area) 120 (second area) |
| << Directory of levels >> | |
Level 1-6 is the sixth level of Mario Toy Company in Mario vs. Donkey Kong and its remake. The high score for this level in the original version is 27500. In the Nintendo Switch remake, the target time for this level's Time Attack is 58.00.
Overview
In the GBA version only, the level starts with a cinematic showing Mario doing a handstand to block falling cement blocks.
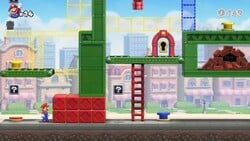
The player starts under a Help Box showing the player how to perform a Handstand Jump, which is needed in order to jump up the platforms. Activating the yellow Color Switch on the upper platform will cause a ladder to appear, at the top of which is another Help Box showing the player how to perform a Handstand Double Jump, used to reach the platform just above. At the far right side of the next platforms is a blue Color Switch, which will activate a blue ladder. After climbing down, the player then needs to activate the yellow then the red Color Switches in order to fall to the platform with the locked door. Climbing down the ladder, the player will find a Help Box telling the player that Handstands prevent damage from falling bricks, which can be utilized against the Brickman ahead. Pressing the blue Color Switch, the player has to make it past the Brickman to collect the key, use the springs, and press the yellow then the red Color Switches again to return to the locked door.
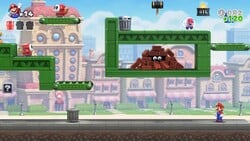
In the second area, the player starts next to another Brickman. At the far left are two Help Boxes showing how to toss items up and perform a Backflip, both can be done with the Garbage Can and getting onto the above platform. The player can then use the Garbage Can to climb the next platform or do a Handstand Jump if the Garbage Can was used to defeat the Shy Guy. By using a spring, the player can reach some platforms with a Garbage Can and a Shy Guy. Across the gap is a Bucket Man and a couple of Oils, along with a Hammer that can be used to defeat them. Between the two Oils is the Mini-Mario.
Enemies
Present locations
- Red: In the first area, above the locked door. The yellow Color Switch needs to be activated in order to collect it.
- Yellow: In the second area, before the Mini-Mario.
- Blue: In the second area, after the Mini-Mario.


