Stone Doohickey: Difference between revisions
From the Super Mario Wiki, the Mario encyclopedia
Jump to navigationJump to search
m (Text replacement - " class="navtemplate [^"]+"" to "") |
|||
| Line 4: | Line 4: | ||
==Red Diamond requirements== | ==Red Diamond requirements== | ||
Each stage | Each stage requires a certain amount of red diamonds to fight the boss. The following chart demonstrates the amount needed per level. | ||
{| style="background:#F8BFF8;text-align:center;width:40em;font-size:95%" | {| style="background:#F8BFF8;text-align:center;width:40em;font-size:95%" | ||
! colspan="2" style="background:#901090"|Red Diamonds required per level | ! colspan="2" style="background:#901090"|Red Diamonds required per level | ||
Revision as of 01:44, May 1, 2020

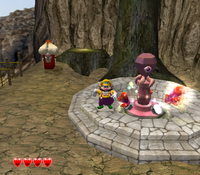
Wario near a Stone Doohickey
- “Listen, eventually you're going to have to deal with the Stone Doohickey that sits on the Goal. To get rid of it, you've gotta collect a certain number of red diamonds.”
- —Spriteling, Wario World
Stone Doohickeys are red statues in Wario World. They are statues that guard the boss doors. They resemble tall, thin pillars with a crest of the black jewel on top. In each level, Wario needs to gather red diamonds to give to the Stone Doohickey. The number of red diamonds necessary to remove the Stone Doohickeys increases in the later levels. Once enough red diamonds are handed over, the Stone Doohickey disappears, enabling Wario to fight the boss.
Red Diamond requirements
Each stage requires a certain amount of red diamonds to fight the boss. The following chart demonstrates the amount needed per level.
| Red Diamonds required per level | |
|---|---|
| Location | Total diamonds required |
| Greenhorn Forest | 3 |
| Greenhorn Ruins | 3 |
| Horror Manor | 4 |
| Wonky Circus | 4 |
| Shivering Mountains | 5 |
| Beanstalk Way | 5 |
| Mirror Mansion | 6 |
| Pecan Sands | 6 |