Level 5-2 (Mario vs. Donkey Kong): Difference between revisions
m (Text replacement - "{{about\|Level 5-([^ \n\[\]\|{}]+) in the \[\[Nintendo Switch\]\] \[\[Mario vs\. Donkey Kong \(Nintendo Switch\)\|remake]] of Mario vs\. Donkey Kong\|Level 5-[^ \n\[\]\|{}]+ in the \[\[Game Boy Advance\]\] \[\[Mario vs\. Donkey Kong\|version\]\]\|\[\[Level 7-[^ \n\[\]\|{}]+\]\]}}" to "{{about|Level 5-$1 in the Nintendo Switch remake of Mario vs. Donkey Kong (Level 4-$1 in the Game Boy Advance [[Mario vs. Donkey Kong|versi...) |
m (Text replacement - "''Mario vs. Donkey Kong (Nintendo Switch)''" to "''Mario vs. Donkey Kong'' (Nintendo Switch)") |
||
| Line 5: | Line 5: | ||
|code= Level 4-2 (GBA)<BR>Level 5-2 (Switch) | |code= Level 4-2 (GBA)<BR>Level 5-2 (Switch) | ||
|world= [[Spooky House]] | |world= [[Spooky House]] | ||
|game= ''[[Mario vs. Donkey Kong]]''<br>''[[Mario vs. Donkey Kong (Nintendo Switch)]]'' | |game= ''[[Mario vs. Donkey Kong]]''<br>''[[Mario vs. Donkey Kong (Nintendo Switch)|Mario vs. Donkey Kong]]'' ([[Nintendo Switch]]) | ||
|limit= 150 | |limit= 150 | ||
|before_alt= | |before_alt= | ||
Latest revision as of 20:03, June 22, 2024
- This article is about Level 5-2 in the Nintendo Switch remake of Mario vs. Donkey Kong (Level 4-2 in the Game Boy Advance version). For Level 5-2 in the Game Boy Advance game, see Level 7-2.
| Level | |
|---|---|
| Level 5-2 | |

| |
| Level code | Level 4-2 (GBA) Level 5-2 (Switch) |
| World | Spooky House |
| Game | Mario vs. Donkey Kong Mario vs. Donkey Kong (Nintendo Switch) |
| Time limit | 150 |
| << Directory of levels >> | |
Level 5-2 (Level 4-2 in the GBA version) is the second level of Spooky House in Mario vs. Donkey Kong and its remake. The high score for this level in the original version is 32000. In the Nintendo Switch remake, the target time for this level's Time Attack is 44.00.
Overview[edit]
In the GBA version only, the level opens with a cinematic showing Mario stepping on a blue Color Switch to make a Key fall onto the conveyor belt, then jumping onto the red Color Switch to remove the blue wall so the Key can reach Mario.
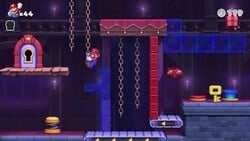
In the first area, the player starts next to a Springboard they can use to reach the platform with the locked door on it. Then, the player needs to climb across ropes to reach the platform on the right. Jumping down to the right, the player needs to press the blue Color Switch and then throw the Key onto the conveyor. Once the key is past the red wall's outline, the player needs to press the red Color Switch to remove the blue wall. Once the key is past the blue wall's outline, the player needs to press the blue Color Switch again and use the ropes to get over the blue wall and reach the Key before its timer runs out. With the Key in hand, the player can use the Springboard again to reach the locked door.
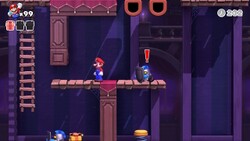
In the second area, the player needs to use a Springboard to reach a platform with a Sir Shovalot on it. While crouching, the Sir Shovalot will push the player through the small opening in the wall, which will cause them to fall into an area with another Sir Shovalot. Using this Sir Shovalot as a platform, the player can reach a ladder to reach a platform with another Sir Shovalot. After having the Sir Shovalot push the player past the wall, the player needs to quickly jump across a couple of Donut Blocks before the Sir Shovalot shoves them off the platform. After the Donut Blocks are three Springboards that will lead to three Donut Blocks (with a 1-Up Mushroom over the first) that the player needs to jump across before the Donut Blocks fall into the spikes below. Above the third Donut Block is a Hammer the player can use to defeat the Candles surrounding the Mini-Mario.
Enemies[edit]
Present locations[edit]
- Red: In the first area, above the Key. Either the blue Color Switch needs to be active and the player has to loop back around, or they can do a Handstand Double Jump off of the Key or red platform before pressing the blue Color Switch.
- Yellow: In the second area, next to the second Sir Shovalot.
- Blue: In the second area, directly above the final Springboard.


