Broken Pier: Difference between revisions
mNo edit summary Tags: Manual revert Disambiguation links |
m (Text replacement - "(\| *)Jap([RMCN\d]* *=)" to "$1Jpn$2") |
||
| (One intermediate revision by one other user not shown) | |||
| Line 12: | Line 12: | ||
==Course layout== | ==Course layout== | ||
The course begins on a short straightway, which is followed by a diagonal turn to the right. The borders consist of blocks which fall off if drivers are to bump into them, and everywhere else has no border at all. After a few turns, there is a split path. One way has a thin bridge, while the other is easier, but longer, and consists of a few diagonal turns. Scattered across the course are many yellow jump pads which help the player skip over turns, but are difficult to pull off. The next turn has two holes with yellow jump pads before them, which then goes to a diagonal slant, leading to a part of the course with three different paths. The shortest path needs a mushroom to be pulled off, but consists of a yellow jump pad, which leads to a small platform separate from the rest of the course which allows the driver to skip a fair portion of the course. The second path has a bridge, which allows the player to skip a large turn on the track. The bridge is thin and easy to fall off of. The final path consists of a far thicker bridge which leads to a diagonal slant to where the other paths lead. Afterwards is a C-turn which a bridge allows the driver to skip over, that has a small hole in it. The next part has two holes with yellow jump pads to let the player get past them followed by [[Dash Panel]]s. The one to the left has a thin bridge, which may be the easiest as long as the driver is going straight forwards. It is also the only bridge in this course which | The course begins on a short straightway, which is followed by a diagonal turn to the right. The borders consist of blocks which fall off if drivers are to bump into them, and everywhere else has no border at all. After a few turns, there is a split path. One way has a thin bridge, while the other is easier, but longer, and consists of a few diagonal turns. Scattered across the course are many yellow jump pads which help the player skip over turns, but are difficult to pull off. The next turn has two holes with yellow jump pads before them, which then goes to a diagonal slant, leading to a part of the course with three different paths. The shortest path needs a mushroom to be pulled off, but consists of a yellow jump pad, which leads to a small platform separate from the rest of the course which allows the driver to skip a fair portion of the course. The second path has a bridge, which allows the player to skip a large turn on the track. The bridge is thin and easy to fall off of. The final path consists of a far thicker bridge which leads to a diagonal slant to where the other paths lead. Afterwards is a C-turn which a bridge allows the driver to skip over, that has a small hole in it. The next part has two holes with yellow jump pads to let the player get past them followed by [[Dash Panel]]s. The one to the left has a thin bridge, which may be the easiest as long as the driver is going straight forwards. It is also the only bridge in this course which does not flicker to stay hidden. Afterwards is another turn, which leads to a section with yet another hole with a Dash Panel at the end, which leads to a sharp turn. After the turn, the player has to move past a short few diagonal turns, which leads the driver back towards the straightway in which the course begins. Throughout the courses, Boos may attack which will take coins and slow the player down. After an interval of time, though, the Boos detach themselves from the player. | ||
==Shortcuts== | ==Shortcuts== | ||
| Line 25: | Line 25: | ||
==Names in other languages== | ==Names in other languages== | ||
{{foreign names | {{foreign names | ||
| | |Jpn=オンボロさんばし | ||
| | |JpnR=Onboro Sanbashi | ||
| | |JpnM=Worn-Out Pier | ||
|Chi=废弃码头<ref>From the iQue localization prototype.</ref> | |Chi=废弃码头<ref>From the iQue localization prototype.</ref> | ||
|ChiR=Fèiqì Mǎtóu | |ChiR=Fèiqì Mǎtóu | ||
Latest revision as of 13:51, January 7, 2025
| Broken Pier | |||
|---|---|---|---|

| |||
| Information | |||
| Appears in | Mario Kart: Super Circuit (2001) | ||
| Cup(s) | Special Cup | ||
| |||
| |||
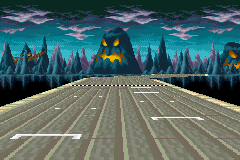
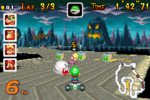
Broken Pier is the second race course of the Special Cup in Mario Kart: Super Circuit. Boos appear about halfway through each race, and steal drivers' coins if they are touched. Many shortcuts flicker, making them somewhat invisible. The course's background is littered with numerous sinister, hollow mountains with flickering light interiors and angry faces caved into them, alongside many long, narrow stalagmites. The course design is similar to Boo Lake's, and the music is the same, remixing a part of the music used for the Ghost Valley courses in Super Mario Kart. Mountains similar to the ones seen in this course can be found in the background of Mario Kart: Double Dash!!'s Bowser's Castle.
Broken Pier is one of two tracks from Mario Kart: Super Circuit that has yet to return as a classic course in a future Mario Kart game, the other being Rainbow Road.
Course layout[edit]
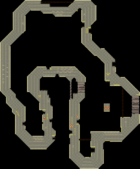
The course begins on a short straightway, which is followed by a diagonal turn to the right. The borders consist of blocks which fall off if drivers are to bump into them, and everywhere else has no border at all. After a few turns, there is a split path. One way has a thin bridge, while the other is easier, but longer, and consists of a few diagonal turns. Scattered across the course are many yellow jump pads which help the player skip over turns, but are difficult to pull off. The next turn has two holes with yellow jump pads before them, which then goes to a diagonal slant, leading to a part of the course with three different paths. The shortest path needs a mushroom to be pulled off, but consists of a yellow jump pad, which leads to a small platform separate from the rest of the course which allows the driver to skip a fair portion of the course. The second path has a bridge, which allows the player to skip a large turn on the track. The bridge is thin and easy to fall off of. The final path consists of a far thicker bridge which leads to a diagonal slant to where the other paths lead. Afterwards is a C-turn which a bridge allows the driver to skip over, that has a small hole in it. The next part has two holes with yellow jump pads to let the player get past them followed by Dash Panels. The one to the left has a thin bridge, which may be the easiest as long as the driver is going straight forwards. It is also the only bridge in this course which does not flicker to stay hidden. Afterwards is another turn, which leads to a section with yet another hole with a Dash Panel at the end, which leads to a sharp turn. After the turn, the player has to move past a short few diagonal turns, which leads the driver back towards the straightway in which the course begins. Throughout the courses, Boos may attack which will take coins and slow the player down. After an interval of time, though, the Boos detach themselves from the player.
Shortcuts[edit]
One major shortcut in the track is about a third of the way through, and involves the driver using a mushroom to hit a small platform in the middle of the track, which lets them skip a large portion of this track. Aside from that, throughout the track are many flickering bridges, which can cut large turns, but are rather thin and easy to fall off of.
Gallery[edit]
Names in other languages[edit]
| Language | Name | Meaning | Notes |
|---|---|---|---|
| Japanese | オンボロさんばし[?] Onboro Sanbashi |
Worn-Out Pier | |
| Chinese | 废弃码头[1] Fèiqì Mǎtóu |
Abandoned Pier |
References[edit]
- ^ From the iQue localization prototype.

