Jewel-Block Cave: Difference between revisions
(→Layout) Tags: Mobile edit Advanced mobile edit |
|||
| (15 intermediate revisions by 12 users not shown) | |||
| Line 5: | Line 5: | ||
|difficulty=★★ | |difficulty=★★ | ||
|powerup=[[Drill Mushroom]] | |powerup=[[Drill Mushroom]] | ||
|wonder=Summons | |wonder=Summons the [[Wonder Konk]]{{derived}} | ||
|before=[[Royal Seed Mansion|<<]] | |before=[[Royal Seed Mansion|<<]] | ||
|after=[[Sunbaked Desert House|>>]] [[Petal Isles Flying Battleship|>>]] | |after=[[Sunbaked Desert House|>>]] [[Petal Isles Flying Battleship|>>]] | ||
|secret= | |secret= | ||
}} | }} | ||
'''Jewel-Block Cave''' is a course in [[Petal Isles]] in ''[[Super Mario Bros. Wonder]]''. It is unlocked after visiting the [[Royal Seed Mansion]], and its own completion unlocks [[Petal Isles Flying Battleship]], as well as a [[Wonder Packun]] leading to [[Sunbaked Desert]]. It has a difficulty of two stars and contains two [[Wonder Seed]]s. It introduces the [[Drill Mario|Drill form]] and is primarily designed around its abilities. | '''Jewel-Block Cave''' is a course in the [[Petal Isles]] in ''[[Super Mario Bros. Wonder]]''. It is unlocked after visiting the [[Royal Seed Mansion]], and its own completion unlocks [[Petal Isles Flying Battleship]], as well as a [[Wonder Packun]] leading to the [[Sunbaked Desert]]. It has a difficulty of two stars and contains two [[Wonder Seed]]s. It introduces the [[Drill Mario|Drill form]] and is primarily designed around its abilities. | ||
In the Nintendo Live 2023 and kiosk demo, it is shown to be located in [[Pipe-Rock Plateau]] with a difficulty of three stars, taking the place of [[Here Come the Hoppos]].<ref | In the Nintendo Live 2023 and kiosk demo, it is shown to be located in [[Pipe-Rock Plateau]] with a difficulty of three stars, taking the place of [[Here Come the Hoppos]].<ref>{{cite|language=en|author=Giant Bomb|date=September 1, 2023|url=www.youtube.com/watch?v=zpC0oCDCMXo|title=Almost 15 Minutes of ''Super Mario Bros. Wonder''|publisher=YouTube|accessdate=September 1, 2023}}</ref> | ||
==Layout== | ==Layout== | ||
The level takes place in a cavern full of [[jewel block]]s, [[Konk]]s, and [[Spiny|Spinies]] walking on the ceiling. The player starts near a Konk in a recess in the ceiling, with a wide jewel block below and a [[? Block]] above it containing a [[Drill Mushroom]]. | The level takes place in a cavern full of [[jewel block]]s, [[Konk]]s, and [[Spiny|Spinies]] walking on the ceiling. The player starts near a Konk in a recess in the ceiling, with a wide jewel block below and a [[? Block]] above it containing a [[Drill Mushroom]]. Immediately after, they will encounter a Spiny, more jewel blocks (including one with a [[Talking Flower]] trapped inside) and another Konk. After a small tunnel accessible only in Drill form leading into an alcove with a few [[coin]]s, there will be a segment with Spinies and jewel blocks above small [[pit]]s, and then another Drill-exclusive tunnel, leading to a [[Warp Pipe]]. Through it is a side room featuring coins, [[flower coin]]s, a Talking Flower and a [[1-Up Mushroom]]. If the player does not take the Warp Pipe, they will have to avoid three Konks and several pits. Both paths rejoin right before the [[Checkpoint Flag]]. | ||
Past the checkpoint, cyan, upwards-facing Konks are introduced, along with [[Beacon (Super Mario Bros. Wonder)|beacon]]s in the ceiling. Past another Konk, a [[Wonder Flower]] can be found inside a jewel block. Touching it will trigger the course's [[Wonder Effect]], which will create blue blocks that wall the player into a vertical shaft and summon | Past the checkpoint, cyan, upwards-facing Konks are introduced, along with [[Beacon (Super Mario Bros. Wonder)|beacon]]s in the ceiling. Past another Konk, a [[Wonder Flower]] can be found inside a jewel block. Touching it will trigger the course's [[Wonder Effect]], which will create blue blocks that wall the player into a vertical shaft and summon [[Wonder Konk]]{{derived}} above. {{derived|Wonder Konk}} will slam down periodically, breaking jewel blocks in its way, but will stagger after breaking stone blocks. The Wonder Seed is found at the bottom of the shaft, encased in a jewel block. A Warp Pipe will take the player to the next part of the level, featuring a horizontal hallway with both downwards- and upwards-facing Konks on either side of a bridge of jewel blocks. At the end is another Warp Pipe, leading to the outside of the cavern, with one last Spiny, a staircase of jewel blocks and the [[Goal Pole]], where the second Wonder Seed is awarded. | ||
{{br|left}} | {{br|left}} | ||
==10-flower | ===Hidden Character Blocks=== | ||
*A [[Yoshi (species)|Blue Yoshi]] [[Hidden Character Block]] can be found in the wide opening above the entrance to the [[1-Up Mushroom]] secret sub-area. It is located seven blocks above the upper-right corner of the 4x4 [[jewel block]] below. It contains a single [[Flower coin|flower coin]]. | |||
==[[10-flower coin]]s== | |||
{|class="wikitable" style="text-align: center" | |||
|- | |||
!Image | |||
!Location | |||
|- | |||
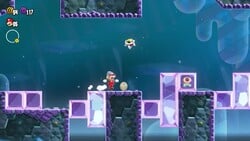
|[[File:SMBW Jewel-Block Cave first 10-flower coin.jpg|200px]] | |||
|Found inside a jewel block under the second Konk. | |||
|- | |||
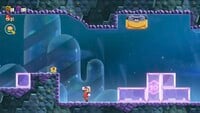
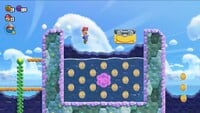
|[[File:SMBW Jewel-Block Cave second 10-flower coin.jpg|200px]] | |||
|The center [[Brick Block]] in the middle of a set of three contains a [[beanstalk]], leading the player up to an overground area containing a Konk floating above a pool of water and the second 10-flower coin. | |||
|- | |||
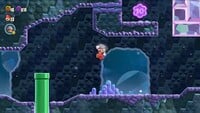
|[[File:SMBW Jewel-Block Cave third 10-flower coin.jpg|200px]] | |||
|Found on an alcove before the final stretch. It can be reached from the left by drilling on the ceiling, or from the right, by hitting a [[Yoshi (species)|Red Yoshi]] [[Hidden Character Block]]. | |||
|} | |||
==Enemies== | ==Enemies== | ||
{{number of enemies | |||
|image1=[[File:Konk Direct.png|75px]] | |||
|name1=[[Konk]] (downwards) | |||
|count1=10 | |||
|image2=[[File:Blue Konk.png|75px]] | |||
|name2=Konk (upwards) | |||
|count2=7 | |||
|image3=[[File:Giant Konk SMBW.jpg|75px]] | |||
|name3=[[Wonder Konk]]{{derived}} (Wonder Effect only) | |||
|count3=1 | |||
|image4=[[File:SMBW screenshot Spiny.png|75px]] | |||
|name4=[[Spiny]] | |||
|count4=8 | |||
}} | |||
==[[Talking Flower]] quotes== | ==[[Talking Flower]]s' quotes== | ||
*"''*exhale*''" (said by the first flower trapped in a jewel block, immediately after being freed) | *"''*exhale*''" (said by the first flower trapped in a jewel block, immediately after being freed) | ||
**"''I can finally talk again!''" (said by the same flower) | |||
**"''Not that I have anything to say.''" (said by the same flower) | |||
*"''*gasp*''" (said by the second flower trapped in a jewel block, immediately after being freed) | *"''*gasp*''" (said by the second flower trapped in a jewel block, immediately after being freed) | ||
**"'' | **"''I'm freeeeeeee!''" (said by the same flower) | ||
*"''*exhale*''" (said by the first flower trapped in a jewel block in the first secret room, immediately after being freed) | *"''*exhale*''" (said by the first flower trapped in a jewel block in the first secret room, immediately after being freed) | ||
**"''*pant*''" (said by the same flower) | **"''*pant*''" (said by the same flower) | ||
| Line 47: | Line 73: | ||
==Names in other languages== | ==Names in other languages== | ||
{{foreign names | {{foreign names | ||
| | |Jpn=ジュエルブロック だらけの{{ruby|洞窟|どうくつ}} | ||
| | |JpnR=Jueru Burokku darake no Dōkutsu | ||
| | |JpnM=Cave full of Jewel Blocks | ||
|ChiS=宝石砖块 满满的洞窟 | |ChiS=宝石砖块 满满的洞窟 | ||
|ChiSR=Bǎoshí Zhuānkuài Mǎnmǎnde Dòngkū | |ChiSR=Bǎoshí Zhuānkuài Mǎnmǎnde Dòngkū | ||
| Line 65: | Line 91: | ||
|ItaM=The jewel block cave | |ItaM=The jewel block cave | ||
|Kor=주얼블록이 가득한 동굴 | |Kor=주얼블록이 가득한 동굴 | ||
|KorR= | |KorR=Jueolbeullok-i gadeukhan donggul | ||
|KorM=Cave full of Jewel Blocks | |KorM=Cave full of Jewel Blocks | ||
|PorA=Um passeio joia pela caverna! | |PorA=Um passeio joia pela caverna! | ||
|PorAM=A Nice Walk Through the Cave! (Pun on | |PorAM=A Nice Walk Through the Cave! (Pun on ''joia'', a slang term for "nice" which literally means "jewel") | ||
|PorE=Viagem pela gruta dos blocos joia | |PorE=Viagem pela gruta dos blocos joia | ||
|PorEM=A Trip to the Jewel Block Cave | |PorEM=A Trip to the Jewel Block Cave | ||
Latest revision as of 17:23, January 23, 2025
| Level | |
|---|---|
| Jewel-Block Cave | |

| |
| World | Petal Isles |
| Game | Super Mario Bros. Wonder |
| Difficulty | ★★ |
| Primary power-up | Drill Mushroom |
| Wonder Effect | Summons the Wonder Konk[derived] |
| << Directory of levels >> >> | |
Jewel-Block Cave is a course in the Petal Isles in Super Mario Bros. Wonder. It is unlocked after visiting the Royal Seed Mansion, and its own completion unlocks Petal Isles Flying Battleship, as well as a Wonder Packun leading to the Sunbaked Desert. It has a difficulty of two stars and contains two Wonder Seeds. It introduces the Drill form and is primarily designed around its abilities.
In the Nintendo Live 2023 and kiosk demo, it is shown to be located in Pipe-Rock Plateau with a difficulty of three stars, taking the place of Here Come the Hoppos.[1]
Layout[edit]
The level takes place in a cavern full of jewel blocks, Konks, and Spinies walking on the ceiling. The player starts near a Konk in a recess in the ceiling, with a wide jewel block below and a ? Block above it containing a Drill Mushroom. Immediately after, they will encounter a Spiny, more jewel blocks (including one with a Talking Flower trapped inside) and another Konk. After a small tunnel accessible only in Drill form leading into an alcove with a few coins, there will be a segment with Spinies and jewel blocks above small pits, and then another Drill-exclusive tunnel, leading to a Warp Pipe. Through it is a side room featuring coins, flower coins, a Talking Flower and a 1-Up Mushroom. If the player does not take the Warp Pipe, they will have to avoid three Konks and several pits. Both paths rejoin right before the Checkpoint Flag.
Past the checkpoint, cyan, upwards-facing Konks are introduced, along with beacons in the ceiling. Past another Konk, a Wonder Flower can be found inside a jewel block. Touching it will trigger the course's Wonder Effect, which will create blue blocks that wall the player into a vertical shaft and summon Wonder Konk[derived] above. Wonder Konk will slam down periodically, breaking jewel blocks in its way, but will stagger after breaking stone blocks. The Wonder Seed is found at the bottom of the shaft, encased in a jewel block. A Warp Pipe will take the player to the next part of the level, featuring a horizontal hallway with both downwards- and upwards-facing Konks on either side of a bridge of jewel blocks. At the end is another Warp Pipe, leading to the outside of the cavern, with one last Spiny, a staircase of jewel blocks and the Goal Pole, where the second Wonder Seed is awarded.
Hidden Character Blocks[edit]
- A Blue Yoshi Hidden Character Block can be found in the wide opening above the entrance to the 1-Up Mushroom secret sub-area. It is located seven blocks above the upper-right corner of the 4x4 jewel block below. It contains a single flower coin.
10-flower coins[edit]
| Image | Location |
|---|---|

|
Found inside a jewel block under the second Konk. |

|
The center Brick Block in the middle of a set of three contains a beanstalk, leading the player up to an overground area containing a Konk floating above a pool of water and the second 10-flower coin. |

|
Found on an alcove before the final stretch. It can be reached from the left by drilling on the ceiling, or from the right, by hitting a Red Yoshi Hidden Character Block. |
Enemies[edit]
| Image | Name | Count |
|---|---|---|

|
Konk (downwards) | 10 |

|
Konk (upwards) | 7 |
| Wonder Konk[derived] (Wonder Effect only) | 1 | |

|
Spiny | 8 |
Talking Flowers' quotes[edit]
- "*exhale*" (said by the first flower trapped in a jewel block, immediately after being freed)
- "I can finally talk again!" (said by the same flower)
- "Not that I have anything to say." (said by the same flower)
- "*gasp*" (said by the second flower trapped in a jewel block, immediately after being freed)
- "I'm freeeeeeee!" (said by the same flower)
- "*exhale*" (said by the first flower trapped in a jewel block in the first secret room, immediately after being freed)
- "*pant*" (said by the same flower)
- "Way to go!" (said by a flower right after the Wonder Seed)
Gallery[edit]
Names in other languages[edit]
| Language | Name | Meaning | Notes |
|---|---|---|---|
| Japanese | ジュエルブロック だらけの Jueru Burokku darake no Dōkutsu |
Cave full of Jewel Blocks | |
| Chinese (simplified) | 宝石砖块 满满的洞窟[?] Bǎoshí Zhuānkuài Mǎnmǎnde Dòngkū |
Cave full of Jewel Bricks | |
| Chinese (traditional) | 寶石磚塊 滿滿的洞窟[?] Bǎoshí Zhuānkuài Mǎnmǎnde Dòngkū |
Cave full of Jewel Bricks | |
| Dutch | Juweelblokgrot[?] | Jewel Block Cave | |
| French | Caverne aux joyaux[?] | Jewel Cavern | |
| German | Höhle der Juwelenblöcke[?] | Cave of Jewel Blocks | |
| Italian | La caverna dei blocchi gioiello[?] | The jewel block cave | |
| Korean | 주얼블록이 가득한 동굴[?] Jueolbeullok-i gadeukhan donggul |
Cave full of Jewel Blocks | |
| Portuguese (NOA) | Um passeio joia pela caverna![?] | A Nice Walk Through the Cave! (Pun on joia, a slang term for "nice" which literally means "jewel") | |
| Portuguese (NOE) | Viagem pela gruta dos blocos joia[?] | A Trip to the Jewel Block Cave | |
| Russian | Самобытная пещера самоцветных блоков[?] Samobytnaya peshchera samotsvetnykh blokov |
Distinctive cave of Jewel Blocks | |
| Spanish | La cueva de los bloques gema[?] | The Cave of the Jewel Blocks |
References[edit]
- ^ Giant Bomb (September 1, 2023). Almost 15 Minutes of Super Mario Bros. Wonder. YouTube (English). Retrieved September 1, 2023.

