Level 8-6: Difference between revisions
No edit summary |
m (Text replacement - "''Mario vs. Donkey Kong (Nintendo Switch)''" to "''Mario vs. Donkey Kong'' (Nintendo Switch)") |
||
| (11 intermediate revisions by 5 users not shown) | |||
| Line 1: | Line 1: | ||
{{level infobox | {{level infobox | ||
|image=[[File: | |image=[[File:MarioVsDKSwitch8-6 1.jpg|250px]] | ||
|code=Level 6-6 | |code=Level 6-6 (GBA)<br>Level 8-6 (Switch) | ||
|world=[[Twilight City]] | |world=[[Twilight City]] | ||
|game=''[[Mario vs. Donkey Kong]]'' | |game=''[[Mario vs. Donkey Kong]]''<br>''[[Mario vs. Donkey Kong (Nintendo Switch)|Mario vs. Donkey Kong]]'' ([[Nintendo Switch]]) | ||
|limit=150 (first area)<br>180 (second area) | |limit=150 (first area)<br>180 (second area) | ||
|before_alt= | |before_alt= | ||
|before=[[Level | |before=[[Level 8-5|<<]] | ||
|after=[[Level | |after=[[Level 8-mm|>>]] | ||
}} | }} | ||
'''Level 6-6''' is the sixth level of [[Twilight City]] in ''[[Mario vs. Donkey Kong]]''. The | '''Level 8-6''' ('''Level 6-6''' in the GBA version) is the sixth level of [[Twilight City]] in ''[[Mario vs. Donkey Kong]]''. The highest score for this level in the original version is 25500. In the [[Nintendo Switch]] remake, the target time for this level's [[Time Attack (Mario vs. Donkey Kong for Nintendo Switch)|Time Attack]] is 114.00. | ||
==Overview== | ==Overview== | ||
[[File: | [[File:MarioVsDKSwitch8-6 2.jpg|250px|thumb|left|The second area]] | ||
In the GBA version only, the level opens with a cinematic showing [[Mario]] using a [[lift]] and then a [[Robo Kikki]]'s tail to avoid [[Spike Trap|spike]]s. | |||
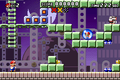
In the first area, the player needs to ride a lift heading right. When they are able to, the player needs to grab onto a | In the first area, the player needs to ride a lift heading right. When they are able to, the player needs to grab onto a Robo Kikki's tail until the lift returns below them and they need to drop back onto it. When the lift moves up enough, the player needs to jump onto some [[rope]]s and climb across them to reach another set of lifts. The player needs to [[crouch]] on the first in order to get under the ceiling and then press the blue [[Color Switch]] in the center of the second's path. The player then needs to return to the ropes and use a lift and a [[Wrench Shy Guy]] to get across some spikes and reach the area on the left. At the [[springboard]], the player can either use a lift or jump to the left to reach the platform with the [[key]] on it. After grabbing the key, the player has to use a lift to reach the platform with the locked door. | ||
In the second area, the player needs to progress to the right while avoid alternating lasers. Once on the right side of the area, the player needs to grab a [[Bob-omb]] and use a | In the second area, the player needs to progress to the right while avoid alternating lasers. Once on the right side of the area, the player needs to grab a [[Bob-omb]] and use a springboard (while avoiding a [[Wire Trap]] above and an attack from the Wrench Shy Guy to the left) to throw it onto the platform above so it can destroy the first set of [[Bob-omb Block]]s, and then the process needs to be repeated to destroy the second set. Once the path is open, the player needs to use a springboard to reach a platform above while avoiding a laser, and then they need to jump from a [[rope|wire]] to get over some spikes. Next, the player needs to progress through two pairs of alternating lasers to reach another Bob-omb deployer. The player needs to use Bob-ombs to clear two sets of blocks, one to the left and one below the player, while avoiding lasers after the first set. With the second set of blocks destroyed, the player can reach the [[Mini Mario (toy)|Mini-Mario]], though they need to avoid an attack from the Wrench Shy Guy. | ||
==Enemies== | ==Enemies== | ||
*[[ | *[[Robo Kikki]] | ||
*[[Bucket Man]] | *[[Bucket Man]] | ||
*[[ | *[[Wrench Shy Guy]]s | ||
*[[Bob-omb]]s | *[[Bob-omb]]s | ||
*[[Wire Trap]] | *[[Wire Trap]] | ||
| Line 28: | Line 28: | ||
==Present locations== | ==Present locations== | ||
*'''Red:''' In the first area, under the blue Color Switch. The player needs to use a [[Bucket Man]] to collect it. | *'''Red:''' In the first area, under the blue Color Switch. The player needs to use a [[Bucket Man]] to collect it. | ||
*'''Yellow:''' In the first area. Once the player reaches the | *'''Yellow:''' In the first area. Once the player reaches the springboard, they need to use it to land on a lift when it is above them to reach some platforms. The player then needs to drop down a small hole, which leads to the [[present (Mario vs. Donkey Kong)|present]] and a [[1-Up Mushroom]] placed between lasers. | ||
*'''Blue:''' In the second area, under the first Bob-omb | *'''Blue:''' In the second area, under the first Bob-omb generator. The player has to destroy the Bob-omb Blocks below them and then collect the present and return back up while avoiding lasers. | ||
==Gallery== | |||
<gallery> | |||
MvsDK 6-6.png|The first area of Level 6-6 in the GBA version | |||
MVDK 6-6 2.png|The second area of Level 6-6 in the GBA version | |||
</gallery> | |||
{{MVDK levels}} | {{MVDK levels}} | ||
[[Category:Cities]] | [[Category:Cities]] | ||
[[Category:Mario vs. Donkey Kong levels]] | [[Category:Mario vs. Donkey Kong levels]] | ||
Latest revision as of 20:03, June 22, 2024
| Level | |
|---|---|
| Level 8-6 | |

| |
| Level code | Level 6-6 (GBA) Level 8-6 (Switch) |
| World | Twilight City |
| Game | Mario vs. Donkey Kong Mario vs. Donkey Kong (Nintendo Switch) |
| Time limit | 150 (first area) 180 (second area) |
| << Directory of levels >> | |
Level 8-6 (Level 6-6 in the GBA version) is the sixth level of Twilight City in Mario vs. Donkey Kong. The highest score for this level in the original version is 25500. In the Nintendo Switch remake, the target time for this level's Time Attack is 114.00.
Overview[edit]

In the GBA version only, the level opens with a cinematic showing Mario using a lift and then a Robo Kikki's tail to avoid spikes.
In the first area, the player needs to ride a lift heading right. When they are able to, the player needs to grab onto a Robo Kikki's tail until the lift returns below them and they need to drop back onto it. When the lift moves up enough, the player needs to jump onto some ropes and climb across them to reach another set of lifts. The player needs to crouch on the first in order to get under the ceiling and then press the blue Color Switch in the center of the second's path. The player then needs to return to the ropes and use a lift and a Wrench Shy Guy to get across some spikes and reach the area on the left. At the springboard, the player can either use a lift or jump to the left to reach the platform with the key on it. After grabbing the key, the player has to use a lift to reach the platform with the locked door.
In the second area, the player needs to progress to the right while avoid alternating lasers. Once on the right side of the area, the player needs to grab a Bob-omb and use a springboard (while avoiding a Wire Trap above and an attack from the Wrench Shy Guy to the left) to throw it onto the platform above so it can destroy the first set of Bob-omb Blocks, and then the process needs to be repeated to destroy the second set. Once the path is open, the player needs to use a springboard to reach a platform above while avoiding a laser, and then they need to jump from a wire to get over some spikes. Next, the player needs to progress through two pairs of alternating lasers to reach another Bob-omb deployer. The player needs to use Bob-ombs to clear two sets of blocks, one to the left and one below the player, while avoiding lasers after the first set. With the second set of blocks destroyed, the player can reach the Mini-Mario, though they need to avoid an attack from the Wrench Shy Guy.
Enemies[edit]
Present locations[edit]
- Red: In the first area, under the blue Color Switch. The player needs to use a Bucket Man to collect it.
- Yellow: In the first area. Once the player reaches the springboard, they need to use it to land on a lift when it is above them to reach some platforms. The player then needs to drop down a small hole, which leads to the present and a 1-Up Mushroom placed between lasers.
- Blue: In the second area, under the first Bob-omb generator. The player has to destroy the Bob-omb Blocks below them and then collect the present and return back up while avoiding lasers.
Gallery[edit]

The first area of Level 6-6 in the GBA version
The second area of Level 6-6 in the GBA version

