Wakeport: Difference between revisions
m (Text replacement - "M&L:DT Overworld Map" to "M&LDT map") |
|||
| (23 intermediate revisions by 14 users not shown) | |||
| Line 1: | Line 1: | ||
{{location infobox | {{location infobox | ||
| | |title=Wakeport | ||
|image=MLDT - Wakeport 1.png | |image=[[File:MLDT - Wakeport 1.png|250px]] | ||
| | |greater_location=[[Pi'illo Island]] | ||
| | |inhabitants=[[Pi'illo]]s, [[Brock]]s, [[Beanish]], [[Yoshi (species)|Yoshi]]s, [[Hooski]]s, [[Toad (species)|Toad]]s, [[Shelltop]]s, [[Kylie Koopa]] | ||
|inhabitants=[[Pi'illo]]s, [[Brock]]s, [[Beanish]], [[Yoshi (species)|Yoshi]]s, [[Hooski]]s, [[Toad (species)|Toad]]s, [[Shelltop]]s | |||
|first_appearance=''[[Mario & Luigi: Dream Team]]'' ([[List of games by date#2013|2013]]) | |first_appearance=''[[Mario & Luigi: Dream Team]]'' ([[List of games by date#2013|2013]]) | ||
}} | }} | ||
'''Wakeport''' (formerly known as '''Wake Isle''' under the [[Pi'illo Island|Pi'illo Kingdom]] era) is a city area in ''[[Mario & Luigi: Dream Team]]''. There are many houses and buildings there, and it | '''Wakeport''' (formerly known as '''Wake Isle''' under the [[Pi'illo Island|Pi'illo Kingdom]] era) is a city area in ''[[Mario & Luigi: Dream Team]]''. There are many houses and buildings there, and it can be considered one of the most populated areas on [[Pi'illo Island]]. Ruins are left around the town to maintain the historic symbols of the town, and is also used as a way to attract tourists. There is a hotel district, a shopping district and an event plaza where the [[Mad Skillathon]] takes place. [[Kylie Koopa]] resides here as the island photographer, whom Mario and Luigi are able to assist in the form of a [[Mario & Luigi: Dream Team#Kylie Koopa's Photo Puzzles|sidequest]]. | ||
It is the player's first introduction to gatekeepers, and their panel based puzzles solved with [[Mole Mario]]. | |||
==History== | ==History== | ||
[[Mario]] and [[Luigi]] first come here in order to find the tour centre to sign up for the [[Mount Pajamaja]] tour, so they can traverse the mountain to where [[Antasma]] and [[Bowser]] are with the [[Dream Stone]]. When they sign up for the tour, the soon learn from [[Lil' Massif]], one of the tour guides, that the tour cannot begin unless his brother and the other tour guide, [[Big Massif]] is also present. Mario and Luigi embark on a search for Big Massif, and eventually find him sleeping on a [[Dreampoint]]. Luigi sleeps near him in the hopes that Mario will arrive in the same Dream World as him, as suggested by [[Prince Dreambert]]. Upon being successful in getting Big Massif to wake up and rush over to Lil' Massif, the Massif Bros. tell Mario and Luigi to meet them on Mount Pajamaja to start the tour. | [[Mario]] and [[Luigi]] first come here in order to find the tour centre to sign up for the [[Mount Pajamaja]] tour, so they can traverse the mountain to where [[Antasma]] and [[Bowser]] are with the [[Dream Stone]]. When they sign up for the tour, the soon learn from [[Lil' Massif]], one of the tour guides, that the tour cannot begin unless his brother and the other tour guide, [[Big Massif]] is also present. Mario and Luigi embark on a search for Big Massif, and eventually find him sleeping on a [[Dreampoint]]. Luigi sleeps near him in the hopes that Mario will arrive in the same Dream World as him, as suggested by [[Prince Dreambert]]. Upon being successful in getting Big Massif to wake up and rush over to Lil' Massif, the Massif Bros. tell Mario and Luigi to meet them on Mount Pajamaja to start the tour. | ||
Later on, after Mario and Luigi have collected all five Zee Parts, they hurry back to Wakeport in order to find [[Bedsmith]], a [[Pi'illo]] with the bed-making skills to create the [[Ultibed]] in order for them to meet the [[Zeekeeper]]. Mario and Luigi, after arriving into an apparently not populated part of town, find [[Popple]] scoping out a [[Wiggler]] planning on creating a flower garden there, whom he thinks is a security guard hired by the Pi'illo fanatic of the house he | Later on, after Mario and Luigi have collected all five Zee Parts, they hurry back to Wakeport in order to find [[Bedsmith]], a [[Pi'illo]] with the bed-making skills to create the [[Ultibed]] in order for them to meet the [[Zeekeeper]]. Mario and Luigi, after arriving into an apparently not populated part of town, find [[Popple]] scoping out a [[Wiggler]] planning on creating a flower garden there, whom he thinks is a security guard hired by the Pi'illo fanatic of the house he is trying to rob. Under the assumption that Mario and Luigi are also thieves, Popple enrages Wiggler and hinders Mario and Luigi in a battle against him. As soon as Wiggler is defeated, Popple turns against the Bros. and attacks them, also soundly defeated. | ||
After the battle, Popple is furious upon learning what they had just fought over, enraging the Wiggler by insulting the flower garden, who then chases Popple, consumed by rage. Popple then states he | After the battle, Popple is furious upon learning what they had just fought over, enraging the Wiggler by insulting the flower garden, who then chases Popple, consumed by rage. Popple then states he is leaving this island for good as he runs away, and Mario and Luigi continue through the area to a secret first floor entrance to [[Pi'illoper]]'s house, the aforementioned Pi'illo fanatic. Pi'illo-per, after seeing the Zee Parts the Bros. have collected, opens the passage to the basement to show his collection of Pi'illo items, eventually showing Bedsmith's pillow, which gets soon slept on by Luigi thanks to Dreambert in order to free Bedsmith. After saving him, Bedsmith states the Bros. must go with him to [[Somnom Woods]] in order to access his workshop and build the Ultibed. | ||
{{M&LDT map}} | {{M&LDT map}} | ||
==Enemies== | ==Enemies== | ||
===First visit=== | |||
<gallery> | <gallery> | ||
Hermite crab.png|[[Hermite Crab]]s | Hermite crab.png|[[Hermite Crab]]s | ||
</gallery> | |||
===Path to Bedsmith=== | |||
<gallery> | |||
Hermite Crab R.png|[[Hermite Crab R|Hermite Crabs R]] | Hermite Crab R.png|[[Hermite Crab R|Hermite Crabs R]] | ||
MLDT Virus.png|[[Virus]]es | MLDT Virus.png|[[Virus]]es | ||
| Line 30: | Line 34: | ||
PoppleMLDT.png|[[Popple]] (boss) | PoppleMLDT.png|[[Popple]] (boss) | ||
</gallery> | </gallery> | ||
==Pi'illo locations== | |||
{|border=1 cellpadding=2 style="text-align: center; border-collapse: collapse; border: 1px solid black; width:100%" | |||
! colspan="4" style="background:rgb(235,245,251); height:2em" | [[Wakeport]] – 6 Pi'illos (5 Pink Pi'illos, Bedsmith) | |||
|-style="background:rgb(235,245,251); height:2em" | |||
!Location | |||
!Necessity | |||
!Type | |||
!Screenshot | |||
|- | |||
|[[Bedsmith]] is found in the basement of [[Pi'illoper]]'s house, available to be accessed after Mario and Luigi visit him on the higher floor of the house through a rooftop entrance. | |||
|Required | |||
|[[File:Bedsmith.png]]<br>Bedsmith | |||
|[[File:M&LDT Wakeport Pi'illo 1.png|512px]] | |||
|- | |||
|This Pi'illo is found in the area where the Mad Skillathon is held, in the far south-west. | |||
|Optional | |||
|[[File:Pi'illoSprite.png]]<br>Pink Pi'illo | |||
|[[File:M&LDT Wakeport Pi'illo 2.png|512px]] | |||
|- | |||
|This Pi'illo is found in the shopping district, in the far-east on some grass. | |||
|Optional | |||
|[[File:Pi'illoSprite.png]]<br>Pink Pi'illo | |||
|[[File:M&LDT Wakeport Pi'illo 3.png|512px]] | |||
|- | |||
|This Pi'illo is found in the area with the tour center, behind one of the three ruins' gates. | |||
|Optional | |||
|[[File:Pi'illoSprite.png]]<br>Pink Pi'illo | |||
|[[File:M&LDT Wakeport Pi'illo 4.png|512px]] | |||
|- | |||
|This Pi'illo is found in the area where Popple and Wiggler are battled, in the westernmost area in the middle of a square made out of tiles. | |||
|Optional | |||
|[[File:Pi'illoSprite.png]]<br>Pink Pi'illo | |||
|[[File:M&LDT Wakeport Pi'illo 5.png|512px]] | |||
|- | |||
|This Pi'illo is found in the area where Popple and Wiggler are battled, in the far-east. | |||
|Optional | |||
|[[File:Pi'illoSprite.png]]<br>Pink Pi'illo | |||
|[[File:M&LDT Wakeport Pi'illo 6.png|512px]] | |||
|} | |||
==Beanhole locations== | |||
{|border=1 cellpadding=2 style="text-align: center; border-collapse: collapse; border: 1px solid black; width:100%" | |||
!colspan="3"style="background:rgb(235,245,251); height:2em"|[[Wakeport]] – 12 Beans (4 Heart Beans, 1 Bros. Bean, 2 Power Beans, 1 Defense Bean, 2 Speed Beans, 2 Stache Beans) | |||
|-style="background:rgb(235,245,251); height:2em" | |||
!Location | |||
!Type | |||
!Screenshot | |||
|- | |||
|In the first area of Wakeport when accessed from Mushrise Park, this Bean is found in the center of the area on some raised ground, right in the middle of a spiral grass pattern. | |||
|Stache | |||
|[[File:M&LDT Wakeport 1.png|512px]] | |||
|- | |||
|In the second area of Wakeport when accessed from Mushrise Park, this Bean is found in the south-west, on a high pillar. (Spin Jump required) | |||
|Heart | |||
|[[File:M&LDT Wakeport 2.png|512px]] | |||
|- | |||
|In the second area of Wakeport when accessed from Mushrise Park, this Bean is found in the center of the area on a high pillar. (Spin Jump required) | |||
|Speed | |||
|[[File:M&LDT Wakeport 3.png|512px]] | |||
|- | |||
|In the hotel district, this Bean is found in the south-west of the area near an umbrella. | |||
|Heart | |||
|[[File:M&LDT Wakeport 4.png|512px]] | |||
|- | |||
|In the shopping district, this Bean is found between the Badge Shop and Gear Shop, in the shade. | |||
|Power | |||
|[[File:M&LDT Wakeport 5.png|512px]] | |||
|- | |||
|In the shopping district, this Bean is found to the far north-east, near a Yellow Yoshi. | |||
|Heart | |||
|[[File:M&LDT Wakeport 6.png|512px]] | |||
|- | |||
|In the area with the tour center, these 2 Beans are found behind the ruins gate, behind a Pink Pi'illo. The eastern one is Stache Bean, the western one is Heart Bean. | |||
|Stache and Heart | |||
|[[File:M&LDT Wakeport 7.png|512px]] | |||
|- | |||
|In the area with the tour center, this Bean is found in the center-south-east, in a patch of grass on rooftop level. | |||
|Speed | |||
|[[File:M&LDT Wakeport 8.png|512px]] | |||
|- | |||
|In the area where Popple and Wiggler are battled, this Bean is found in the center-north, to the slight north-east of some stone structures. | |||
|Defense | |||
|[[File:M&LDT Wakeport 9.png|512px]] | |||
|- | |||
|In the area where Popple and Wiggler are battled, these 2 Beans are found in the north-east, next to the water where it is not blocked by plants. The western one is Power Bean, the eastern one is Bros. Bean. | |||
|Power and Bros. | |||
|[[File:M&LDT Wakeport 10.png|512px]] | |||
|} | |||
==Block locations== | |||
{|border=1 cellpadding=2 style="text-align: center; border-collapse: collapse; border: 1px solid black; width:100%" | |||
!colspan="3"style="background:gainsboro; height:2em"|[[Wakeport]] - 42 Blocks (25 ?, 2 M, 1 L, 2 Bros., 3 Random, 8 Attack Piece, 1 Camera) | |||
|-style="background:gainsboro; height:2em" | |||
!Item/s | |||
!Location | |||
!Screenshot | |||
|- | |||
|[[File:MLSS+BM10Coin.png]][[File:MLSS+BM10Coin.png]][[File:MLSS+BM10Coin.png]][[File:MLSS+BM10Coin.png]][[File:MLSS+BM10Coin.png]][[File:MLSS+BM10Coin.png]][[File:MLSS+BM10Coin.png]][[File:MLSS+BM10Coin.png]][[File:MLSS+BM10Coin.png]][[File:MLSS+BM10Coin.png]]<br>10 10-Coins | |||
|In the first scene, in the Mini-Mario section. | |||
|[[File:Wakeport Block 1.png]] | |||
|- | |||
|[[File:MLPJ5Coin.png]][[File:MLPJ5Coin.png]][[File:MLPJ5Coin.png]][[File:MLPJ5Coin.png]][[File:MLPJ5Coin.png]][[File:MLPJ5Coin.png]][[File:MLPJ5Coin.png]][[File:MLPJ5Coin.png]][[File:MLPJ5Coin.png]][[File:MLPJ5Coin.png]]<br>10 Five Coins | |||
|In the second scene, in the west. | |||
|[[File:Wakeport Block 2.png]] | |||
|- | |||
|[[File:MLSS+BM10Coin.png]][[File:MLSS+BM10Coin.png]][[File:MLSS+BM10Coin.png]][[File:MLSS+BM10Coin.png]][[File:MLSS+BM10Coin.png]][[File:MLSS+BM10Coin.png]][[File:MLSS+BM10Coin.png]][[File:MLSS+BM10Coin.png]][[File:MLSS+BM10Coin.png]][[File:MLSS+BM10Coin.png]] [[File:MLDTAttackPiece.png]]<br>10 10-Coins, [[Bye-Bye Cannon]] Attack Piece | |||
|In the middle house of the third scene, above the bookcases, in front of the windows. | |||
|[[File:Wakeport Blocks 3-4.png]] | |||
|- | |||
|[[File:MLSS+BM10Coin.png]][[File:MLSS+BM10Coin.png]][[File:MLSS+BM10Coin.png]][[File:MLSS+BM10Coin.png]][[File:MLSS+BM10Coin.png]][[File:MLSS+BM10Coin.png]][[File:MLSS+BM10Coin.png]][[File:MLSS+BM10Coin.png]][[File:MLSS+BM10Coin.png]][[File:MLSS+BM10Coin.png]]<br>10 10-Coins | |||
|In the left house of the third scene, in the lower part, right of the pillar. | |||
|[[File:Wakeport Block 5.png]] | |||
|- | |||
|[[File:DreamTeam1up.png]]<br>1-Up Mushroom | |||
|Same scene, in the middle of the upper part. | |||
|[[File:Wakeport Block 6.png]] | |||
|- | |||
|[[File:M&LDT Nut.png]]<br>Super Nut | |||
|In the third scene, above the middle house. | |||
|[[File:Wakeport Block 7.png]] | |||
|- | |||
|[[File:MLDTAttackPiece.png]]<br>Bye-Bye Cannon Attack Piece | |||
|Same scene, above the right house. | |||
|[[File:Wakeport Block 8.png]] | |||
|- | |||
|[[File:MLPJ5Coin.png]]<br>Five Coin | |||
|In the scene south of the third scene, near the exit. | |||
|[[File:Wakeport Block 9.png]] | |||
|- | |||
|[[File:MLDTAttackPiece.png]]<br>Bye-Bye Cannon Attack Piece | |||
|In the Kylie Koopa's house in the scene west of the previous one, at the end of the upper part. | |||
|[[File:Wakeport Block 10.png]] | |||
|- | |||
|[[File:M&LDT Shot.png]]<br>Wakeport Shot | |||
|Same scene, right of Kylie Koopa, appears after agreeing to help her. | |||
|[[File:Wakeport Block 11.png]] | |||
|- | |||
|[[File:MLDTAttackPiece.png]]<br>Bye-Bye Cannon Attack Piece | |||
|In the scene north of the previous one, on the wall in the east, accessible from the third scene. | |||
|[[File:Wakeport Block 12.png]] | |||
|- | |||
|[[File:MLPJ5Coin.png]]<br>Five Coin | |||
|Same scene, in the middle. | |||
|[[File:Wakeport Block 13.png]] | |||
|- | |||
|[[File:MLDTAttackPiece.png]] [[File:MLPJ5Coin.png]][[File:MLPJ5Coin.png]][[File:MLPJ5Coin.png]][[File:MLPJ5Coin.png]][[File:MLPJ5Coin.png]][[File:MLPJ5Coin.png]][[File:MLPJ5Coin.png]][[File:MLPJ5Coin.png]][[File:MLPJ5Coin.png]][[File:MLPJ5Coin.png]]<br>Bye-Bye Cannon Attack Piece, 10 Five Coins | |||
|Same scene, above the left house (tourist centre). | |||
|[[File:Wakeport Blocks 14-15.png]] | |||
|- | |||
|[[File:MLPJ5Coin.png]][[File:MLPJ5Coin.png]][[File:MLPJ5Coin.png]][[File:MLPJ5Coin.png]][[File:MLPJ5Coin.png]][[File:MLPJ5Coin.png]][[File:MLPJ5Coin.png]][[File:MLPJ5Coin.png]][[File:MLPJ5Coin.png]][[File:MLPJ5Coin.png]]<br>10 Five Coins | |||
|In the [[Pi'illoper|Pi'illoper's]] house (found in the east of the scene), in the lower part. | |||
|[[File:Wakeport Block 16.png]] | |||
|- | |||
|[[File:MLPJ5Coin.png]]<br>Five Coin | |||
|In the southern-most scene, near the western entrance. | |||
|[[File:Wakeport Block 17.png]] | |||
|- | |||
|[[File:M&LDT Shock Bomb.png]]<br>Shock Bomb | |||
|Same scene, above the awning near the western entrance. | |||
|[[File:Wakeport Block 18.png]] | |||
|- | |||
|[[File:MLSS+BM10Coin.png]][[File:MLSS+BM10Coin.png]][[File:MLSS+BM10Coin.png]][[File:MLSS+BM10Coin.png]][[File:MLSS+BM10Coin.png]][[File:MLSS+BM10Coin.png]][[File:MLSS+BM10Coin.png]][[File:MLSS+BM10Coin.png]][[File:MLSS+BM10Coin.png]][[File:MLSS+BM10Coin.png]] [[File:MLDTAttackPiece.png]]<br>10 10-Coins, Bye-Bye Cannon Attack Piece | |||
|Same scene, in the southeast. | |||
|[[File:Wakeport Blocks 19-20.png]] | |||
|- | |||
|[[File:M&LDT Candy.png]]<br>Super Candy | |||
|Same scene, in the east. | |||
|[[File:Wakeport Block 21.png]] | |||
|- | |||
|[[File:MLSS+BM10Coin.png]] [[File:MLPJ5Coin.png]][[File:MLPJ5Coin.png]][[File:MLPJ5Coin.png]][[File:MLPJ5Coin.png]][[File:MLPJ5Coin.png]][[File:MLPJ5Coin.png]][[File:MLPJ5Coin.png]][[File:MLPJ5Coin.png]][[File:MLPJ5Coin.png]][[File:MLPJ5Coin.png]]<br>10-Coin, 10 Five Coins | |||
|Same scene, in the northeast. | |||
|[[File:Wakeport Blocks 22-23.png]] | |||
|- | |||
|[[File:MLPJ5Coin.png]][[File:MLPJ5Coin.png]][[File:MLPJ5Coin.png]][[File:MLPJ5Coin.png]][[File:MLPJ5Coin.png]][[File:MLPJ5Coin.png]][[File:MLPJ5Coin.png]][[File:MLPJ5Coin.png]][[File:MLPJ5Coin.png]][[File:MLPJ5Coin.png]]<br>10 Five Coins | |||
|In the scene south of the third scene, in the island part, near the entrance. | |||
|[[File:Wakeport Block 24.png]] | |||
|- | |||
|[[File:DreamTeam1up.png]]<br>1-Up Mushroom | |||
|Same scene, left of the previous one, in the Mini-Mario section. | |||
|[[File:Wakeport Block 25.png]] | |||
|- | |||
|[[File:MLDTAttackPiece.png]]<br>Bye-Bye Cannon Attack Piece | |||
|Same scene, right of the bridge connecting the main part with island part. | |||
|[[File:Wakeport Block 26.png]] | |||
|- | |||
|[[File:Dream Team Accessory.png]] [[File:MLDTAttackPiece.png]]<br>Counter Belt, Bye-Bye Cannon Attack Piece | |||
|Same scene, in the Mini-Mario section above the Badge Shop. | |||
|[[File:Wakeport Blocks 27-28.png]] | |||
|- | |||
|[[File:MLPJ5Coin.png]][[File:MLPJ5Coin.png]][[File:MLPJ5Coin.png]][[File:MLPJ5Coin.png]][[File:MLPJ5Coin.png]][[File:MLPJ5Coin.png]][[File:MLPJ5Coin.png]][[File:MLPJ5Coin.png]][[File:MLPJ5Coin.png]][[File:MLPJ5Coin.png]]<br>10 Five Coins | |||
|Same scene, above the Item Shop. | |||
|[[File:Wakeport Block 29.png]] | |||
|- | |||
|[[File:M&LDT Syrup.png]]<br>Supersyrup Jar | |||
|In the scene west of the previous one, above the Kylie Koopa's house. | |||
|[[File:Wakeport Block 30.png]] | |||
|- | |||
|[[File:MLPJ5Coin.png]][[File:MLPJ5Coin.png]][[File:MLPJ5Coin.png]][[File:MLPJ5Coin.png]][[File:MLPJ5Coin.png]][[File:MLPJ5Coin.png]][[File:MLPJ5Coin.png]][[File:MLPJ5Coin.png]][[File:MLPJ5Coin.png]][[File:MLPJ5Coin.png]]<br>10 Five Coins | |||
|Same scene, above the awning in the north. | |||
|[[File:Wakeport Block 31.png]] | |||
|- | |||
|[[File:MLPJ50Coin.png]]<br>50-Coin | |||
|'''NOTE''': Following 3 blocks are available only after learning the Spin Jump on Mount Pajamaja.<br>In the first scene, near the entrance. | |||
|[[File:Wakeport Block 32.png]] | |||
|- | |||
|[[File:MLSS+BM10Coin.png]][[File:MLSS+BM10Coin.png]][[File:MLSS+BM10Coin.png]][[File:MLSS+BM10Coin.png]][[File:MLSS+BM10Coin.png]][[File:MLSS+BM10Coin.png]][[File:MLSS+BM10Coin.png]][[File:MLSS+BM10Coin.png]][[File:MLSS+BM10Coin.png]][[File:MLSS+BM10Coin.png]]<br>10 10-Coins | |||
|In the second scene, near the entrance. | |||
|[[File:Wakeport Block 33.png]] | |||
|- | |||
|[[File:M&LDT Syrup.png]]<br>Ultrasyrup Jar | |||
|In the right house of the third scene, in the upper right part. | |||
|[[File:Wakeport Block 34.png]] | |||
|- | |||
|[[File:M&LDT Syrup.png]]<br>Ultrasyrup Jar | |||
|'''NOTE''': Following 8 blocks are available only after learning the Ball Hop during second Mount Pajamaja visit.<br>In the first scene, in the northeast. | |||
|[[File:Wakeport Block 35.png]] | |||
|- | |||
|[[File:M&LDT Nut.png]]<br>Ultra Nut | |||
|Same scene, in the north. | |||
|[[File:Wakeport Block 36.png]] | |||
|- | |||
|[[File:DreamTeam1up.png]] [[File:M&LDT Candy.png]]<br>1-Up Mushroom, Max Candy | |||
|In the scene where [[Wiggler#Mario_.26_Luigi:_Dream_Team|Wiggler]] and [[Popple#Mario_.26_Luigi:_Dream_Team|Popple]] are battled, in the northeast. | |||
|[[File:Wakeport Blocks 37-38.png]] | |||
|- | |||
|[[File:M&LDT Mushroom.png]]<br>Ultra Mushroom | |||
|In the basement of the Pi'illoper's house, at the east end of the upper part. | |||
|[[File:Wakeport Block 39.png]] | |||
|- | |||
|[[File:MLPJ50Coin.png]] [[File:MLSS+BM10Coin.png]][[File:MLSS+BM10Coin.png]][[File:MLSS+BM10Coin.png]][[File:MLSS+BM10Coin.png]][[File:MLSS+BM10Coin.png]][[File:MLSS+BM10Coin.png]][[File:MLSS+BM10Coin.png]][[File:MLSS+BM10Coin.png]][[File:MLSS+BM10Coin.png]][[File:MLSS+BM10Coin.png]]<br>50-Coin, 10 10-Coins | |||
|Same scene, at the east end of the middle part. | |||
|[[File:Wakeport Blocks 40-41.png]] | |||
|- | |||
|[[File:MLSSBMRefreshingHerb.png]]<br>Refreshing Herb | |||
|Same scene, at the southwest end of the middle part. | |||
|[[File:Wakeport Block 42.png]] | |||
|} | |||
==Names in other languages== | ==Names in other languages== | ||
| Line 35: | Line 277: | ||
|Jap=メザメタウン | |Jap=メザメタウン | ||
|JapR=Mezame Taun | |JapR=Mezame Taun | ||
|JapM= | |JapM=Awakening Town | ||
|Dut=Wakkerstad | |Dut=Wakkerstad | ||
|DutM=Awake City | |DutM=Awake City | ||
|FreA=Port de l'Aube | |FreA=Port de l'Aube | ||
|FreAM=Dawn Port | |FreAM=Dawn Port | ||
| | |FreE=Évolis | ||
| | |FreEM=From ''éveil'' ("awakening") and "-polis" (meaning "city" in Ancient Greek) | ||
|Ger=Pennemünde | |||
|GerM=From ''pennen'' (a colloquial term meaning "sleep") and ''-münde'' (a common suffix for German cities where rivers enter the sea), possibly a pun on the real town of ''Peenemünde'' in the northeast of Germany | |||
|Ita=Risvegliopoli | |Ita=Risvegliopoli | ||
|ItaM=From | |ItaM=From ''risveglio'' ("awakening") and "-polis" (meaning "city" in Ancient Greek) | ||
|Kor=이러나 타운 | |Kor=이러나 타운 | ||
|KorR= | |KorR=I'reona Taun | ||
|KorM= | |KorM=Phonetic reading of "일어나" (''il'eona'', Korean phrase "wake up!") + "town" | ||
| | |Por=Vila Espertina | ||
| | |PorM=Insomnia Town | ||
|Rus=Утрянск | |||
|RusR=Utryansk | |||
|RusM=from "утро" (''utro'', morning) and -ск (Russian suffix for city names) | |||
|SpaA=Puerto Despuerto | |||
|SpaAM=''Puerto'' ("port") + portmanteau of ''despierto'' ("awake") and ''puerto'' ("port") | |||
|SpaE=Desperta d'Or | |||
|SpaEM=Pun on ''despertador'' ("alarm clock") and "Marina d'Or" (Spanish holiday resort) | |||
}} | }} | ||
Latest revision as of 06:58, December 10, 2024
| Wakeport | |
|---|---|
| |
| First appearance | Mario & Luigi: Dream Team (2013) |
| Greater location | Pi'illo Island |
| Inhabitants | Pi'illos, Brocks, Beanish, Yoshis, Hooskis, Toads, Shelltops, Kylie Koopa |
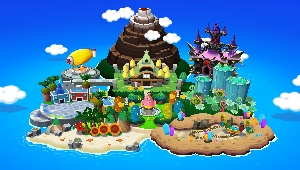
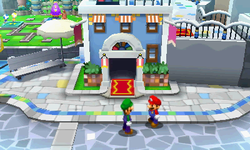
Wakeport (formerly known as Wake Isle under the Pi'illo Kingdom era) is a city area in Mario & Luigi: Dream Team. There are many houses and buildings there, and it can be considered one of the most populated areas on Pi'illo Island. Ruins are left around the town to maintain the historic symbols of the town, and is also used as a way to attract tourists. There is a hotel district, a shopping district and an event plaza where the Mad Skillathon takes place. Kylie Koopa resides here as the island photographer, whom Mario and Luigi are able to assist in the form of a sidequest.
It is the player's first introduction to gatekeepers, and their panel based puzzles solved with Mole Mario.
History[edit]
Mario and Luigi first come here in order to find the tour centre to sign up for the Mount Pajamaja tour, so they can traverse the mountain to where Antasma and Bowser are with the Dream Stone. When they sign up for the tour, the soon learn from Lil' Massif, one of the tour guides, that the tour cannot begin unless his brother and the other tour guide, Big Massif is also present. Mario and Luigi embark on a search for Big Massif, and eventually find him sleeping on a Dreampoint. Luigi sleeps near him in the hopes that Mario will arrive in the same Dream World as him, as suggested by Prince Dreambert. Upon being successful in getting Big Massif to wake up and rush over to Lil' Massif, the Massif Bros. tell Mario and Luigi to meet them on Mount Pajamaja to start the tour.
Later on, after Mario and Luigi have collected all five Zee Parts, they hurry back to Wakeport in order to find Bedsmith, a Pi'illo with the bed-making skills to create the Ultibed in order for them to meet the Zeekeeper. Mario and Luigi, after arriving into an apparently not populated part of town, find Popple scoping out a Wiggler planning on creating a flower garden there, whom he thinks is a security guard hired by the Pi'illo fanatic of the house he is trying to rob. Under the assumption that Mario and Luigi are also thieves, Popple enrages Wiggler and hinders Mario and Luigi in a battle against him. As soon as Wiggler is defeated, Popple turns against the Bros. and attacks them, also soundly defeated.
After the battle, Popple is furious upon learning what they had just fought over, enraging the Wiggler by insulting the flower garden, who then chases Popple, consumed by rage. Popple then states he is leaving this island for good as he runs away, and Mario and Luigi continue through the area to a secret first floor entrance to Pi'illoper's house, the aforementioned Pi'illo fanatic. Pi'illo-per, after seeing the Zee Parts the Bros. have collected, opens the passage to the basement to show his collection of Pi'illo items, eventually showing Bedsmith's pillow, which gets soon slept on by Luigi thanks to Dreambert in order to free Bedsmith. After saving him, Bedsmith states the Bros. must go with him to Somnom Woods in order to access his workshop and build the Ultibed.
Enemies[edit]
First visit[edit]
Path to Bedsmith[edit]
Shy Guy Airtubs (background enemy)
Wiggler (boss)
Popple (boss)
Pi'illo locations[edit]
| Wakeport – 6 Pi'illos (5 Pink Pi'illos, Bedsmith) | |||
|---|---|---|---|
| Location | Necessity | Type | Screenshot |
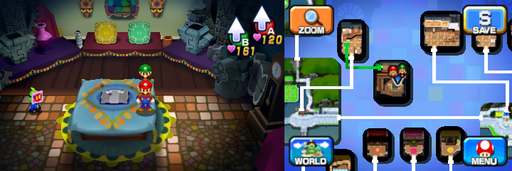
| Bedsmith is found in the basement of Pi'illoper's house, available to be accessed after Mario and Luigi visit him on the higher floor of the house through a rooftop entrance. | Required | Bedsmith |
|
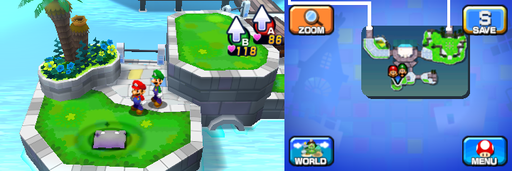
| This Pi'illo is found in the area where the Mad Skillathon is held, in the far south-west. | Optional | Pink Pi'illo |
|
| This Pi'illo is found in the shopping district, in the far-east on some grass. | Optional | Pink Pi'illo |
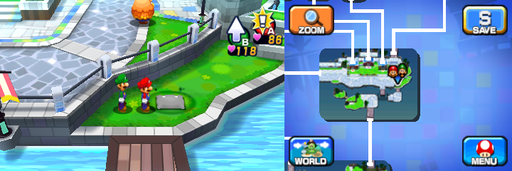
|
| This Pi'illo is found in the area with the tour center, behind one of the three ruins' gates. | Optional | Pink Pi'illo |
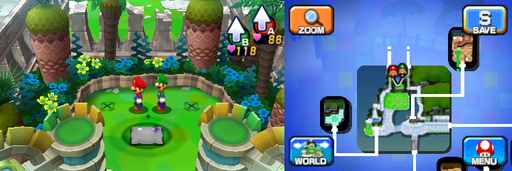
|
| This Pi'illo is found in the area where Popple and Wiggler are battled, in the westernmost area in the middle of a square made out of tiles. | Optional | Pink Pi'illo |
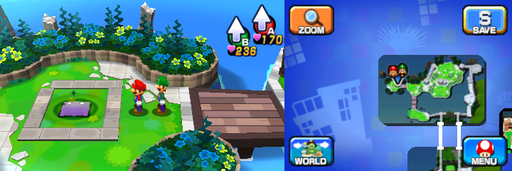
|
| This Pi'illo is found in the area where Popple and Wiggler are battled, in the far-east. | Optional | Pink Pi'illo |
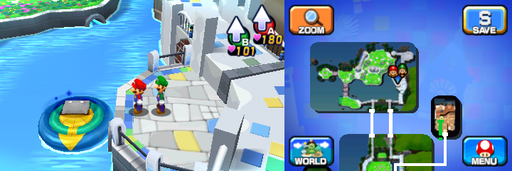
|
Beanhole locations[edit]
| Wakeport – 12 Beans (4 Heart Beans, 1 Bros. Bean, 2 Power Beans, 1 Defense Bean, 2 Speed Beans, 2 Stache Beans) | ||
|---|---|---|
| Location | Type | Screenshot |
| In the first area of Wakeport when accessed from Mushrise Park, this Bean is found in the center of the area on some raised ground, right in the middle of a spiral grass pattern. | Stache | 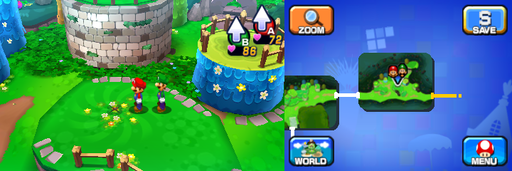
|
| In the second area of Wakeport when accessed from Mushrise Park, this Bean is found in the south-west, on a high pillar. (Spin Jump required) | Heart | 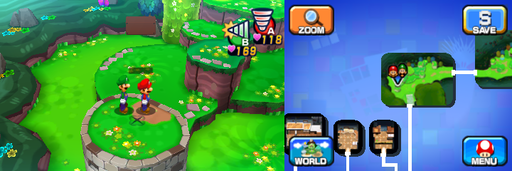
|
| In the second area of Wakeport when accessed from Mushrise Park, this Bean is found in the center of the area on a high pillar. (Spin Jump required) | Speed | 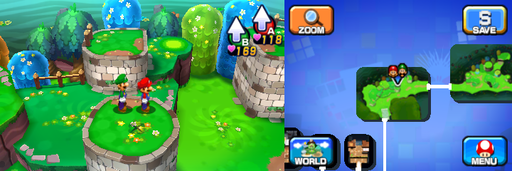
|
| In the hotel district, this Bean is found in the south-west of the area near an umbrella. | Heart | 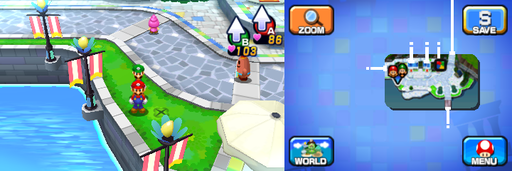
|
| In the shopping district, this Bean is found between the Badge Shop and Gear Shop, in the shade. | Power | 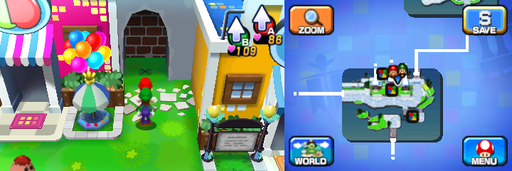
|
| In the shopping district, this Bean is found to the far north-east, near a Yellow Yoshi. | Heart | 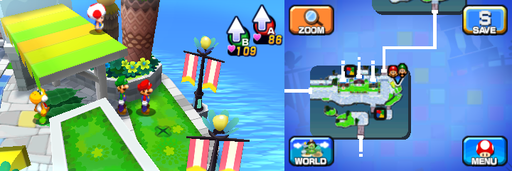
|
| In the area with the tour center, these 2 Beans are found behind the ruins gate, behind a Pink Pi'illo. The eastern one is Stache Bean, the western one is Heart Bean. | Stache and Heart | 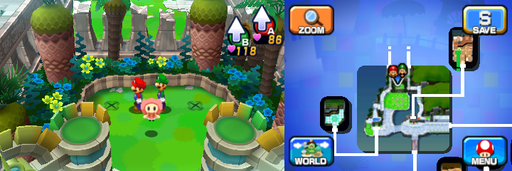
|
| In the area with the tour center, this Bean is found in the center-south-east, in a patch of grass on rooftop level. | Speed | 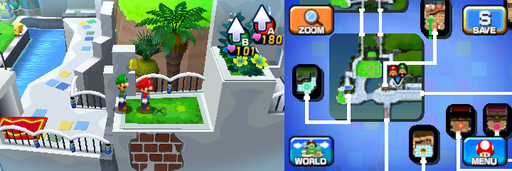
|
| In the area where Popple and Wiggler are battled, this Bean is found in the center-north, to the slight north-east of some stone structures. | Defense | 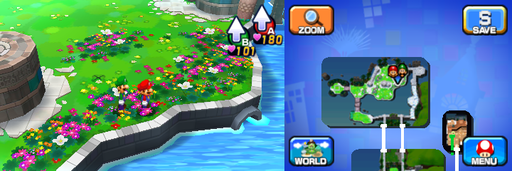
|
| In the area where Popple and Wiggler are battled, these 2 Beans are found in the north-east, next to the water where it is not blocked by plants. The western one is Power Bean, the eastern one is Bros. Bean. | Power and Bros. | 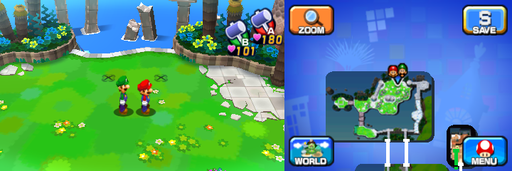
|
Block locations[edit]
| Wakeport - 42 Blocks (25 ?, 2 M, 1 L, 2 Bros., 3 Random, 8 Attack Piece, 1 Camera) | ||
|---|---|---|
| Item/s | Location | Screenshot |
10 10-Coins |
In the first scene, in the Mini-Mario section. | 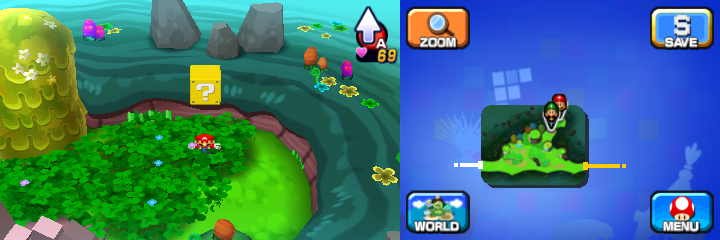
|
10 Five Coins |
In the second scene, in the west. | 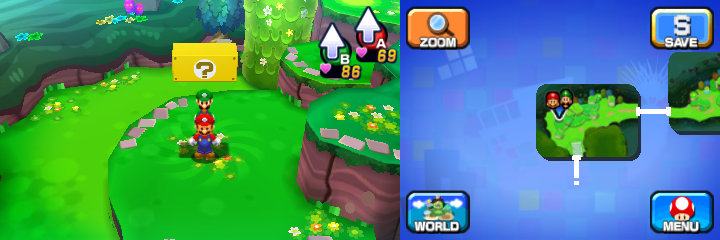
|
10 10-Coins, Bye-Bye Cannon Attack Piece |
In the middle house of the third scene, above the bookcases, in front of the windows. | 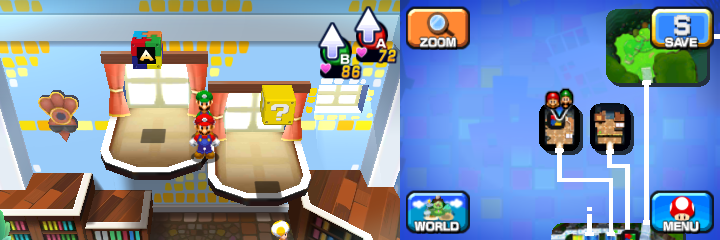
|
10 10-Coins |
In the left house of the third scene, in the lower part, right of the pillar. | 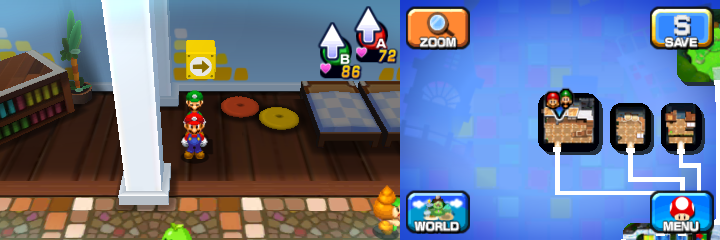
|
1-Up Mushroom |
Same scene, in the middle of the upper part. | 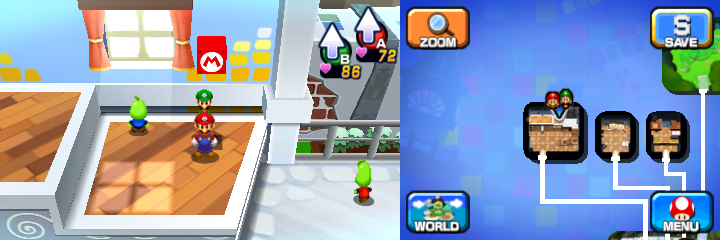
|
Super Nut |
In the third scene, above the middle house. | 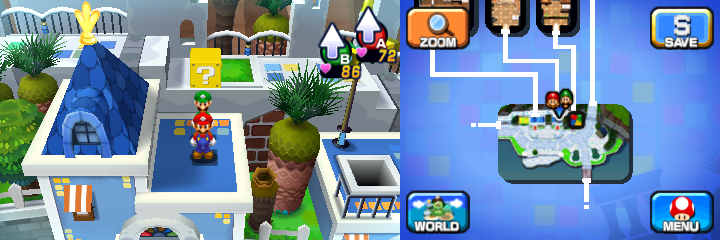
|
Bye-Bye Cannon Attack Piece |
Same scene, above the right house. | 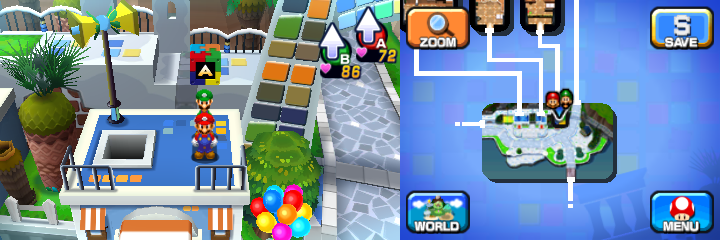
|
Five Coin |
In the scene south of the third scene, near the exit. | 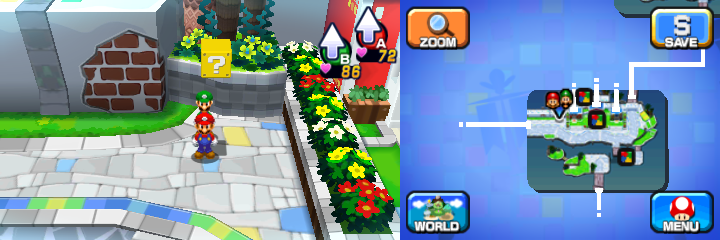
|
Bye-Bye Cannon Attack Piece |
In the Kylie Koopa's house in the scene west of the previous one, at the end of the upper part. | 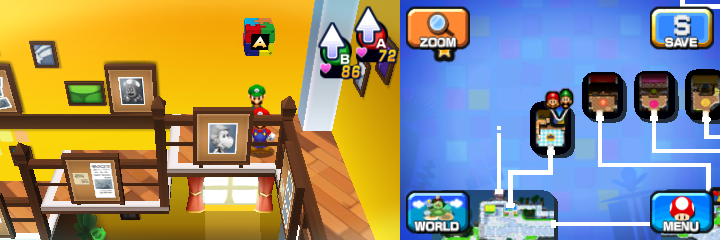
|
Wakeport Shot |
Same scene, right of Kylie Koopa, appears after agreeing to help her. | 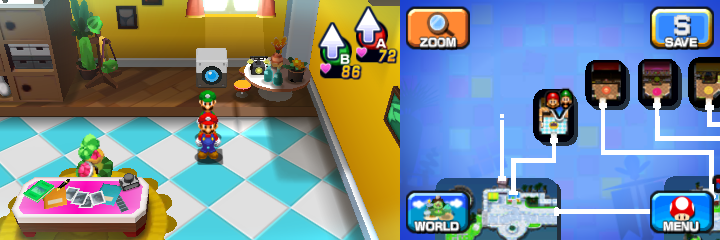
|
Bye-Bye Cannon Attack Piece |
In the scene north of the previous one, on the wall in the east, accessible from the third scene. | 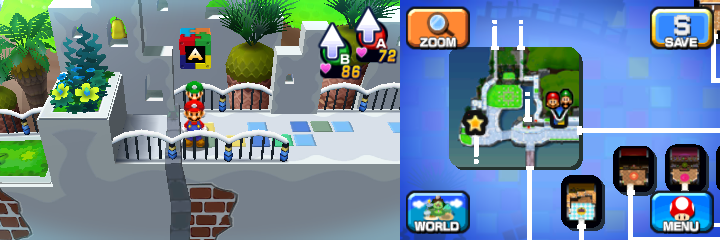
|
Five Coin |
Same scene, in the middle. | 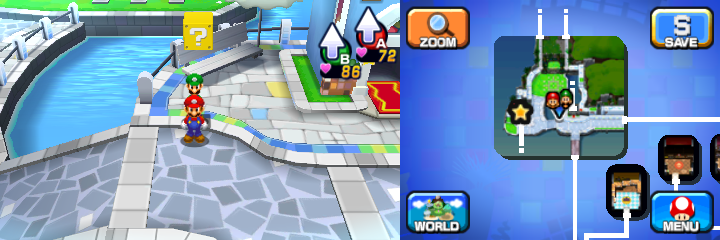
|
Bye-Bye Cannon Attack Piece, 10 Five Coins |
Same scene, above the left house (tourist centre). | 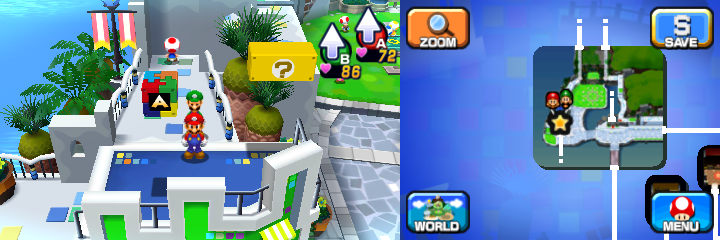
|
10 Five Coins |
In the Pi'illoper's house (found in the east of the scene), in the lower part. | 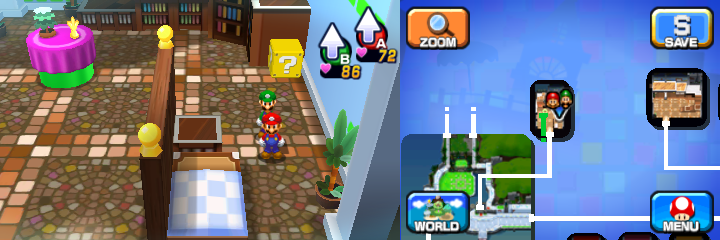
|
Five Coin |
In the southern-most scene, near the western entrance. | 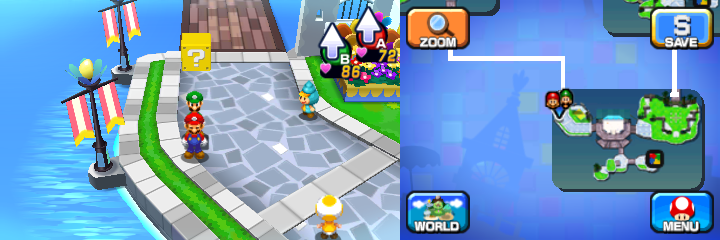
|
Shock Bomb |
Same scene, above the awning near the western entrance. | 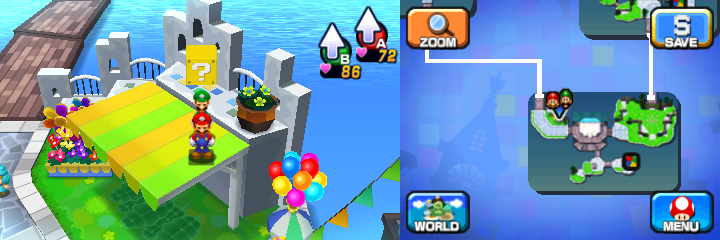
|
10 10-Coins, Bye-Bye Cannon Attack Piece |
Same scene, in the southeast. | 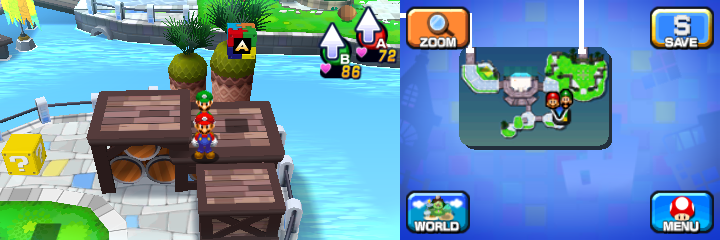
|
Super Candy |
Same scene, in the east. | 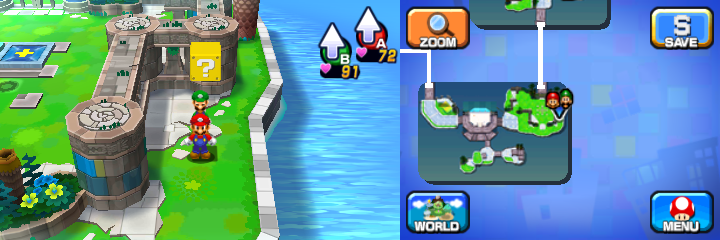
|
10-Coin, 10 Five Coins |
Same scene, in the northeast. | 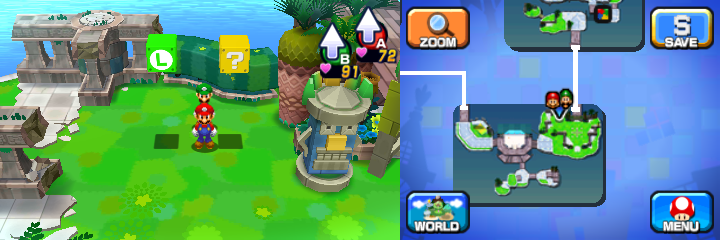
|
10 Five Coins |
In the scene south of the third scene, in the island part, near the entrance. | 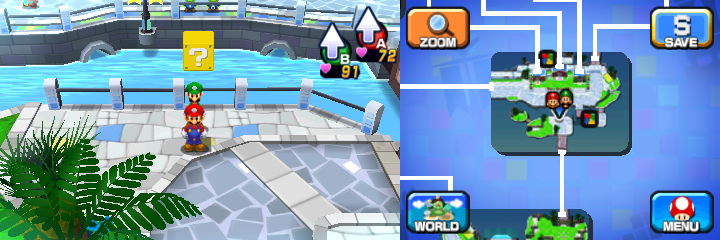
|
1-Up Mushroom |
Same scene, left of the previous one, in the Mini-Mario section. | 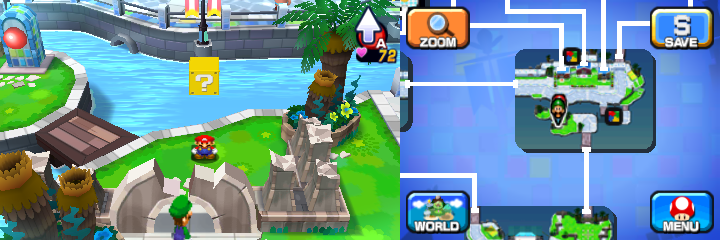
|
Bye-Bye Cannon Attack Piece |
Same scene, right of the bridge connecting the main part with island part. | 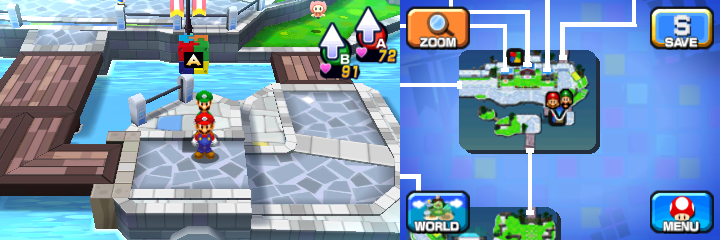
|
Counter Belt, Bye-Bye Cannon Attack Piece |
Same scene, in the Mini-Mario section above the Badge Shop. | 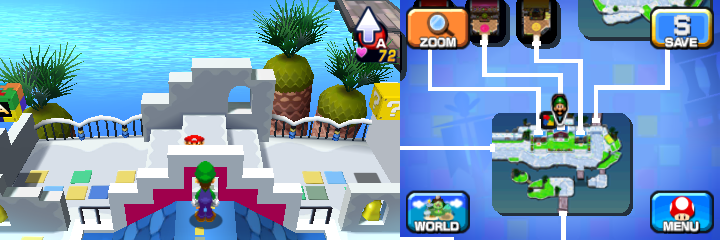
|
10 Five Coins |
Same scene, above the Item Shop. | 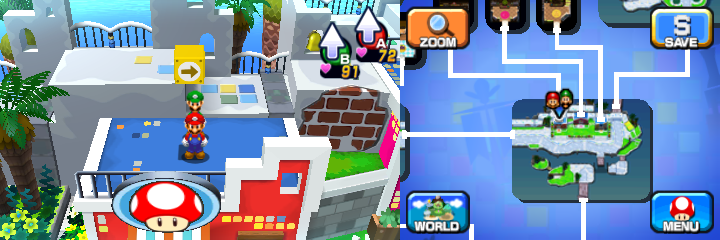
|
Supersyrup Jar |
In the scene west of the previous one, above the Kylie Koopa's house. | 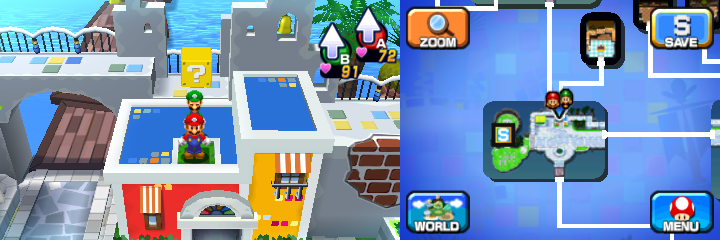
|
10 Five Coins |
Same scene, above the awning in the north. | 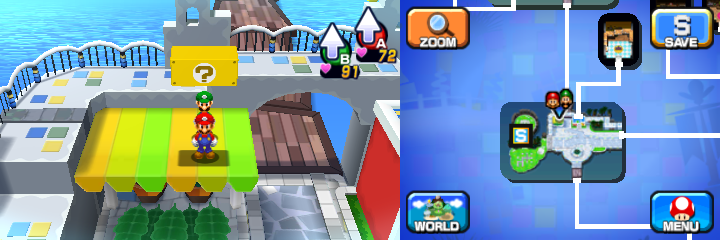
|
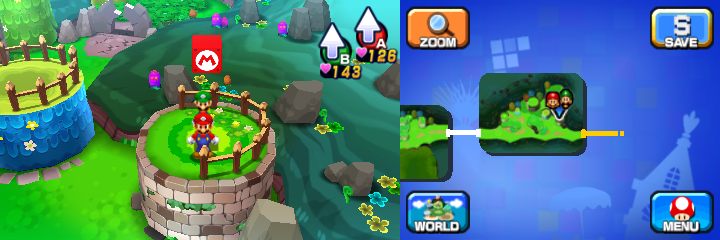
50-Coin |
NOTE: Following 3 blocks are available only after learning the Spin Jump on Mount Pajamaja. In the first scene, near the entrance. |
|
10 10-Coins |
In the second scene, near the entrance. | 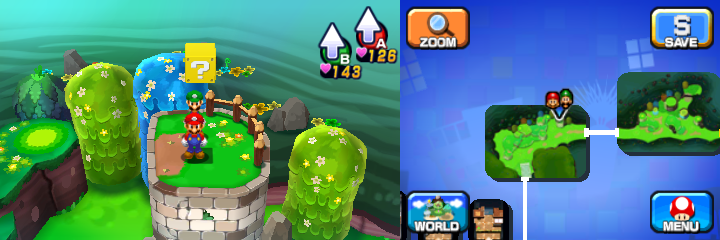
|
Ultrasyrup Jar |
In the right house of the third scene, in the upper right part. | 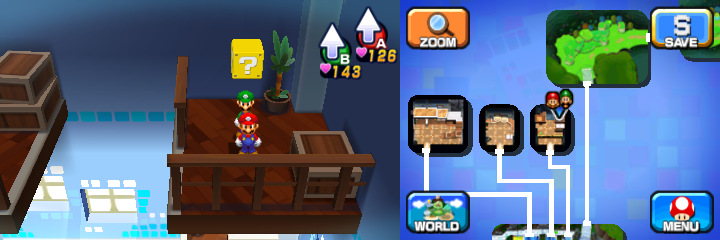
|
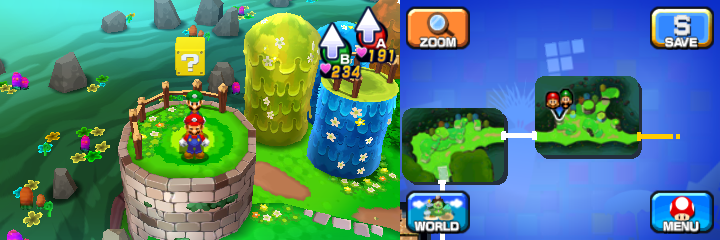
Ultrasyrup Jar |
NOTE: Following 8 blocks are available only after learning the Ball Hop during second Mount Pajamaja visit. In the first scene, in the northeast. |
|
Ultra Nut |
Same scene, in the north. | 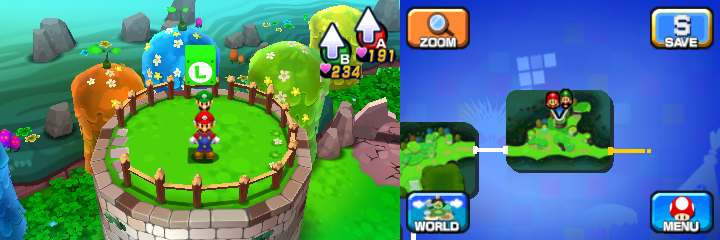
|
1-Up Mushroom, Max Candy |
In the scene where Wiggler and Popple are battled, in the northeast. | 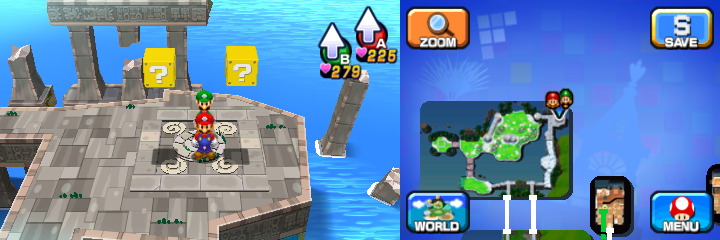
|
Ultra Mushroom |
In the basement of the Pi'illoper's house, at the east end of the upper part. | 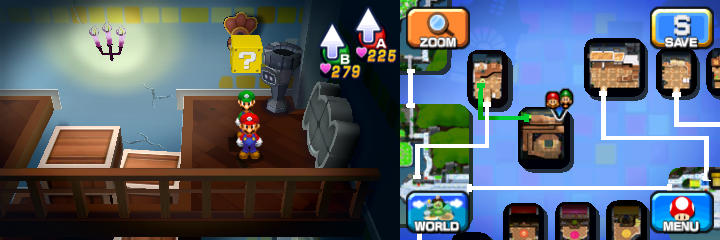
|
50-Coin, 10 10-Coins |
Same scene, at the east end of the middle part. | 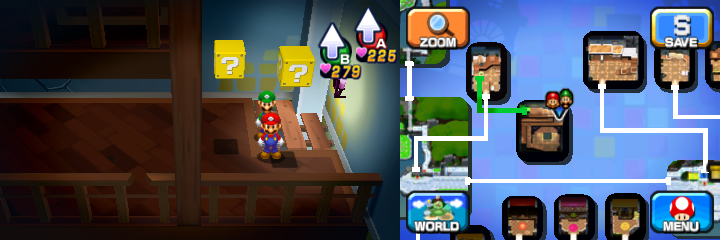
|
Refreshing Herb |
Same scene, at the southwest end of the middle part. | 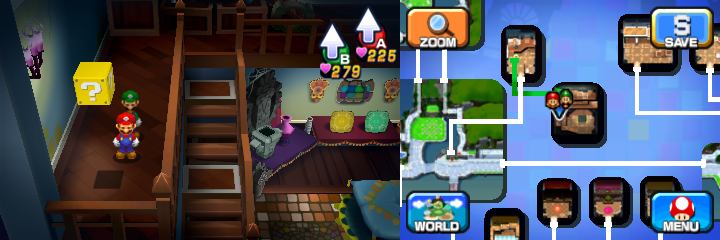
|
Names in other languages[edit]
| Language | Name | Meaning | Notes |
|---|---|---|---|
| Japanese | メザメタウン[?] Mezame Taun |
Awakening Town | |
| Dutch | Wakkerstad[?] | Awake City | |
| French (NOA) | Port de l'Aube[?] | Dawn Port | |
| French (NOE) | Évolis[?] | From éveil ("awakening") and "-polis" (meaning "city" in Ancient Greek) | |
| German | Pennemünde[?] | From pennen (a colloquial term meaning "sleep") and -münde (a common suffix for German cities where rivers enter the sea), possibly a pun on the real town of Peenemünde in the northeast of Germany | |
| Italian | Risvegliopoli[?] | From risveglio ("awakening") and "-polis" (meaning "city" in Ancient Greek) | |
| Korean | 이러나 타운[?] I'reona Taun |
Phonetic reading of "일어나" (il'eona, Korean phrase "wake up!") + "town" | |
| Portuguese | Vila Espertina[?] | Insomnia Town | |
| Russian | Утрянск[?] Utryansk |
from "утро" (utro, morning) and -ск (Russian suffix for city names) | |
| Spanish (NOA) | Puerto Despuerto[?] | Puerto ("port") + portmanteau of despierto ("awake") and puerto ("port") | |
| Spanish (NOE) | Desperta d'Or[?] | Pun on despertador ("alarm clock") and "Marina d'Or" (Spanish holiday resort) |
