Dreamy Wakeport: Difference between revisions
mNo edit summary |
|||
| (25 intermediate revisions by 14 users not shown) | |||
| Line 1: | Line 1: | ||
{{ | {{location infobox | ||
| | |title=Dreamy Wakeport | ||
|image=MLDT - Wakeport Dream.png | |image=[[File:MLDT - Wakeport Dream.png|256px]] | ||
| | |greater_location=[[Pi'illo Island]] | ||
|inhabitants=[[Cocoknight]], [[Cocoknight R]], [[Ticksquawk]], [[Krubbish]], [[Earthwake]], [[Beef Cloud]], [[Thunder Sass]], [[Sorrow Fist]], [[Heavy Zest]] | |inhabitants=[[Cocoknight]], [[Cocoknight R]], [[Ticksquawk]], [[Krubbish]], [[Earthwake]], [[Beef Cloud]], [[Thunder Sass]], [[Sorrow Fist]], [[Heavy Zest]] | ||
|first_appearance=''[[Mario & Luigi: Dream Team]]'' ([[List of games by date#2013|2013]]) | |first_appearance=''[[Mario & Luigi: Dream Team]]'' ([[List of games by date#2013|2013]]) | ||
| Line 8: | Line 8: | ||
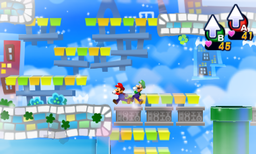
'''Dreamy Wakeport''' is the [[Dream World]]'s version of [[Wakeport]] and a location in ''[[Mario & Luigi: Dream Team]]''. It is the fourth location visited in the Dream World. | '''Dreamy Wakeport''' is the [[Dream World]]'s version of [[Wakeport]] and a location in ''[[Mario & Luigi: Dream Team]]''. It is the fourth location visited in the Dream World. | ||
[[Mario]] comes here to wake up [[Big Massif]] so that he can start the [[Mount Pajamaja]] tour. A mysterious | [[Mario]] comes here to wake up [[Big Massif]] so that he can start the [[Mount Pajamaja]] tour. A mysterious tour center operator says that Big Massif will appear if he defeats four of Big Massif's minions. After Mario defeats them, the operator reveals himself to be Big Massif, who refuses to wake up unless Mario beats him in battle, which he does. The two return to the real world. Mario comes here a second time in order to free [[Bedsmith]], who can assemble the [[Ultibed]] for him. After a long journey, Mario accidentally activates a security system which summons [[Earthwake]]. [[Giant Luigi]] defeats the monster and Mario frees Bedsmith. The special attack [[Luiginary Wall]] is learned here in the second visit. | ||
==Enemies== | ==Enemies== | ||
===Dreampoint and petrified Pi'illos' dream worlds=== | |||
<gallery> | |||
Cocoknight.png|[[Cocoknight]]s | |||
Ticksquawk.png|[[Ticksquawk]]s | |||
HeavyZest.png|[[Heavy Zest]] (boss) | |||
SorrowFist.png|[[Sorrow Fist]] (boss) | |||
ThunderSass.png|[[Thunder Sass]] (boss) | |||
BeefCloud.png|[[Beef Cloud]] (boss) | |||
BigMassif.png|[[Big Massif]] (boss) | |||
</gallery> | |||
===Bedsmith's dream world=== | |||
<gallery> | |||
Krubbish.png|[[Krubbish]]es | |||
Cocoknight R.png|[[Cocoknight R|Cocoknights R]] | |||
Earthwake.png|[[Earthwake]] (giant boss) | |||
</gallery> | |||
==Block locations== | |||
===Big Massif Dreampoint=== | |||
{|border=1 cellpadding=2 style="text-align: center; border-collapse: collapse; border: 1px solid black; width:100%" | |||
!colspan="3"style="background:orange; height:2em"|[[Dreamy Wakeport]] (Big Massif Dreampoint) - 28 Blocks (23 ?, 2 M, 3 Red Coin) | |||
|-style="background:orange; height:2em" | |||
!Item/s | |||
!Location | |||
!Screenshot | |||
|- | |||
|[[File:MLPJ5Coin.png]] [[File:M&LDT Syrup.png]]<br>Five Coin, Supersyrup Jar | |||
|In the second scene, in the east. | |||
|[[File:Dreamy Wakeport (Big Massif Dreampoint) Blocks 1-2.png]] | |||
|- | |||
|[[File:MLPJ5Coin.png]]<br>Five Coin | |||
|In the scene northeast of the third scene, at the start of the third platform. | |||
|[[File:Dreamy Wakeport (Big Massif Dreampoint) Block 3.png]] | |||
|- | |||
|[[File:MLPJ5Coin.png]]<br>Five Coin | |||
|In the scene east of the previous one, near the exit. | |||
|[[File:Dreamy Wakeport (Big Massif Dreampoint) Block 4.png]] | |||
|- | |||
|[[File:MLPJ5Coin.png]][[File:MLPJ5Coin.png]][[File:MLPJ5Coin.png]][[File:MLPJ5Coin.png]][[File:MLPJ5Coin.png]][[File:MLPJ5Coin.png]][[File:MLPJ5Coin.png]][[File:MLPJ5Coin.png]][[File:MLPJ5Coin.png]][[File:MLPJ5Coin.png]] [[File:MLPJ5Coin.png]]<br>10 Five Coins, Five Coin | |||
|In the scene west of the previous one, in the southwest of the lower part. | |||
|[[File:Dreamy Wakeport (Big Massif Dreampoint) Blocks 5-6.png]] | |||
|- | |||
|[[File:M&LDT Mushroom.png]]<br>Super Mushroom | |||
|Same scene, in the middle of the upper part. Reachable only with slowed down [[Luiginary Speedometer]]. | |||
|[[File:Dreamy Wakeport (Big Massif Dreampoint) Block 7.png]] | |||
|- | |||
|[[File:Dream Team Wear.png]]<br>Filler Wear | |||
|In the scene west of the scene northwest of the third scene, in the part reached by the upper exit from the previous scene. | |||
|[[File:Dreamy Wakeport (Big Massif Dreampoint) Block 8.png]] | |||
|- | |||
|[[File:MLPJ5Coin.png]]<br>Five Coin | |||
|Same scene, near the exit pipe. | |||
|[[File:Dreamy Wakeport (Big Massif Dreampoint) Block 9.png]] | |||
|- | |||
|[[File:MLPJ5Coin.png]][[File:MLPJ5Coin.png]][[File:MLPJ5Coin.png]][[File:MLPJ5Coin.png]][[File:MLPJ5Coin.png]][[File:MLPJ5Coin.png]][[File:MLPJ5Coin.png]][[File:MLPJ5Coin.png]][[File:MLPJ5Coin.png]][[File:MLPJ5Coin.png]]<br>10 Five Coins | |||
|In the first scene of the [[Thunder Sass]] area, in the northeast. | |||
|[[File:Dreamy Wakeport (Big Massif Dreampoint) Block 10.png]] | |||
|- | |||
|[[File:MLSS+BM10Coin.png]]<br>10-Coin | |||
|Same scene, in the southeast. | |||
|[[File:Dreamy Wakeport (Big Massif Dreampoint) Block 11.png]] | |||
|- | |||
|[[File:MLSS+BM10Coin.png]]<br>10-Coin | |||
|In the second scene of the Thunder Sass area, in the middle of the lower part. | |||
|[[File:Dreamy Wakeport (Big Massif Dreampoint) Block 12.png]] | |||
|- | |||
|[[File:M&LDT Mushroom.png]]<br>Super Mushroom | |||
|Same scene, near the exit. Reachable only with slowed down Luiginary Speedometer. | |||
|[[File:Dreamy Wakeport (Big Massif Dreampoint) Block 13.png]] | |||
|- | |||
|[[File:MLPJ5Coin.png]][[File:MLPJ5Coin.png]][[File:MLPJ5Coin.png]][[File:MLPJ5Coin.png]]<br>4 Five Coins | |||
|In the first scene of the [[Heavy Zest]] area, near the entrance pipe. Reachable only with slowed down Luiginary Speedometer. | |||
|[[File:Dreamy Wakeport (Big Massif Dreampoint) Block 14.png]] | |||
|- | |||
|[[File:Red Coin SMR.png|21px]][[File:Red Coin SMR.png|21px]][[File:Red Coin SMR.png|21px]][[File:Red Coin SMR.png|21px]][[File:Red Coin SMR.png|21px]][[File:Red Coin SMR.png|21px]][[File:Red Coin SMR.png|21px]][[File:Red Coin SMR.png|21px]]<br>8 [[Red_Coin#Mario_.26_Luigi:_Dream_Team|Red Coin]]s | |||
|Same scene, at the top. | |||
|[[File:Dreamy Wakeport (Big Massif Dreampoint) Block 15.png]] | |||
|- | |||
|[[File:Red Coin SMR.png|21px]][[File:Red Coin SMR.png|21px]][[File:Red Coin SMR.png|21px]][[File:Red Coin SMR.png|21px]][[File:Red Coin SMR.png|21px]][[File:Red Coin SMR.png|21px]][[File:Red Coin SMR.png|21px]][[File:Red Coin SMR.png|21px]] [[File:MLPJ5Coin.png]] [[File:MLPJ5Coin.png]]<br>8 Red Coins, Five Coin (both) | |||
|Same scene, in the middle. | |||
|[[File:Dreamy Wakeport (Big Massif Dreampoint) Blocks 16-18.png]] | |||
|- | |||
|[[File:Red Coin SMR.png|21px]][[File:Red Coin SMR.png|21px]][[File:Red Coin SMR.png|21px]][[File:Red Coin SMR.png|21px]][[File:Red Coin SMR.png|21px]][[File:Red Coin SMR.png|21px]][[File:Red Coin SMR.png|21px]][[File:Red Coin SMR.png|21px]]<br>8 Red Coins | |||
|Same scene, above the lowest platform. | |||
|[[File:Dreamy Wakeport (Big Massif Dreampoint) Block 19.png]] | |||
|- | |||
|[[File:MLPJ5Coin.png]][[File:MLPJ5Coin.png]][[File:MLPJ5Coin.png]][[File:MLPJ5Coin.png]][[File:MLPJ5Coin.png]][[File:MLPJ5Coin.png]][[File:MLPJ5Coin.png]][[File:MLPJ5Coin.png]][[File:MLPJ5Coin.png]][[File:MLPJ5Coin.png]]<br>10 Five Coins | |||
|In the second scene of the Heavy Zest area, in the southwest. | |||
|[[File:Dreamy Wakeport (Big Massif Dreampoint) Block 20.png]] | |||
|- | |||
|[[File:M&LDT Candy.png]]<br>Super Candy | |||
|Same scene, in the middle-east. | |||
|[[File:Dreamy Wakeport (Big Massif Dreampoint) Block 21.png]] | |||
|- | |||
|[[File:MLPJ5Coin.png]][[File:MLPJ5Coin.png]][[File:MLPJ5Coin.png]][[File:MLPJ5Coin.png]][[File:MLPJ5Coin.png]][[File:MLPJ5Coin.png]][[File:MLPJ5Coin.png]][[File:MLPJ5Coin.png]][[File:MLPJ5Coin.png]][[File:MLPJ5Coin.png]]<br>10 Five Coins | |||
|In the third scene of the Heavy Zest area, in the southeast. | |||
|[[File:Dreamy Wakeport (Big Massif Dreampoint) Block 22.png]] | |||
|- | |||
|[[File:MLPJ5Coin.png]] [[File:M&LDT Boo Biscuit.png]] [[File:MLPJ5Coin.png]][[File:MLPJ5Coin.png]][[File:MLPJ5Coin.png]][[File:MLPJ5Coin.png]][[File:MLPJ5Coin.png]][[File:MLPJ5Coin.png]][[File:MLPJ5Coin.png]][[File:MLPJ5Coin.png]][[File:MLPJ5Coin.png]][[File:MLPJ5Coin.png]] [[File:MLSS+BM10Coin.png]]<br>Five Coin, [[Boo Biscuit]], 10 Five Coins, 10-Coin | |||
|Same scene, above the large platform near the exit. 3 out of 4 blocks are reachable only with slowed down Luiginary Speedometer. | |||
|[[File:Dreamy Wakeport (Big Massif Dreampoint) Blocks 23-26.png]] | |||
|- | |||
|[[File:MLSSBMRefreshingHerb.png]]<br>Refreshing Herb | |||
|In the third scene of the [[Sorrow Fist]] area, in the northwest. | |||
|[[File:Dreamy Wakeport (Big Massif Dreampoint) Block 27.png]] | |||
|- | |||
|[[File:MLSS+BM10Coin.png]]<br>10-Coin | |||
|Same scene, near the exit. | |||
|[[File:Dreamy Wakeport (Big Massif Dreampoint) Block 28.png]] | |||
|} | |||
===Pink Pi'illo 1=== | |||
{|border=1 cellpadding=2 style="text-align: center; border-collapse: collapse; border: 1px solid black; width:100%" | |||
!colspan="3"style="background:pink; height:2em"|Dreamy Wakeport (Pink Pi'illo 1) - 2 Blocks (1 M, 1 L) | |||
|-style="background:pink; height:2em" | |||
!Item/s | |||
!Location | |||
!Screenshot | |||
|- | |||
|[[File:MLSS+BM10Coin.png]][[File:MLSS+BM10Coin.png]][[File:MLSS+BM10Coin.png]][[File:MLSS+BM10Coin.png]][[File:MLSS+BM10Coin.png]][[File:MLSS+BM10Coin.png]][[File:MLSS+BM10Coin.png]][[File:MLSS+BM10Coin.png]][[File:MLSS+BM10Coin.png]][[File:MLSS+BM10Coin.png]]<br>10 10-Coins | |||
|In the middle of the lower part | |||
|[[File:Dreamy Wakeport (Pink Pi'illo 1) Block 1.png]] | |||
|- | |||
|[[File:M&LDT Boo Biscuit.png]]<br>Boo Biscuit | |||
|Above the second stone platform. | |||
|[[File:Dreamy Wakeport (Pink Pi'illo 1) Block 2.png]] | |||
|} | |||
===Pink Pi'illo 3=== | |||
{|border=1 cellpadding=2 style="text-align: center; border-collapse: collapse; border: 1px solid black; width:100%" | |||
!colspan="3"style="background:pink; height:2em"|Dreamy Wakeport (Pink Pi'illo 3) - 1 ? Block | |||
|-style="background:pink; height:2em" | |||
!Item/s | |||
!Location | |||
!Screenshot | |||
|- | |||
|[[File:Dream Team Gloves.png]]<br>Lucky Gloves | |||
|In the second scene, left of the highest left platform. | |||
|[[File:Dreamy Wakeport (Pink Pi'illo 3) Block.png]] | |||
|} | |||
===Bedsmith=== | |||
{|border=1 cellpadding=2 style="text-align: center; border-collapse: collapse; border: 1px solid black; width:100%" | |||
!colspan="3"style="background:yellow; height:2em"|Dreamy Wakeport (Bedsmith) - 23 Blocks (12 ?, 1 M, 10 Attack Piece) | |||
|-style="background:yellow; height:2em" | |||
!Item/s | |||
!Location | |||
!Screenshot | |||
|- | |||
|[[File:MLSS+BM10Coin.png]]<br>10-Coin | |||
|In the first scene, in the lower part accessible from the second scene. | |||
|[[File:Dreamy Wakeport (Bedsmith) Block 1.png]] | |||
|- | |||
|[[File:MLDTAttackPiece.png]]<br>[[Luiginary Wall]] Attack Piece | |||
|In the third scene, above the platform. | |||
|[[File:Dreamy Wakeport (Bedsmith) Block 2.png]] | |||
|- | |||
|[[File:MLDTAttackPiece.png]]<br>Luiginary Wall Attack Piece | |||
|In the fourth scene, near the exit, above the red platform. | |||
|[[File:Dreamy Wakeport (Bedsmith) Block 3.png]] | |||
|- | |||
|[[File:MLDTAttackPiece.png]]<br>Luiginary Wall Attack Piece | |||
|Same scene, left of the first two platforms. | |||
|[[File:Dreamy Wakeport (Bedsmith) Block 4.png]] | |||
|- | |||
|[[File:MLDTAttackPiece.png]]<br>Luiginary Wall Attack Piece | |||
|In the scene west of the fourth scene, at the end. | |||
|[[File:Dreamy Wakeport (Bedsmith) Block 5.png]] | |||
|- | |||
|[[File:MLDTAttackPiece.png]]<br>Luiginary Wall Attack Piece | |||
|In the fifth scene, at the end of the lower part. | |||
|[[File:Dreamy Wakeport (Bedsmith) Block 6.png]] | |||
|- | |||
|[[File:MLPJ50Coin.png]]<br>50-Coin | |||
|In the sixth scene (west of the fifth scene), above the left platform next to the upper leftmost platform. | |||
|[[File:Dreamy Wakeport (Bedsmith) Block 7.png]] | |||
|- | |||
|[[File:MLDTAttackPiece.png]]<br>Luiginary Wall Attack Piece | |||
|Same scene, above the upper rightmost platform. | |||
|[[File:Dreamy Wakeport (Bedsmith) Block 8.png]] | |||
|- | |||
|[[File:MLDTAttackPiece.png]]<br>Luiginary Wall Attack Piece | |||
|In the fifth scene, above the highest platform, reached by jumping from left parasol. | |||
|[[File:Dreamy Wakeport (Bedsmith) Block 9.png]] | |||
|- | |||
|[[File:MLDTAttackPiece.png]]<br>Luiginary Wall Attack Piece | |||
|In the seventh scene, above the red platform, right of the last platform. | |||
|[[File:Dreamy Wakeport (Bedsmith) Block 10.png]] | |||
|- | |||
|[[File:M&LDT Syrup.png]]<br>Ultrasyrup Jar | |||
|In the eighth scene, at the end of the lower part. | |||
|[[File:Dreamy Wakeport (Bedsmith) Block 11.png]] | |||
|- | |||
|[[File:MLDTAttackPiece.png]]<br>Luiginary Wall Attack Piece | |||
|Same scene, at the end of the middle part. | |||
|[[File:Dreamy Wakeport (Bedsmith) Block 12.png]] | |||
|- | |||
|[[File:MLPJ50Coin.png]]<br>50-Coin | |||
|Same scene, above the second-to-last platform. | |||
|[[File:Dreamy Wakeport (Bedsmith) Block 13.png]] | |||
|- | |||
|[[File:Dream Team Wear.png]] [[File:M&LDT Mushroom.png]] [[File:MLDTAttackPiece.png]]<br>DoB Wear, [[Max Mushroom]], Luiginary Wall Attack Piece | |||
|In the scene accessed from the left pipe in ninth scene. | |||
|[[File:Dreamy Wakeport (Bedsmith) Blocks 14-16.png]] | |||
|- | |||
|[[File:MLPJ50Coin.png]] [[File:M&LDT Mushroom.png]] [[File:MLPJ50Coin.png]]<br>Ultra Mushroom (middle), 50-Coin (rest) | |||
|In the tenth scene, in the west part, under the platforms. | |||
|[[File:Dreamy Wakeport (Bedsmith) Blocks 17-19.png]] | |||
|- | |||
|[[File:MLSS+BM10Coin.png]][[File:MLSS+BM10Coin.png]][[File:MLSS+BM10Coin.png]][[File:MLSS+BM10Coin.png]][[File:MLSS+BM10Coin.png]][[File:MLSS+BM10Coin.png]][[File:MLSS+BM10Coin.png]][[File:MLSS+BM10Coin.png]][[File:MLSS+BM10Coin.png]][[File:MLSS+BM10Coin.png]] [[File:M&LDT Secret Box.png]]<br>10 10-Coins, Secret Box | |||
|In the eleventh scene, above the highest leftmost platform. | |||
|[[File:Dreamy Wakeport (Bedsmith) Blocks 20-21.png]] | |||
|- | |||
|[[File:MLSS+BM10Coin.png]]<br>10-Coin | |||
|Same scene, above the platform near the start of the upper part. | |||
|[[File:Dreamy Wakeport (Bedsmith) Block 22.png]] | |||
|- | |||
|[[File:M&LDT Mushroom.png]]<br>Ultra Mushroom | |||
|Same scene, above the green platform in the upper part. | |||
|[[File:Dreamy Wakeport (Bedsmith) Block 23.png]] | |||
|} | |||
===Pink Pi'illo 5=== | |||
{|border=1 cellpadding=2 style="text-align: center; border-collapse: collapse; border: 1px solid black; width:100%" | |||
!colspan="3"style="background:pink; height:2em"|Dreamy Wakeport (Pink Pi'illo 5) - 1 ? Block | |||
|-style="background:pink; height:2em" | |||
!Item/s | |||
!Location | |||
!Screenshot | |||
|- | |||
|[[File:Dream Team Accessory.png]]<br>Silver Statue | |||
|In the middle of the ceiling. Reachable only with Luiginary Gravity. | |||
|[[File:Dreamy Wakeport (Pink Pi'illo 5) Block.png]] | |||
|} | |||
==Names in other languages== | ==Names in other languages== | ||
{{foreign names | {{foreign names | ||
| | |Jap=夢のメザメタウン | ||
| | |JapR=Yume no Mezame Taun | ||
|JapM=[[Wakeport#Names in other languages|Wakeport]] of Dreams | |||
|Dut=Slaapstad | |||
|DutM=Sleep City | |||
|FreA= | |||
|FreE=Évolis onirique | |||
|FreEM=Oneiric Wakeport | |||
|Ger= | |||
|Ita=Risvegliopoli onirica | |||
|ItaM=Dreamy Wakeport | |||
|Kor= | |||
|Por=Vila Espertina onírica | |||
|PorM=Oneiric Wakeport | |||
|SpaA=Puerto Despuerto onírico | |||
|SpaAM=Dreamy Wakeport | |||
|SpaE=Desperta d'Or en sueños | |||
|SpaEM=Wakeport in dreams | |||
}} | }} | ||
| Line 31: | Line 272: | ||
*After [[Pi'illoper]]'s conversation ends, it will play the real-world Wakeport theme instead for unknown reasons. | *After [[Pi'illoper]]'s conversation ends, it will play the real-world Wakeport theme instead for unknown reasons. | ||
{{ | {{M&LDT}} | ||
[[Category:Dreamy]] | [[Category:Dreamy]] | ||
[[Category:Mario & Luigi: Dream Team | [[Category:Mario & Luigi: Dream Team locations]] | ||
[[it:Risvegliopoli onirica]] | [[it:Risvegliopoli onirica]] | ||
Latest revision as of 15:16, August 1, 2024
| Dreamy Wakeport | |
|---|---|
| |
| First appearance | Mario & Luigi: Dream Team (2013) |
| Greater location | Pi'illo Island |
| Inhabitants | Cocoknight, Cocoknight R, Ticksquawk, Krubbish, Earthwake, Beef Cloud, Thunder Sass, Sorrow Fist, Heavy Zest |
Dreamy Wakeport is the Dream World's version of Wakeport and a location in Mario & Luigi: Dream Team. It is the fourth location visited in the Dream World.
Mario comes here to wake up Big Massif so that he can start the Mount Pajamaja tour. A mysterious tour center operator says that Big Massif will appear if he defeats four of Big Massif's minions. After Mario defeats them, the operator reveals himself to be Big Massif, who refuses to wake up unless Mario beats him in battle, which he does. The two return to the real world. Mario comes here a second time in order to free Bedsmith, who can assemble the Ultibed for him. After a long journey, Mario accidentally activates a security system which summons Earthwake. Giant Luigi defeats the monster and Mario frees Bedsmith. The special attack Luiginary Wall is learned here in the second visit.
Enemies[edit]
Dreampoint and petrified Pi'illos' dream worlds[edit]
Heavy Zest (boss)
Sorrow Fist (boss)
Thunder Sass (boss)
Beef Cloud (boss)
Big Massif (boss)
Bedsmith's dream world[edit]
Earthwake (giant boss)
Block locations[edit]
Big Massif Dreampoint[edit]
| Dreamy Wakeport (Big Massif Dreampoint) - 28 Blocks (23 ?, 2 M, 3 Red Coin) | ||
|---|---|---|
| Item/s | Location | Screenshot |
Five Coin, Supersyrup Jar |
In the second scene, in the east. | 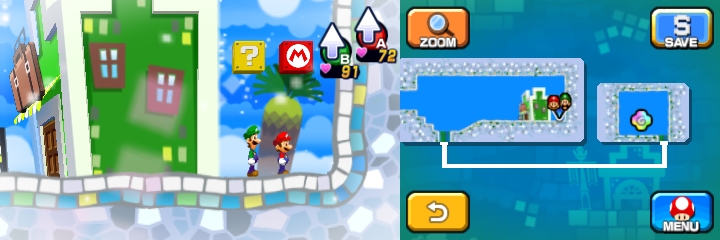
|
Five Coin |
In the scene northeast of the third scene, at the start of the third platform. | 
|
Five Coin |
In the scene east of the previous one, near the exit. | 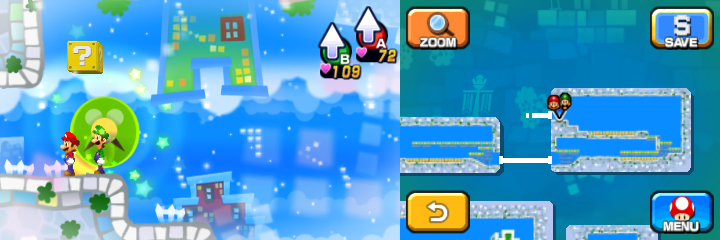
|
10 Five Coins, Five Coin |
In the scene west of the previous one, in the southwest of the lower part. | 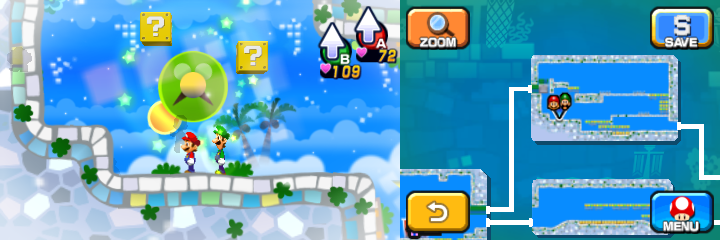
|
Super Mushroom |
Same scene, in the middle of the upper part. Reachable only with slowed down Luiginary Speedometer. | 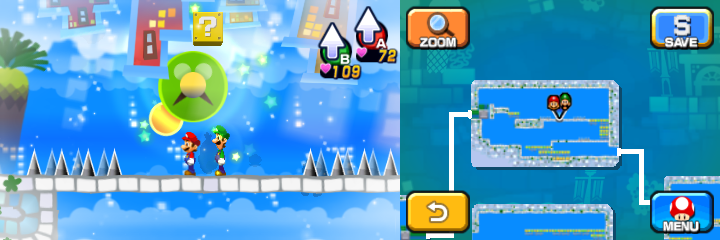
|
Filler Wear |
In the scene west of the scene northwest of the third scene, in the part reached by the upper exit from the previous scene. | 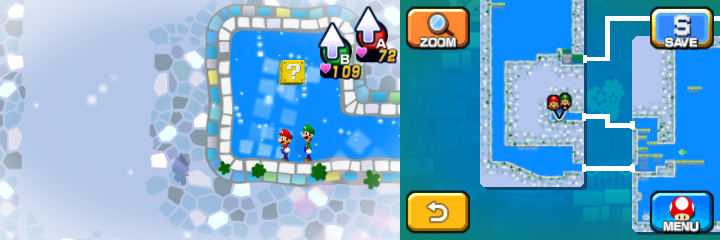
|
Five Coin |
Same scene, near the exit pipe. | 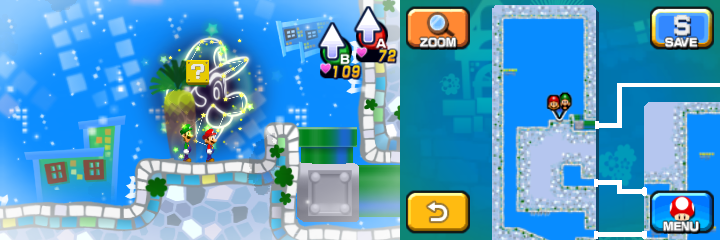
|
10 Five Coins |
In the first scene of the Thunder Sass area, in the northeast. | 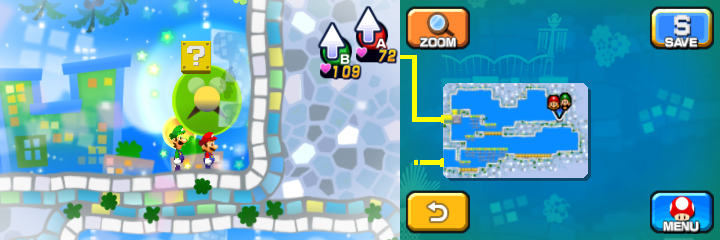
|
10-Coin |
Same scene, in the southeast. | 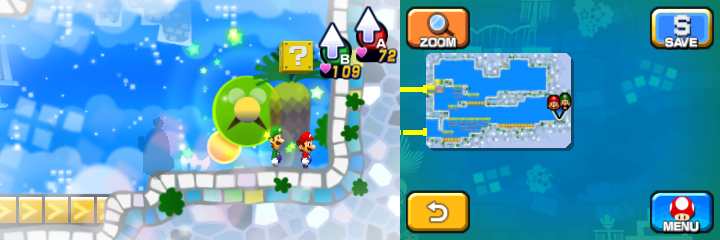
|
10-Coin |
In the second scene of the Thunder Sass area, in the middle of the lower part. | 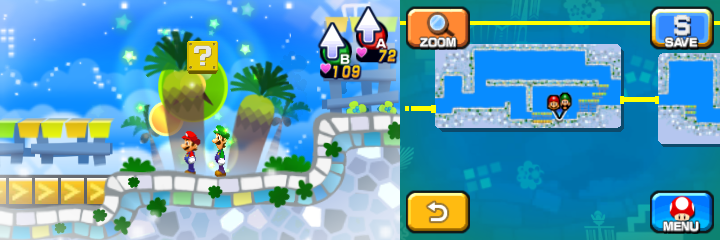
|
Super Mushroom |
Same scene, near the exit. Reachable only with slowed down Luiginary Speedometer. | 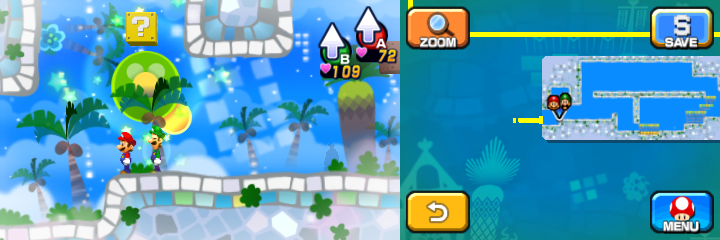
|
4 Five Coins |
In the first scene of the Heavy Zest area, near the entrance pipe. Reachable only with slowed down Luiginary Speedometer. | 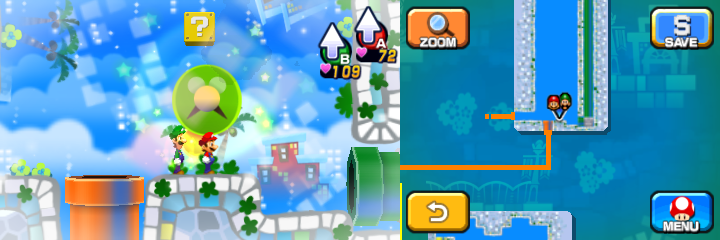
|
8 Red Coins |
Same scene, at the top. | 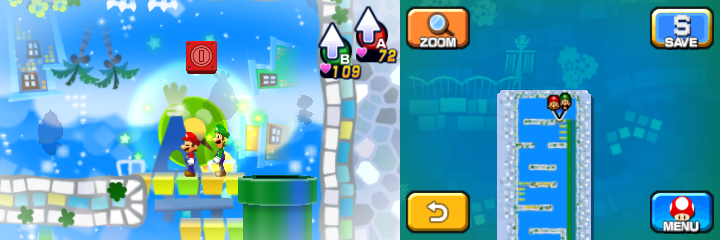
|
8 Red Coins, Five Coin (both) |
Same scene, in the middle. | 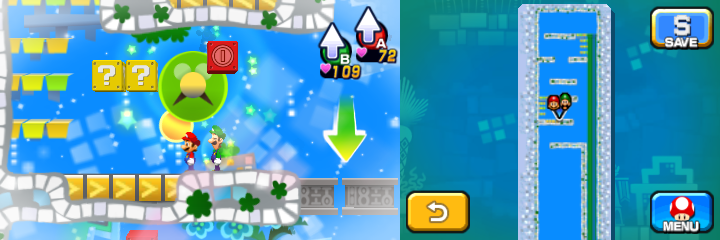
|
8 Red Coins |
Same scene, above the lowest platform. | 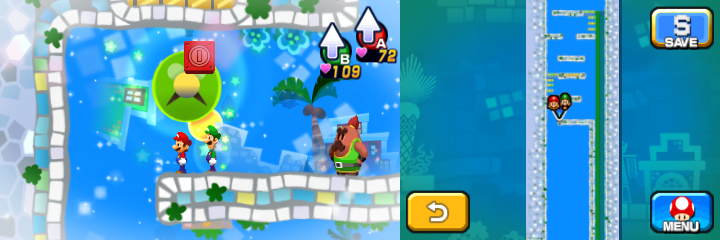
|
10 Five Coins |
In the second scene of the Heavy Zest area, in the southwest. | 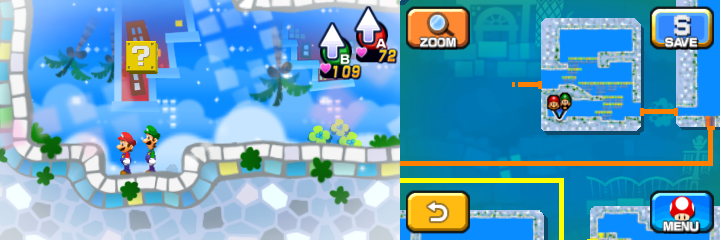
|
Super Candy |
Same scene, in the middle-east. | 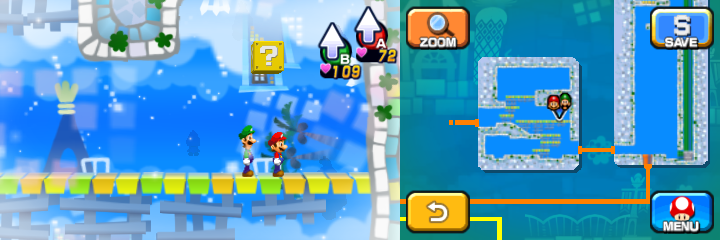
|
10 Five Coins |
In the third scene of the Heavy Zest area, in the southeast. | 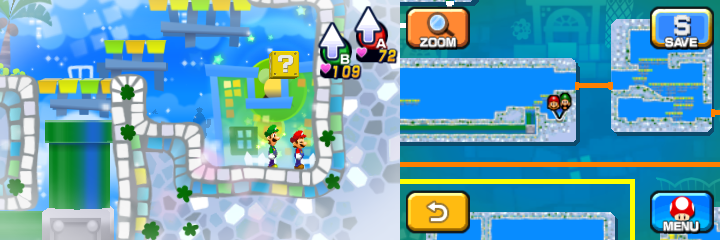
|
Five Coin, Boo Biscuit, 10 Five Coins, 10-Coin |
Same scene, above the large platform near the exit. 3 out of 4 blocks are reachable only with slowed down Luiginary Speedometer. | 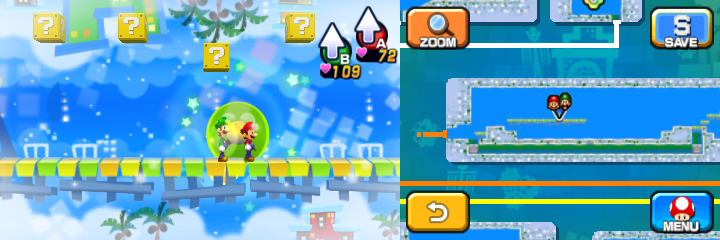
|
Refreshing Herb |
In the third scene of the Sorrow Fist area, in the northwest. | 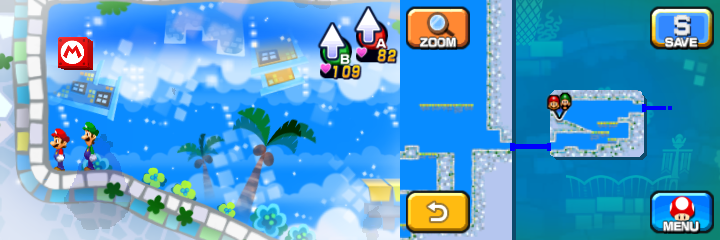
|
10-Coin |
Same scene, near the exit. | 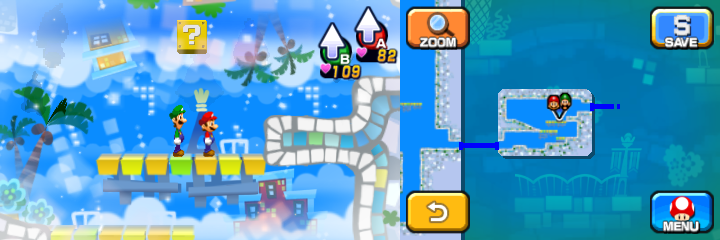
|
Pink Pi'illo 1[edit]
| Dreamy Wakeport (Pink Pi'illo 1) - 2 Blocks (1 M, 1 L) | ||
|---|---|---|
| Item/s | Location | Screenshot |
10 10-Coins |
In the middle of the lower part | 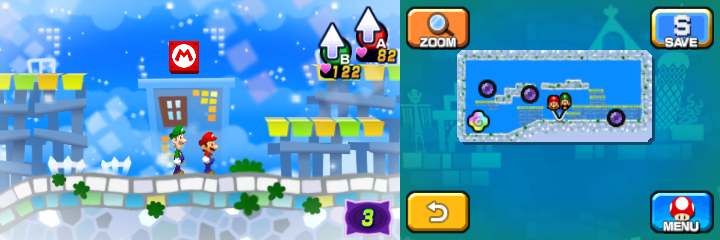
|
Boo Biscuit |
Above the second stone platform. | 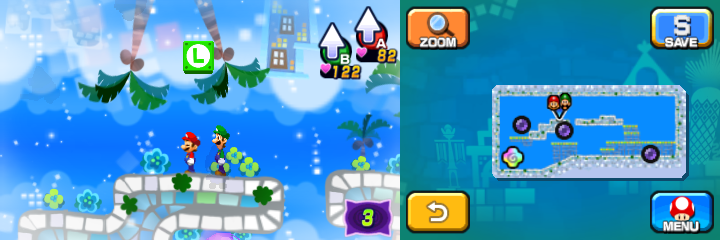
|
Pink Pi'illo 3[edit]
| Dreamy Wakeport (Pink Pi'illo 3) - 1 ? Block | ||
|---|---|---|
| Item/s | Location | Screenshot |
Lucky Gloves |
In the second scene, left of the highest left platform. | 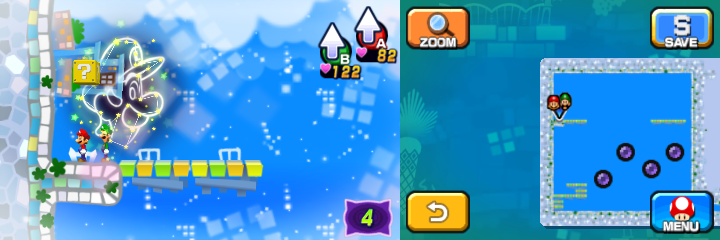
|
Bedsmith[edit]
| Dreamy Wakeport (Bedsmith) - 23 Blocks (12 ?, 1 M, 10 Attack Piece) | ||
|---|---|---|
| Item/s | Location | Screenshot |
10-Coin |
In the first scene, in the lower part accessible from the second scene. | 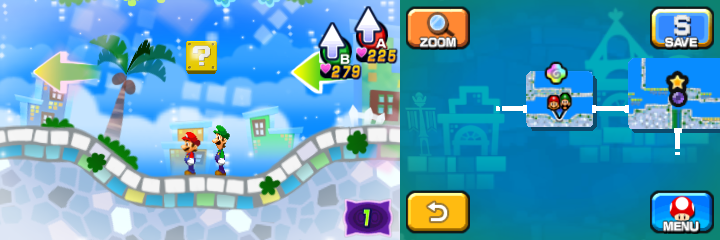
|
Luiginary Wall Attack Piece |
In the third scene, above the platform. | 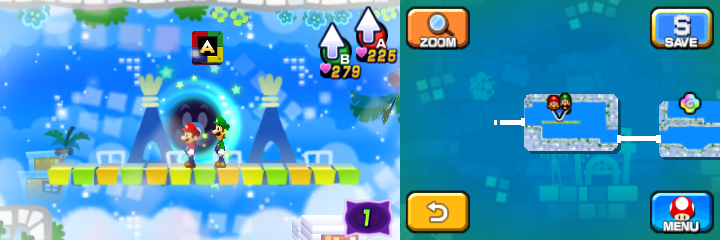
|
Luiginary Wall Attack Piece |
In the fourth scene, near the exit, above the red platform. | 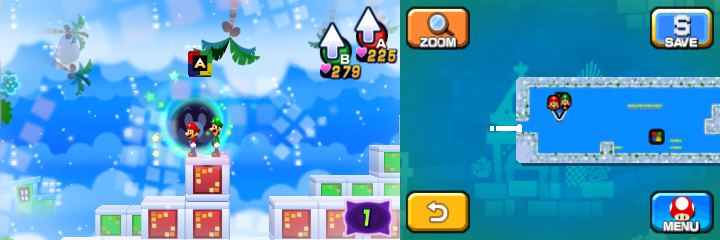
|
Luiginary Wall Attack Piece |
Same scene, left of the first two platforms. | 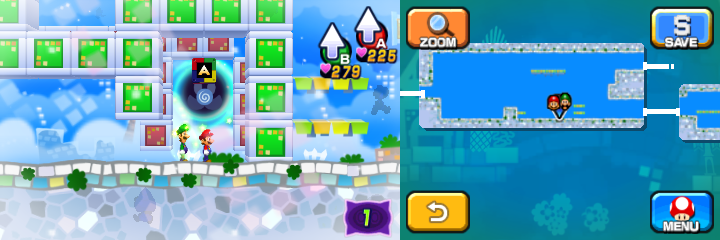
|
Luiginary Wall Attack Piece |
In the scene west of the fourth scene, at the end. | 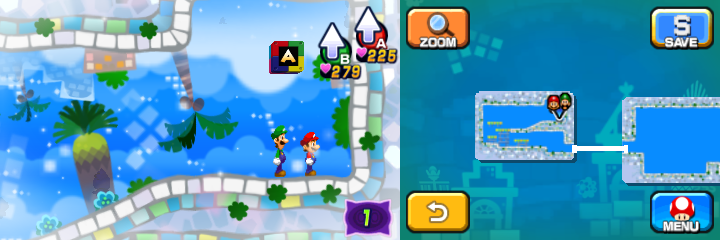
|
Luiginary Wall Attack Piece |
In the fifth scene, at the end of the lower part. | 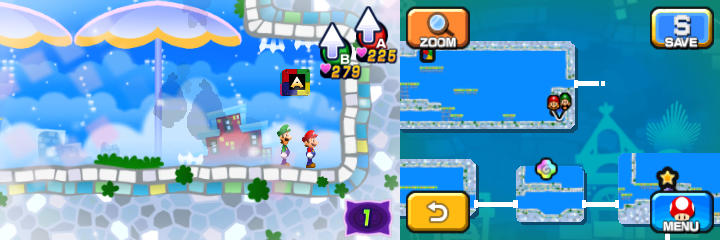
|
50-Coin |
In the sixth scene (west of the fifth scene), above the left platform next to the upper leftmost platform. | 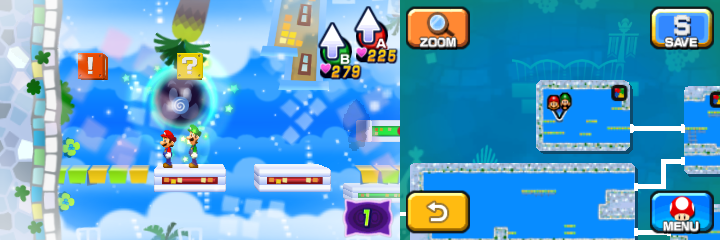
|
Luiginary Wall Attack Piece |
Same scene, above the upper rightmost platform. | 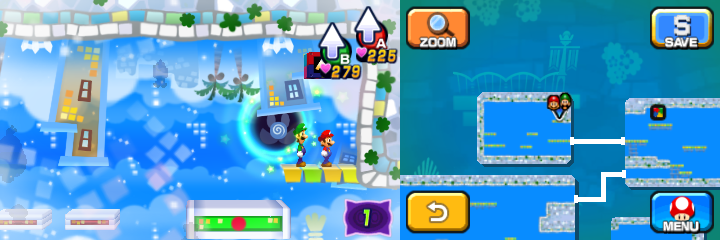
|
Luiginary Wall Attack Piece |
In the fifth scene, above the highest platform, reached by jumping from left parasol. | 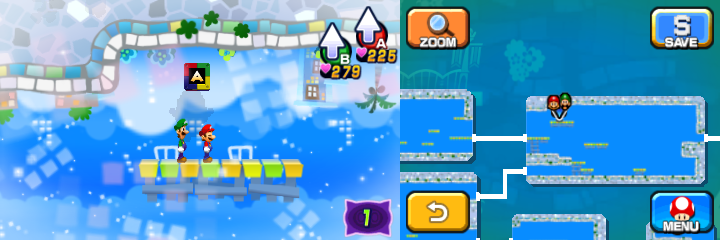
|
Luiginary Wall Attack Piece |
In the seventh scene, above the red platform, right of the last platform. | 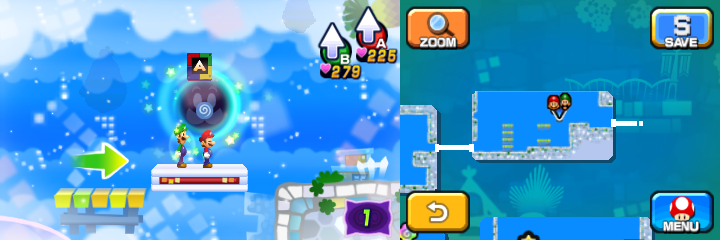
|
Ultrasyrup Jar |
In the eighth scene, at the end of the lower part. | 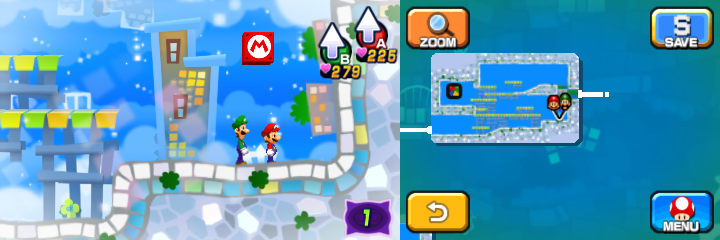
|
Luiginary Wall Attack Piece |
Same scene, at the end of the middle part. | 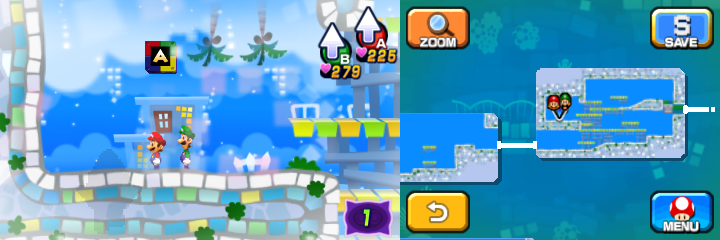
|
50-Coin |
Same scene, above the second-to-last platform. | 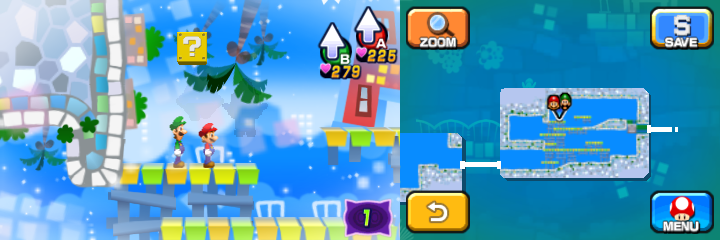
|
DoB Wear, Max Mushroom, Luiginary Wall Attack Piece |
In the scene accessed from the left pipe in ninth scene. | 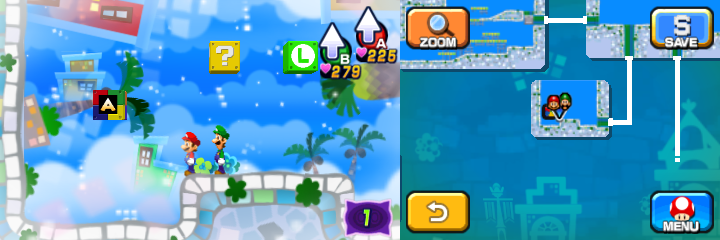
|
Ultra Mushroom (middle), 50-Coin (rest) |
In the tenth scene, in the west part, under the platforms. | 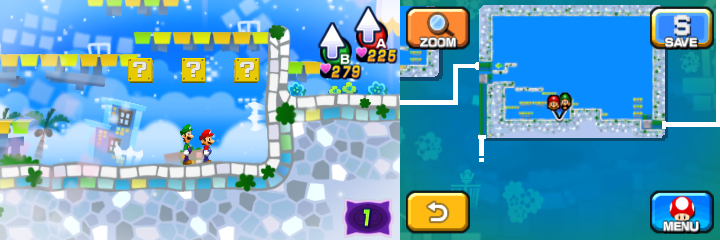
|
10 10-Coins, Secret Box |
In the eleventh scene, above the highest leftmost platform. | 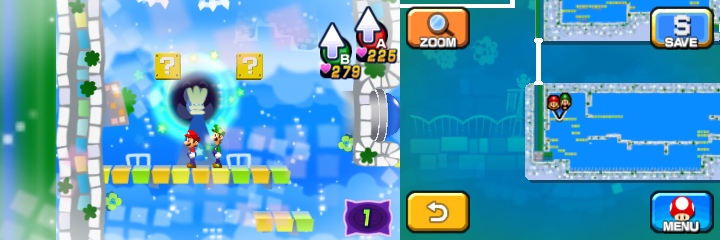
|
10-Coin |
Same scene, above the platform near the start of the upper part. | 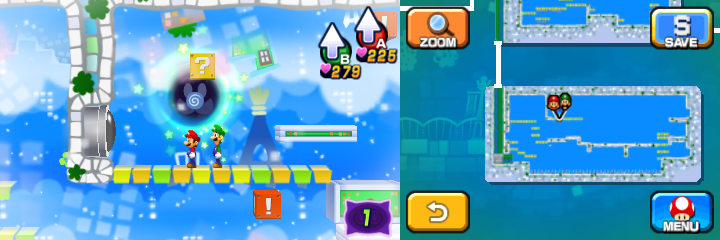
|
Ultra Mushroom |
Same scene, above the green platform in the upper part. | 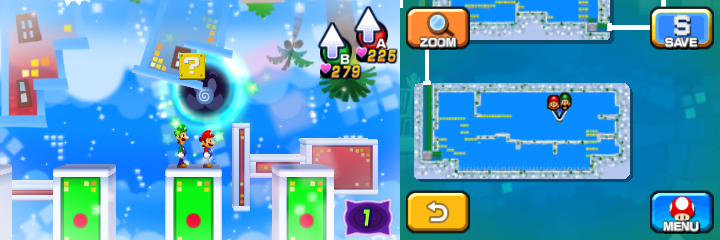
|
Pink Pi'illo 5[edit]
| Dreamy Wakeport (Pink Pi'illo 5) - 1 ? Block | ||
|---|---|---|
| Item/s | Location | Screenshot |
Silver Statue |
In the middle of the ceiling. Reachable only with Luiginary Gravity. | 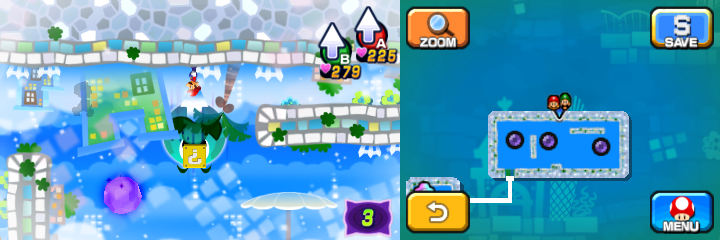
|
Names in other languages[edit]
| Language | Name | Meaning | Notes |
|---|---|---|---|
| Japanese | 夢のメザメタウン[?] Yume no Mezame Taun |
Wakeport of Dreams | |
| Dutch | Slaapstad[?] | Sleep City | |
| French (NOE) | Évolis onirique[?] | Oneiric Wakeport | |
| Italian | Risvegliopoli onirica[?] | Dreamy Wakeport | |
| Portuguese | Vila Espertina onírica[?] | Oneiric Wakeport | |
| Spanish (NOA) | Puerto Despuerto onírico[?] | Dreamy Wakeport | |
| Spanish (NOE) | Desperta d'Or en sueños[?] | Wakeport in dreams |
Trivia[edit]
- After Pi'illoper's conversation ends, it will play the real-world Wakeport theme instead for unknown reasons.


