Bowser's Last Stand: Difference between revisions
Goolgenerade (talk | contribs) No edit summary |
m (bowser's castle category) |
||
| (49 intermediate revisions by 29 users not shown) | |||
| Line 1: | Line 1: | ||
{{level | {{level infobox | ||
|title= | |title=Bowser's Last Stand | ||
|image=[[File: | |image=[[File:SMA4Card M27.jpg|200px]] | ||
|code=27 ([[World-e]]) | |code=27 ([[World-e]]) | ||
|game=''[[Super Mario Advance 4: Super Mario Bros. 3]]'' | |game=''[[Super Mario Advance 4: Super Mario Bros. 3]]'' | ||
|before=[[ | |track=Fortress Theme | ||
|after=[[ | |before=[[An Aqueous Adventure|<<]] | ||
|after=[[Koopaling Confusion|>>]] | |||
}} | }} | ||
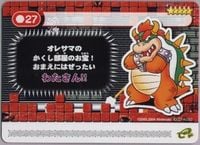
''' | '''Bowser's Last Stand''' is an [[e-Reader]] level for ''[[Super Mario Advance 4: Super Mario Bros. 3]]''. The level contains five [[Advance Coin]]s. This card was released in Series 2 in Japan. Its official difficulty rating is ★★★★★. Originally available only in Japan, it was eventually included along with every other e-Reader level in the [[Wii U]] [[Virtual Console]] release of the game in 2016 for the first time. The key art featured [[Bowser]]. | ||
The three rooms that the player can choose between near the start of the level contain themes and layouts that closely resemble those in each of the three [[World 8-Hand Traps]] levels in the main game of ''[[Super Mario Bros. 3]]''. | |||
*'''Left door:''' a room guarded by [[Boomerang Bro]] | ==Layout== | ||
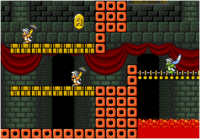
*'''Middle door:''' a corridor over lava filled with | [[File:SMA4 Bowser's Last Stand Screenshot.png|thumb|left|Screenshot from ''Super Mario Advance 4: Super Mario Bros. 3'']] | ||
*'''Right door:''' a lava pool with jumping [[Cheep Cheep]]s. There is an Advance Coin after the platform rails. | This level takes place within [[Bowser]]'s castle. Its entrance room contains some [[Bowser Statue]]s and a short [[lava]] pool with two [[Lava Bubble|Podoboo]]s. A [[Hot Foot]] and a Door are found at the end of this room. The door takes Mario to a vertical area divided into three sections. Mario must choose one of them and drop down via its [[Donut Block|Donut Lift]] to enter the corresponding door. | ||
*'''Left door:''' a room guarded by [[Boomerang Bro]]thers, [[Hammer Bro]]thers, [[Fire Bro]]thers, and a [[Sledge Bro]]ther. The Hammer Brothers guard an Advance Coin, and one of the Boomerang Brothers uses a blue [[boomerang]] which can be used by [[Mario]] or [[Luigi]] upon its defeat. | |||
*'''Middle door:''' a corridor over lava filled with Podoboos. An Advance Coin is found above a moving [[platform]]. | |||
*'''Right door:''' a lava pool with jumping [[Cheep Cheep|Cheep-Cheep]]s. There is an Advance Coin after the platform rails. | |||
They all contain a [[Warp Pipe]] that takes Mario to a longer corridor, where Hot Foots, [[Bony Beetle]]s and [[Dry Bones]] are found. Upward Donut Lifts appear here as well, and can be used to collect another Advance Coin. | They all contain a [[Warp Pipe]] that takes Mario to a longer corridor, where Hot Foots, [[Bony Beetle]]s and [[Dry Bones]] are found. Upward Donut Lifts appear here as well, and can be used to collect another Advance Coin. | ||
The next area is constantly attacked by [[Magikoopa]] | The next area is constantly attacked by a [[Magikoopa]]. An Advance Coin is stuck inside a [[Brick Block]] cage, which the Magikoopa can destroy (Mario can get it using a [[boomerang]] too). After that, Mario faces fire-breathing | ||
gray [[Bowser Statue]]s and jumping gold Bowser Statues on falling spike platforms. There is another Advance Coin before the door. | |||
The next room features Bowser's incoming [[fireball]]s. The upper route is made of falling platforms and has more fireballs. However, Mario can get an Advance Coin that only appears inside this route's arena. The lower route is made of stationary blocks, has Podoboos and a few fireballs, but the player cannot get the Advance Coin. Both routes lead to a fight with Bowser, which plays out similarly to the one featured in [[World 8-Bowser's Castle (Super Mario Bros. 3)|World 8 of the main game]]. | |||
==Enemies== | |||
{{number of enemies | |||
|image1=[[File:Boomerang Bro SMB3 All-Stars.png]] | |||
|name1=[[Boomerang Bro]]ther | |||
|count1=2 | |||
|image2=[[File:HammerBro-SMB3-SMAS.png]] | |||
|name2=[[Hammer Bro]]ther | |||
|count2=2 | |||
|image3=[[File:Fire Bro SMB3 All-Stars.png]] | |||
|name3=[[Fire Bro]]ther | |||
|count3=2 | |||
|image4=[[File:SMAS SMB3-SledgeBro sprite.png]] | |||
|name4=[[Sledge Bro]]ther | |||
|count4=1 | |||
|image5=[[File:Hotfoot SMB3 All-Stars.png]] | |||
|name5=[[Hot Foot]] | |||
|count5=3 | |||
|image6=[[File:SMAS SMB3 Podoboo Sprite.png]] | |||
|name6=[[Lava Bubble|Podoboo]] | |||
|count6=20 | |||
|image7=[[File:CheepCheepSMA4.png]] | |||
|name7=[[Cheep Cheep|Cheep-Cheep]] | |||
|count7=Infinite | |||
|image8=[[File:SMA4 SMB3 Bony Beetle.png]] | |||
|name8=[[Bony Beetle]] | |||
|count8=4 | |||
|image9=[[File:SMA4 Dry Bones.png]] | |||
|name9=[[Dry Bones]] | |||
|count9=2 | |||
|image10=- | |||
|name10=[[Falling spike]] | |||
|count10=5 (regular)<br>38 (platform) | |||
|image11=[[File:Super Mario Advance 4 Magikoopa.png]] | |||
|name11=[[Magikoopa]] | |||
|count11=1 | |||
|image12=[[File:SMW Bowser Statue SMA4.png]] | |||
|name12=[[Bowser Statue|Grey Bowser Statue]] | |||
|count12=6 | |||
|image13=[[File:Gold Bowser Statue SMA4.png]] | |||
|name13=[[Bowser Statue|Gold Bowser Statue]] | |||
|count13=2 | |||
|image14=- | |||
|name14=[[Fire Breath|Fireball]] | |||
|count14=Infinite | |||
|image15=[[File:BowserSMA4SMB3.png]] | |||
|name15=[[Bowser]] | |||
|count15=1 (boss) | |||
}} | |||
==Level map== | |||
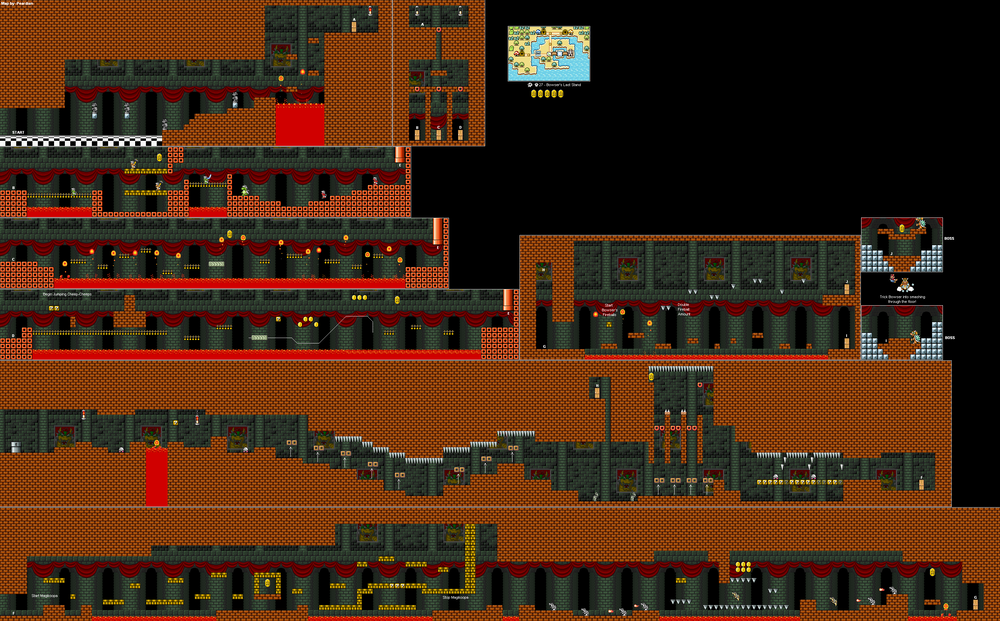
{{wide image|Bowser's Last Stand map.png|1000}} | |||
==Flavor | ==Flavor text== | ||
{| | {| | ||
|- | |- | ||
| Line 30: | Line 87: | ||
*Translation: </b> | *Translation: </b> | ||
| | | | ||
オレサマの かくし部屋(べや)のお宝(たから)! おまえにはぜったい '''わたさん'''!!<br> | |||
''Oresama no kakushibeya no otakara! Omae niwa zettai watasan!!''<br> | ''Oresama no kakushibeya no otakara! Omae niwa zettai '''watasan'''!!''<br> | ||
" | "The treasure of my hidden room! I absolutely '''won't hand it over''' to you!!" | ||
|} | |} | ||
== | ==Names in other languages== | ||
{{foreign names | |||
{{ | |Jap=かくしクッパじょう | ||
{{ | |JapR=Kakushi Kuppa Jō | ||
|JapM=Hidden Bowser's Castle | |||
}} | |||
{{SMB3 levels}} | |||
[[Category:Bowser's castles]] | |||
[[Category:World-e]] | [[Category:World-e]] | ||
Latest revision as of 08:46, December 7, 2024
| Level | |
|---|---|
| Bowser's Last Stand | |

| |
| Level code | 27 (World-e) |
| Game | Super Mario Advance 4: Super Mario Bros. 3 |
| Music track | Fortress Theme |
| << Directory of levels >> | |
Bowser's Last Stand is an e-Reader level for Super Mario Advance 4: Super Mario Bros. 3. The level contains five Advance Coins. This card was released in Series 2 in Japan. Its official difficulty rating is ★★★★★. Originally available only in Japan, it was eventually included along with every other e-Reader level in the Wii U Virtual Console release of the game in 2016 for the first time. The key art featured Bowser.
The three rooms that the player can choose between near the start of the level contain themes and layouts that closely resemble those in each of the three World 8-Hand Traps levels in the main game of Super Mario Bros. 3.
Layout[edit]
This level takes place within Bowser's castle. Its entrance room contains some Bowser Statues and a short lava pool with two Podoboos. A Hot Foot and a Door are found at the end of this room. The door takes Mario to a vertical area divided into three sections. Mario must choose one of them and drop down via its Donut Lift to enter the corresponding door.
- Left door: a room guarded by Boomerang Brothers, Hammer Brothers, Fire Brothers, and a Sledge Brother. The Hammer Brothers guard an Advance Coin, and one of the Boomerang Brothers uses a blue boomerang which can be used by Mario or Luigi upon its defeat.
- Middle door: a corridor over lava filled with Podoboos. An Advance Coin is found above a moving platform.
- Right door: a lava pool with jumping Cheep-Cheeps. There is an Advance Coin after the platform rails.
They all contain a Warp Pipe that takes Mario to a longer corridor, where Hot Foots, Bony Beetles and Dry Bones are found. Upward Donut Lifts appear here as well, and can be used to collect another Advance Coin.
The next area is constantly attacked by a Magikoopa. An Advance Coin is stuck inside a Brick Block cage, which the Magikoopa can destroy (Mario can get it using a boomerang too). After that, Mario faces fire-breathing gray Bowser Statues and jumping gold Bowser Statues on falling spike platforms. There is another Advance Coin before the door.
The next room features Bowser's incoming fireballs. The upper route is made of falling platforms and has more fireballs. However, Mario can get an Advance Coin that only appears inside this route's arena. The lower route is made of stationary blocks, has Podoboos and a few fireballs, but the player cannot get the Advance Coin. Both routes lead to a fight with Bowser, which plays out similarly to the one featured in World 8 of the main game.
Enemies[edit]
| Image | Name | Count |
|---|---|---|
| Boomerang Brother | 2 | |
| Hammer Brother | 2 | |
| Fire Brother | 2 | |
| Sledge Brother | 1 | |
| Hot Foot | 3 | |
| Podoboo | 20 | |
| Cheep-Cheep | Infinite | |
| Bony Beetle | 4 | |
| Dry Bones | 2 | |
| - | Falling spike | 5 (regular) 38 (platform) |
| Magikoopa | 1 | |
| Grey Bowser Statue | 6 | |
| Gold Bowser Statue | 2 | |
| - | Fireball | Infinite |
| Bowser | 1 (boss) |
Level map[edit]
Flavor text[edit]
|
オレサマの かくし部屋(べや)のお宝(たから)! おまえにはぜったい わたさん!! |
Names in other languages[edit]
| Language | Name | Meaning | Notes |
|---|---|---|---|
| Japanese | かくしクッパじょう[?] Kakushi Kuppa Jō |
Hidden Bowser's Castle |

