Kelorometer: Difference between revisions
(→Trivia) |
(Add more info) |
||
| (41 intermediate revisions by 20 users not shown) | |||
| Line 1: | Line 1: | ||
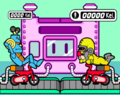
[[File:Kelorometer WarioWare Smooth Moves.png|thumb | [[File:Kelorometer WarioWare Smooth Moves.png|thumb|[[Mike]] and Dr. Crygor with the Kelorometer]] | ||
The '''Kelorometer''' is an invention built by [[Dr. Crygor]] in ''[[WarioWare: Smooth Moves]]''. It is one of the game's | The '''Kelorometer''' is an invention built by [[Dr. Crygor]] in ''[[WarioWare: Smooth Moves]]''. It is one of the game's levels. It was built to lose ''kelories''. As the player starts playing the game, their [[Mii]] face will be composed into a red body. The player will then go into the machine, starting the level. The Kelorometer features 20 [[microgame]]s. The recommended goal to achieve in this level is 5000 kelories. The high score on the game resets every day. After all the microgames are completed, the player's Mii will lose weight based on how many kelories have been burned. It is succeeded by [[Megagame Muscles]] in ''[[WarioWare: Move It!]]'', which is also hosted by Dr. Crygor and Mike. | ||
== | ==Microgames== | ||
The first 9 microgames are played in any order: | |||
{|class="wikitable"style="text-align:center" | |||
|- | |||
!Microgame | |||
!Host(s) | |||
![[Form Baton|Form(s)]] | |||
!Microgame | |||
!Host(s) | |||
![[Form Baton|Form(s)]] | |||
|- | |||
|[[File:WWSM Shakedown icon.png]]<br>[[Shakedown (WarioWare: Smooth Moves)|Shakedown]] | |||
|[[File:Mona Overworld Sprite WWSM.png]]<br>[[Mona]] | |||
|[[File:WWSM The Umbrella (Left).png]][[File:WWSM The Umbrella (Right).png]]<br>The Umbrella | |||
|[[File:WWSM Carrot Away icon.png]]<br>[[Carrot Away]] | |||
|[[File:Mona Overworld Sprite WWSM.png]]<br>[[Mona]] | |||
|[[File:WWSM The Handlebar (Left).png]][[File:WWSM The Handlebar (Right).png]]<br>The Handlebar | |||
|- | |||
|[[File:WWSM Dough Boy icon.png]]<br>[[Dough Boy]] | |||
|[[File:Mona Overworld Sprite WWSM.png]]<br>[[Mona]] | |||
|[[File:WWSM The Umbrella (Left).png]][[File:WWSM The Umbrella (Right).png]]<br>The Umbrella | |||
|[[File:WWSM Come to Poppa icon.png]]<br>[[Come to Poppa]] | |||
|[[File:Mona Overworld Sprite WWSM.png]]<br>[[Mona]] | |||
|[[File:WWSM The Handlebar (Left).png]][[File:WWSM The Handlebar (Right).png]]<br>The Handlebar | |||
|- | |||
|[[File:WWSM Universal Marionette icon.png]]<br>[[Universal Marionette]] | |||
|[[File:Mona Overworld Sprite WWSM.png]]<br>[[Mona]] | |||
|[[File:WWSM The Handlebar (Left).png]][[File:WWSM The Handlebar (Right).png]]<br>The Handlebar | |||
|[[File:WWSM Extreme Patty-Cake icon.png]]<br>[[Extreme Patty-Cake]] | |||
|[[File:Kat Overworld Sprite WWSM.png]]<br>[[Kat & Ana]] | |||
|[[File:WWSM The Chauffeur (Left).png]][[File:WWSM The Chauffeur (Right).png]]<br>The Chauffeur | |||
|- | |||
|[[File:WWSM Writer's Block icon.png]]<br>[[Writer's Block]] | |||
|[[File:Kat Overworld Sprite WWSM.png]]<br>[[Kat & Ana]] | |||
|[[File:WWSM The Sketch Artist (Left).png]][[File:WWSM The Sketch Artist (Right).png]]<br>The Sketch Artist | |||
|[[File:WWSM Simon Says (Left) icon.png]][[File:WWSM Simon Says (Right) icon.png]]<br>[[Simon Says]] | |||
|[[File:Kat Overworld Sprite WWSM.png]]<br>[[Kat & Ana]] | |||
|[[File:WWSM The Samurai (Left).png]][[File:WWSM The Samurai (Right).png]]<br>The Samurai | |||
|- | |||
|[[File:WWSM Mall Tour (Left) icon.png]][[File:WWSM Mall Tour (Right) icon.png]]<br>[[Mall Tour]] | |||
|[[File:Kat Overworld Sprite WWSM.png]]<br>[[Kat & Ana]] | |||
|[[File:WWSM The Samurai (Left).png]][[File:WWSM The Samurai (Right).png]]<br>The Samurai | |||
|[[File:WWSM Plane and Simple icon.png]]<br>[[Plane and Simple]] | |||
|[[File:Young Cricket Overworld Sprite WWSM.png]]<br>[[Young Cricket]] & [[Master Mantis]] | |||
|[[File:WWSM The Tug-of-War (Left).png]][[File:WWSM The Tug-of-War (Right).png]]<br>The Tug-of-War | |||
|- | |||
|[[File:WWSM Logged In icon.png]]<br>[[Logged In]] | |||
|[[File:Young Cricket Overworld Sprite WWSM.png]]<br>[[Young Cricket]] & [[Master Mantis]] | |||
|[[File:WWSM The Tug-of-War (Left).png]][[File:WWSM The Tug-of-War (Right).png]]<br>The Tug-of-War | |||
|[[File:WWSM Anchor Man icon.png]]<br>[[Anchor Man]] | |||
|[[File:Young Cricket Overworld Sprite WWSM.png]]<br>[[Young Cricket]] & [[Master Mantis]] | |||
|[[File:WWSM The Tug-of-War (Left).png]][[File:WWSM The Tug-of-War (Right).png]]<br>The Tug-of-War | |||
|- | |||
|[[File:WWSM Spray It, Don't Say It (Left) icon.png]][[File:WWSM Spray It, Don't Say It (Right) icon.png]]<br>[[Spray It, Don't Say It]] | |||
|[[File:Ashley Overworld Sprite WWSM.png]]<br>[[Ashley]] & [[Red (WarioWare series)|Red]] | |||
|[[File:WWSM The Thumb Wrestler (Left).png]][[File:WWSM The Thumb Wrestler (Right).png]]<br>The Thumb Wrestler | |||
|[[File:WWSM Sticky Shift icon.png]]<br>[[Sticky Shift]] | |||
|[[File:Ashley Overworld Sprite WWSM.png]]<br>[[Ashley]] & [[Red (WarioWare series)|Red]] | |||
|[[File:WWSM The Thumb Wrestler (Left).png]][[File:WWSM The Thumb Wrestler (Right).png]]<br>The Thumb Wrestler | |||
|- | |||
|[[File:WWSM The Closer (Left) icon.png]][[File:WWSM The Closer (Right) icon.png]]<br>[[The Closer]] | |||
|[[File:Dribble Overworld Sprite WWSM.png]]<br>[[Dribble & Spitz]] | |||
|[[File:WWSM The Dumbbell (Left).png]][[File:WWSM The Dumbbell (Right).png]]<br>The Dumbbell | |||
|[[File:WWSM Use Your Head icon.png]]<br>[[Use Your Head]] | |||
|[[File:Dribble Overworld Sprite WWSM.png]]<br>[[Dribble & Spitz]] | |||
|[[File:WWSM The Mohawk (Left).png]][[File:WWSM The Mohawk (Right).png]]<br>The Mohawk | |||
|- | |||
|[[File:WWSM Spring Training icon.png]]<br>[[Spring Training]] | |||
|[[File:Dribble Overworld Sprite WWSM.png]]<br>[[Dribble & Spitz]] | |||
|[[File:WWSM The Mohawk (Left).png]][[File:WWSM The Mohawk (Right).png]]<br>The Mohawk | |||
|[[File:WWSM Slice of Life (Left) icon.png]][[File:WWSM Slice of Life (Right) icon.png]]<br>[[Slice of Life]] | |||
|[[File:Penny Overworld Sprite WWSM.png]]<br>[[Penny]] | |||
|[[File:WWSM The Boxer (Left).png]][[File:WWSM The Boxer (Right).png]]<br>The Boxer | |||
|- | |||
|[[File:WWSM Community Service icon.png]]<br>[[Community Service]] | |||
|[[File:Penny Overworld Sprite WWSM.png]]<br>[[Penny]] | |||
|[[File:WWSM The Boxer (Left).png]][[File:WWSM The Boxer (Right).png]]<br>The Boxer | |||
|[[File:WWSM Sucker Punch (Left) icon.png]][[File:WWSM Sucker Punch (Right) icon.png]]<br>[[Sucker Punch]] | |||
|[[File:Tiny Wario Overworld Sprite WWSM.png]]<br>[[Tiny Wario]] | |||
|[[File:WWSM The Boxer (Left).png]][[File:WWSM The Boxer (Right).png]]<br>The Boxer (Levels 1 & 3)<br>[[File:WWSM The Dumbbell (Left).png]][[File:WWSM The Dumbbell (Right).png]]<br>The Dumbbell (Level 2) | |||
|- | |||
|[[File:WWSM Party Crasher icon.png]]<br>[[Party Crasher]] | |||
|[[File:Tiny Wario Overworld Sprite WWSM.png]]<br>[[Tiny Wario]] | |||
|[[File:WWSM The Handlebar (Left).png]][[File:WWSM The Handlebar (Right).png]]<br>The Handlebar | |||
|[[File:WWSM He Who Smelt It... (Left) icon.png]][[File:WWSM He Who Smelt It... (Right) icon.png]]<br>[[He Who Smelt It...]] | |||
|[[File:Tiny Wario Overworld Sprite WWSM.png]]<br>[[Tiny Wario]] | |||
|[[File:WWSM The Umbrella (Left).png]][[File:WWSM The Umbrella (Right).png]]<br>The Umbrella | |||
|} | |||
The 10th microgame takes 16 seconds, and can be one of the following: | |||
{|class="wikitable"style="text-align:center" | |||
|- | |||
!Microgame | |||
!Host(s) | |||
![[Form Baton|Form(s)]] | |||
!Microgame | |||
!Host(s) | |||
![[Form Baton|Form(s)]] | |||
|- | |||
|[[File:WWSM On the Ropes icon.png]]<br>[[On the Ropes]] | |||
|[[File:Wario Overworld Sprite WWSM.png]]<br>[[Wario]] | |||
|[[File:WWSM The Remote Control (Left).png]][[File:WWSM The Remote Control (Right).png]]<br>The Remote Control | |||
|[[File:WWSM Wokka Wokka! icon.png]]<br>[[Wokka Wokka!]] | |||
|[[File:Wario Overworld Sprite WWSM.png]]<br>[[Wario]] | |||
|[[File:WWSM The Remote Control (Left).png]][[File:WWSM The Remote Control (Right).png]]<br>The Remote Control | |||
|- | |||
|[[File:WWSM Fan Boy icon.png]]<br>[[Fan Boy]] | |||
|[[File:Mona Overworld Sprite WWSM.png]]<br>[[Mona]] | |||
|[[File:WWSM The Umbrella (Left).png]][[File:WWSM The Umbrella (Right).png]]<br>The Umbrella | |||
|[[File:WWSM Wiggle Room icon.png]]<br>[[Wiggle Room]] | |||
|[[File:Ashley Overworld Sprite WWSM.png]]<br>[[Ashley]] & [[Red (WarioWare series)|Red]] | |||
|[[File:WWSM The Big Cheese (Left).png]][[File:WWSM The Big Cheese (Right).png]]<br>The Big Cheese | |||
|- | |||
|[[File:WWSM Up in Arms (Left) icon.png]][[File:WWSM Up in Arms (Right) icon.png]]<br>[[Up in Arms]] | |||
|[[File:Dribble Overworld Sprite WWSM.png]]<br>[[Dribble & Spitz]] | |||
|[[File:WWSM The Dumbbell (Left).png]][[File:WWSM The Dumbbell (Right).png]]<br>The Dumbbell | |||
|[[File:WWSM Super Mario Brothers icon.png]]<br>[[Super Mario Brothers (WarioWare: Smooth Moves)|Super Mario Brothers]] | |||
|[[File:9-Volt Overworld Sprite WWSM.png]]<br>[[9-Volt]] & [[18-Volt]] | |||
|[[File:WWSM The Umbrella (Left).png]][[File:WWSM The Umbrella (Right).png]]<br>The Umbrella | |||
|- | |||
|[[File:WWSM It'sa Me, Wario! (Left) icon.png]][[File:WWSM It'sa Me, Wario! (Right) icon.png]]<br>[[It'sa Me, Wario!]] | |||
|[[File:Tiny Wario Overworld Sprite WWSM.png]]<br>[[Tiny Wario]] | |||
|[[File:WWSM The Thumb Wrestler (Left).png]][[File:WWSM The Thumb Wrestler (Right).png]]<br>The Thumb Wrestler | |||
|[[File:WWSM Rude Awakening icon.png]]<br>[[Rude Awakening]] | |||
|[[File:Tiny Wario Overworld Sprite WWSM.png]]<br>[[Tiny Wario]] | |||
|[[File:WWSM The Samurai (Left).png]][[File:WWSM The Samurai (Right).png]]<br>The Samurai | |||
|} | |||
The next 9 microgames are played in any order: | |||
{|class="wikitable"style="text-align:center" | |||
|- | |||
!Microgame | |||
!Host(s) | |||
![[Form Baton|Form(s)]] | |||
!Microgame | |||
!Host(s) | |||
![[Form Baton|Form(s)]] | |||
|- | |||
|[[File:WWSM Swat Team icon.png]]<br>[[Swat Team]] | |||
|[[File:Mona Overworld Sprite WWSM.png]]<br>[[Mona]] | |||
|[[File:WWSM The Umbrella (Left).png]][[File:WWSM The Umbrella (Right).png]]<br>The Umbrella | |||
|[[File:WWSM Closing Time icon.png]]<br>[[Closing Time]] | |||
|[[File:Mona Overworld Sprite WWSM.png]]<br>[[Mona]] | |||
|[[File:WWSM The Handlebar (Left).png]][[File:WWSM The Handlebar (Right).png]]<br>The Handlebar | |||
|- | |||
|[[File:WWSM Hand Me Down (Left) icon.png]][[File:WWSM Hand Me Down (Right) icon.png]]<br>[[Hand Me Down]] | |||
|[[File:Mona Overworld Sprite WWSM.png]]<br>[[Mona]] | |||
|[[File:WWSM The Umbrella (Left).png]][[File:WWSM The Umbrella (Right).png]]<br>The Umbrella | |||
|[[File:WWSM Cutting Edge icon.png]]<br>[[Cutting Edge]] | |||
|[[File:Kat Overworld Sprite WWSM.png]]<br>[[Kat & Ana]] | |||
|[[File:WWSM The Samurai (Left).png]][[File:WWSM The Samurai (Right).png]]<br>The Samurai | |||
|- | |||
|[[File:WWSM Sweeps Week icon.png]]<br>[[Sweeps Week]] | |||
|[[File:Young Cricket Overworld Sprite WWSM.png]]<br>[[Young Cricket]] & [[Master Mantis]] | |||
|[[File:WWSM The Tug-of-War (Left).png]][[File:WWSM The Tug-of-War (Right).png]]<br>The Tug-of-War | |||
|[[File:WWSM Carving Artist icon.png]]<br>[[Carving Artist]] | |||
|[[File:Ashley Overworld Sprite WWSM.png]]<br>[[Ashley]] & [[Red (WarioWare series)|Red]] | |||
|[[File:WWSM The Thumb Wrestler (Left).png]][[File:WWSM The Thumb Wrestler (Right).png]]<br>The Thumb Wrestler | |||
|- | |||
|[[File:WWSM Flask Me Later icon.png]]<br>[[Flask Me Later]] | |||
|[[File:Ashley Overworld Sprite WWSM.png]]<br>[[Ashley]] & [[Red (WarioWare series)|Red]] | |||
|[[File:WWSM The Thumb Wrestler (Left).png]][[File:WWSM The Thumb Wrestler (Right).png]]<br>The Thumb Wrestler | |||
|[[File:WWSM Secret Ingredient icon.png]]<br>[[Secret Ingredient]] | |||
|[[File:Ashley Overworld Sprite WWSM.png]]<br>[[Ashley]] & [[Red (WarioWare series)|Red]] | |||
|[[File:WWSM The Thumb Wrestler (Left).png]][[File:WWSM The Thumb Wrestler (Right).png]]<br>The Thumb Wrestler | |||
|- | |||
|[[File:WWSM Clean Sweep (Left) icon.png]][[File:WWSM Clean Sweep (Right) icon.png]]<br>[[Clean Sweep (microgame)|Clean Sweep]] | |||
|[[File:Dribble Overworld Sprite WWSM.png]]<br>[[Dribble & Spitz]] | |||
|[[File:WWSM The Janitor (Left).png]][[File:WWSM The Janitor (Right).png]]<br>The Janitor | |||
|[[File:WWSM Bell Captain (Left) icon.png]][[File:WWSM Bell Captain (Right) icon.png]]<br>[[Bell Captain]] | |||
|[[File:Dribble Overworld Sprite WWSM.png]]<br>[[Dribble & Spitz]] | |||
|[[File:WWSM The Janitor (Left).png]][[File:WWSM The Janitor (Right).png]]<br>The Janitor | |||
|- | |||
|[[File:WWSM Rally and Cry (Left) icon.png]][[File:WWSM Rally and Cry (Right) icon.png]]<br>[[Rally and Cry]] | |||
|[[File:Dribble Overworld Sprite WWSM.png]]<br>[[Dribble & Spitz]] | |||
|[[File:WWSM The Dumbbell (Left).png]][[File:WWSM The Dumbbell (Right).png]]<br>The Dumbbell | |||
|[[File:WWSM Stick a Fork in It (Left) icon.png]][[File:WWSM Stick a Fork in It (Right) icon.png]]<br>[[Stick a Fork in It]] | |||
|[[File:Dribble Overworld Sprite WWSM.png]]<br>[[Dribble & Spitz]] | |||
|[[File:WWSM The Mohawk (Left).png]][[File:WWSM The Mohawk (Right).png]]<br>The Mohawk | |||
|- | |||
|[[File:WWSM Armed and Dangerous (Left) icon.png]][[File:WWSM Armed and Dangerous (Right) icon.png]]<br>[[Armed and Dangerous]] | |||
|[[File:Dribble Overworld Sprite WWSM.png]]<br>[[Dribble & Spitz]] | |||
|[[File:WWSM The Dumbbell (Left).png]][[File:WWSM The Dumbbell (Right).png]]<br>The Dumbbell | |||
|[[File:WWSM Stir Crazy icon.png]]<br>[[Stir Crazy]] | |||
|[[File:Penny Overworld Sprite WWSM.png]]<br>[[Penny]] | |||
|[[File:WWSM The Mortar and Pestle (Left).png]][[File:WWSM The Mortar and Pestle (Right).png]]<br>The Mortar and Pestle | |||
|- | |||
|[[File:WWSM Mercury Falling (Left) icon.png]][[File:WWSM Mercury Falling (Right) icon.png]]<br>[[Mercury Falling]] | |||
|[[File:Penny Overworld Sprite WWSM.png]]<br>[[Penny]] | |||
|[[File:WWSM The Boxer (Left).png]][[File:WWSM The Boxer (Right).png]]<br>The Boxer | |||
|[[File:WWSM On Point (Left) icon.png]][[File:WWSM On Point (Right) icon.png]]<br>[[On Point]] | |||
|[[File:Penny Overworld Sprite WWSM.png]]<br>[[Penny]] | |||
|[[File:WWSM The Remote Control (Left).png]][[File:WWSM The Remote Control (Right).png]]<br>The Remote Control | |||
|- | |||
|[[File:WWSM Sure, You Can (Left) icon.png]][[File:WWSM Sure, You Can (Right) icon.png]]<br>[[Sure, You Can]] | |||
|[[File:Penny Overworld Sprite WWSM.png]]<br>[[Penny]] | |||
|[[File:WWSM The Boxer (Left).png]][[File:WWSM The Boxer (Right).png]]<br>The Boxer | |||
|[[File:WWSM Wario Land icon.png]]<br>[[Wario Land (WarioWare: Smooth Moves)|Wario Land]] | |||
|[[File:9-Volt Overworld Sprite WWSM.png]]<br>[[9-Volt]] & [[18-Volt]] | |||
|[[File:WWSM The Boxer (Left).png]][[File:WWSM The Boxer (Right).png]]<br>The Boxer | |||
|- | |||
|[[File:WWSM Super Nostalgic Entertainment System icon.png]]<br>[[Super Nostalgic Entertainment System]] | |||
|[[File:9-Volt Overworld Sprite WWSM.png]]<br>[[9-Volt]] & [[18-Volt]] | |||
|[[File:WWSM The Handlebar (Left).png]][[File:WWSM The Handlebar (Right).png]]<br>The Handlebar | |||
|[[File:WWSM Ocarina of Time icon.png]]<br>[[Ocarina of Time]] | |||
|[[File:9-Volt Overworld Sprite WWSM.png]]<br>[[9-Volt]] & [[18-Volt]] | |||
|[[File:WWSM The Janitor (Left).png]][[File:WWSM The Janitor (Right).png]]<br>The Janitor | |||
|- | |||
|[[File:WWSM Sifty Character icon.png]]<br>[[Sifty Character]] | |||
|[[File:9-Volt Overworld Sprite WWSM.png]]<br>[[9-Volt]] & [[18-Volt]] | |||
|[[File:WWSM The Chauffeur (Left).png]][[File:WWSM The Chauffeur (Right).png]]<br>The Chauffeur | |||
|[[File:WWSM A Tale of One Kitty icon.png]]<br>[[A Tale of One Kitty]] | |||
|[[File:Tiny Wario Overworld Sprite WWSM.png]]<br>[[Tiny Wario]] | |||
|[[File:WWSM The Big Cheese (Left).png]][[File:WWSM The Big Cheese (Right).png]]<br>The Big Cheese | |||
|- | |||
|[[File:WWSM Paper Wario (Left) icon.png]][[File:WWSM Paper Wario (Right) icon.png]]<br>[[Paper Wario]] | |||
|[[File:Tiny Wario Overworld Sprite WWSM.png]]<br>[[Tiny Wario]] | |||
|[[File:WWSM The Waiter (Left).png]][[File:WWSM The Waiter (Right).png]]<br>The Waiter | |||
|} | |||
The last microgame takes 16 seconds, and can be one of the following: | |||
{|class="wikitable"style="text-align:center" | |||
|- | |||
!Microgame | |||
!Host(s) | |||
![[Form Baton|Form(s)]] | |||
!Microgame | |||
!Host(s) | |||
![[Form Baton|Form(s)]] | |||
|- | |||
|[[File:WWSM Runner's High icon.png]]<br>[[Runner's High]] | |||
|[[File:Mona Overworld Sprite WWSM.png]]<br>[[Mona]] | |||
|[[File:WWSM The Umbrella (Left).png]][[File:WWSM The Umbrella (Right).png]]<br>The Umbrella | |||
|[[File:WWSM Skip It icon.png]]<br>[[Skip It]] | |||
|[[File:Ashley Overworld Sprite WWSM.png]]<br>[[Ashley]] & [[Red (WarioWare series)|Red]] | |||
|[[File:WWSM The Big Cheese (Left).png]][[File:WWSM The Big Cheese (Right).png]]<br>The Big Cheese | |||
|- | |||
|[[File:WWSM Diddly Squat icon.png]]<br>[[Diddly Squat]] | |||
|[[File:Dribble Overworld Sprite WWSM.png]]<br>[[Dribble & Spitz]] | |||
|[[File:WWSM The Mohawk (Left).png]][[File:WWSM The Mohawk (Right).png]]<br>The Mohawk | |||
|[[File:WWSM Soiled Reputation icon.png]]<br>[[Soiled Reputation]] | |||
|[[File:Dribble Overworld Sprite WWSM.png]]<br>[[Dribble & Spitz]] | |||
|[[File:WWSM The Janitor (Left).png]][[File:WWSM The Janitor (Right).png]]<br>The Janitor | |||
|- | |||
|[[File:WWSM Balloon Fight icon.png]]<br>[[Balloon Fight (WarioWare: Smooth Moves)|Balloon Fight]] | |||
|[[File:9-Volt Overworld Sprite WWSM.png]]<br>[[9-Volt]] & [[18-Volt]] | |||
|[[File:WWSM The Big Cheese (Left).png]][[File:WWSM The Big Cheese (Right).png]]<br>The Big Cheese | |||
|[[File:WWSM Punch-Out!! icon.png]]<br>[[Punch-Out!! (WarioWare: Smooth Moves)|Punch-Out!!]] | |||
|[[File:9-Volt Overworld Sprite WWSM.png]]<br>[[9-Volt]] & [[18-Volt]] | |||
|[[File:WWSM The Umbrella (Left).png]][[File:WWSM The Umbrella (Right).png]]<br>The Umbrella | |||
|- | |||
|[[File:WWSM Wario's Gym icon.png]]<br>[[Wario's Gym]] | |||
|[[File:Tiny Wario Overworld Sprite WWSM.png]]<br>[[Tiny Wario]] | |||
|[[File:WWSM The Thumb Wrestler (Left).png]][[File:WWSM The Thumb Wrestler (Right).png]]<br>The Thumb Wrestler | |||
|} | |||
==Dr. Crygor's comments== | |||
{{stub|section=y|Include all of Dr. Crygor's comments in the game over screen}} | |||
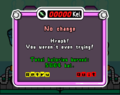
*'''No change''': "''Hrmph! You weren't even trying!''" | |||
*'''Rotund''': "''C'mon now! Give it your all!''" | |||
*'''Portly''': "''Well... I must give you credit.''" | |||
*'''Chubby''': "''You might look a tad trimmer.''" | |||
*'''Husky''': "''You're pleasantly plump, but at least you're healthy!''" | |||
*'''Robust''': "''A little more... Your clothes look tight!''" | |||
*'''Normal''': "''Ah-ha! Perfect! The ideal body shape!''" | |||
*'''Slight''': "''See? If you set your mind to something, it will happen!''" | |||
*'''Scrappy''': "''You're a little thin, but you're a scrapper!''" | |||
*'''Skinny''': "''This is fine and all, but you don't look healthy.''" | |||
*'''Scrawny''': "''Is something wrong? Oh yes, the diet.''" | |||
*'''Boney''': "''You're working too hard! Everything in moderation!''" | |||
*'''Twig-like''': "''Not even I thought you could lose so much!''" | |||
*'''Stringy''': "''Eek! You're so skinny I can't see you!''" | |||
*'''Emaciated''': "''What happened?! You're all shriveled!''" | |||
==Gallery== | |||
<gallery> | |||
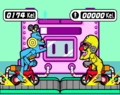
WWSM Kelorometer Lounging.png|Dr. Crygor and Mike resting after no microgame activity | |||
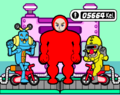
WWSM Kelorometer Maximum.png|Dr. Crygor and Mike pedaling after a great microgame performance | |||
WWSM Kelorometer Before.png|The player's Mii before any weight has been lost | |||
WWSM Kelorometer Twig-Like.png|The player's Mii at a twig-like size | |||
WWSM Game Over Kelorometer.png|[[Game Over|Getting a score of zero]], resulting in no weight lost | |||
</gallery> | |||
==Names in other languages== | |||
{{foreign names | |||
|Jpn=ダイエットマシーン | |||
|JpnR=Daietto Mashīn | |||
|JpnM=Dieting Machine | |||
|Fre=Kélorimètre | |||
|FreM=Kelorometer | |||
|Ger=Kelorienmesser | |||
|GerM=Keloriemeter | |||
|Ita=Kelorimetro | |||
|ItaM=Kelorometer | |||
|Kor=초특급 다이어트 머신 | |||
|KorR=Choteuggeub Daieoteu Meosin | |||
|KorM=Super Special Diet Machine | |||
|Spa=Sudorímetro | |||
|SpaM=Sweatymeter}} | |||
==Notes== | |||
*"Kelories" is a pun on calories, a measurement of energy. | *"Kelories" is a pun on calories, a measurement of energy. | ||
** Similarly, a calorimeter is a device for measuring the energy given off by a heat source, such as a chemical reaction. "Kelorometer" is a play on this. | ** Similarly, a calorimeter is a device for measuring the energy given off by a heat source, such as a chemical reaction. "Kelorometer" is a play on this. | ||
{{WWSM}} | {{WWSM}} | ||
[[Category:Crygor's | [[Category:Dr. Crygor's inventions]] | ||
[[Category: | [[Category:WarioWare: Smooth Moves]] | ||
Latest revision as of 06:50, April 19, 2025

The Kelorometer is an invention built by Dr. Crygor in WarioWare: Smooth Moves. It is one of the game's levels. It was built to lose kelories. As the player starts playing the game, their Mii face will be composed into a red body. The player will then go into the machine, starting the level. The Kelorometer features 20 microgames. The recommended goal to achieve in this level is 5000 kelories. The high score on the game resets every day. After all the microgames are completed, the player's Mii will lose weight based on how many kelories have been burned. It is succeeded by Megagame Muscles in WarioWare: Move It!, which is also hosted by Dr. Crygor and Mike.
Microgames
The first 9 microgames are played in any order:
| Microgame | Host(s) | Form(s) | Microgame | Host(s) | Form(s) |
|---|---|---|---|---|---|
Shakedown |
Mona |
.png) .png) The Umbrella |
Carrot Away |
Mona |
.png) .png) The Handlebar |
Dough Boy |
Mona |
The Umbrella |
Come to Poppa |
Mona |
The Handlebar |
Universal Marionette |
Mona |
The Handlebar |
Extreme Patty-Cake |
Kat & Ana |
.png) .png) The Chauffeur |
Writer's Block |
Kat & Ana |
.png) .png) The Sketch Artist |
Simon Says |
Kat & Ana |
.png) .png) The Samurai |
Mall Tour |
Kat & Ana |
The Samurai |
Plane and Simple |
Young Cricket & Master Mantis |
.png) .png) The Tug-of-War |
Logged In |
Young Cricket & Master Mantis |
The Tug-of-War |
Anchor Man |
Young Cricket & Master Mantis |
The Tug-of-War |
Spray It, Don't Say It |
Ashley & Red |
.png) .png) The Thumb Wrestler |
Sticky Shift |
Ashley & Red |
The Thumb Wrestler |
The Closer |
Dribble & Spitz |
.png) .png) The Dumbbell |
Use Your Head |
Dribble & Spitz |
.png) .png) The Mohawk |
Spring Training |
Dribble & Spitz |
The Mohawk |
Slice of Life |
Penny |
.png) .png) The Boxer |
Community Service |
Penny |
The Boxer |
Sucker Punch |
Tiny Wario |
The Boxer (Levels 1 & 3) The Dumbbell (Level 2) |
Party Crasher |
Tiny Wario |
The Handlebar |
He Who Smelt It... |
Tiny Wario |
The Umbrella |
The 10th microgame takes 16 seconds, and can be one of the following:
| Microgame | Host(s) | Form(s) | Microgame | Host(s) | Form(s) |
|---|---|---|---|---|---|
On the Ropes |
Wario |
.png) .png) The Remote Control |
Wokka Wokka! |
Wario |
The Remote Control |
Fan Boy |
Mona |
The Umbrella |
Wiggle Room |
Ashley & Red |
.png) .png) The Big Cheese |
Up in Arms |
Dribble & Spitz |
The Dumbbell |
Super Mario Brothers |
9-Volt & 18-Volt |
The Umbrella |
It'sa Me, Wario! |
Tiny Wario |
The Thumb Wrestler |
Rude Awakening |
Tiny Wario |
The Samurai |
The next 9 microgames are played in any order:
.png)
.png)
.png)
.png)
The last microgame takes 16 seconds, and can be one of the following:
| Microgame | Host(s) | Form(s) | Microgame | Host(s) | Form(s) |
|---|---|---|---|---|---|
Runner's High |
Mona |
The Umbrella |
Skip It |
Ashley & Red |
The Big Cheese |
Diddly Squat |
Dribble & Spitz |
The Mohawk |
Soiled Reputation |
Dribble & Spitz |
.png) .png) The Janitor |
Balloon Fight |
9-Volt & 18-Volt |
The Big Cheese |
Punch-Out!! |
9-Volt & 18-Volt |
The Umbrella |
Wario's Gym |
Tiny Wario |
The Thumb Wrestler |
Dr. Crygor's comments
This section is a stub. Please consider expanding it to include any missing information. Specifics: Include all of Dr. Crygor's comments in the game over screen
- No change: "Hrmph! You weren't even trying!"
- Rotund: "C'mon now! Give it your all!"
- Portly: "Well... I must give you credit."
- Chubby: "You might look a tad trimmer."
- Husky: "You're pleasantly plump, but at least you're healthy!"
- Robust: "A little more... Your clothes look tight!"
- Normal: "Ah-ha! Perfect! The ideal body shape!"
- Slight: "See? If you set your mind to something, it will happen!"
- Scrappy: "You're a little thin, but you're a scrapper!"
- Skinny: "This is fine and all, but you don't look healthy."
- Scrawny: "Is something wrong? Oh yes, the diet."
- Boney: "You're working too hard! Everything in moderation!"
- Twig-like: "Not even I thought you could lose so much!"
- Stringy: "Eek! You're so skinny I can't see you!"
- Emaciated: "What happened?! You're all shriveled!"
Gallery
Dr. Crygor and Mike resting after no microgame activity
Dr. Crygor and Mike pedaling after a great microgame performance
The player's Mii before any weight has been lost
The player's Mii at a twig-like size
Getting a score of zero, resulting in no weight lost


Names in other languages
| Language | Name | Meaning | Notes |
|---|---|---|---|
| Japanese | ダイエットマシーン[?] Daietto Mashīn |
Dieting Machine | |
| French | Kélorimètre[?] | Kelorometer | |
| German | Kelorienmesser[?] | Keloriemeter | |
| Italian | Kelorimetro[?] | Kelorometer | |
| Korean | 초특급 다이어트 머신[?] Choteuggeub Daieoteu Meosin |
Super Special Diet Machine | |
| Spanish | Sudorímetro[?] | Sweatymeter |
Notes
- "Kelories" is a pun on calories, a measurement of energy.
- Similarly, a calorimeter is a device for measuring the energy given off by a heat source, such as a chemical reaction. "Kelorometer" is a play on this.