Level 7-5: Difference between revisions
LinkTheLefty (talk | contribs) mNo edit summary |
m (fixing present icons (via JWB)) |
||
| (24 intermediate revisions by 8 users not shown) | |||
| Line 1: | Line 1: | ||
{{ | {{level infobox | ||
|image=[[File:MarioVsDKSwitch7-5 1.jpg|250px]] | |||
|code=Level 5-5 (GBA)<br>Level 7-5 (Switch) | |||
|image = [[File: | |world=[[Mystic Forest]] | ||
|code= Level 5-5 | |game=''[[Mario vs. Donkey Kong]]''<br>''[[Mario vs. Donkey Kong (Nintendo Switch)|Mario vs. Donkey Kong]]'' ([[Nintendo Switch]]) | ||
|world= [[Mystic Forest]] | |limit=150 (first area)<br>180 (second area) | ||
|game= ''[[Mario vs. Donkey Kong]]'' | |before_alt= | ||
|limit= 150 (first area)<br>180 (second area) | |before=[[Level 7-4|<<]] | ||
| | |after=[[Level 7-6|>>]] | ||
|before= [[Level | |||
|after= [[Level | |||
}} | }} | ||
'''Level 5-5''' is the fifth level of [[Mystic Forest]] in ''[[Mario vs. Donkey Kong]]''. The high score for this level is | '''Level 7-5''' ('''Level 5-5''' in the GBA version) is the fifth level of [[Mystic Forest]] in ''[[Mario vs. Donkey Kong]]'' and its [[Mario vs. Donkey Kong (Nintendo Switch)|remake]]. The high score for this level in the original version is 24500. In the [[Nintendo Switch]] remake, the target time for this level's [[Time Attack (Mario vs. Donkey Kong for Nintendo Switch)|Time Attack]] is 53.00. | ||
==Overview== | ==Overview== | ||
[[File: | [[File:MarioVsDKSwitch7-5 2.jpg|250px|thumb|left|The second area]] | ||
In the GBA version only, the level opens with a cinematic showing [[Mario]] jumping onto a [[Direction Switch]] to change the direction the [[lift]]s are moving it, and then using them to jump onto a platform. | |||
In the first area, the player has to travel to the far left and use the first [[Springboard]] to reach a yellow [[Color Switch]]. After pressing it, the player needs to climb the ladder and press the Direction Switch at the top, and then grab the [[Key]] nearby. The player needs to throw the Key onto the [[conveyor]] | In the first area, the player has to travel to the far left and use the first [[Springboard]] to reach a yellow [[Color Switch]]. After pressing it, the player needs to climb the ladder and press the Direction Switch at the top, and then grab the [[Key]] nearby. The player needs to throw the Key onto the [[Conveyor Belt|conveyor belt]] to the right, and then climb down the ladder and ride the conveyor below to find another Direction Switch. After pressing the button, the player needs to use the Springboard to reunite with the Key and grab it. The player then has to navigate a few lifts to reach the locked door. | ||
In the second area, the player has to use a [[Hammer]] to defeat two sleeping [[ | In the second area, the player has to use a [[Hammer]] to defeat two sleeping [[Spear Guy]]s, one on the ground and one on a platform above connected by a ladder. Next, the player has to climb across [[rope]]s and a [[Monchee]]'s tail to reach a Springboard. On the other end of a conveyor belt is another Spear Guy, which the player can avoid by jumping onto the ropes above, and a Hammer is also placed above the conveyor. Climbing up the ropes, the player will reach several conveyor belts that will lead to a Spear Guy guarding the [[Mini Mario (toy)|Mini-Mario]]. By doing a [[Handstand]] Jump on the top conveyor, the player can reach a Hammer that can be used to defeat the Spear Guy. | ||
{{br|left}} | {{br|left}} | ||
==Enemies== | ==Enemies== | ||
*[[ | *[[Spear Guy]]s | ||
*[[Monchee]]s | *[[Monchee]]s | ||
==Present locations== | ==[[Present (Mario vs. Donkey Kong)|Present]] locations== | ||
{|class="wikitable" style="text-align: center" | |||
|- | |||
!Color | |||
!Location | |||
|- | |||
|[[File:MarioVsDKSwitch RedPresent.png]] | |||
|In the first area, between the conveyor and spiked platform next to the Key. | |||
|- | |||
|[[File:MarioVsDKSwitch YellowPresent.png]] | |||
|In the second area, in the path of the second Monchee behind the conveyor belt with the Spear Guy. | |||
|- | |||
|[[File:MarioVsDKSwitch BluePresent.png]] | |||
|In the second area, behind the Mini-Mario and guarded by a Spear Guy. | |||
|} | |||
==Gallery== | |||
<gallery> | |||
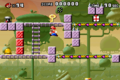
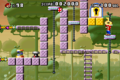
MVDK_5-5_Part_1_(1).png|The first area of Level 5-5 in the GBA version | |||
MVDK_5-5_Part_1_(2).png|The first area of Level 5-5 in the GBA version | |||
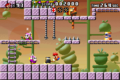
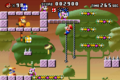
MVDK_5-5_Part_2_(1).png|The second area of Level 5-5 in the GBA version | |||
MVDK_5-5_Part_2_(2).png|The second area of Level 5-5 in the GBA version | |||
</gallery> | |||
{{MVDK | {{MVDK levels}} | ||
[[Category:Mario vs. Donkey Kong | [[Category:Mario vs. Donkey Kong levels]] | ||
Latest revision as of 22:53, March 1, 2025
| Level | |
|---|---|
| Level 7-5 | |

| |
| Level code | Level 5-5 (GBA) Level 7-5 (Switch) |
| World | Mystic Forest |
| Game | Mario vs. Donkey Kong Mario vs. Donkey Kong (Nintendo Switch) |
| Time limit | 150 (first area) 180 (second area) |
| << Directory of levels >> | |
Level 7-5 (Level 5-5 in the GBA version) is the fifth level of Mystic Forest in Mario vs. Donkey Kong and its remake. The high score for this level in the original version is 24500. In the Nintendo Switch remake, the target time for this level's Time Attack is 53.00.
Overview[edit]

In the GBA version only, the level opens with a cinematic showing Mario jumping onto a Direction Switch to change the direction the lifts are moving it, and then using them to jump onto a platform.
In the first area, the player has to travel to the far left and use the first Springboard to reach a yellow Color Switch. After pressing it, the player needs to climb the ladder and press the Direction Switch at the top, and then grab the Key nearby. The player needs to throw the Key onto the conveyor belt to the right, and then climb down the ladder and ride the conveyor below to find another Direction Switch. After pressing the button, the player needs to use the Springboard to reunite with the Key and grab it. The player then has to navigate a few lifts to reach the locked door.
In the second area, the player has to use a Hammer to defeat two sleeping Spear Guys, one on the ground and one on a platform above connected by a ladder. Next, the player has to climb across ropes and a Monchee's tail to reach a Springboard. On the other end of a conveyor belt is another Spear Guy, which the player can avoid by jumping onto the ropes above, and a Hammer is also placed above the conveyor. Climbing up the ropes, the player will reach several conveyor belts that will lead to a Spear Guy guarding the Mini-Mario. By doing a Handstand Jump on the top conveyor, the player can reach a Hammer that can be used to defeat the Spear Guy.
Enemies[edit]
Present locations[edit]
| Color | Location |
|---|---|

|
In the first area, between the conveyor and spiked platform next to the Key. |

|
In the second area, in the path of the second Monchee behind the conveyor belt with the Spear Guy. |

|
In the second area, behind the Mini-Mario and guarded by a Spear Guy. |
Gallery[edit]
The first area of Level 5-5 in the GBA version
The first area of Level 5-5 in the GBA version
The second area of Level 5-5 in the GBA version
The second area of Level 5-5 in the GBA version
.png)
.png)
.png)
.png)