MegaDragonBowser
This article is about a subject in an upcoming or recently released game. When the game is released, or more information about this subject is found, this article may need major rewriting.
This notice should be removed after a month has passed since the game was first released.
| Mario + Rabbids Kingdom Battle enemy | |
|---|---|
| MegaDragonBowser (1) | |

| |
| Health Points | 1600 |
| Area of Movement | 20 Cells |
| Pipe Exit Range | None |
| Chase Range | None |
| Team Jump | None |
| Dash | None |
| Primary Weapon | Rumblebang |
| 100 DMG | |
| Secondary Weapon | |
| None | |
| Primary Technique | Villain Sight |
| 100-100 DMG | |
| Secondary Technique | Magnet Dance |
| Draws opponents | |
| Tertiary Technique | |
| None | |
| The Ultimate Boss! | |
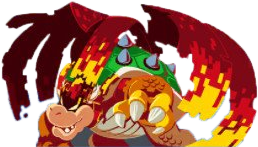
MegaDragonBowser is the end boss of the Lava Pit in Mario + Rabbids Kingdom Battle, and the final boss in the game. As his name suggests, he is Bowser consumed by the Megabug.
MegaDragonBowser largely resembles Bowser's regular form, with the addition of the Megabug's wings, tail, and orange circuitry patterns on his shell and limbs.
Battle
The fight with MegaDragonBowser takes place on a large platform high above a pit of lava. Blocks are scattered around the area to act as cover; most are Giant Brick Blocks, but several indestructible metal blocks are arranged in a large ring near the edges of the floor.
Initially, MegaDragonBowser stands at the center of the arena, supported by four Lava Valkyries. He follows a set pattern of actions during this phase:
- Taking flight and attacking one character with a stream of small fireballs from his hand, similar to a Rumblebang; these shots can destroy Giant Brick Blocks and inflict the Burn status.
- Activating a line-of-sight technique that allows him to shoot a character if they move between his turns.
- Drawing characters towards him, similar to Rabbid Mario's Magnet Dance.
- Slamming onto the ground, creating a shockwave that damages and blows back anyone in range. Destroys Giant Brick Blocks in range as well.
Once his HP is depleted, MegaDragonBowser heals back to full before flying out of the arena - he can be attacked with line-of-sight abilities at this time. He immediately bombards the battlefield with fireballs, inflicting 20 HP damage and a Burn on any characters in their path and leaving scorched craters where they land. After summoning four Lava Bucklers near the middle of the arena, he will spend the rest of this phase flying around the sides of the battlefield and raining fireballs on the craters, as well as using a Protection technique to reduce damage to his minions by taking a fraction of the damage himself. The heroes must attack MegaDragonBowser to deplete his HP again, but dealing with the Bucklers first is highly advised.
After regenerating his HP once more, MegaDragonBowser returns to the arena (being once again vulnerable to line-of-sight attacks while he moves) and uses his melee smash on the center as he lands. As four Lava Smashers spawn around him, he now attacks with Whirling Fortress and shields himself on the heroes' turn. To harm the boss, the heroes must lure him into spinning at the metal blocks around the arena - impact with a block will shatter it and stun MegaDragonBowser for a turn.
When MegaDragonBowser's HP is depleted for the third time, the Megabug separates from Bowser and attempts to attack the heroes. However, they respond with a combined attack that destroys the MegaBug for good, breaking its control over the warped Mushroom Kingdom.
Stats
| Mario + Rabbids Kingdom Battle enemy | ||||||
|---|---|---|---|---|---|---|
| MegaDragonBowser (2) | ||||||

|
Health Points | 1600 | Team Jump | None | Dash | None |
| Area of Movement | 20 Cells | Primary Weapon | Rumblebang | Secondary Weapon | ||
| 100 DMG | None | |||||
| Pipe Exit Range | None | Primary Technique | Protection | Secondary Technique | Shield | |
| 50% DMG Reduction | 100% DMG Reduction | |||||
| Chase Range | None | Tertiary Technique | Pyroclast | The Ultimate Boss! | ||
| 20 DMG | ||||||
| Mario + Rabbids Kingdom Battle enemy | ||||||
|---|---|---|---|---|---|---|
| MegaDragonBowser (3) | ||||||

|
Health Points | 1600 | Team Jump | None | Whirling Fortress | 100.00 DMG |
| Area of Movement | 20 Cells | Primary Weapon | Rumblebang | Secondary Weapon | ||
| 100 DMG | None | |||||
| Pipe Exit Range | None | Primary Technique | Shield | Secondary Technique | Shield | |
| 100% DMG Reduction | 100% DMG Reduction | |||||
| Chase Range | None | Tertiary Technique | The Ultimate Boss! | |||
| None | ||||||
Gallery
- MegaDragonBowser.jpg
MegaDragonBowser's introduction.
