Trial of Power: Difference between revisions
m (typo (destory → destroy)) |
m (Bot: Automated text replacement (-\| *image *= *([^\n\}\]\|]+)\n\| *caption *= *([^\n]+)\n +|image=256px<br>\2\n)) |
||
| Line 1: | Line 1: | ||
{{location infobox | {{location infobox | ||
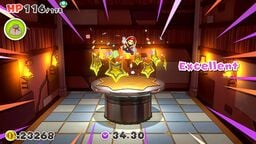
|image=PMTOK Trial of Power.jpg | |image=[[File:PMTOK Trial of Power.jpg|256px]]<br>Mario jumping on a nail for the third challenge of the Trial of Power | ||
| | |||
|greater_location=[[Diamond Island]] | |greater_location=[[Diamond Island]] | ||
|first_appearance=''[[Paper Mario: The Origami King]]'' ([[List of games by date#2020|2020]]) | |first_appearance=''[[Paper Mario: The Origami King]]'' ([[List of games by date#2020|2020]]) | ||
Revision as of 18:04, November 21, 2023
| Trial of Power | |
|---|---|
 Mario jumping on a nail for the third challenge of the Trial of Power | |
| First appearance | Paper Mario: The Origami King (2020) |
| Greater location | Diamond Island |
- “Hooray! I knew you were super strong, Mario!”
- —Olivia, Paper Mario: The Origami King
The Trial of Power is one of three trials held on Diamond Island in Paper Mario: The Origami King. It is held in a red temple, where it puts Mario through three levels of increasing difficulty testing his strength.
Unlike the Trial of Wisdom and the Trial of Courage, this one can be entered before clearing Ice Vellumental Mountain, as it does not require an Ice Vellumental to access. Mario must simply use a Magic Circle in front of the temple to turn Olivia into an Earth Vellumental to lower a large pile of dirt holding up the temple.
Mario is then able to enter and speak with the Toad statue in the room. It welcomes Mario into the temple and puts him through three challenges that he must overcome to be rewarded with a sacred orb. A small circle of light appears in the center of the room, which warps Mario to the following room when he stands on it.
After clearing all three challenges, Mario is rewarded a song and dance routine and access to the final area, where he receives a Power Orb, one of three orbs required to unlock the Sea Tower. He can then return to the first area and exit the temple, at which point it cannot be reentered.
If Mario is having difficulty clearing the trial (failing at least two times), he is given an option to pay the Toad statue in the starting area 3,000 coins for easier setups.
Layout
First challenge
For the first challenge, Mario is tasked with destroying every Brick Block that appears in the room in the allotted time by means of jumping. Mario has one minute to clear all three rounds. The first round features blocks lined up in the front and back of the room. The second round holds blocks in the center, with a big Brick Block on each end. Regular Brick Blocks require one strike to break, while these bigger Brick Blocks require three. In the third and final round, a massive Brick Block appears floating in the center of the room. Mario must jump into it seven times to destroy it, clearing the first challenge.
Second challenge
For the second challenge, Mario is again tasked with destroying every Brick Block that appears in the time limit, this time by using his hammer. However, rather than being able to simply swing it as he would in the overworld, Mario must time his swings to get a good hit, similar to using the hammer in battle. If he gets an excellent hit, a small blast radius appears, damaging any nearby blocks a bit. In the first round, twelve regular Brick Blocks appear. In the second round, one Brick Block appears between two larger, tougher Brick Blocks. In the third round, a massive Brick Block appears in the center, requiring several hits to destroy.
Third challenge
For the third challenge, there are no blocks. Mario is asked to get onto a giant nail in the center of the room for further instruction. He is then told to use a mix of jumps and hammer attacks to pound in the nail as quickly as possible - in under one minute. After this challenge is cleared, Mario is awarded a small celebration.