World Mushroom-Ghost House: Difference between revisions
No edit summary Tag: Mobile edit |
mNo edit summary |
||
| Line 13: | Line 13: | ||
}} | }} | ||
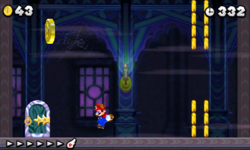
'''{{world|mushroom|ghosthousen2}}''' is a level in ''[[New Super Mario Bros. 2]]''. This level (as well as {{world-link|6|ghosthousen2|World 6-Ghost House (New Super Mario Bros. 2)}}) is a maze-like [[Ghost House]] where almost every door leads to a different room, thus comprising of several areas. The main objective of this level is to make Mario's way up from the basement of the house (the starting point) to the top of the house where an exit door is to be found to reach the [[Goal Pole]]. | '''{{world|mushroom|ghosthousen2}}''' is a level in ''[[New Super Mario Bros. 2]]''. This level (as well as {{world-link|6|ghosthousen2|World 6-Ghost House (New Super Mario Bros. 2)}}) is a maze-like [[Ghost House]] where almost every door leads to a different room, thus comprising of several areas. The main objective of this level is to make Mario's way up from the basement of the house (the starting point) to the top of the house where an exit door is to be found to reach the [[Goal Pole]]. | ||
==Layout== | ==Layout== | ||
===Area 1=== | ===Area 1=== | ||
| Line 47: | Line 48: | ||
[[File:NSMB2_map_MGHOST.png|400px|thumb|left|]] | [[File:NSMB2_map_MGHOST.png|400px|thumb|left|]] | ||
{{NSMB2 levels}} | {{NSMB2 levels}} | ||
[[Category:Ghost Houses]] | [[Category:Ghost Houses]] | ||
[[Category:Levels with a | [[Category:Levels with a secret exit]] | ||
[[Category:New Super Mario Bros. 2 levels]] | [[Category:New Super Mario Bros. 2 levels]] | ||
[[de:Welt Pilz-Spukhaus (New Super Mario Bros. 2)]] | [[de:Welt Pilz-Spukhaus (New Super Mario Bros. 2)]] | ||
Revision as of 20:37, November 11, 2022
| Level | |
|---|---|
| World | |

| |
| World | World Mushroom |
| Game | New Super Mario Bros. 2 |
| Time limit | 400 seconds |
| Coin Rush limit | 100 seconds |
| << Directory of levels >> ** | |
World ![]() Mushroom-
Mushroom-![]() Ghost House is a level in New Super Mario Bros. 2. This level (as well as Template:World-link) is a maze-like Ghost House where almost every door leads to a different room, thus comprising of several areas. The main objective of this level is to make Mario's way up from the basement of the house (the starting point) to the top of the house where an exit door is to be found to reach the Goal Pole.
Ghost House is a level in New Super Mario Bros. 2. This level (as well as Template:World-link) is a maze-like Ghost House where almost every door leads to a different room, thus comprising of several areas. The main objective of this level is to make Mario's way up from the basement of the house (the starting point) to the top of the house where an exit door is to be found to reach the Goal Pole.
Layout
Area 1
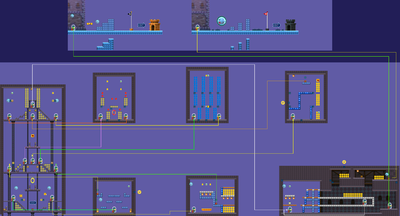
Mario begins in the basement of the level, where two moving ? Blocks can be found, the left one containing a Super Leaf. There are two elevated doors, one on the left and another on the right which leads to different areas. There is a Gold Ring above Mario's starting position which can be obtained by using Raccoon Mario to fly to the top platform with the Gold Ring. The two Boos in the room will then turn gold and begin to move away from Mario while producing coins.
- Left Door: This door leads to a room with a lone Boo and two ? Switches at the two ends of the room. The switch on the left activates blue platforms which appear set by set and also makes the door to the next area appear. For the right switch, see Star Coin 1 below. Activating both switches simultaneously will cause both the door and the Star Coin become temporarily inaccessible.
- Right Door: This door leads to a room with six ? Switches and a Boo. Three of them are very high up and cannot be accessed at first and another three can be activated at first. The first switch (from the left side of the room) removes the blue blocks enclosing the coins above and below the last three switches. The second switch extends the platform where the first three switches are located. The third switch makes a wall of blue blocks appear immediately to the right of the player. (If the second and third switches are combined, then access to the last three switches is unavailable.) The fourth switch makes a yellow moving platform appear so the player can reach the first three switches. The fifth switch makes blue blocks appear which encloses the first three switches, making them inaccessible. The last switch makes the door appear floating in the middle of the room to the left of the platform with the last three switches. To exit, Mario has to activate the second and last switches. To activate the second switch, Mario also needs to activate the fourth switch first.
Area 2
Mario enters an area that is just above Area 1 and below Area 3. There is a ? Block on the left containing a coin and another on the right containing a Super Leaf. The two doors at the bottom are no longer accessible. However, there is another fork in the path, this time the player has to choose between the three elevated doors. Above the three doors the player can additionally find a platform with a Roulette Coin Block.
- Left Door: In this room, there is a Red Ring and several rows of Trampoline Blocks.
- Middle Door: There are many blue blocks and Trampoline Blocks in the area. At the top of the structure there is a ? Switch on the ceiling which the player needs to activate. The entire structure of the room will then change momentarily and the door to the next area will appear as well as a Roulette Coin Block to the right.
- Right Door: This room is filled with Trampoline Blocks. The left Brick Block in the middle of the room contains a P Switch where players can collect blue coins. The door on the right leads to the next area.
Area 3
This area is at the highest floor of the main room. There is only one accessible door remaining in this area, which is the one elevated. There are also two Boos in the room. Two ? Blocks can be found. The left one contains a Super Leaf.
Through the door, three more ? Switches can be found. There are three paths here which is blocked by blue blocks. These blocks change positions when activating a ? Switch. The player has to combine any and only two switches to open up a path. The first two switches opens up the middle path, the first and last switches opens up the bottom paths and the last two switches opens up the top path. The middle path leads to a door, which leads back to the same room. Both the top and bottom path lead to the same door. This door leads outside the house where there are three Brick Blocks and two Boos. At the end is the Goal Pole.
Star Coins
- Star Coin 1: At the starting area, Mario has to enter the left door. Then he needs to activate the right ? Switch to make the Star Coin appear along with blue platforms leading to the Star Coin. Mario should not activate the left switch in the process as otherwise the Star Coin will be inaccessible.
- Star Coin 2: At Area 2, Mario needs to take the middle door through and activate the ? Switch at the top of the area. The Star Coin will then appear near the left wall at the bottom of the room. To collect it Mario needs to get back to the bottom and wall kick off the left wall.
- Star Coin 3: In the final room, the player needs to take the top path (for Raccoon Mario the bottom path is possible too) and look for two areas at the ceiling of the room. The player needs to activate the ? Switch in the second area which will make the Star Coin (and the secret exit) appear. The player needs to go to the previous area to get the Star Coin. All this can be done by either wall kicking, or flying as Raccoon Mario.
Secret exit
The secret exit door is located in the final room beside the ? Switch that causes the third Star Coin to appear. When activating the switch, a door will appear on the other side of the same small area. Going through the door leads to an area outside the house. A Big Boo can be seen hiding several Brick Blocks. Going past him is the Goal Pole.
This exit unlocks Template:World-link.
