Desert Ruins: Difference between revisions
No edit summary |
(Added Musical Coins sections, rearranged the sections) |
||
| Line 7: | Line 7: | ||
The Desert Ruins are a big structure located in the center of a nameless desert. It appears to be the remains of an ancient civilization. The exterior of the level is mainly composed of two big pools of quicksand, and an underground tunnel that lies beneath them. The level of quicksand changes depending on the time of the day. At night, the level is almost free of quicksand, with the only exception being a small underground puddle. During daytime, the pools are filled with quicksand to the brim, and sometimes hands made of sand try to grab Wario and pull him down when he is standing on a platform above the pools. The background of the level shows the silhouettes of tall buildings. Two of these buildings flank the level. It appears that the buildings were erected in dedication to the sun and the moon respectively. Images of the celestial bodies are a common sight in both temples. Both buildings have huge entrance doors which only open during a specific time of the day; the western temple opens at night and the eastern temple opens at day. The entrance doors can be broken, though, once Wario eats the Garlic of the [[Tower of Revival]], making both buildings accessible at any time. A balloon-like being called [[Helio (Wario Land 3)|Yellow Belly]] resides in the moon temple as well. | The Desert Ruins are a big structure located in the center of a nameless desert. It appears to be the remains of an ancient civilization. The exterior of the level is mainly composed of two big pools of quicksand, and an underground tunnel that lies beneath them. The level of quicksand changes depending on the time of the day. At night, the level is almost free of quicksand, with the only exception being a small underground puddle. During daytime, the pools are filled with quicksand to the brim, and sometimes hands made of sand try to grab Wario and pull him down when he is standing on a platform above the pools. The background of the level shows the silhouettes of tall buildings. Two of these buildings flank the level. It appears that the buildings were erected in dedication to the sun and the moon respectively. Images of the celestial bodies are a common sight in both temples. Both buildings have huge entrance doors which only open during a specific time of the day; the western temple opens at night and the eastern temple opens at day. The entrance doors can be broken, though, once Wario eats the Garlic of the [[Tower of Revival]], making both buildings accessible at any time. A balloon-like being called [[Helio (Wario Land 3)|Yellow Belly]] resides in the moon temple as well. | ||
==Treasures== | ==Treasures== | ||
| Line 48: | Line 38: | ||
The Sun Medallion, which is formed from this half and the one from [[Sea Turtle Rocks]], affects the east part of the world. When Wario first arrives there, the land is trapped in an eternal night. This also means that the [[Owl (species)|owl]]s in that area never rest. When Wario restores the Sun Medallion, the night on the east side of the world will come to an end. This allows Wario to make use of the owls and he can visit the levels on the east side at both day- and nighttime. On top of all this, Wario will be able to access new paths in [[The Colossal Hole]], [[The Frigid Sea]], and the [[Castle of Illusions]] during the daytime. | The Sun Medallion, which is formed from this half and the one from [[Sea Turtle Rocks]], affects the east part of the world. When Wario first arrives there, the land is trapped in an eternal night. This also means that the [[Owl (species)|owl]]s in that area never rest. When Wario restores the Sun Medallion, the night on the east side of the world will come to an end. This allows Wario to make use of the owls and he can visit the levels on the east side at both day- and nighttime. On top of all this, Wario will be able to access new paths in [[The Colossal Hole]], [[The Frigid Sea]], and the [[Castle of Illusions]] during the daytime. | ||
{{br|left}} | {{br|left}} | ||
==[[Musical Coin]]s== | |||
{|width=60% cellspacing=0 border=2 cellpadding=3 style="border-collapse:collapse;" | |||
|- | |||
!Location | |||
!Description | |||
|- | |||
|[[File:WL3 S DesertRuins MC1.png]] | |||
|align="center"|In the sun temple where the room to the Gray Chest is, there is a Musical Coin three levels below the entrance. The Super Smash is required to break the gate, which is required if visiting the level at night. | |||
|- | |||
|[[File:WL3 S DesertRuins MC2.png]] | |||
|align="center"|In the sun temple where the room to the Gray Chest is, the Musical Coin is at the bottom-most level. It can be accessed by breaking the block on the floor to the left of the entrance to the Gray Chest. | |||
|- | |||
|[[File:WL3 S DesertRuins MC3.png]] | |||
|align="center"|In the sun temple where the room to the Gray Chest is, the Musical Coin is at the top-most level. It can be accessed by using a [[Hammer-bot]] to trigger [[Bouncy Wario]], and then breaking the top-right block at the ceiling from where the entrance it. To the left, there is the Musical Coin and a pillar blocking it. That pillar can be broken by throwing a [[Spear-bot]] at it. | |||
|- | |||
|[[File:WL3 S DesertRuins MC4 Loc.png]] | |||
[[File:WL3 S DesertRuins MC4.png]] | |||
|align="center"|The Musical Coin is underground, which can only be reached by breaking the blocks below the entrance to the moon temple during the day (the gate to reach the entrance can be broken with a Super Smash during the day) since the quicksand prevents Wario from using a Dash Attack or a Smash Attack. The quicksand is absent at night so Wario can also break the blocks underneath the platforms to the left from the entrance. To the right below the ladder, Wario has to crawl past a narrow passageway to reach two breakable pillars, and past them is where the Musical Coin is. | |||
|- | |||
|[[File:WL3 S DesertRuins MC5.png]] | |||
|align="center"|From where the previous Musical Coin is, there are two breakable blocks to the right. The Musical Coin is past those two blocks. At night, there are breakable blocks above this Musical Coin that can be broken with a Smash Attack to reach it. | |||
|- | |||
|[[File:WL3 S DesertRuins MC6.png]] | |||
|align="center"|In the moon temple, there is an unstructured block on the floor to the right of the entrance. In the floor below, there are three pillars that can only be thrown by throwing an enemy on them. The Musical Coin is to the left of the last of the three pillars. | |||
|- | |||
|[[File:WL3 S DesertRuins MC7.png]] | |||
|align="center"|In the room where the blue key is, a Musical Coin is below the light that is second from the top. | |||
|- | |||
|[[File:WL3 S DesertRuins MC8 Loc.png]] | |||
[[File:WL3 S DesertRuins MC8.png]] | |||
|align="center"|In the room where the blue key is, there is a secret entrance that is reachable by breaking the fifth block on the floor, and then breaking the blocks towards the left. In this room, there is a Hammer-Bot that requires throwing a barrel at it to bring it down, and it is required to trigger Bouncy Wario so that Wario can reach the Musical Coin at the top-right. | |||
|} | |||
==Enemies== | |||
*[[Sand Hand]] (6), (day only) | |||
*[[Spearhead (enemy)|Spearhead]] (9) | |||
*[[Spear-bot]] (3) | |||
*[[Hammer-bot]] (7) | |||
*[[Doughnuteer]] (2) | |||
*[[Para-Goom]] (3) | |||
*[[Beam Robota]] (6) | |||
*[[Silky]] (3) | |||
*[[Kobatto]] (1) | |||
==Reaction abilities in this level== | ==Reaction abilities in this level== | ||
Revision as of 11:36, March 9, 2023
- This article is about the level in Wario Land 3. For the stadium in Mario Strikers: Battle League, see Desert Ruin.
| Level | |
|---|---|
| Desert Ruins | |

| |
| Game | Wario Land 3 |
| << Directory of levels >> | |
Desert Ruins, also known as The Western Ruins[1], is a structure found in Wario Land 3 of the Wario Land series. It serves as the first of six levels found at the west side of the music box world. Wario, in search of the five music boxes, cannot reach this place from the very beginning because a gate is blocking the hill passage on the north side. However, after Wario finds the Blue and Green Tablets in The Peaceful Village and The Vast Plain, the door disappears, opening the path to the Desert Ruins.
The Desert Ruins are a big structure located in the center of a nameless desert. It appears to be the remains of an ancient civilization. The exterior of the level is mainly composed of two big pools of quicksand, and an underground tunnel that lies beneath them. The level of quicksand changes depending on the time of the day. At night, the level is almost free of quicksand, with the only exception being a small underground puddle. During daytime, the pools are filled with quicksand to the brim, and sometimes hands made of sand try to grab Wario and pull him down when he is standing on a platform above the pools. The background of the level shows the silhouettes of tall buildings. Two of these buildings flank the level. It appears that the buildings were erected in dedication to the sun and the moon respectively. Images of the celestial bodies are a common sight in both temples. Both buildings have huge entrance doors which only open during a specific time of the day; the western temple opens at night and the eastern temple opens at day. The entrance doors can be broken, though, once Wario eats the Garlic of the Tower of Revival, making both buildings accessible at any time. A balloon-like being called Yellow Belly resides in the moon temple as well.
Treasures
Gray Chest: Top Half of Scroll

The Top Half of Scroll[2] is located in the sun temple in the Gray Chest. Wario has to access the level during daytime in order to pass the gate at the east side of the level. Inside the building, Wario has to make his way through a bunch of Spearheads in order to grab the Gray key, and then travel to the temple's basement where the Gray Chest is located.
The Scroll unfolds its power once it is complete.
Red Chest: Bottom Half of Scroll

The Bottom Half of Scroll[2] can also be found at the Desert Ruins, but this part is located in the moon temple on the other side of the level. Wario has to come here at night, so that the entrance door is not closed. Since the treasure is hidden inside the Red Chest, Wario first needs to obtain the Red Key which is guarded by Doughnuteers. He then has to make his way up to the Red Chest while avoiding Para-Gooms and Silkies. This enables Wario to complete the Ancient Document.
The Scroll is an ancient, yellowed slip of paper. It has words written on it, which apparently form a magical charm which gives its user some sort of control over the wind. After Wario has found both pieces, he puts them together and uses the charm written on it in order to calm down a cyclone on the west side of the world. With the storm having vanished, the treasure hunter is free to explore a new level: The Volcano's Base.
Green Chest: Crayon (pink)

The Crayon[3] is the treasure of the Green Chest is located in the moon temple again. Wario acquires the means to reach it after he found the Head Smash Helmet from The Frigid Sea. This opens a new path in the moon temple, where Wario can use his new item to reach the top floor of the building. There he finds the Mini Golf game, as well as a passage to the Green Key. After completing the golf course, he can travel to the Green Chest and claim the treasure.
Once the crayon has been collected, it flies to a hill on the north side of the world. A building resembling a tower can be found there, complete with a door and a sign that reads "GAME". The scene is initially monochrome, but gains another color for each crayon Wario manages to find. There are seven crayons in total hidden throughout the game, and once Wario finds all of them, he will be able to play the Mini Golf game there at every time the player desires. The pink crayon colors the bricks on the building itself.
Blue Chest: Bottom Half of Sun Medallion

The Bottom Half of Sun Medallion[4] can once again be found in the moon temple, guarded by a being called Yellow Belly. Wario needs the Super Jump Slam Overalls from the Castle of Illusions before he can smash through the block that covers the passage to the boss' chamber, though. In the basement of the moon temple, Wario finds a swarm of Kobatto which transform him into Vampire Wario. Using this form and avoiding the rays of light entering the room through numerous windows, Wario can collect the Blue Key and reach the door to Yellow Belly's chamber (provided he can find a hidden switch first). Yellow Belly will then engage Wario in battle.

The floating boss opens the battle by swooping down at Wario, trying to stab him with one of his two pointy weapons. If Wario gets stung, this will cause him to transform into Puffy Wario and float out of the battle. If this happens, the battle has to be restarted. Wario's only chance of damaging Yellow Belly is to land a well aimed Ground Pound onto the enemy's head. This will cause Yellow Belly to drop an air pump which Wario can use to inflate the enemy. Yellow Belly then repeats his earlier tactic, though his speed increases with each successful hit. After Wario manages to inflate him three times, Yellow Belly explodes and opens the way to the Blue Chest.
The Sun Medallion, which is formed from this half and the one from Sea Turtle Rocks, affects the east part of the world. When Wario first arrives there, the land is trapped in an eternal night. This also means that the owls in that area never rest. When Wario restores the Sun Medallion, the night on the east side of the world will come to an end. This allows Wario to make use of the owls and he can visit the levels on the east side at both day- and nighttime. On top of all this, Wario will be able to access new paths in The Colossal Hole, The Frigid Sea, and the Castle of Illusions during the daytime.
Musical Coins
| Location | Description |
|---|---|

|
In the sun temple where the room to the Gray Chest is, there is a Musical Coin three levels below the entrance. The Super Smash is required to break the gate, which is required if visiting the level at night. |

|
In the sun temple where the room to the Gray Chest is, the Musical Coin is at the bottom-most level. It can be accessed by breaking the block on the floor to the left of the entrance to the Gray Chest. |

|
In the sun temple where the room to the Gray Chest is, the Musical Coin is at the top-most level. It can be accessed by using a Hammer-bot to trigger Bouncy Wario, and then breaking the top-right block at the ceiling from where the entrance it. To the left, there is the Musical Coin and a pillar blocking it. That pillar can be broken by throwing a Spear-bot at it. |

|
The Musical Coin is underground, which can only be reached by breaking the blocks below the entrance to the moon temple during the day (the gate to reach the entrance can be broken with a Super Smash during the day) since the quicksand prevents Wario from using a Dash Attack or a Smash Attack. The quicksand is absent at night so Wario can also break the blocks underneath the platforms to the left from the entrance. To the right below the ladder, Wario has to crawl past a narrow passageway to reach two breakable pillars, and past them is where the Musical Coin is. |

|
From where the previous Musical Coin is, there are two breakable blocks to the right. The Musical Coin is past those two blocks. At night, there are breakable blocks above this Musical Coin that can be broken with a Smash Attack to reach it. |

|
In the moon temple, there is an unstructured block on the floor to the right of the entrance. In the floor below, there are three pillars that can only be thrown by throwing an enemy on them. The Musical Coin is to the left of the last of the three pillars. |

|
In the room where the blue key is, a Musical Coin is below the light that is second from the top. |

|
In the room where the blue key is, there is a secret entrance that is reachable by breaking the fifth block on the floor, and then breaking the blocks towards the left. In this room, there is a Hammer-Bot that requires throwing a barrel at it to bring it down, and it is required to trigger Bouncy Wario so that Wario can reach the Musical Coin at the top-right. |


Enemies
- Sand Hand (6), (day only)
- Spearhead (9)
- Spear-bot (3)
- Hammer-bot (7)
- Doughnuteer (2)
- Para-Goom (3)
- Beam Robota (6)
- Silky (3)
- Kobatto (1)
Reaction abilities in this level
- Ball o' String Wario (via Silky)
- Bouncy Wario (via Hammer-bot)
- Fat Wario (via Doughnuteer)
- Puffy Wario (via Yellow Belly)
- Vampire Wario (via Kobatto)
Gallery
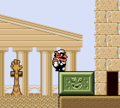
The exteriors of Desert Ruins at day.
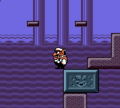
The exteriors of Desert Ruins at night.
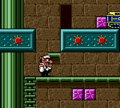
Inside one of the temples.


Names in other languages
| Language | Name | Meaning | Notes |
|---|---|---|---|
| Japanese | 砂漠の遺跡[?] Sabaku no Iseki |
Desert Ruins |
References
- ^ Nintendo Power Volume 133, page 64.
- ^ a b Brady, Matthew K., Nathan Beittenmiller, Debra McBride, and David Cassady. Game Boy Game Secrets, 2001 Edition Prima's Official Strategy Guide. Page 90.
- ^ Brady, Matthew K., Nathan Beittenmiller, Debra McBride, and David Cassady. Game Boy Game Secrets, 2001 Edition Prima's Official Strategy Guide. Page 93.
- ^ Brady, Matthew K., Nathan Beittenmiller, Debra McBride, and David Cassady. Game Boy Game Secrets, 2001 Edition Prima's Official Strategy Guide. Page 95.