Super Mario-kun Volume 7: Difference between revisions
| Line 106: | Line 106: | ||
#'''犯人はだれだ?!''' (''Who is the culprit?!''): Using Mario and Yoshi's testimonies, find which one of the enemies made Princess Peach cry. | #'''犯人はだれだ?!''' (''Who is the culprit?!''): Using Mario and Yoshi's testimonies, find which one of the enemies made Princess Peach cry. | ||
#'''カミナリ迷路''' (''Thunder maze''): Help Yoshi passing through the space between the [[Sumo Bro]]'s lightning shocks. | #'''カミナリ迷路''' (''Thunder maze''): Help Yoshi passing through the space between the [[Sumo Bro]]'s lightning shocks. | ||
#'''ヨッシーの冒険迷路''' (''Yoshi's Adventure Maze''): Collect all 4 items from the start and go to Mario. On the way back, go to Princess Peach after defeating all the enemies. (You can't go the same way back and forth) | |||
#'''スーパーアスレチック迷路''' (''Super Athletic Maze''): From the start reach the goal on the mountain, beyond the sea and over the hills. | |||
#'''迷宮城突破迷路''' (''Maze to break through the labyrinth castle''): Let's reach the goal by taking the [[Cape Feather]] that the [[Super Koopa (species)|Super Koopa]] has. | |||
<gallery> | <gallery> | ||
| Line 113: | Line 116: | ||
SMKun 7 puzzle 4.png|Who is the culprit?! | SMKun 7 puzzle 4.png|Who is the culprit?! | ||
SMKun 7 puzzle 5.png|Thunder maze | SMKun 7 puzzle 5.png|Thunder maze | ||
SMKun 7 puzzle 6.png| | SMKun 7 puzzle 6.png|Yoshi's Adventure Maze | ||
SMKun 7 puzzle 7.png| | SMKun 7 puzzle 7.png|Super Athletic Maze | ||
SMKun 7 puzzle 8.png| | SMKun 7 puzzle 8.png|Maze to break through the labyrinth castle | ||
</gallery> | </gallery> | ||
[[Category:Comics]] | [[Category:Comics]] | ||
Revision as of 16:45, December 7, 2021
This article is under construction. Therefore, please excuse its informal appearance while it is being worked on. We hope to have it completed as soon as possible.
Super Mario-kun Volume 7 is the seventh volume of the manga series. It starts the Super Mario Land 2: 6 Golden Coins story arc (which was already anticipated in the last volume's last chapter) with elements from Yoshi's Cookie. In this chapter, Mario, accompanied by Carrot and Coshie, enters the Tree Zone, Turtle Zone, Mario Zone, and Macro Zone.
The last two chapters are two original stories; the first one has elements from Super Mario World, Super Mario Kart, and Super Mario Bros. 2, while the last one is a completely original story, narrated in the style of a role-playing game.
Just like in the last two volumes, this volume contains no 4-komas.
Contents
It has been requested that this section be rewritten.
Chapters
Stage One

帰ってきたマリオ!! 打倒ワリオへGO!! (Mario is Back!! Go and Defeat Wario!!)
After saving Princess Peach from Bowser's clutches in Dinosaur Land, Mario decides to return to his home in Mario Land, the land Peach gave to him as a reward for all his (and Luigi's) heroic acts, and enjoy some well deserved rest. Flying in the Sky Pop, Mario returns to Mario Land, but he's not even landed yet that he's attacked by a tree. Then, after crashing, the entire vegetation attacks him. Mario questions himself if he got on the right island and sees the welcoming sign: it's saying "Mario Land". A Goomba appears and replace the sign with another one that's saying "Wario Land". Still shocked, Mario's childhood friend, Wario itself, way bigger and stronger than the last time Mario saw him, appears.
Wario mocks Mario and explains to him that he conquered the Mario Land, while he was busy fighting Bowser, because he is jealous of his popularity and the fact that he owns a castle. To conquer it, Wario hypnotized (almost) every inhabitant of the island to be on his side, explaining why even the vegetation attacked him. Wario shoves Mario down a cliff, but he manages to save himself with a rope, then tries to punch him, but he ends up only in hurting himself, without making Wario flinch. Wario beats him to a pulp, then leaves. Mario tries to sneakily make faces behind his back, but Wario catches him in the act and beats him again, then disappears with the Goomba, his assistant.
Mario hears someone approaching: it's a Spikey that farts on him, then rolls towards him. A pebble gets it by one of Spikey's spikes and it's launched in the air, hitting a ? Block from which a Carrot comes out. The Carrot lands on Mario and he becomes Bunny Mario, letting him dodge the incoming Spikey with a hop. Spikey rolls on a wall and Mario kicks him, defeating him. The Carrot, which can speak and grows some limbs, explains that not everyone succumbed to Wario's hypnosis, like the power-ups, which won't follow Wario's orders. She also explains that the Mario's Castle, now Wario's HQ, is locked and only the 6 Golden Coins can open it, and they are hidden in the six regions of the island. So, Mario, with his new ally, decides to go on a quest to search the 6 Golden Coins and retake back the Mario Land from Mario.
Stage Two

ツリーゾーン突入!! この木なんの木敵がいる木!? (Enter the Tree Zone!! What Kind of Tree is This!?)
With Mario's return, Wario and his fellow Goomba are testing the castle traps, but they should also spy on Mario. Goomba presents to Wario the Kyotonbo, a robot dragonfly with a hidden camera linked to their computer screen. However, the Kyotonbo gets too near to Mario, so he squashes it, making the computer screen explode on Wario and Goomba's faces.
The Tree Zone, the first region made out of a giant tree. Mario and Carrot enter the first area and, fascinated by the Tree sap walls, Mario falls in a pond of sap. Carrot tries to help him, but gets stuck herself as well. A Mōgyo drags Mario deeper and attempts to kill him, but dodging it like a toreador, Mario has the upper hand, but then the Mōgyo enlarges its horns and charges at him. Carrot finally frees herself from the sap and slaps herself on Mario, giving him Bunny Ears. With those, Mario holds the Mōgyo's horns and then breaks them, defeating it. Later, after getting stung by a Spike, Mario sits on a Noko Bombette, making it explode.
Finally out from the trunk, it's time to face the branches. The duo enters a beehive. Scared of the Bees, Mario puts an armor on, but at the first attempted sting, Mario jumps out and rushes in the middle of a nest of Bees and Uneras, knocking them out. Mario gives a sigh of relief, but is then crushed by a Būichi. Mario, angry, slams it with a swatter, then buries it in the ground. Angry, the Būichi calls a group of Skeleton Bees that stings him in the bunny ears. Mario is hurt, but realized that the stings made his swollen ears big and use those as a swatter to off all the Bees. Dragging behind him a pair of big, swollen and bulky bunny ears, Mario, and Carrot, leaves the beehive.
Stage Three

助っ人グー登場!! ねむけざましのベルが鳴る!? (Helpful Heavy Zed is Here!! The Sleepy Bell Rings!?)
Goomba has made a second Kyotonbo to spy on Mario and Carrot, who are busy fishing coins on the branches of Tree Zone. Once again, the Kyotonbo gets too near and Mario squashes it, making the Wario's screen explode on his face again.
All the coins collected are put by Mario in a sack, but when he's about to pick it up, a Battle Beetle takes it, challenging Mario to take it back. Mario punches it on the belly, but only causes him to be tickled, and drops the bag on top of the two heroes, knocking out Carrot. Mario is punched against the trunk of the Tree. The Battle Beetle attacks with another punch that Mario ends up avoiding, making it hit the tree. From a higher branch, a sleeping Heavy Zed falls on the Beetle, squashing it.
Carrot suggests then to use Heavy Zed's flying ability to reach the top and quickly looking for the Golden Coin. With some difficulty in keeping the Zed awake, Mario and Carrot reaches the top of the Tree Zone, where they see a giant and shiny bird nest. In the nest, Mario and Carrot finds Big Bird in the middle of polishing his egg. Mario realizes that the coin must be in the egg and orders him to give it to him.
Big Bird attacks, trying to swoop at them, but they easily dodge him. Big Bird then ruffles out some of his feathers, that falls on Mario, tickling him. Big Bird swoops again at him, but Heavy Zed arrives in the heroes' aid with a Bonus bell. Carrot rings it and accesses to Mario Catcher, winning a Fire Flower she passes to Mario, transforming him in Fire Mario. Mario roasts Big Bird and wins, but when he goes to check the egg, the coin isn't there, there's just a bald guy. Only then, Mario and Carrot notices a lot of many other eggs. Mario, Carrot and Heavy Zed starts checking each egg. Heavy Zed finds it with the first try, but falls asleep, so Mario and Carrot keeps checking many other eggs before noticing it.
Stage Four

お役に立ちます!? ヨッシーからの贈り物!! (Useful, You Say!? A Gift From Yoshi!!)
While heading to the Zone, Mario and Carrot come across a Flying Message Block. The block is from Yoshi and, to thank Mario for saving his country from Bowser, he has sent a bunch of delicious food from Dinosaur Land, but apart from a Yoshi Cookie, that Carrot puts away in her hair-leaves, Mario only finds a bunch of enemy based food. The duo reaches Turtle Zone entrance. The Koopa Troopa statue's head lunges at Mario, but he dodges it for some time, but in the end, Mario and Carrot are swallowed, ending up in the ocean. Immediately, they are attacked by a bunch of Cheep Cheeps and Blurps. After failing to stop them with a stamp, Mario touches Carrot, becomes Bunny Mario and defeats the fishes, then, using the ears as a propeller, the two zip away, not noticing a group of Pokos spying on them.
Continuing on their path, Mario and Carrot fall in the Pokos' trap and find themselves trapped in an Empty Blocks cage, where the Pokos force them to fight a Shark in a box match. The Shark has the upper hand, but then he hears the gong sound, but the Pokos realize it was Carrot imitating the gong. The second round starts and Mario manages to do better, but not by much, and gets beat again to a pulp. Suddenly, the water level starts lowering and Mario notices the Yoshi Cookie kept by Carrot drinking the water inside the cage, making the Shark and the Pokos flip due to water absence.
Mario kicks one of the flipping Pokos against a ? Block with a Moneybag inside. Using it a boxing glove, Mario puts the Moneybag on one of the bunny ears, and punches the Shark so hard to make a hole in the cage, letting the heroes continuing their journey with a new party member: Coshie the Yoshi Cookie.
Stage Five

沈黙の潜水艦!? バクダンマリオで一発逆転!! (The Wrecked Submarine!? Bomb Mario One-Shot Attack!!)
Goomba has prepared a third Kyotonbo to spy on Mario, but Wario had enough of exploding screens, so Goomba hires the Pokos to spy on Mario, disguised as takoyakis, but two of them (the ones having the camera) are eaten by Coshie. Through a speaker, Wario warns the rest of the Pokos to use "that" and they go into action. Mario's party reaches a sunken and shipwrecked submarine and explores it. After the team gets lost, Mario uses Coshie to chomp the walls and skip the level in a jiffy, but they are attacked by a Bill Blaster. Running away, Carrot loses sight of Mario and Coshie.
Suddenly, something is attacking the submarine and, watching on a porthole, Mario and Coshie see a Poko's submarine attacking them with poop-shaped torpedoes. One of the explosions bumps Mario and Coshie to a group of Cheep Cheeps and Unibōs. Mario asks Coshie to get rid of them, but he's knocked out. Meanwhile, Carrot has found a way out and end up in the surface, on an island with "Wario Land 2" written in coins and the W in blocks. Carrot decides to fix this and destroys the central part of the W and, through some Hidden Blocks, creates an M. This causes the shipwrecked submarine to repair himself, and dehypnotizes the enemies inside. With their help, Mario guide a counterattack to the Poko's submarine.
The fishes, now on Mario's side, attack the Pokos, but are squeezed by the submarine's tentacles. Mario then orders the Bill Blaster to shoot some torpedoes, but it has no more ammunition. Coshie, then, jumps in the save files room and hits the CLEAR Block, transforming Mario into Bomb Mario. Carrot reload Mario in the Bill Blaster and shoots him to the enemies. Bomb Mario explode, destroying the enemy submarine (and almost killing himself).
Stage Six

海底大戦争!? 失クリボーの恩返し!! (The Great Underwater War!? Rescuing the Lost Goomba!!)
Stage Seven

マリオ人形の逆襲!? カギをめぐって大騒動 !! (Mario Zone's Counterattack!? A Fuss Over the Key!!)
Stage Eight

マリオ人形に突入!! ブー兄弟をやっつけろ!! (Rushing Inside the Mario Zone!! Defeat the Three Little Pigheads!!)
Stage Nine

敵!? 味方!? ドジなどろぼうケイプ登場 !! (Enemy or Ally!? Keipu Appears!!)
Stage Ten

こんなのアリー!? アントット一家の挑戦!! (Such an Ally!? The Challenge of the Antotto Family!!)
Stage Eleven

ハナせばわかる!? ケイプ最後の大仕事!! (Can You Understand It if You Do It!? Keipu's Last Big Job!!)
Stage Twelve

ひまんじマリオ!? おせいぼダイエット作戦!! (Mario's Free Time!! Oseibo Diet Strategy!!)
Stage Thirteen

マリオとヨッシーのスター花クエスト!! (Mario and Yoshi's Star Flower Quest!!)
Puzzles
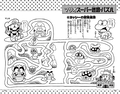
マリオスーパー迷路・パズル (Mario Super Maze: Puzzle)
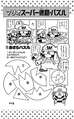
- おさらバスル (Goodbye, tray): There's only one shard you don't need. Which one of the 6 is it?
- ヨッシーのパクパク迷路 (Yoshi's chomp-chomp maze): Let's reach the goal by passing only by the enemies that Yoshi can eat.
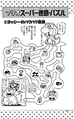
- ピーチ姫のつみきパズル (Princess Peach's block puzzle): Princess Peach made a castle with building blocks. Which set of block, from 1 through 5, has she used?
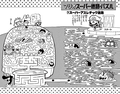
- 犯人はだれだ?! (Who is the culprit?!): Using Mario and Yoshi's testimonies, find which one of the enemies made Princess Peach cry.
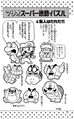
- カミナリ迷路 (Thunder maze): Help Yoshi passing through the space between the Sumo Bro's lightning shocks.
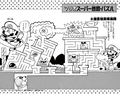
- ヨッシーの冒険迷路 (Yoshi's Adventure Maze): Collect all 4 items from the start and go to Mario. On the way back, go to Princess Peach after defeating all the enemies. (You can't go the same way back and forth)
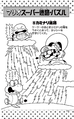
- スーパーアスレチック迷路 (Super Athletic Maze): From the start reach the goal on the mountain, beyond the sea and over the hills.
- 迷宮城突破迷路 (Maze to break through the labyrinth castle): Let's reach the goal by taking the Cape Feather that the Super Koopa has.
Goodbye, tray
Yoshi's chomp-chomp maze

Princess Peach's block puzzle
Who is the culprit?!
Thunder maze
Yoshi's Adventure Maze
Super Athletic Maze
Maze to break through the labyrinth castle


