Tap-Tap The Red Nose's Fort: Difference between revisions
No edit summary |
m (Text replacement - "(\| *)Jap([RMCN\d]* *=)" to "$1Jpn$2") |
||
| (18 intermediate revisions by 7 users not shown) | |||
| Line 4: | Line 4: | ||
|code=6-4 | |code=6-4 | ||
|game=''[[Super Mario World 2: Yoshi's Island]]'', ''[[Yoshi's Island: Super Mario Advance 3]]'' | |game=''[[Super Mario World 2: Yoshi's Island]]'', ''[[Yoshi's Island: Super Mario Advance 3]]'' | ||
|boss=[[Tap-Tap the Red Nose]] | |||
|before=[[Beware The Spinning Logs|<<]] | |before=[[Beware The Spinning Logs|<<]] | ||
|after=[[The Very Loooooong Cave|>>]] | |after=[[The Very Loooooong Cave|>>]] | ||
|track=Castle & Fortress | |||
|sample=[[File:SMW2YI Castle and Fortress.oga]] | |||
}} | }} | ||
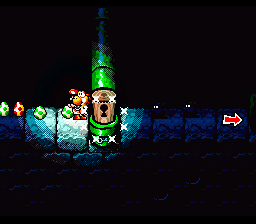
[[File:TTTRNF.png|frame|left||200px|[[Yoshi (species)|Yellow Yoshi]] opening the locked cork [[Warp Pipe|pipe]]. The cork is about to pop out of the pipe and fly off.]] | [[File:TTTRNF.png|frame|left||200px|[[Yoshi (species)|Yellow Yoshi]] opening the locked cork [[Warp Pipe|pipe]]. The cork is about to pop out of the pipe and fly off.]] | ||
'''Tap-Tap The Red Nose's Fort''' is the sixth and final mini-boss | '''Tap-Tap The Red Nose's Fort''' is the sixth and final mini-[[boss]] [[fort]] in ''[[Super Mario World 2: Yoshi's Island]]'' and ''[[Yoshi's Island: Super Mario Advance 3]]''. This [[level]]'s playable [[Yoshi (species)|Yoshi]] is the Yellow Yoshi. | ||
{{br|left}} | {{br|left}} | ||
==Layout== | ==Layout== | ||
The majority of the course consists of finding a [[key]] through a [[Warp Pipe]] maze, as the pipe to the way out is locked (actually, stuffed with a [[cork]]). Upon entering the maze, | The majority of the course consists of finding a [[key]] through a [[Warp Pipe]] maze, as the pipe to the way out is locked (actually, stuffed with a [[cork]]). Upon entering the maze, Yellow Yoshi exits the sewers through a [[Warp Pipe]] on the ground floor. | ||
The key turns out to be guarded by a [[Slime]] on the lower first floor of the maze on the left side. Once Yoshi defeats the Slime (which requires all of his [[Yoshi's Egg|egg]]s), he can take the key | The key turns out to be guarded by a [[Slime]] on the lower first floor of the maze on the left side. Once Yellow Yoshi defeats the Slime (which requires all of his [[Yoshi's Egg|egg]]s), he can take the key travel back up to the pipe, and venture on. | ||
Yoshi will then find himself on two obstacle courses over [[lava]], which he must cross using first a wheel of spinning platforms, then a small log. Finally after the final [[Checkpoint Ring|Middle Ring]], Yellow Yoshi enters the Warp Pipe to the battle of the fort. | Yellow Yoshi will then find himself on two obstacle courses over [[lava]], which he must cross using first a wheel of spinning platforms, then a small log. Finally, after the final [[Checkpoint Ring|Middle Ring]], Yellow Yoshi enters the Warp Pipe to the battle of the fort. | ||
[[Kamek]] will scream at Yellow Yoshi for making so much progress and "resize" a [[Tap-Tap]]. | [[Kamek]] will scream at Yellow Yoshi for making so much progress and "resize" a [[Tap-Tap]]. | ||
While [[Tap-Tap the Red Nose]] is jumping around the arena, Yoshi will notice that the bridge over the lava is made of unstable blocks. He then pelts them with Yoshi eggs until a gap appears. Yoshi waits for Red Nose to jump at him, only to fall into the gap in the bridge. Yoshi then progresses onto the last four levels of the game. | While [[Tap-Tap the Red Nose]] is jumping around the arena, Yellow Yoshi will notice that the bridge over the lava is made of unstable blocks. He then pelts them with Yellow Yoshi eggs until a gap appears. Yellow Yoshi waits for Red Nose to jump at him, only to fall into the gap in the bridge. Yoshi then progresses onto the last four levels of the game. | ||
{{br|left}} | {{br|left}} | ||
==Enemies== | ==Enemies== | ||
<gallery> | |||
Boo Guy SMW2YI sprite.png|[[Boo Guy]] | |||
SMW2 Big and Little Boos.png|[[Big Boo]] with [[Boo|Boo Buddies]] | |||
SMW2YI - Lava Bubble.png|[[Lava Bubble]] (vertical) | |||
Lava Drop.png|[[Lava Drop]] (vertical) | |||
SMW2 Lava Drop horizontal.png|Lava Drop (horizontal) | |||
SMW2YI - Fire Bar.png|[[Fire Bar|Fire-Bar]] (single) | |||
SMW2 Fire-Bar double.png|Fire-Bar (double) | |||
SMW2 Piranha Plant.png|[[Piranha Plant|Wild Piranha]] | |||
SMW2 Thorn.png|[[Thorn]] | |||
SMW2YI - Slime.png|[[Slime]] | |||
SMW2YI Orange Tap-Tap sprite.png|[[Tap-Tap]] (orange) | |||
Little Mouser.PNG|[[Little Mouser]] | |||
SMW2 Hopping Tap-Tap.png|[[Tap-Tap|Hopping Tap-Tap]] | |||
Jean De fillet.png|[[Jean de Fillet]] | |||
SMW2YI - Tap-Tap the Red Nose.png|[[Tap-Tap the Red Nose]] (boss) | |||
</gallery> | |||
==Gallery== | ==Gallery== | ||
<gallery> | <gallery> | ||
Icon SMW2-YI - Tap-Tap The Red Nose's Fort.png|Level icon from ''Super Mario World 2: Yoshi's Island'' | Icon SMW2-YI - Tap-Tap The Red Nose's Fort.png|Level icon from ''Super Mario World 2: Yoshi's Island'' | ||
SMA3-TapTapTheRedNosesFort-Icon.png|Level icon from ''Yoshi's Island: Super Mario Advance 3'' | |||
SMA3-TapTapTheRedNosesFortMap.png|Icon from World 6 map from ''Yoshi's Island: Super Mario Advance 3'' | |||
</gallery> | </gallery> | ||
==Names in other languages== | ==Names in other languages== | ||
{{foreign names | {{foreign names | ||
| | |Jpn=ビッグカチカチの とりで | ||
| | |JpnR=Biggu Kachikachi no Toride | ||
| | |JpnM=Big Tap-Tap's Fortress | ||
|Chi=大咔咔堡垒 | |Chi=大咔咔堡垒 | ||
|ChiR=Dà Kākā bǎolěi | |ChiR=Dà Kākā bǎolěi | ||
| Line 54: | Line 65: | ||
|Ita=La fortezza del Grande Piombospino | |Ita=La fortezza del Grande Piombospino | ||
|ItaM=The fortress of the Big Tap-Tap | |ItaM=The fortress of the Big Tap-Tap | ||
| | |Fre=Antre du Gros Bobo. | ||
| | |FreM=Den of the Big Tap-Tap. | ||
}} | }} | ||
==Trivia== | ==Trivia== | ||
*If Yoshi does a Ground Pound on the cork that requires a key to remove, the cork will get further pressed down. | *If Yellow Yoshi does a Ground Pound on the cork that requires a key to remove, the cork will get further pressed down. | ||
*This is the only level in the game to have a boss, but no boss door. | *This is the only level in the game to have a boss, but no boss door. Instead, the boss room is accessed through a [[pipe]]. | ||
{{ | {{YI levels}} | ||
[[Category:Fortresses]] | [[Category:Fortresses]] | ||
[[Category:Haunted areas]] | |||
[[Category:Volcanic areas]] | [[Category:Volcanic areas]] | ||
[[Category:Super Mario World 2: Yoshi's Island levels]] | [[Category:Super Mario World 2: Yoshi's Island levels]] | ||
[[Category:Yoshi's Island: Super Mario Advance 3 levels]] | [[Category:Yoshi's Island: Super Mario Advance 3 levels]] | ||
Latest revision as of 17:03, January 7, 2025
| Level | |||
|---|---|---|---|
| Tap-Tap The Red Nose's Fort | |||

| |||
| Level code | 6-4 | ||
| Game | Super Mario World 2: Yoshi's Island, Yoshi's Island: Super Mario Advance 3 | ||
| Boss | Tap-Tap the Red Nose | ||
| Music track | Castle & Fortress | ||
| |||
| << Directory of levels >> | |||

Tap-Tap The Red Nose's Fort is the sixth and final mini-boss fort in Super Mario World 2: Yoshi's Island and Yoshi's Island: Super Mario Advance 3. This level's playable Yoshi is the Yellow Yoshi.
Layout[edit]
The majority of the course consists of finding a key through a Warp Pipe maze, as the pipe to the way out is locked (actually, stuffed with a cork). Upon entering the maze, Yellow Yoshi exits the sewers through a Warp Pipe on the ground floor.
The key turns out to be guarded by a Slime on the lower first floor of the maze on the left side. Once Yellow Yoshi defeats the Slime (which requires all of his eggs), he can take the key travel back up to the pipe, and venture on.
Yellow Yoshi will then find himself on two obstacle courses over lava, which he must cross using first a wheel of spinning platforms, then a small log. Finally, after the final Middle Ring, Yellow Yoshi enters the Warp Pipe to the battle of the fort.
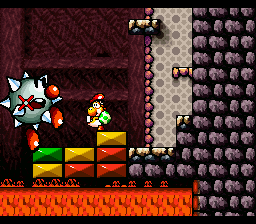
Kamek will scream at Yellow Yoshi for making so much progress and "resize" a Tap-Tap.
While Tap-Tap the Red Nose is jumping around the arena, Yellow Yoshi will notice that the bridge over the lava is made of unstable blocks. He then pelts them with Yellow Yoshi eggs until a gap appears. Yellow Yoshi waits for Red Nose to jump at him, only to fall into the gap in the bridge. Yoshi then progresses onto the last four levels of the game.
Enemies[edit]
Big Boo with Boo Buddies
Lava Bubble (vertical)
Lava Drop (vertical)
Fire-Bar (single)
Tap-Tap (orange)
Tap-Tap the Red Nose (boss)
Gallery[edit]
Names in other languages[edit]
| Language | Name | Meaning | Notes |
|---|---|---|---|
| Japanese | ビッグカチカチの とりで[?] Biggu Kachikachi no Toride |
Big Tap-Tap's Fortress | |
| Chinese | 大咔咔堡垒[?] Dà Kākā bǎolěi |
Tap-Tap the Red Nose fort | |
| French | Antre du Gros Bobo.[?] | Den of the Big Tap-Tap. | |
| German | Stegos Festung[?] | Tap-Tap the Red Nose' Fortress | |
| Italian | La fortezza del Grande Piombospino[?] | The fortress of the Big Tap-Tap | |
| Spanish | Fortaleza de Metalón[?] | Tap-Tap the Red Nose's Fortress |
Trivia[edit]
- If Yellow Yoshi does a Ground Pound on the cork that requires a key to remove, the cork will get further pressed down.
- This is the only level in the game to have a boss, but no boss door. Instead, the boss room is accessed through a pipe.


