Diamond Island (Paper Mario: The Origami King): Difference between revisions
m (Text replacement - "{{[Pp]MTOKLevelbox" to "{{PMTOK location infobox") |
Technetium (talk | contribs) No edit summary Tag: Mobile edit |
||
| (6 intermediate revisions by 5 users not shown) | |||
| Line 1: | Line 1: | ||
{{ | {{italic title|id=y}} | ||
{{PMTOK location infobox | {{PMTOK location infobox | ||
|image=PMTOK Diamond Island inside.jpg | |image=PMTOK Diamond Island inside.jpg | ||
| Line 26: | Line 26: | ||
Inside the red temple, featuring the [[Trial of Power]], Mario must speak to the statue in back and step into the glowing circle to begin. This warps him to a separate area with a similar build. To clear the first stage, Mario must strike all of the [[Brick Block]]s that appear in the allotted time. The blocks get bigger and end with one giant block Mario must strike multiple times. Just as in the last stage, numerous Brick Blocks appear and must be destroyed, this time with Mario's hammer. However, rather than being able to simply hammer the blocks to destroy them, Mario must build up an attack as he would in battle, breaking all blocks within a radius. The third and final stage features a giant nail, requiring Mario to get onto it and use a series of jump and hammer attacks to drill in the nail within one minute. If Mario successfully does so, he clears the Trial of Power and is awarded a Power Orb. | Inside the red temple, featuring the [[Trial of Power]], Mario must speak to the statue in back and step into the glowing circle to begin. This warps him to a separate area with a similar build. To clear the first stage, Mario must strike all of the [[Brick Block]]s that appear in the allotted time. The blocks get bigger and end with one giant block Mario must strike multiple times. Just as in the last stage, numerous Brick Blocks appear and must be destroyed, this time with Mario's hammer. However, rather than being able to simply hammer the blocks to destroy them, Mario must build up an attack as he would in battle, breaking all blocks within a radius. The third and final stage features a giant nail, requiring Mario to get onto it and use a series of jump and hammer attacks to drill in the nail within one minute. If Mario successfully does so, he clears the Trial of Power and is awarded a Power Orb. | ||
The first room of the blue temple has a very similar setup, featuring the [[Trial of Wisdom]] and a glowing circle Mario must stand in to warp to the first challenge. The Trial of Wisdom features questions, including the player's knowledge of events in the game. The first room is a true/false challenge, asking a simple question the player must answer by standing on the check mark tray for true and the "X" tray for false. After Mario has confirmed his answer, he is launched into the next room. If he has answered correctly, he is able to warp to the next room, featuring a slightly more difficult true/false question. Although the first two questions are random, the third and final question is a riddle. Mario is required to speak to each of the three statues in the room and determine which one is lying by answering "A", "B", or "C". If Mario answers correctly, he clears the Trial of Wisdom and is awarded a Wisdom Orb. | The first room of the blue temple has a very similar setup, featuring the [[Trial of Wisdom]] and a glowing circle Mario must stand in to warp to the first challenge. The Trial of Wisdom features questions, including the player's knowledge of events in the game. The first room is a true/false challenge, asking a simple question the player must answer by standing on the check mark tray for true and the "X" tray for false. After Mario has confirmed his answer, he is launched into the next room. If he has answered correctly, he is able to warp to the next room, featuring a slightly more difficult true/false question. Although the first two questions are random, the third and final question is a riddle. Mario is required to speak to each of the three statues in the room and determine which one is lying or telling the truth by answering "A", "B", or "C". If Mario answers correctly, he clears the Trial of Wisdom and is awarded a Wisdom Orb. | ||
The green temple, featuring the [[Trial of Courage]], also requires Mario to warp to a starting room to begin. Mario is tasked with holding and releasing a rope, then grabbing it again in time. If Mario is not quick enough, he is crushed by a basin and forced to restart the challenges of courage. However, Mario also cannot grab the rope before the basin falls below the arrow - that is also a fail, and Mario is forced to restart. The second stage has a similar setup, aside from a noticeably smaller rope. The third and final stage has a much longer rope, although instead of a falling basin, the object is now a [[ | The green temple, featuring the [[Trial of Courage]], also requires Mario to warp to a starting room to begin. Mario is tasked with holding and releasing a rope, then grabbing it again in time. If Mario is not quick enough, he is crushed by a basin and forced to restart the challenges of courage. However, Mario also cannot grab the rope before the basin falls below the arrow - that is also a fail, and Mario is forced to restart. The second stage has a similar setup, aside from a noticeably smaller rope. The third and final stage has a much longer rope, although instead of a falling basin, the object is now a [[Thwomp]] which falls rapidly, requiring the player to have extraordinary reflexes. After Mario clears all three stages, he is awarded a Courage Orb. | ||
It should be noted that if a player is struggling with a certain set of trials (having failed more than two times), easier challenges are offered in exchange for 3,000 [[coin]]s. | It should be noted that if a player is struggling with a certain set of trials (having failed more than two times), easier challenges are offered in exchange for 3,000 [[coin]]s. | ||
| Line 53: | Line 53: | ||
==Names in other languages== | ==Names in other languages== | ||
{{foreign names | {{foreign names | ||
|Jap=ダイヤ | |Jap=ダイヤ{{hover|島|じま}} | ||
|JapR=Daiya-jima | |JapR=Daiya-jima | ||
|JapM=Diamond Island | |JapM=Diamond Island | ||
|Spa=Isla Diamante | |Spa=Isla Diamante | ||
|SpaM=Diamond Island | |SpaM=Diamond Island | ||
| | |Fre=Île du carreau | ||
| | |FreM=Diamond Island | ||
|Ger=Karo-Insel | |Ger=Karo-Insel | ||
|GerM=Diamond Island | |GerM=Diamond Island | ||
| Line 72: | Line 72: | ||
|ChiTR=Fāngkuài Dǎo | |ChiTR=Fāngkuài Dǎo | ||
|ChiTM=Diamond Island | |ChiTM=Diamond Island | ||
|Kor=다이아몬드 섬 | |||
|KorR=Daiamondeu Seom | |||
|KorM=Diamond Island | |||
}} | }} | ||
Latest revision as of 13:23, December 23, 2024
| Diamond Island | |
|---|---|
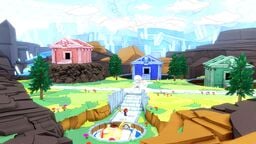
 Mario and Olivia inside Diamond Island |
- “I've seen things you wouldn't believe...but a huge diamond on the sea floor? That's new to me.”
- —Captain T. Ode, Paper Mario: The Origami King
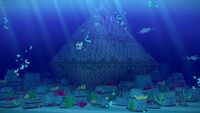
Diamond Island is one of 11 accessible islands in the Great Sea in Paper Mario: The Origami King. It is charted in territory D-3 with a diamond icon. Unlike the other ten islands, all of which are found on the surface, Diamond Island is completely sunk in the sea, found midpoint between Club Island, Full Moon Island, Heart Island, and Spade Island. Mario, Olivia, and Captain T. Ode must dive down at that particular spot to find a large diamond underwater and use the Diamond Key acquired from Luigi on Mushroom Island to enter the "island". There are absolutely no Toads to be rescued, Not-Bottomless Holes to be filled, Collectible Treasures to be found, or ? Blocks to be struck here. However, Mario is required to complete the three trials on this island to obtain an orb from clearing each trial in order to advance in his quest to clear the purple streamer.
Layout[edit]
After getting into the island dome, Olivia notes its colorful features, with Captain T. Ode speaking of a hidden jewel beneath the waves. Unlike the other islands, Captain T. Ode does not give it a name based on its shape, although he does refer to it as rare as a diamond. Suddenly, a Toad statue in the middle of the area lights up, welcoming them and introducing the trials of power, wisdom, and courage, each rewarding an orb upon completion. These orbs are used to enter the Sea Tower.
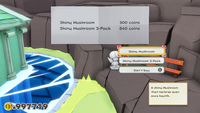
Off to the right, away from the trials, there is a bench nearby Mario can use to restore his HP. Additionally, there is a Toad statue next to the bench Mario can purchase Mushrooms from. Off to the left of the trials is a Save Block and a path to Ice Vellumental Mountain.
There are three temples in total. The red, blue, and green serve the trials of power, wisdom, and courage, respectively. The temples can be visited in any order, but each have a Magic Circle requiring the power of a different Vellumental to access. Mario must use the Earth Vellumental to lower the dirt mound holding up the red temple, the Ice Vellumental to freeze the water surrounding the blue temple, and both the Water Vellumental and Ice Vellumental to create a pool of water around the green temple and freeze it, respectively. Mario must have obtained a bibliofold for the Ice Vellumental in order to access the latter two temples.
Inside the red temple, featuring the Trial of Power, Mario must speak to the statue in back and step into the glowing circle to begin. This warps him to a separate area with a similar build. To clear the first stage, Mario must strike all of the Brick Blocks that appear in the allotted time. The blocks get bigger and end with one giant block Mario must strike multiple times. Just as in the last stage, numerous Brick Blocks appear and must be destroyed, this time with Mario's hammer. However, rather than being able to simply hammer the blocks to destroy them, Mario must build up an attack as he would in battle, breaking all blocks within a radius. The third and final stage features a giant nail, requiring Mario to get onto it and use a series of jump and hammer attacks to drill in the nail within one minute. If Mario successfully does so, he clears the Trial of Power and is awarded a Power Orb.
The first room of the blue temple has a very similar setup, featuring the Trial of Wisdom and a glowing circle Mario must stand in to warp to the first challenge. The Trial of Wisdom features questions, including the player's knowledge of events in the game. The first room is a true/false challenge, asking a simple question the player must answer by standing on the check mark tray for true and the "X" tray for false. After Mario has confirmed his answer, he is launched into the next room. If he has answered correctly, he is able to warp to the next room, featuring a slightly more difficult true/false question. Although the first two questions are random, the third and final question is a riddle. Mario is required to speak to each of the three statues in the room and determine which one is lying or telling the truth by answering "A", "B", or "C". If Mario answers correctly, he clears the Trial of Wisdom and is awarded a Wisdom Orb.
The green temple, featuring the Trial of Courage, also requires Mario to warp to a starting room to begin. Mario is tasked with holding and releasing a rope, then grabbing it again in time. If Mario is not quick enough, he is crushed by a basin and forced to restart the challenges of courage. However, Mario also cannot grab the rope before the basin falls below the arrow - that is also a fail, and Mario is forced to restart. The second stage has a similar setup, aside from a noticeably smaller rope. The third and final stage has a much longer rope, although instead of a falling basin, the object is now a Thwomp which falls rapidly, requiring the player to have extraordinary reflexes. After Mario clears all three stages, he is awarded a Courage Orb.
It should be noted that if a player is struggling with a certain set of trials (having failed more than two times), easier challenges are offered in exchange for 3,000 coins.
Shop[edit]
Two items can be purchased from the Toad statue on the east side of the area, next to the bench.
| Image | Item | Price |
|---|---|---|
| Shiny Mushroom | 300 | |
| Shiny Mushroom 3-Pack | 840 |
Profile[edit]
- Collectible Treasure No. 93: "An "island" slumbering beneath the Great Sea. Legendary structures await those who can find their way inside."
Names in other languages[edit]
| Language | Name | Meaning | Notes |
|---|---|---|---|
| Japanese | ダイヤ島[?] Daiya-jima |
Diamond Island | |
| Chinese (simplified) | 方块岛[?] Fāngkuài Dǎo |
Diamond Island | |
| Chinese (traditional) | 方塊島[?] Fāngkuài Dǎo |
Diamond Island | |
| Dutch | Ruiteneiland[?] | Diamond Island | |
| French | Île du carreau[?] | Diamond Island | |
| German | Karo-Insel[?] | Diamond Island | |
| Italian | Isola Quadro[?] | Diamond Island | |
| Korean | 다이아몬드 섬[?] Daiamondeu Seom |
Diamond Island | |
| Spanish | Isla Diamante[?] | Diamond Island |

