Butter Bridge 2: Difference between revisions
Waluigi Time (talk | contribs) No edit summary |
|||
| (14 intermediate revisions by 11 users not shown) | |||
| Line 1: | Line 1: | ||
{{ | {{level infobox | ||
|image=[[File:Butter Bridge 2.png|256px]]<br>Mario flying on the bridge | |||
|image=[[File:Butter Bridge 2.png|256px]] | |||
Mario flying on the bridge | |||
|code=4-4 | |code=4-4 | ||
|game=''[[Super Mario World]]'' | |game=''[[Super Mario World]]'' | ||
|world=[[Twin Bridges]] | |||
|limit=300 seconds | |||
|before=[[Butter Bridge 1|<<]] | |before=[[Butter Bridge 1|<<]] | ||
|after=[[4 Ludwig's Castle|>>]] | |after=[[4 Ludwig's Castle|>>]] | ||
|track=[[Ground Theme (Super Mario World)|Ground Theme]] | |||
|sample=[[File:Overworld Theme Super Mario World.oga]] | |||
}} | }} | ||
'''Butter Bridge 2''', which makes up part of the [[Twin Bridges]] area, is the second level of the Butter Bridge in ''[[Super Mario World]]''. It can be accessed through completing [[Butter Bridge 1]]. By completing this level, the player gains access to [[4 Ludwig's Castle|#4 Ludwig's Castle]]. | '''Butter Bridge 2''', which makes up part of the [[Twin Bridges]] area, is the second level of the Butter Bridge in ''[[Super Mario World]]''. It can be accessed through completing [[Butter Bridge 1]]. By completing this level, the player gains access to [[4 Ludwig's Castle|#4 Ludwig's Castle]]. | ||
==Layout== | |||
== | [[File:Twin Bridges.png|thumb|left|Screenshot from ''Super Mario World'']] | ||
[[File:Twin Bridges.png|thumb|left]] | The player has 300 seconds on the [[Time Limit|Timer]]. In this level, there are many [[Super Koopa (enemy)|Super Koopa]]s and some [[Unshelled Koopa Troopa|unshelled Koopa]]s. | ||
The player has 300 seconds on the [[Time Limit|Timer]]. In this level, there are many [[Super Koopa (enemy)|Super Koopa]]s and some [[ | |||
Most of the level, including the start, takes place on a very long bridge. As [[Mario]] walks across it, Super Koopas fly at him. Then, after jumping over a couple of gaps, he finds a [[Koopa Shell]] and a [[? Block]]. He can throw the shell up at it to get the item, or jump on the heads of the enemies. Then, he travels across a part of the bridge with many gaps differently-spaced apart, while Super Koopas fly at him again. There is a [[Dragon Coin]] here. | Most of the level, including the start, takes place on a very long bridge. As [[Mario]] walks across it, Super Koopas fly at him. Then, after jumping over a couple of gaps, he finds a [[Koopa Shell]] and a [[? Block]]. He can throw the shell up at it to get the item, or jump on the heads of the enemies. Then, he travels across a part of the bridge with many gaps differently-spaced apart, while Super Koopas fly at him again. There is a [[Dragon Coin]] here. | ||
| Line 24: | Line 25: | ||
==Enemies== | ==Enemies== | ||
{|class=wikitable style="text-align:center" | |||
!Sprite | |||
[[File: | !Name | ||
!Count | |||
|- | |||
|[[File:SuperKoopaFlashingL.gif]] | |||
|[[Super Koopa (enemy)|Super Koopa]] (flashing) | |||
|2 | |||
|- | |||
|[[File:SuperKoopaBlueL.gif]] | |||
|Super Koopa (blue) | |||
|1 | |||
|- | |||
|[[File:SMW SuperKoopa Red.png]] | |||
|Super Koopa (red) | |||
|32 | |||
|- | |||
|[[File:SMW SuperKoopa Green.png]] | |||
|Super Koopa (green) | |||
|infinite | |||
|- | |||
|[[File:SMW KoopaTroopaNoShell Green.png]] | |||
|[[Unshelled Koopa Troopa|Unshelled Koopa]] (green) | |||
|1 | |||
|- | |||
|[[File:SMW KoopaTroopaNoShell Red.png]] | |||
|Unshelled Koopa (red) | |||
|3 | |||
|- | |||
|[[File:SMW KoopaTroopaNoShell Blue.png]] | |||
|Unshelled Koopa (blue) | |||
|7 | |||
|} | |||
==Map== | |||
{{wide image|Butterbridge2map.png|1500}} | |||
==Names in other languages== | ==Names in other languages== | ||
{{foreign names | {{foreign names | ||
| | |Jpn=バターブリッジ コース2 | ||
| | |JpnR=Batā Burijji Kōsu 2 | ||
| | |JpnM=Butter Bridge Course 2 | ||
| | |SpaE=Puente de Crema 2 | ||
| | |SpaEM=Cream Bridge 2 | ||
|Fre=Pont de Beurre 2 | |Fre=Pont de Beurre 2 | ||
|FreM=Butter Bridge 2 | |FreM=Butter Bridge 2 | ||
| Line 42: | Line 76: | ||
|ItaM=Butter Bridge 2 | |ItaM=Butter Bridge 2 | ||
}} | }} | ||
{{SMW levels}} | |||
{{SMW | [[Category:Sky areas]] | ||
[[Category: | |||
[[Category:Bridges]] | [[Category:Bridges]] | ||
[[Category:Super Mario World | [[Category:Super Mario World levels]] | ||
Latest revision as of 17:20, January 12, 2025
| Level | |||
|---|---|---|---|
| Butter Bridge 2 | |||
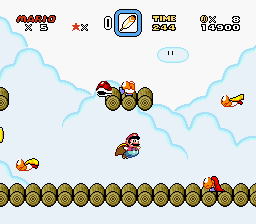
 Mario flying on the bridge | |||
| Level code | 4-4 | ||
| World | Twin Bridges | ||
| Game | Super Mario World | ||
| Time limit | 300 seconds | ||
| Music track | Ground Theme | ||
| |||
| << Directory of levels >> | |||
Butter Bridge 2, which makes up part of the Twin Bridges area, is the second level of the Butter Bridge in Super Mario World. It can be accessed through completing Butter Bridge 1. By completing this level, the player gains access to #4 Ludwig's Castle.
Layout[edit]
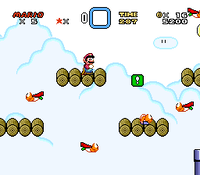
The player has 300 seconds on the Timer. In this level, there are many Super Koopas and some unshelled Koopas.
Most of the level, including the start, takes place on a very long bridge. As Mario walks across it, Super Koopas fly at him. Then, after jumping over a couple of gaps, he finds a Koopa Shell and a ? Block. He can throw the shell up at it to get the item, or jump on the heads of the enemies. Then, he travels across a part of the bridge with many gaps differently-spaced apart, while Super Koopas fly at him again. There is a Dragon Coin here.
Then, Mario travels along a long bridge without any gaps, but the shell-less Koopas kick their shells at him from higher bridges. After three of these, two will do this at once, and Mario has to jump on the Super Koopas' heads to get up to them. There is another Dragon Coin there. Next, after a simple, normal bridge, he gets to the Midway Gate. After this, there are a few bridges at different heights, and a Green ! Block, as well as a blue Warp Pipe. The next part is the same, along with the pipe, but four Super Koopas fly at Mario at the end. There is a ? Block on the floor here, which contains Yoshi.
After this, there are a few more bridges and Super Koopas, plus a green Warp Pipe, before a long bridge, where many Super Koopas, in groups of two, fly at Mario, from both in front and behind. Then, finally, after another section of many bridges and Super Koopas, Mario reaches the Giant Gate.
Placed high at the start of the level is a cloud platform that can be accessed only if Mario is Caped Mario and runs on the first bridge and then makes a jump. This platform contains several coins and a Dragon Coin.
Enemies[edit]
| Sprite | Name | Count |
|---|---|---|
| Super Koopa (flashing) | 2 | |
| Super Koopa (blue) | 1 | |
| Super Koopa (red) | 32 | |
| Super Koopa (green) | infinite | |
| Unshelled Koopa (green) | 1 | |
| Unshelled Koopa (red) | 3 | |
| Unshelled Koopa (blue) | 7 |
Map[edit]
Names in other languages[edit]
| Language | Name | Meaning | Notes |
|---|---|---|---|
| Japanese | バターブリッジ コース2[?] Batā Burijji Kōsu 2 |
Butter Bridge Course 2 | |
| French | Pont de Beurre 2[?] | Butter Bridge 2 | |
| German | Butterbrücke 2[?] | Butter Bridge 2 | |
| Italian | Ponte di Burro 2[?] | Butter Bridge 2 | |
| Spanish (NOE) | Puente de Crema 2[?] | Cream Bridge 2 |

