KEEP MOVING!!!!: Difference between revisions
FanOfYoshi (talk | contribs) m (Per proposal.) |
m (Text replacement - "(\| *)Jap([RMCN\d]* *=)" to "$1Jpn$2") |
||
| (34 intermediate revisions by 15 users not shown) | |||
| Line 1: | Line 1: | ||
{{ | {{level infobox | ||
|image=[[File:KeepMoving!!!!.png]] | |image=[[File:KeepMoving!!!!.png]] | ||
|code=6-7 | |code=6-7 | ||
| Line 5: | Line 5: | ||
|before=[[The Deep, Underground Maze|<<]] | |before=[[The Deep, Underground Maze|<<]] | ||
|after=[[King Bowser's Castle (Super Mario World 2: Yoshi's Island)|>>]] | |after=[[King Bowser's Castle (Super Mario World 2: Yoshi's Island)|>>]] | ||
|track=Castle & Fortress | |||
|sample=[[File:SMW2YI Castle and Fortress.oga]] | |||
}} | }} | ||
'''KEEP MOVING!!!!''' is the seventh level in World 6 of ''[[Super Mario World 2: Yoshi's Island]]'' and ''[[Yoshi's Island: Super Mario Advance 3]]''. | '''KEEP MOVING!!!!''' is the seventh level in [[World 6 (Super Mario World 2: Yoshi's Island)|World 6]] of ''[[Super Mario World 2: Yoshi's Island]]'' and ''[[Yoshi's Island: Super Mario Advance 3]]''. This level's playable [[Yoshi (species)|Yoshi]] is the Red Yoshi. | ||
This level uses the fort/castle background music, despite not being a fort/castle level. It is the only main level in the game to do this and is one of two levels (excluding the secret levels from ''Yoshi's Island: Super Mario Advance 3'') with this distinction, the other being the extra level [[Poochy Ain't Stupid]]. However, the last part of the level appears to be in front of a castle, likely to introduce the next level, [[King Bowser's Castle (Super Mario World 2: Yoshi's Island)|King Bowser's Castle]]. The background used in the second scene of this level alludes to {{wp|Vincent van Gogh}}'s ''{{wp|The Starry Night}}''. | |||
==Layout== | ==Layout== | ||
Hence its namesake, the player has to keep moving in this level. At the beginning of the level, | Hence its namesake, the player has to keep moving in this level. At the beginning of the level, Red Yoshi will find many [[Countdown Platform]]s, and then after going along them a bit, a [[Big Chain Chomp|Shark Chomp]] will start chasing the player. Soon after, the player will need to ride a spinning platform to get to some [[Flatbed Ferry|Flatbed Ferries]] over [[Spike Trap|spikes]], where Red Yoshi will encounter another Shark Chomp. Then the player will need to ride another Flatbed Ferry, then cross a lot of spikes on Countdown Platforms. | ||
The player will then need to cross a bridge over a long gap. At the end of the gap they will be on a large stone area, but then go onto another bridge, which leads to a Flatbed Ferry. The player will continue to go through a winding area full of many Flatbed Ferries. Eventually the player will get to an area with some steps heading up into the next area. After that there will be a castle arena filled with great number of [[Bandit]]s. After that area the player will need to cross some [[ | The player will then need to cross a bridge over a long gap. At the end of the gap they will be on a large stone area, but then go onto another bridge, which leads to a Flatbed Ferry. The player will continue to go through a winding area full of many Flatbed Ferries. Eventually, the player will get to an area with some steps heading up into the next area. After that, there will be a castle arena filled with a great number of [[Bandit]]s. After that area, the player will need to cross some [[thorn]]s; after that, the player will go up some steps where they will encounter even more Bandits. Not long after, the level will be completed after going down a [[Warp Pipe]]. | ||
==Enemies== | |||
<gallery> | |||
SMW2 Chomp Shark.png|[[Big Chain Chomp|Shark Chomp]] | |||
SMW2 Fly Guy.png|[[Fly Guy]] | |||
Lava Drop.png|[[Lava Drop]] (vertical) | |||
SMW2 Lava Drop horizontal.png|Lava Drop (horizontal) | |||
Cloud drops.PNG|[[Cloud Drop]] (vertical) | |||
Snifit SMW2.png|[[Snifit]] | |||
Blow hard.png|[[Blow Hard]] | |||
SMW2 Needlenose yellow.png|[[Pokey (projectile)|Needlenose]] (yellow) | |||
Needlenose SMW2.png|Needlenose (green) | |||
SMW2 Hopping Tap-Tap.png|[[Tap-Tap|Hopping Tap-Tap]] | |||
SMW2YI Green Shy Guy.png|[[Shy Guy|Shy-Guy]] (green) | |||
SMW2YI Purple Shy Guy.png|Shy-Guy (magenta) | |||
Bandit-SMW2.png|[[Bandit]] | |||
SMW2 Spiked Fun Guy.png|[[Spiked Fun Guy (Super Mario World 2: Yoshi's Island)|Spiked Fun Guy]] | |||
SMW2 Potted Spiked Fun Guy.png|Potted Spiked Fun Guy | |||
Black Little Mouser.png|[[Little Mouser]] (black) | |||
Egg-Plant SMW2.png|[[Sanbo Flower]] | |||
</gallery> | |||
==Transformations== | |||
<gallery> | |||
SMW2YI - Superstar Mario.png|[[Superstar Mario|Powerful Mario]] | |||
</gallery> | |||
==Bonus Game shack Mini Battle== | |||
<gallery> | |||
ThrowingBalloons.png|[[Throwing Balloons]] | |||
</gallery> | |||
==Gallery== | |||
<gallery> | |||
Icon SMW2-YI - KEEP MOVING!!!!.png|Level icon from ''Super Mario World 2: Yoshi's Island'' | |||
SMA3-KeepMoving-Icon.png|Level icon from ''Yoshi's Island: Super Mario Advance 3'' | |||
</gallery> | |||
==Names in other languages== | ==Names in other languages== | ||
{{foreign names | {{foreign names | ||
| | |Jpn=すごくハードなアスレチック | ||
| | |JpnR=Sugoku Hādo na Asurechikku | ||
| | |JpnM=Very Hard Athletics | ||
|Ita=NON TI FERMARE!!!! | |Ita=NON TI FERMARE!!!! | ||
|ItaM=DON'T STOP!!!! | |ItaM=DON'T STOP!!!! | ||
|Chi= | |Chi=别停! | ||
|ChiR=Bié tíng! | |ChiR=Bié tíng! | ||
|ChiM=Don't Stop! | |ChiM=Don't Stop! | ||
| Line 29: | Line 68: | ||
|Ger=Fels-O-Mania | |Ger=Fels-O-Mania | ||
|GerM=Rock-O-Mania | |GerM=Rock-O-Mania | ||
| | |Fre=Le Parcours du Combattant. (''Super Mario World 2 : Yoshi's Island'')<br>Parcours du Combattant. (''Yoshi's Island : Super Mario Advance 3'') | ||
| | |FreM=The Route of the Scrapper.<br>Route of the Scrapper. | ||
}} | |||
==Trivia== | ==Trivia== | ||
*The Japanese | *The Japanese name for this stage is similar to that of [[Superhard Acrobatics!]] from ''[[Yoshi's Island DS]]''. They are also both the second to last level in their respective game. | ||
{{ | *This is the second and last appearance of the [[Big Chain Chomp|Shark Chomp]], which appears commonly in the level. This is also the level to have the most [[Bandit]]s. | ||
[[Category:Super Mario World 2: Yoshi's Island | {{YI levels}} | ||
[[Category:Yoshi's Island: Super Mario Advance 3 | [[Category:Super Mario World 2: Yoshi's Island levels]] | ||
[[Category:Yoshi's Island: Super Mario Advance 3 levels]] | |||
Latest revision as of 13:36, January 7, 2025
| Level | |||
|---|---|---|---|
| KEEP MOVING!!!! | |||

| |||
| Level code | 6-7 | ||
| Game | Super Mario World 2: Yoshi's Island, Yoshi's Island: Super Mario Advance 3 | ||
| Music track | Castle & Fortress | ||
| |||
| << Directory of levels >> | |||
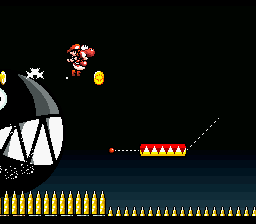
KEEP MOVING!!!! is the seventh level in World 6 of Super Mario World 2: Yoshi's Island and Yoshi's Island: Super Mario Advance 3. This level's playable Yoshi is the Red Yoshi.
This level uses the fort/castle background music, despite not being a fort/castle level. It is the only main level in the game to do this and is one of two levels (excluding the secret levels from Yoshi's Island: Super Mario Advance 3) with this distinction, the other being the extra level Poochy Ain't Stupid. However, the last part of the level appears to be in front of a castle, likely to introduce the next level, King Bowser's Castle. The background used in the second scene of this level alludes to Vincent van Gogh's The Starry Night.
Layout[edit]
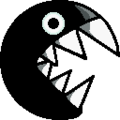
Hence its namesake, the player has to keep moving in this level. At the beginning of the level, Red Yoshi will find many Countdown Platforms, and then after going along them a bit, a Shark Chomp will start chasing the player. Soon after, the player will need to ride a spinning platform to get to some Flatbed Ferries over spikes, where Red Yoshi will encounter another Shark Chomp. Then the player will need to ride another Flatbed Ferry, then cross a lot of spikes on Countdown Platforms.
The player will then need to cross a bridge over a long gap. At the end of the gap they will be on a large stone area, but then go onto another bridge, which leads to a Flatbed Ferry. The player will continue to go through a winding area full of many Flatbed Ferries. Eventually, the player will get to an area with some steps heading up into the next area. After that, there will be a castle arena filled with a great number of Bandits. After that area, the player will need to cross some thorns; after that, the player will go up some steps where they will encounter even more Bandits. Not long after, the level will be completed after going down a Warp Pipe.
Enemies[edit]
Lava Drop (vertical)
Cloud Drop (vertical)
Needlenose (yellow)
Shy-Guy (green)
Little Mouser (black)
Transformations[edit]
Bonus Game shack Mini Battle[edit]
Gallery[edit]
Names in other languages[edit]
| Language | Name | Meaning | Notes |
|---|---|---|---|
| Japanese | すごくハードなアスレチック[?] Sugoku Hādo na Asurechikku |
Very Hard Athletics | |
| Chinese | 别停![?] Bié tíng! |
Don't Stop! | |
| French | Le Parcours du Combattant. (Super Mario World 2 : Yoshi's Island) Parcours du Combattant. (Yoshi's Island : Super Mario Advance 3)[?] |
The Route of the Scrapper. Route of the Scrapper. |
|
| German | Fels-O-Mania[?] | Rock-O-Mania | |
| Italian | NON TI FERMARE!!!![?] | DON'T STOP!!!! | |
| Spanish | ¡NO TE DETENGAS![?] | DON'T STOP! |
Trivia[edit]
- The Japanese name for this stage is similar to that of Superhard Acrobatics! from Yoshi's Island DS. They are also both the second to last level in their respective game.
- This is the second and last appearance of the Shark Chomp, which appears commonly in the level. This is also the level to have the most Bandits.


