Front Door: Difference between revisions
m (→Boss Battle) |
m (Text replacement - "(\| *)Jap([RMCN\d]* *=)" to "$1Jpn$2") |
||
| (145 intermediate revisions by 76 users not shown) | |||
| Line 1: | Line 1: | ||
{{level | {{level infobox | ||
|title=Front Door | |title=Front Door | ||
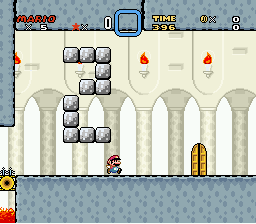
|image=[[ | |image=[[File:Front Door.png|256px]]<br>Mario running towards door 2 | ||
|code=FD | |code=7-FD | ||
|game=''[[Super Mario World]]'' | |game=''[[Super Mario World]]'' | ||
| | |world=[[Valley of Bowser]] | ||
|before=[[Larry's Castle|<<]] | |limit=400 seconds (SNES version)<br>800 seconds (GBA version) | ||
|boss=[[Bowser]] | |||
|before=[[7 Larry's Castle|<<]] [[Valley of Bowser 4|<<]] [[Star World 4|<<]] | |||
|after=>> | |after=>> | ||
|track=[[Castle (theme)|Castle]] | |||
|sample=[[File:Sub Castle Theme Super Mario World.oga]] | |||
}} | }} | ||
The '''Front Door''' is a [[level]] in ''[[Super Mario World]]''. It can be accessed by the completion of [[7 Larry's Castle|#7 Larry's Castle]], or through the [[Star Road (Super Mario World)|Star Road]] connected from [[Star World 5]] and [[Valley of Bowser 4]]’s secret exit. It consists of [[Bowser's Castle]] in [[Dinosaur Land]]. This level and the [[Back Door]] are both counted as the same exit, and as such, the player is only required to complete one of them to achieve 100% [[completion]]. | |||
==Layout== | |||
*1 | Inside is a bright hallway with four doors – four areas (numbered 1 to 4) for [[Mario]] or [[Luigi]] to choose from, each door leads to a different area with enemies and obstacles that vary depending on which door was selected. | ||
*2 | *Door 1: An auto-scrolling room with [[Pillar]]s (as previously seen in [[1 Iggy's Castle|#1 Iggy's Castle]] and the [[Forest Fortress]]), [[Lava Bubble]]s, and Yellow, Green, Red, and Blue [[! Block]]s to stop the player from falling into the lava. | ||
*3 | *Door 2: A series of [[Chain-Link|fence]]s with [[Climbing Koopa]]s, a pit filled with [[Spike Trap|spikes]] and flying Lava Bubbles. | ||
*4 | *Door 3: A maze with many blocks and [[Mechakoopa]]s. A [[1-Up Mushroom]] and [[Cape Feather]] are hidden in the room. | ||
*Door 4: A room full of floating platforms with [[Lil Sparky|Lil Sparkies]] and a [[Hothead]]. | |||
All four areas then lead to a second bright hallway with another four doors-four more areas (but this time numbered 5 to 8). The obstacles and enemies will again vary on what door is selected. | |||
*Door 5: A room filled with [[Skewer]]s and [[Thwomp]]s. The player must sprint past these at the right time in order to get through unharmed. | |||
*Door 6: An underwater room with [[Dry Bones]] that throw bones at the player, [[Fish Bone|Fishbone]]s, [[Spinner|Ball 'N' Chain]]s, and spikes. | |||
*Door 7: A room full of Gray [[Bowser Statue]]s that shoot fireballs and Gold Bowser Statues that pursue Mario/Luigi. | |||
*Door 8: A room with [[Chargin' Chuck]]s that jump at the player. | |||
The last four areas lead to a dark room and a red [[? Block]] that activates a spotlight<ref>{{cite|date=August 1991|title=Nintendo ''[[Mario Mania]]'' Player's Guide|page=147|language=en-us|publisher=Nintendo of America}}</ref> at the top of the screen; this room is also seen at the beginning of [[Back Door]], with slight alterations. This area has Mechakoopas. The area is also the only area in the game where the player can encounter [[Ninji]]s. The boss door is found at the end. | |||
===Boss battle=== | |||
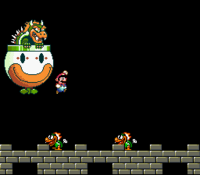
[[File:SMWMvsB.png|thumb|Screenshot of the final battle]] | |||
Beyond the boss door is the roof of the castle, where Bowser is fought his [[Koopa Clown Car]]. If Mario or Luigi touches the propeller at the bottom of the Koopa Clown Car, he will take damage; otherwise, he will simply bounce off. In the first stage of the battle, Bowser will fly around the top of the screen, throwing Mechakoopas. The player must grab and throw these upward at Bowser - if they hit the Koopa Clown Car, they are destroyed. After taking two hits, Bowser will fly off-screen to drop many [[Fire Breath|Flames]] from the sky, before returning to fight. [[Princess Peach|Princess Toadstool]] will throw a [[Super Mushroom]] to her left. The player may choose whether to take it or not. In the second phase, Bowser will then try to hover above Mario or Luigi and drop [[metal ball|Big Steelies]] on them. After throwing two Big Steelies, he will throw two Mechakoopas. Again, the player must kick the Mechakoopas up toward Bowser and hit him twice. After another round of Flames (and another Super Mushroom), Bowser and the Koopa Clown Car will start bouncing on the ground, trying to crush Mario or Luigi. Eventually, more Mechakoopas are thrown and the player must again kick two into Bowser, defeating him. | |||
A message comes up as Peach kisses Mario (or Luigi): "Mario's (Luigi's) adventure is over. Mario (Luigi), Peach, Yoshi and friends are all going to take a vacation." Four groups of [[firework]]s appear, with the last one being heart-shaped. The screen then begins to show the credits (with [[Mario]] walking and Peach riding [[Yoshi]], as the seven [[Yoshi Egg]]s follow along) and the list of enemies from the game, complete with pictures and name tags. After the enemy gallery, a picture of Mario, Luigi and Peach with text reading “The End” will fade in. The screen will freeze on the image once the music finishes and the system will need to be turned off or reset, though the [[Super Mario World: Super Mario Advance 2|remake]] adds a custom illustration, and the player can return to the Yoshi's Island world map upon pressing {{button|GBA|Start}}, alongside being able to save the game. | |||
While the HUD is absent, the [[item storage|Item Stock]] still appears if it is holding a power-up, though the HUD is visible in the remake. | |||
[[ | |||
==Enemies== | |||
{{number of enemies | |||
|image1=[[File:SMW Lava Bubble.png]] | |||
|name1=[[Lava Bubble]] | |||
|count1=7 | |||
|image2=[[File:SMW ZigzagLavaBubble.png]] | |||
|name2=Lava Bubble (zigzag) | |||
|count2=10 | |||
|image3=[[File:SMWClimbingKoopaRed.png]] | |||
|name3=[[Climbing Koopa]] (red) | |||
|count3=8 | |||
|image4=[[File:Mechakoopa.png]] | |||
|name4=[[Mechakoopa]] | |||
|count4=10 | |||
|image5=[[File:Li'lSparky SMW.png]] | |||
|name5=[[Lil Sparky]] | |||
|count5=8 | |||
|image6=[[File:Hothead SMW.png]] | |||
|name6=[[Hothead]] | |||
|count6=1 | |||
|image7=[[File:ThwompAngry.png]] | |||
|name7=[[Thwomp]] | |||
|count7=8 | |||
|image8=[[File:SMWDB.png]] | |||
|name8=[[Dry Bones]] | |||
|count8=2 | |||
|image9=[[File:Fish Bone SMW sprite.png]] | |||
|name9=[[Fish Bone|Fishbone]] | |||
|count9=6 | |||
|image10=[[File:SMW Whistling Chargin Chuck.png]] | |||
|name10=[[Chargin' Chuck|Bouncing Chuck]] | |||
|count10=8 | |||
|image11=[[File:SMW Ninji sprite.png]] | |||
|name11=[[Ninji]] | |||
|count11=6 | |||
|image12=[[File:BowserSMW.png]] | |||
|name12=[[Bowser]] | |||
|count12=1 (boss) | |||
}} | |||
==Obstacles== | |||
{{number of enemies | |||
|image1=[[File:SMW Pillar.png]] | |||
|name1=[[Pillar]] | |||
|count1=indefinite | |||
|image2=[[File:SpikePillar-SMW.png]] | |||
|name2=[[Skewer]] | |||
|count2=9 | |||
|image3=[[File:Ball N Chain.png]] | |||
|name3=[[Spinner|Ball 'N' Chain]] | |||
|count3=6 | |||
|image4=[[File:Grey Bowser Statue.png]] | |||
|name4=[[Bowser Statue]] (grey) | |||
|count4=6 | |||
|image5=[[File:Gold Bowser Statue.png]] | |||
|name5=Bowser Statue (gold) | |||
|count5=3 | |||
|image6=[[File:BigSteely SMW.png]] | |||
|name6=[[metal ball|Big Steely]] | |||
|count6=infinite | |||
|image7=[[File:SMW Bowser fireballs.png]] | |||
|name7=[[Fire Breath|Flame]] | |||
|count7=infinite | |||
}} | |||
==See also== | |||
*[[Back Door]] | |||
==Names in other languages== | |||
{{foreign names | |||
|Jpn=クッパのしろいりぐち | |||
|JpnR=Kuppa no Shiro Iriguchi | |||
|JpnM=Bowser's Castle Front Door | |||
|Fre=Porte Principale | |||
|FreM=Main Door | |||
|Ger=Burgtor | |||
|GerM=Castle Gate | |||
|Ita=Portone d'ingresso | |||
|ItaM=Front Door | |||
|Por=Entrada Principal | |||
|PorM=Main Entrance | |||
|Spa=Puerta Principal | |||
|SpaM=Main Door | |||
}} | |||
==Trivia== | |||
*The ''[[Super Mario World (television series)|Super Mario World]]'' television series episode "[[Send in the Clown]]" features what seems to be the Front Door, due to similar background designs and it featuring the same white and green lozenge curtains and a block that toggles light. However, the light block is the normal yellow color instead of red, and the spotlight is replaced with torch lamps. | |||
==References== | |||
<references/> | |||
{{SMW | {{SMW levels}} | ||
[[Category: | [[Category:Underground areas]] | ||
[[Category: | [[Category:Bowser's castles]] | ||
[[Category: | [[Category:Super Mario World levels]] | ||
[[Category: | [[Category:Amiibo tap: Nintendo's Greatest Bits]] | ||
Latest revision as of 11:44, January 7, 2025
| Level | |||
|---|---|---|---|
| Front Door | |||
 Mario running towards door 2 | |||
| Level code | 7-FD | ||
| World | Valley of Bowser | ||
| Game | Super Mario World | ||
| Time limit | 400 seconds (SNES version) 800 seconds (GBA version) | ||
| Boss | Bowser | ||
| Music track | Castle | ||
| |||
| << << << Directory of levels >> | |||
The Front Door is a level in Super Mario World. It can be accessed by the completion of #7 Larry's Castle, or through the Star Road connected from Star World 5 and Valley of Bowser 4’s secret exit. It consists of Bowser's Castle in Dinosaur Land. This level and the Back Door are both counted as the same exit, and as such, the player is only required to complete one of them to achieve 100% completion.
Layout[edit]
Inside is a bright hallway with four doors – four areas (numbered 1 to 4) for Mario or Luigi to choose from, each door leads to a different area with enemies and obstacles that vary depending on which door was selected.
- Door 1: An auto-scrolling room with Pillars (as previously seen in #1 Iggy's Castle and the Forest Fortress), Lava Bubbles, and Yellow, Green, Red, and Blue ! Blocks to stop the player from falling into the lava.
- Door 2: A series of fences with Climbing Koopas, a pit filled with spikes and flying Lava Bubbles.
- Door 3: A maze with many blocks and Mechakoopas. A 1-Up Mushroom and Cape Feather are hidden in the room.
- Door 4: A room full of floating platforms with Lil Sparkies and a Hothead.
All four areas then lead to a second bright hallway with another four doors-four more areas (but this time numbered 5 to 8). The obstacles and enemies will again vary on what door is selected.
- Door 5: A room filled with Skewers and Thwomps. The player must sprint past these at the right time in order to get through unharmed.
- Door 6: An underwater room with Dry Bones that throw bones at the player, Fishbones, Ball 'N' Chains, and spikes.
- Door 7: A room full of Gray Bowser Statues that shoot fireballs and Gold Bowser Statues that pursue Mario/Luigi.
- Door 8: A room with Chargin' Chucks that jump at the player.
The last four areas lead to a dark room and a red ? Block that activates a spotlight[1] at the top of the screen; this room is also seen at the beginning of Back Door, with slight alterations. This area has Mechakoopas. The area is also the only area in the game where the player can encounter Ninjis. The boss door is found at the end.
Boss battle[edit]
Beyond the boss door is the roof of the castle, where Bowser is fought his Koopa Clown Car. If Mario or Luigi touches the propeller at the bottom of the Koopa Clown Car, he will take damage; otherwise, he will simply bounce off. In the first stage of the battle, Bowser will fly around the top of the screen, throwing Mechakoopas. The player must grab and throw these upward at Bowser - if they hit the Koopa Clown Car, they are destroyed. After taking two hits, Bowser will fly off-screen to drop many Flames from the sky, before returning to fight. Princess Toadstool will throw a Super Mushroom to her left. The player may choose whether to take it or not. In the second phase, Bowser will then try to hover above Mario or Luigi and drop Big Steelies on them. After throwing two Big Steelies, he will throw two Mechakoopas. Again, the player must kick the Mechakoopas up toward Bowser and hit him twice. After another round of Flames (and another Super Mushroom), Bowser and the Koopa Clown Car will start bouncing on the ground, trying to crush Mario or Luigi. Eventually, more Mechakoopas are thrown and the player must again kick two into Bowser, defeating him.
A message comes up as Peach kisses Mario (or Luigi): "Mario's (Luigi's) adventure is over. Mario (Luigi), Peach, Yoshi and friends are all going to take a vacation." Four groups of fireworks appear, with the last one being heart-shaped. The screen then begins to show the credits (with Mario walking and Peach riding Yoshi, as the seven Yoshi Eggs follow along) and the list of enemies from the game, complete with pictures and name tags. After the enemy gallery, a picture of Mario, Luigi and Peach with text reading “The End” will fade in. The screen will freeze on the image once the music finishes and the system will need to be turned off or reset, though the remake adds a custom illustration, and the player can return to the Yoshi's Island world map upon pressing , alongside being able to save the game.
While the HUD is absent, the Item Stock still appears if it is holding a power-up, though the HUD is visible in the remake.
Enemies[edit]
| Image | Name | Count |
|---|---|---|
| Lava Bubble | 7 | |
| Lava Bubble (zigzag) | 10 | |
| Climbing Koopa (red) | 8 | |
| Mechakoopa | 10 | |
| Lil Sparky | 8 | |
| Hothead | 1 | |
| Thwomp | 8 | |
| Dry Bones | 2 | |
| Fishbone | 6 | |
| Bouncing Chuck | 8 | |
| Ninji | 6 | |

|
Bowser | 1 (boss) |
Obstacles[edit]
| Image | Name | Count |
|---|---|---|

|
Pillar | indefinite |
| Skewer | 9 | |

|
Ball 'N' Chain | 6 |
| Bowser Statue (grey) | 6 | |
| Bowser Statue (gold) | 3 | |
| Big Steely | infinite | |
| Flame | infinite |
See also[edit]
Names in other languages[edit]
| Language | Name | Meaning | Notes |
|---|---|---|---|
| Japanese | クッパのしろいりぐち[?] Kuppa no Shiro Iriguchi |
Bowser's Castle Front Door | |
| French | Porte Principale[?] | Main Door | |
| German | Burgtor[?] | Castle Gate | |
| Italian | Portone d'ingresso[?] | Front Door | |
| Portuguese | Entrada Principal[?] | Main Entrance | |
| Spanish | Puerta Principal[?] | Main Door |
Trivia[edit]
- The Super Mario World television series episode "Send in the Clown" features what seems to be the Front Door, due to similar background designs and it featuring the same white and green lozenge curtains and a block that toggles light. However, the light block is the normal yellow color instead of red, and the spotlight is replaced with torch lamps.
References[edit]
- ^ August 1991. Nintendo Mario Mania Player's Guide. Nintendo of America (American English). Page 147.
