Glittertown: Difference between revisions
LinkTheLefty (talk | contribs) mNo edit summary |
|||
| (25 intermediate revisions by 11 users not shown) | |||
| Line 1: | Line 1: | ||
{{ | {{level infobox | ||
|title=Glittertown | |title=Glittertown | ||
|image=[[File:Glittertown.png|275px]] | |image=[[File:Glittertown.png|275px]] | ||
|code=3-4 | |code=3-4 | ||
|game=''[[Wario Land: Shake It!]]'' | |game=''[[Wario Land: Shake It!]]'' | ||
|track=Glittertown (before holding a Merfle Barrel)<br>Neon City (after freeing a yellow Merfle) | |||
|before=[[Its-all Mine|<<]] | |before=[[Its-all Mine|<<]] | ||
|after=[[ | |after=[[Chortlebot Challenge|>>]] | ||
|secret=[[Neon City|**]] | |secret=[[Neon City|**]] | ||
}} | }} | ||
'''Glittertown''' is | {{quote|This is Glittertown. This one could be tough. Oh, and there's a secret map here!|[[Merfle|Yellow Merfle]]|Wario Land: Shake It!}} | ||
'''Glittertown''' is the fourth level of [[Rocking Range]] in ''[[Wario Land: Shake It!]]'' The music played in the level is an arrangement of the theme of [[Greenhorn Ruins]] from ''[[Wario World]]''. | |||
==Layout== | |||
The level features vertical streams of water, which can shoot up and down at different heights, elevating [[Wario]] to different areas. Another feature are spotlights that shine around the area, making certain platforms visible in their light. Wario encounters a number of [[Slot machine (Wario Land: Shake It!)|slot machines]] displaying enemies, balls, and [[Bomb (object)|bombs]]; he can perform an [[Earthshake Punch]] to stop the slot machine, causing it to produce the item displayed. After overcoming many obstacles, Wario busts a yellow [[Merfle]] out of a [[Merfle Barrel]], after which he must run back to the starting point of the level to beat it. | |||
{{br}} | |||
The | ==Secret Map location== | ||
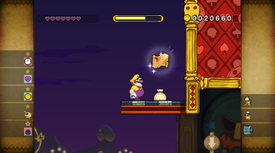
[[File:WLSI Glittertown Secret Map.png|thumb|275px|Wario finds the Secret Map of this level.]] | |||
The [[Secret Map]] is found after the second slot machine section. Wario needs to make his way on the second set of streams, which can take him to the top right corner of the level where one can see a platform with a small [[Coin Bag (Wario Land: Shake It!)|Coin Bag]]. Performing an Earthshake Punch on this platform reveals a secret map, which leads to [[Neon City]]. | |||
{{br}} | |||
==Missions== | ==Missions== | ||
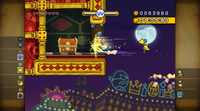
[[File:WLSI Glittertown golden enemy.png|thumb|275px|Wario preparing to throw a [[Bandinero]] (initially encountered as a silver [[Boomdinero]]) into a [[Certainty Switch]], which releases the golden enemy.]] | |||
{| class="wikitable" style="text-align:center" | |||
! Icon | |||
! Mission | |||
! Description | |||
|- | |||
| [[File:WLSI! Clock icon.png]] | |||
| style="text-align:left" | ''Finish before the clock hits 1:50:00'' | |||
| style="text-align:left" | After holding a [[Merfle Barrel]], Wario must hurry back to the start of the level within a set time limit of forty seconds (0:40:00). | |||
|- | |||
| [[File:WLSI! Heart icon.png]] | |||
| style="text-align:left" | ''Beat the stage without taking damage'' | |||
| style="text-align:left" | Wario must clear the level without taking any damage. | |||
|- | |||
| [[File:WLSI! Coin icon.png]] | |||
| style="text-align:left" | ''Collect 48,000 [[coin]]s'' | |||
| style="text-align:left" | Wario must collect at least 48,000 coins, including [[diamond]]s. | |||
|- | |||
| [[File:WLSI! Golden Shortfuse icon.png]] | |||
| style="text-align:left" | ''Defeat the golden enemy'' | |||
| style="text-align:left" | Wario must defeat a lone golden [[Shortfuse]]. | |||
|- | |||
| [[File:WLSI! Bomb icon (2).png]] | |||
| style="text-align:left" | ''Detonate 2 [[bomb]]s simultaneously'' | |||
| style="text-align:left" | Wario must use an [[Earthshake Punch]] to simultaneously detonate two bombs. | |||
|} | |||
==Enemies== | |||
*[[Bandinero]] (red and yellow) | |||
*[[Boomdinero]] (silver) | |||
*[[Bumbleprod]] | |||
*[[Floating Bandinero]] | |||
*[[Nosedozer]] | |||
*[[Pitchfork]] (blue) | |||
*[[Shortfuse]] (normal and gold) | |||
==Treasures== | |||
{| class="wikitable sortable" style="text-align:center" | |||
! rowspan="2" width="5%" | Treasure | |||
! rowspan="2" width="5%" class="unsortable" | Image | |||
! colspan="2" width="30%" | Description | |||
! rowspan="2" width="5%" class="unsortable" | Location image | |||
|- | |||
! width="15%" class="unsortable" | NTSC-U | |||
! width="15%" class="unsortable" | PAL | |||
|- | |||
| Ancient Duck Soup Mix | |||
| [[File:WLSItreasure49.png]] | |||
| colspan="2" style="text-align:left" | ''Ancient peoples had more primitive means of making instant soup.'' | |||
| [[File:WLSI Glittertown chest1.png|200px]] | |||
|- | |||
| Energy Drink | |||
| [[File:WLSItreasure50.png]] | |||
| style="text-align:left" | ''Looks like cough syrup. Tastes kind of like cough syrup, too. Wait a minute...'' | |||
| style="text-align:left" | ''Looks like cough medicine. Tastes a lot like cough medicine, too. Wait a minute...'' | |||
| [[File:WLSI Glittertown chest2.png|200px]] | |||
|- | |||
| Pink Diamond | |||
| [[File:WLSItreasure51.png]] | |||
| style="text-align:left" | ''So shiny! So pink! Is there anything lovelier that you can pull from deep under the ground?'' | |||
| style="text-align:left" | ''So shiny! So pink! Is there anything lovelier that you could pull from deep underground?'' | |||
| [[File:WLSI Glittertown chest3.png|200px]] | |||
|} | |||
==Data== | |||
{| class="wikitable" style="text-align:center" | |||
! Given time | |||
! Sum of coins | |||
|- | |||
| 2:30:00 | |||
| 42,750 | |||
|- | |||
| colspan="2" style="text-align:left; background:#eaecf0" | <small>In addition to the sum of 42,750 coins, the last slot machine in the level, encountered during Wario's escape sequence, produces an infinite amount of gold coins worth 1,000 coins. However, given the limited time of two minutes and thirty seconds, the player can theoretically reach a sum of coins between 65,000 and 70,000 if each Earthshake Punch stops the slot machine for it to display a coin.</small> | |||
|} | |||
==Names in other languages== | ==Names in other languages== | ||
{{foreign names| | {{foreign names| | ||
| | |Jpn=フィーバータウン | ||
| | |JpnR=Fībā taun | ||
| | |JpnM=Fever Town | ||
|Ger=Glitter-City | |||
|Ita=Luminio City | |||
|ItaM=Glittering City | |||
|Fre=Ville Lumière | |||
|FreM=Literally "Light Town", also a famous nickname for Paris | |||
}} | |||
{{WLSI}} | {{WLSI}} | ||
[[Category: | [[Category:Towns]] | ||
[[Category:Wario Land: Shake It! | [[Category:Wario Land: Shake It! levels]] | ||
Latest revision as of 05:04, January 20, 2025
| Level | |
|---|---|
| Glittertown | |
| |
| Level code | 3-4 |
| Game | Wario Land: Shake It! |
| Music track | Glittertown (before holding a Merfle Barrel) Neon City (after freeing a yellow Merfle) |
| << Directory of levels >> ** | |
- “This is Glittertown. This one could be tough. Oh, and there's a secret map here!”
- —Yellow Merfle, Wario Land: Shake It!
Glittertown is the fourth level of Rocking Range in Wario Land: Shake It! The music played in the level is an arrangement of the theme of Greenhorn Ruins from Wario World.
Layout[edit]
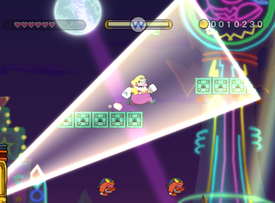
The level features vertical streams of water, which can shoot up and down at different heights, elevating Wario to different areas. Another feature are spotlights that shine around the area, making certain platforms visible in their light. Wario encounters a number of slot machines displaying enemies, balls, and bombs; he can perform an Earthshake Punch to stop the slot machine, causing it to produce the item displayed. After overcoming many obstacles, Wario busts a yellow Merfle out of a Merfle Barrel, after which he must run back to the starting point of the level to beat it.
Secret Map location[edit]
The Secret Map is found after the second slot machine section. Wario needs to make his way on the second set of streams, which can take him to the top right corner of the level where one can see a platform with a small Coin Bag. Performing an Earthshake Punch on this platform reveals a secret map, which leads to Neon City.
Missions[edit]
| Icon | Mission | Description |
|---|---|---|
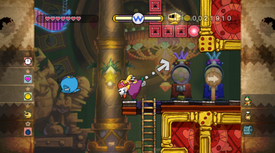
| Finish before the clock hits 1:50:00 | After holding a Merfle Barrel, Wario must hurry back to the start of the level within a set time limit of forty seconds (0:40:00). | |
| Beat the stage without taking damage | Wario must clear the level without taking any damage. | |
| Collect 48,000 coins | Wario must collect at least 48,000 coins, including diamonds. | |
| Defeat the golden enemy | Wario must defeat a lone golden Shortfuse. | |
| Detonate 2 bombs simultaneously | Wario must use an Earthshake Punch to simultaneously detonate two bombs. |
Enemies[edit]
- Bandinero (red and yellow)
- Boomdinero (silver)
- Bumbleprod
- Floating Bandinero
- Nosedozer
- Pitchfork (blue)
- Shortfuse (normal and gold)
Treasures[edit]
Data[edit]
| Given time | Sum of coins |
|---|---|
| 2:30:00 | 42,750 |
| In addition to the sum of 42,750 coins, the last slot machine in the level, encountered during Wario's escape sequence, produces an infinite amount of gold coins worth 1,000 coins. However, given the limited time of two minutes and thirty seconds, the player can theoretically reach a sum of coins between 65,000 and 70,000 if each Earthshake Punch stops the slot machine for it to display a coin. | |
Names in other languages[edit]
| Language | Name | Meaning | Notes |
|---|---|---|---|
| Japanese | フィーバータウン[?] Fībā taun |
Fever Town | |
| French | Ville Lumière[?] | Literally "Light Town", also a famous nickname for Paris | |
| German | Glitter-City[?] | - | |
| Italian | Luminio City[?] | Glittering City |
