User:Stone Pokey/sandbox: Difference between revisions
From the Super Mario Wiki, the Mario encyclopedia
Jump to navigationJump to search
Stone Pokey (talk | contribs) No edit summary |
Stone Pokey (talk | contribs) No edit summary |
||
| Line 15: | Line 15: | ||
CannonNSMB.png|A Warp Cannon | CannonNSMB.png|A Warp Cannon | ||
</gallery> | </gallery> | ||
==Race tracks== | |||
''Diddy Kong Racing'' contains twenty race tracks split between five worlds. In most races (marked with a check mark), racers are able to choose what type of vehicle to bring into the race, which can effect the paths in the course they are able to take. For some races, there are vehicles that are not able to be taken into it (marked with a red X). Every race also has a default vehicle type to use (marked with a D), which is usually the best type of vehicle to use for the race. | |||
{|align=center class="wikitable"style="text-align:center;margin:0 auto 1em auto" | |||
|- | |||
!colspan="12"style="font-size:125%;text-align:center;background:#9C6936"|{{color-link|Dino Domain|white}} | |||
|- | |||
|colspan="3"style="background:wheat"|[[File:DKR-AncientLake.png|150px]]{{br}}[[Ancient Lake]] | |||
|colspan="3"style="background:#FFF8DC"|[[File:DKR-FossilCanyon.png|150px]]{{br}}[[Fossil Canyon]] | |||
|colspan="3"style="background:wheat"|[[File:DKR-JungleFalls.png|150px]]{{br}}[[Jungle Falls (Diddy Kong Racing)|Jungle Falls]] | |||
|colspan="3"style="background:#FFF8DC"|[[File:DKR-HotTopVolcano.png|150px]]{{br}}[[Hot Top Volcano]] | |||
|- | |||
{{DKR vehicle|intable=y|car=d|hover=y|plane=y|bg=wheat}}{{DKR vehicle|intable=y|car=d|hover=y|plane=y|bg=#FFF8DC}}{{DKR vehicle|intable=y|car=d|hover=y|plane=y|bg=wheat}}{{DKR vehicle|intable=y|car=n|hover=y|plane=d|bg=#FFF8DC}} | |||
|} | |||
{|align=center class="wikitable"style="text-align:center;margin:0 auto 1em auto" | |||
|- | |||
!colspan="12"style="font-size:125%;text-align:center;background:#9C6936"|{{color-link|Snowflake Mountain|white}} | |||
|- | |||
|colspan="3"style="background:wheat"|[[File:DKR-EverfrostPeak.png|150px]]{{br}}[[Everfrost Peak]] | |||
|colspan="3"style="background:#FFF8DC"|[[File:DKR-WalrusCove.png|150px]]{{br}}[[Walrus Cove]] | |||
|colspan="3"style="background:wheat"|[[File:DKR-SnowballValley.png|150px]]{{br}}[[Snowball Valley]] | |||
|colspan="3"style="background:#FFF8DC"|[[File:DKR-FrostyVillage.png|150px]]{{br}}[[Frosty Village]] | |||
|- | |||
{{DKR vehicle|intable=y|car=y|hover=y|plane=d|bg=wheat}}{{DKR vehicle|intable=y|car=d|hover=y|plane=n|bg=#FFF8DC}}{{DKR vehicle|intable=y|car=d|hover=y|plane=n|bg=wheat}}{{DKR vehicle|intable=y|car=d|hover=y|plane=y|bg=#FFF8DC}} | |||
|} | |||
{|align=center class="wikitable"style="text-align:center;margin:0 auto 1em auto" | |||
|- | |||
!colspan="12"style="font-size:125%;text-align:center;background:#9C6936"|{{color-link|Sherbet Island|white}} | |||
|- | |||
|colspan="3"style="background:wheat"|[[File:DKR-WhaleBay.png|150px]]{{br}}[[Whale Bay]] | |||
|colspan="3"style="background:#FFF8DC"|[[File:DKR-PirateLagoon.png|150px]]{{br}}[[Pirate Lagoon]] | |||
|colspan="3"style="background:wheat"|[[File:DKR-CrescentIsland.png|150px]]{{br}}[[Crescent Island]] | |||
|colspan="3"style="background:#FFF8DC"|[[File:DKR-TreasureCaves.png|150px]]{{br}}[[Treasure Caves]] | |||
|- | |||
{{DKR vehicle|intable=y|car=n|hover=d|plane=n|bg=wheat}}{{DKR vehicle|intable=y|car=n|hover=d|plane=n|bg=#FFF8DC}}{{DKR vehicle|intable=y|car=d|hover=y|plane=n|bg=wheat}}{{DKR vehicle|intable=y|car=d|hover=y|plane=y|bg=#FFF8DC}} | |||
|} | |||
{|align=center class="wikitable"style="text-align:center;margin:0 auto 1em auto" | |||
|- | |||
!colspan="12"style="font-size:125%;text-align:center;background:#9C6936"|{{color-link|Dragon Forest|white}} | |||
|- | |||
|colspan="3"style="background:wheat"|[[File:DKR-BoulderCanyon.png|150px]]{{br}}[[Boulder Canyon]] | |||
|colspan="3"style="background:#FFF8DC"|[[File:DKR-GreenwoodVillage.png|150px]]{{br}}[[Greenwood Village]] | |||
|colspan="3"style="background:wheat"|[[File:DKR-WindmillPlains.png|150px]]{{br}}[[Windmill Plains]] | |||
|colspan="3"style="background:#FFF8DC"|[[File:DKR-HauntedWoods.png|150px]]{{br}}[[Haunted Woods]] | |||
|- | |||
{{DKR vehicle|intable=y|car=n|hover=d|plane=n|bg=wheat}}{{DKR vehicle|intable=y|car=d|hover=y|plane=n|bg=#FFF8DC}}{{DKR vehicle|intable=y|car=y|hover=y|plane=d|bg=wheat}}{{DKR vehicle|intable=y|car=d|hover=y|plane=n|bg=#FFF8DC}} | |||
|} | |||
{|align=center class="wikitable"style="text-align:center;margin:0 auto 1em auto" | |||
|- | |||
!colspan="12"style="font-size:125%;text-align:center;background:#9C6936"|{{color-link|Future Fun Land|white}} | |||
|- | |||
|colspan="3"style="background:wheat"|[[File:DKR-SpacedustAlley.png|150px]]{{br}}[[Spacedust Alley]] | |||
|colspan="3"style="background:#FFF8DC"|[[File:DKR-DarkmoonCaverns.png|150px]]{{br}}[[Darkmoon Caverns]] | |||
|colspan="3"style="background:wheat"|[[File:DKR-StarCity.png|150px]]{{br}}[[Star City]] | |||
|colspan="3"style="background:#FFF8DC"|[[File:DKR-SpaceportAlpha.png|150px]]{{br}}[[Spaceport Alpha]] | |||
|- | |||
{{DKR vehicle|intable=y|car=y|hover=y|plane=d|bg=wheat}}{{DKR vehicle|intable=y|car=d|hover=y|plane=n|bg=#FFF8DC}}{{DKR vehicle|intable=y|car=d|hover=y|plane=y|bg=wheat}}{{DKR vehicle|intable=y|car=y|hover=y|plane=d|bg=#FFF8DC}} | |||
|} | |||
Revision as of 16:33, December 13, 2024
New Super Mario Bros.

Door

Tower/Castle boss door

Final boss door
A Tower

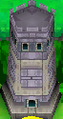
A Castle

A Ghost House
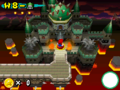
Bowser's Castle

A Warp Cannon


Race tracks
Diddy Kong Racing contains twenty race tracks split between five worlds. In most races (marked with a check mark), racers are able to choose what type of vehicle to bring into the race, which can effect the paths in the course they are able to take. For some races, there are vehicles that are not able to be taken into it (marked with a red X). Every race also has a default vehicle type to use (marked with a D), which is usually the best type of vehicle to use for the race.
| Template:Color-link | |||||||||||
|---|---|---|---|---|---|---|---|---|---|---|---|
 Ancient Lake Ancient Lake
|
 Fossil Canyon Fossil Canyon
|
 Jungle Falls Jungle Falls
|
 Hot Top Volcano Hot Top Volcano
| ||||||||
| Template:Color-link | |||||||||||
|---|---|---|---|---|---|---|---|---|---|---|---|
 Everfrost Peak Everfrost Peak
|
 Walrus Cove Walrus Cove
|
 Snowball Valley Snowball Valley
|
 Frosty Village Frosty Village
| ||||||||
| Template:Color-link | |||||||||||
|---|---|---|---|---|---|---|---|---|---|---|---|
 Whale Bay Whale Bay
|
 Pirate Lagoon Pirate Lagoon
|
 Crescent Island Crescent Island
|
 Treasure Caves Treasure Caves
| ||||||||
| Template:Color-link | |||||||||||
|---|---|---|---|---|---|---|---|---|---|---|---|
 Boulder Canyon Boulder Canyon
|
 Greenwood Village Greenwood Village
|
 Windmill Plains Windmill Plains
|
 Haunted Woods Haunted Woods
| ||||||||
| Template:Color-link | |||||||||||
|---|---|---|---|---|---|---|---|---|---|---|---|
 Spacedust Alley Spacedust Alley
|
 Darkmoon Caverns Darkmoon Caverns
|
 Star City Star City
|
 Spaceport Alpha Spaceport Alpha
| ||||||||