World A-4: Difference between revisions
m (→Level map) |
PlugMeister (talk | contribs) No edit summary |
||
| Line 1: | Line 1: | ||
{{image|more=yes|Base game}} | |||
{{level infobox | {{level infobox | ||
|title=World A-4 | |title=World A-4 | ||
| Line 19: | Line 20: | ||
{{br|left}} | {{br|left}} | ||
==Enemies== | ==Enemies and obstacles== | ||
{| | {{Number of enemies | ||
|image1=[[File:FireRodSMB.gif]] | |||
|name1=[[Fire Bar|Fire-Bar]] | |||
|count1=5 | |||
|image2=[[File:Podoboo Sprite SMB.png]] | |||
|name2=[[Lava Bubble|Podoboo]] | |||
|5 | |count2=7 | ||
| | |image3=[[File:SMB Red Koopa Troopa.gif]] | ||
|name3=[[Koopa Troopa|Red Koopa Troopa]] | |||
|7 | |count3=1 | ||
| | |image4=[[File:Bill Blaster Sprite SMB.png]] | ||
|name4=[[Bill Blaster|Turtle Cannon]] | |||
|1 | |count4=3 | ||
| | |image5=[[File:Bullet Bill Super Mario Bros.png]] | ||
|name5=[[Bullet Bill]] | |||
|3 | |count5=(infinitely spawned from Turtle Cannons) | ||
| | |image6=[[File:SMB Bowser Breathing Fire Sprite.gif]] | ||
|name6=[[Fake Bowser]] ([[Goomba]]) | |||
|(infinitely spawned from | |count6=1 (FDS boss) | ||
| | |image7=[[File:SMAS SMB Bowser Sprite.png]] | ||
|name7=[[Fake Bowser]] (Red Koopa Troopa) | |||
| | |count7=1 (SNES boss) | ||
}} | |||
== | ==Items== | ||
{| | {{Item locations | ||
|image1=[[File:SMBLL Super Mushroom Sprite.png]][[File:Fire Flower SMB.gif]] | |||
|name1=[[Super Mushroom|Mushroom]]/[[Fire Flower]] | |||
|count1=1 | |||
|notes1= | |||
}} | |||
| | |||
|1 | |||
| | |||
==Level map== | ==Level map== | ||
Revision as of 09:43, July 17, 2024
It has been requested that more images be uploaded for this article. Remove this notice only after the additional images have been added. Specifics: Base game
| Level | |
|---|---|
| World A-4 | |

| |
| Level code | World A-4 |
| World | World A |
| Game | Super Mario Bros.: The Lost Levels |
| Time limit | 300 seconds |
| Boss | Fake Bowser |
| << Directory of levels >> | |
World A-4 is the fourth and final level of World A in Super Mario Bros.: The Lost Levels and the eighth secret level overall in said game.
Layout

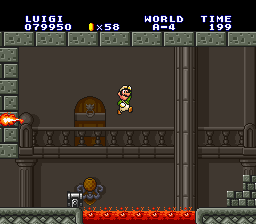
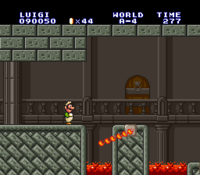
The player starts before a group of pillars with the first three having Fire Bars in them (the third Fire Bar being longer than the others), a Lava Bubble jumping up between the first two, and a ? Block with a power-up above the second pillar. Through a passage with a Fire Bar on the ceiling, the player will arrive at a large pit of lava with a Fire Bar before it and a Lava Bubble jumping up from the lava; to cross, the player has to time a jump off of the Fire Bar. After a narrow passage at the top of some stairs with a Koopa Troopa are narrow pillars the player has to jump between while avoiding Lava Bubbles (it is, however, possible to potentially defeat one of the Lava Bubbles, though otherwise invincible, by kicking the Koopa's shell at it, but it will immediately respawn soon afterwards). The player then has to pass through a narrow passage with Bill Blasters, two on the floor and one on the ceiling. By running and then jumping off of the third Bill Blaster, the player can cross the lava pit and reach the Fake Bowser, who breathes fire or throws hammers (Super Mario All-Stars).
Enemies and obstacles
| Image | Name | Count |
|---|---|---|

|
Fire-Bar | 5 |
| Podoboo | 7 | |
| Red Koopa Troopa | 1 | |
| Turtle Cannon | 3 | |
| Bullet Bill | (infinitely spawned from Turtle Cannons) | |
| Fake Bowser (Goomba) | 1 (FDS boss) | |
| Fake Bowser (Red Koopa Troopa) | 1 (SNES boss) |
Items
| Image | Name | Count | Note(s)
|
|---|---|---|---|
| Mushroom/Fire Flower | 1 |
