Warp Zone (Wario Blast: Featuring Bomberman!): Difference between revisions
From the Super Mario Wiki, the Mario encyclopedia
Jump to navigationJump to search
m (Text replacement - "(\|[\n ]*)lev([\n ]*=)" to "$1levels$2") |
m (Text replacement - "(\|[\n ]*)app([\n ]*=)" to "$1appearance$2") |
||
| Line 3: | Line 3: | ||
{{world infobox | {{world infobox | ||
|image=[[File:Warp Zone Wario Blast.png|250px]] | |image=[[File:Warp Zone Wario Blast.png|250px]] | ||
| | |appearance=''[[Wario Blast: Featuring Bomberman!]]'' | ||
|levels=4 | |levels=4 | ||
|before=[[Normal Zone|<<]] | |before=[[Normal Zone|<<]] | ||
Revision as of 01:48, May 3, 2022
| Warp Zone | |
|---|---|

| |
| Level(s) | 4 |
| << List of worlds >> | |
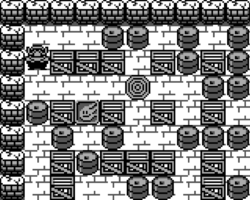
Warp Zone[1] is the Round 2 of Wario Blast: Featuring Bomberman! that introduces Warp Holes. This round contains three levels and a boss fight with Top Man. After defeating the boss, the player obtains Dashin.
Appearance
In this round, breakable blocks look like drums, and unbreakable blocks look like crates.
Objects and differences
References
- ^ Wario Blast: Featuring Bomberman! instruction booklet, page 11.
| Wario Blast: Featuring Bomberman! | |||
|---|---|---|---|
| Characters | Wario • Bomberman • Madbombers | ||
| Bosses | Cup King • Top Man • T-Bear • P-Flower • Thunder Cloud • Pukupuku • Gururin Knight • Mad-Bomber | ||
| Rounds | Normal Zone • Warp Zone • Arrow Zone • Fire Zone • Coma Zone • Ice Zone • Burn Zone • Power Zone | ||
| Normal Items | Explosion Expander • Extra Bomb • Skull | ||
| Special Items | Kicks • Dashin • The Trouncer • Liner • Moto | ||
| Objects | Block (Regenerating Wall) • Bomb • Bomb-Guiding block • Heated Vent • Warp Hole | ||
| Other | Bomberland • Staff • The Battle | ||