The 'Shroom:Issue 142/Strategy Wing: Difference between revisions
m (Text replacement - "\[\[forum:(\d+)(\.0)?(\||])" to "[[mb:threads/$1$3") |
|||
| Line 127: | Line 127: | ||
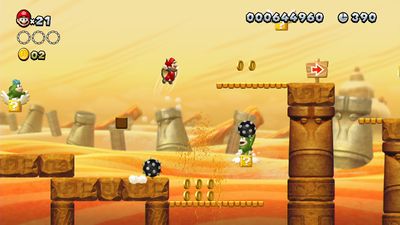
Next thing on the agenda, is yet another fantastic piece of design, and gives us our third out of three mechanics, the Sand Geysers! These things are simple. At an interval, they shoot upwards, then go back down, which we can see from the other side of the stage as soon as it starts, so the interval is also shown to us as soon as the stage starts. Tucked in a little corner behind the Geyser, is a Spike on a Flying Block, and all three of these things interact! We see the Spike throw his ball, and have it fall into the abyss, but then he tosses another, and the Geyser picks it up, and sends it your way! This adds another hazard into the mix, and explains it without words beautifully. Also, if you think you're skillful enough to do so, you can clamber your way into the Spike's little hole, and taking him out will reward you with a 1-up, further pushing the idea of being rewarded for taking out Spikes! | Next thing on the agenda, is yet another fantastic piece of design, and gives us our third out of three mechanics, the Sand Geysers! These things are simple. At an interval, they shoot upwards, then go back down, which we can see from the other side of the stage as soon as it starts, so the interval is also shown to us as soon as the stage starts. Tucked in a little corner behind the Geyser, is a Spike on a Flying Block, and all three of these things interact! We see the Spike throw his ball, and have it fall into the abyss, but then he tosses another, and the Geyser picks it up, and sends it your way! This adds another hazard into the mix, and explains it without words beautifully. Also, if you think you're skillful enough to do so, you can clamber your way into the Spike's little hole, and taking him out will reward you with a 1-up, further pushing the idea of being rewarded for taking out Spikes! | ||
[[File: | [[File:NSMBU Spike's Spouting Sands Screenshot.jpg|thumb|400px|"The gatekeeper of the 1-up."]] | ||
We're given sort of a rest room after this, with three huge, unmissable pillars, with some Flying Blocks there to hit for some coins and sweet, sweet, satisfaction! After this we're shown something else. The game leads us towards a Spike on a Flying Block, that's way below us, and just by looking at it for a bit, we can gain the info: Don't jump on Spikes when they're getting ready to throw a ball. Killing the Spike under your leathery foot isn't very hard, which is probably why his block just has a coin in it. | We're given sort of a rest room after this, with three huge, unmissable pillars, with some Flying Blocks there to hit for some coins and sweet, sweet, satisfaction! After this we're shown something else. The game leads us towards a Spike on a Flying Block, that's way below us, and just by looking at it for a bit, we can gain the info: Don't jump on Spikes when they're getting ready to throw a ball. Killing the Spike under your leathery foot isn't very hard, which is probably why his block just has a coin in it. | ||
| Line 151: | Line 151: | ||
<div class=shroomsection> | <div class=shroomsection> | ||
==Racing Like the Staff== | ==Racing Like the Staff== | ||
Written by: {{User|Yoshi876}} | Written by: {{User|Yoshi876}} | ||
Revision as of 11:29, March 14, 2020
Director Notes
Written by: Hooded Pitohui (talk)
Welcome to the first edition of Strategy Wing in 2019! I have a few announcements to cover, but, I’d like to first welcome The 'Shroom’s new Director, Raregold (talk) and our new Sub-Director, MsRetroGeek (talk). I was honored to have the opportunity to run against the two of them, both highly qualified and passionate candidates, and I know that The 'Shroom will prosper under their direction. I wish them the best with their term and I hope to be of service in any way I can! I’d also like to thank Fun With Despair (talk) for running with me as a candidate for the position of Sub-Director, all of those folks who expressed their support for us during the election (that you felt comfortable trusting Fun With Despair and myself with The ‘Shroom is humbling and means a great deal), and anyone who took an active interest in the debate and election. I couldn’t have been happier with how engaged so many community members and writers were during this year’s election, and I hope that those of you out there who are interested in the future direction of The 'Shroom get or stay involved with the project and perhaps aim for a Staff position or even the Directorship someday.
Enough about that, though! Turning to announcements regarding Strategy Wing, I must start with some unfortunate news. With schoolwork keeping him busy, YoshiFlutterJump (talk) has retired as a regular writer for YoshiFlutterJump’s Tips and Tricks. The news is not all bad, though. YoshiFlutterJump will continue to submit the section on a volunteer basis, so you can expect to still see his helpful and engaging walkthroughs in the future! While we lose YoshiFlutterJump for now, our writers have still put together wonderful sections for you to read as you start your year with The 'Shroom. If you want to join them, consider making a New Year’s Resolution you can keep and resolve to join Strategy Wing as a writer. Whether you’re interested in offering your own advice and analyses of videogame challenges or you want to explore the intricacies and processes of a craft you’re familiar with, you should read the requirements and sign up right here! While you think about what you’d be interested in writing, go ahead and take a look below at what our writers have for you this month!
Section of the Month
Congratulations are in order for Superchao (talk) and his detailed coverage of Blood Falcon in Mach Speed Mayhem. His hard work has earned him first place. Parakoopa144 (talk) and his look at stages from Super Smash Bros. Ultimate takes second with Yoshi876 (talk) and his chilling take on Frosslas' Pokèdex entries. Writers, please look upon the rest of the year as an opportunity to continue striving to do the best work possible and aim for Section of the Month!
| STRATEGY WING SECTION OF THE MONTH | ||||
|---|---|---|---|---|
| Place | Section | Votes | % | Writer |
| 1st | Mach Speed Mayhem | 5 | 33.33% | Superchao |
| 2nd | Pokédex Power | 3 | 20.00% | Yoshi876 |
| 2nd | PK144's Course Corner | 3 | 20.00% | Parakoopa144 |
PK144 analyzes Spike's Spouting Sands from New Super Mario Bros. U Deluxe.
[read more]
876 tries out Dolphin Shoals' Staff Ghost in Mario Kart 8 Deluxe's Star Cup.
[read more]
Get out a new calendar for the year while GPM1000 lists Mario games released in January.
[read more]
PK144's Course Corner
Written by: Parakoopa144 (talk)
Hey there! As of writing this on 11th of January 2019, New Super Mario Bros. U Deluxe, has just launched! Now whether you're revisiting the game with this flashy rerelease, or if you're playing this gem for the first time like me, one thing rings true: this game has some really great level design! Now sadly there are no "New" levels to play this time around, unlike Captain Toad, but we can still look at one of the nearly 150 stages this game has! So with my INFINITE KNOWLEDGE OF GAME DESIGN, I decided to pick...
| Spike's Spouting Sands | ||
|---|---|---|
| Year | 2012 (2018) | |
| Game | New Super Mario Bros. U (Deluxe) (Nintendo Switch and Nintendo Wii U) | |
| Wiki Page | Spike's Spouting Sands | |
Well to start, this level is gorgeous! I really wish that pretty much all the desert stages looked like this! The scrolling effect in the background looks great, along with the really geometric, stiff shapes that not only look nice because of the sandy-Aztec look of the stage, but also makes the stage really easy to platform on!
Now when I review this stage, I also wanna give an insight into the "New" level design philosophy, as there is definitely a uniform feel, and if you look close enough, there are certainly patterns. Most stages follow the same sort of structure, which has the order of: An introduction, a challenge, a reward, a challenge, a reward, a twist, a reward, a final challenge that is longer, and then finally, use the mechanic throughout the level to try and hit the Flagpole. So how does Spike's Spouting Sands follow the template? Well let's have a look.
The first thing you come across in this stage is the following, and this genius. There's an empty space, so that nothing will really jump out in front of the player an attack them. It gives them a feeling of safety. An arrowed sign points towards a Spike on top of a winged Item Block. Not only does this show two of the stage's three core mechanics, but it shows how they interact. The Spike can't move while on the Winged Block, and whenever the Spike tries to throw a ball, it will constantly hit the ledge and shatter, because the Block affects the trajectory. This, right off the bat, teaches us a few things: Spikes throw balls. Winged Item Blocks fly. Spikes on Item Blocks will throw balls differently, depending on the height of the Item Block. And that's it, the level's main mechanic has already been presented to the player, and we haven't even pressed a button yet! That sign seems to want us to get a move on, so I guess we'll make our way onwards!
Just a few steps forwards, there's already something else to talk about! First instinct when you see an Item Block is to hit it a thwack, and hit it a thwack we do. This kills the Spike we just talked about, and gives us an Ice Flower. This again serves multiple purposes. It shows us that we can kill Spikes by hitting the blocks they stand on, and we'll likely be rewarded for doing so. The item we get, the Ice Flower, is arguably the best tool for taking out Spikes also, so we have options now. The player was taught how the Spikes work, and how you take them out, in such a short time! Immediately after this, there's another Flying Block, but there's no Spike atop it, and just gives us a coin. I'm pretty sure this was done to show that we won't just be rewarded power-ups for everything, they make us work for it!
Next thing on the agenda, is yet another fantastic piece of design, and gives us our third out of three mechanics, the Sand Geysers! These things are simple. At an interval, they shoot upwards, then go back down, which we can see from the other side of the stage as soon as it starts, so the interval is also shown to us as soon as the stage starts. Tucked in a little corner behind the Geyser, is a Spike on a Flying Block, and all three of these things interact! We see the Spike throw his ball, and have it fall into the abyss, but then he tosses another, and the Geyser picks it up, and sends it your way! This adds another hazard into the mix, and explains it without words beautifully. Also, if you think you're skillful enough to do so, you can clamber your way into the Spike's little hole, and taking him out will reward you with a 1-up, further pushing the idea of being rewarded for taking out Spikes!
We're given sort of a rest room after this, with three huge, unmissable pillars, with some Flying Blocks there to hit for some coins and sweet, sweet, satisfaction! After this we're shown something else. The game leads us towards a Spike on a Flying Block, that's way below us, and just by looking at it for a bit, we can gain the info: Don't jump on Spikes when they're getting ready to throw a ball. Killing the Spike under your leathery foot isn't very hard, which is probably why his block just has a coin in it.
The path then splits into two, the higher path just basically being a straight line, while the lower path is an optional challenge for a Star Coin! This will have you jump a gap for a Star Coin, while two Flying Blocks with Spikes toss their horrifying spiky murderous balls of death and destruction at you. Not too hard to do, a pretty unmissable and easy Star Coin.
After this, we get some more Flying Blocks to bash, which is sort of a pattern. Then we get the first really bad bit of design from this stage. A random invisible Block on top of a Geyser shoots out a vine, which is a really frustratingly obtuse way to hide a Star Coin. Also this room introduces an entire new mechanic, which isn't used anywhere else in the stage. A really poor design choice on their part.
This is followed by more twists, with a line of three Geysers manipulating both you and the Spikes. Dangerous play is obviously rewarded here as normal, as taking the more treacherous route rewards you with a ton of coins.
After the Checkpoint, the level just kinda continues. Not in a bad way, but I can't really just go over everything if there's nothing to see, so I'm gonna go over the highlights of the second half. There's a completely genius secret here, where you find a pipe through a walk-through wall, but the smoking gun is that the Spike's balls go through the wall! That kinda stuff is devilishly clever, and I wish they would hide more secrets like that.
This leads to a section where the Geysers that are already in the stage are reused for a simultaneous obstacle! This also leads to the third and final Star Coin, for those who are curious. Sadly, this duet of brilliant Mini Mushroom designs are then over shadowed by one of this game's worst issue. Nearly every secret-exit location in this game is horrible, and this one is no different. Whether it's ground-pounding in random spots, jumping off random cliffs, or, in this case, walking into random walls, all of these locations are far too cryptic, and not satisfying to find at all. In this case, just hop over the wall after the third Star Coin, and run into the side of the wall with the Mini Mushroom, and voila, secret pipe. It's horrible design.
And that's a wrap! This level, while it's good, I feel that it has two pretty glaring issues that would need addressed. There are other levels in the game which balance good secrets and good gimmick design, so there's really no excuse. In fact, pretty much every level in this game is great, with the usual exceptions of course, so I'm really happy this game is available to more people now, with the new Deluxe port. The other changes they added are fun too, as Peachette is wonderful to play as, but she's no Funky Kong!
Anyway, that was PK's Course Corner, and I hope you enjoyed it! Remember to DM me any level suggestions through the boards or through Discord, and I'll see you next month!
Bye!
Racing Like the Staff
Hello readers and welcome to Racing like the Staff, a section where I do 150cc on different Mario Kart games, but the twist is, I take on the Grand Prix by using the combination that a staff and expert staff member used in that Cup. If you're still a little confused, by this I mean if the track is in the Mushroom Cup, then that's the Cup that I race in. Unfortunately, I don't have copies of the Mario Kart games before Mario Kart 7, so it's only that, 8 and Deluxe that will be getting this treatment.
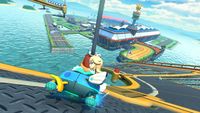
My probably was wrong, but do not fear as we are still in the realm of Mario Kart 8, just Mario Kart 8 Deluxe instead. Now, as I did promise Mount Wario, I am choosing the Star Cup to race through, however as it is no longer our Christmas-themed special, it does feel wrong to choose the snow-themed track. So instead I'm picking to do the Staff from one of my least favourite tracks, so I can get it out the way. Yes, this month we are racing like the Staff on Dolphin Shoals. Now like last time, this will be a 150cc run, not a 200cc one. I would like to report back that I did more than crash into walls.
The combination for normal staff for Dolphin Shoals is Wendy with the Landship, Wooden tyres and Bowser Kite, and the stats are as follows:
- Speed – Just over two bars
- Acceleration – Just over four bars
- Weight – Two bars
- Handling – Just under five bars
- Grip – Three bars
Sunshine Airport
I got off to an absolutely amazing start and was up into second by the time we got to the first set of Item Boxes, however my low speed stat started to show as I was unable to gain on Princess Peach. It wasn’t until we were on the Boost Pads for the anti-gravity section that I was able to steer my Triple Bananas into her and gain the lead. My lead started to grow and despite a Blue Shell being launched at me while I was still on the anti-gravity section, it failed to catch me until the first set of Item Boxes. This didn't immediately cost me my lead, but Peach did take it back. I managed to overtake her in the plane section, as I went over and she went under. I thought the rest of the race would be smooth sailing, but a Lightning Bolt and a Red Shell proved otherwise, and Princess Daisy overtook me. I was just about to get her back when another Red Shell hit me, dropping me to third. Thankfully, I overtook Peach on the anti-gravity section, and got a Red Shell in my final Item Box, and so I was able to hit Daisy with it and overtake her before we re-entered the airport.
Dolphin Shoals
I will admit to messing around blaring my horn during the intro and so I messed up my start, only getting a small boost. This allowed Princess Peach into the lead and a world of horrors to open up upon me. Firstly, Peach and I ran into each other with Bananas, spinning us both out and allowing Roy to overtake me. Just as I was about to overtake Roy on the Unagi, he pulled out a Bob-omb, blowing up both up. Thankfully, my superior acceleration gave me the initial boost, but just when it looked like he would overtake me, we were both hit by a second Bob-omb, dropping us down. Thankfully, my time down was short lived as Yoshi ran into a Banana, and I took out Metal Mario with a Super Horn over the water. Unfortunately, I then steered off-road and as the lap ended both Roy and Toadette overtook me. For some reason though, I was able to keep up with and even overtake Toadette, despite her having Triple Mushrooms. A Red Shell I launched hit Roy and I was up into second before the cave, and before of purple drifts I overtook Peach for the lead during the above water section. The third lap was uneventful, as not even a Blue Shell, which hit me just before I hit the Glide Pad could ruin my race, and I came home with my second win.
Electrodrome
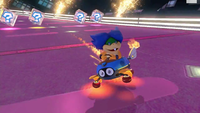
I managed to get another good start and despite Princess Peach trying to challenge for the lead, when my Triple Bananas came out, she was finished. And even though I got hit by a Blue Shell later in the lap, I did think that the race would be plain sailing. As it turns out, I was wrong. The second lap saw me hit by a Lightning Bolt, followed by a Green Shell. Peach overtook me, and Princess Daisy flattened me, allowing Metal Mario past. Thankfully, Metal Mario was easy fodder for my Green Shell and I overtook Daisy near the end. Peach was overtaken before the first anti-gravity section, but another Blue Shell spelt doom for me, and Princess Daisy overtook me on an anti-gravity section, and despite attempting to hit her with a Green Shell, I missed and she won.
Mount Wario
I didn't get the start I wanted, and was unable to overtake Princess Daisy, however going for a jump got me into first. Unfortunately, it also led to me flying off the track and falling down to third. However, near the end of the first section I was able to start some snaking on Daisy, although again I drove off and went back to third. Roy then overtook me, and despite going into the water during the cave instead of gliding, I soon found myself in the lead. This stayed the same until I was hit by a Blue Shell just at the start of the third section, and I was back in third. Thankfully, Roy took Daisy out with a Red Shell, I managed to overtake him, and subsequently win the race.
Even though I don't like using Wendy, this combination is one that appeals to me. I generally favour Karts that have more acceleration than speed and this applies here, and other than Mount Wario I found no issues in controlling the Kart. Plus, as I found out to my detriment on Dolphin Shoals, it has one of the best horn sounds, although I imagine this is more the Landship than the combination on the whole. It's a shame that my issues on Electrodrome cost me a three-star rating as I felt like I could've gotten it with this combination.
The expert staff combination is Ludwig with the Steel Driver, Normal Blue (Blue Standard) and Bowser Kite. The stats are as follows:
- Speed – Just under four bars
- Acceleration – Three bars
- Weight – Four bars
- Handling – Three bars
- Grip – Just over three bars
Sunshine Airport
Unlike the first time racing here, there's not a whole lot to report here. I just managed to get second place going into the first set of Item Boxes, and I got a Mushroom from them. It turns out I didn't even need that Mushroom as I overtook Link during the section through the plane. The shortcut was just the icing on the cake. Following that, it was just a leisurely drive to the end.
Dolphin Shoals
Dolphin Shoals started off better than last time, but eventually went the way of Electrodome. I managed to lead for the vast majority of the race, and Link was only able to get ahead for seconds at most. However, I could never shake him off, and so at the finish line he was able to hit me with a Red Shell and claim the victory.
Electrodrome
Sadly, again these races seem to be mainly uneventful. I didn't get the lead from Link until after the first set of Item Boxes as I hit him with a Red Shell. However, on the pink section, I managed to fall off, but on the keyboard section before the Glide Pad I did regain the lead somehow. I kept this lead until Link got a Mushroom at the end of the second lap and used the shortcut, but I quickly got ahead of him. A Lightning Bolt during the glide section didn't help, and I fell into the water, and Luigi got ahead of me, but I overtook him before we regrew to our normal size. And then nothing happened, and I won.
Mount Wario
And this was the least eventful race of them all. Link overtook me at the start, I hit him with Red Shell, I won. And that is genuinely the most detail I can go into.
Like the other combination, I could've gotten a three-star rating with it, even though I didn't, but I think overall, I preferred the other combination more. Mainly down to personal preference, but I did feel like I had some issues with positioning the Kart where I wanted it to be, which allowed Link to overtake me on the second lap of Dolphin Shoals for all about three seconds.
I hope you enjoyed this section, and I'll see you next month where I'll take a look at a combination from Mario Kart 8, probably. If you've got a combination you'd like me to review next, feel free to private message me on the forums.
Mario Calendar
Hello everyone! I hope you all had an amazing holiday! Here we have another Mario Calendar, in which I will be looking at all the Mario games that have released in January!
Region Abbreviations
| Abb. | Region |
|---|---|
| JP | Japan |
| NA | North America |
| EU | Europe |
| AU | Oceania/Australia |
| SK | South Korea |
Console Abbreviations
| Abb. | Console |
|---|---|
| NES | Nintendo Entertainment System |
| Famicom | Nintendo Family Computer |
| SNES | Super Nintendo Entertainment System |
| Super Famicom | Super Nintendo Family Computer |
| N64 | Nintendo 64 |
| GC | Nintendo GameCube |
| Wii | Nintendo Wii |
| Wii U | Nintendo Wii U |
| NS | Nintendo Switch |
| GB | Game Boy |
| GBC | Game Boy Color |
| GBA | Game Boy Advance |
| DS | Nintendo DS |
| 3DS | Nintendo 3DS |
| Wii VC | Nintendo Wii Virtual Console |
| 3DS VC | Nintendo 3DS Virtual Console |
| Wii U VC | Nintendo Wii U Virtual Console |
| Wii U eShop | Nintendo Wii U eShop |
| DSiWare | Nintendo DSiWare |
| VB | Virtual Boy |
| G&W | Game and Watch |
| 64DD | Nintendo 64 Disk Drive |
| MS-DOS | Microsoft Disk Operating System |
| Satellaview | Satellaview |
| CD-i | Philips CD-i |
- January 1st
- 1998 (JP): Wrecking Crew '98 (Super Famicom)
- January 2nd
- 2015 (EU): Captain Toad: Treasure Tracker (Wii U)
- January 3rd
- 2015 (AU): Captain Toad: Treasure Tracker (Wii U)
- January 5th
- 2012 (AU): Fortune Street (Wii)
- January 7th
- 2005 (EU): Classic NES Series: Dr. Mario (GBA)
- January 9th
- 1986 (EU): Pinball (NES)
- January 11th
- 2019 (JP/NA/EU/AU): New Super Mario Bros. U Deluxe (Switch)
- 2019 (NA): Mario & Luigi: Bowser's Inside Story + Bowser Junior's Journey (3DS)
- January 12th
- 2007 (EU): WarioWare: Smooth Moves (Wii)
- January 13th
- 2005 (JP): Mario Party Advance (GBA)
- January 15th
- 2007 (NA): WarioWare: Smooth Moves (Wii)
- 2009 (JP): New Play Control! Mario Power Tennis (Wii)
- 2014 (JP/EU/AU): Dr. Luigi (Wii U eShop)
- January 16th
- 1995 (JP): Undake30 Same Game (Super Famicom)
- January 17th
- 2008 (JP): Mario & Sonic at the Olympic Games (DS)
- 2014 (EU): Mario Party: Island Tour (3DS)
- January 18th
- 2007
- (JP): Wario: Master of Disguise (DS)
- (AU): Mario vs. Donkey Kong 2: March of the Minis (DS)
- 2014 (AU): Mario Party: Island Tour (3DS)
- 2018 (JP): Mario + Rabbids Kingdom Battle (NS)
- 2007
- January 19th
- 2006 (JP): Super Mario Strikers (GC)
- 2017 (JP): Poochy & Yoshi's Woolly World (3DS)
- January 21st
- 1993 (EU): Super Mario Kart (SNES)
- 1994 (JP): Wario Land: Super Mario Land 3 (GB)
- 1999 (JP): Super Smash Bros. (N64)
- 2001 (JP): Donkey Kong Country (GBC)
- January 22nd
- 2008 (NA): Mario & Sonic at the Olympic Games (DS)
- 2016 (NA): Mario & Luigi: Paper Jam (3DS)
- January 24th
- 2000 (NA): Mario Party 2 (N64)
- January 25th
- 2007 (AU): WarioWare: Smooth Moves (Wii)
- 2008 (EU): Donkey Kong Barrel Blast (Wii)
- 2019 (EU): Mario & Luigi: Bowser's Inside Story + Bowser Junior's Journey (3DS)
- January 26th
- 2019 (AU): Mario & Luigi: Bowser's Inside Story + Bowser Junior's Journey (3DS)
- January 27
- 2005 (JP): Yoshi Touch & Go (DS)
- 2011 (AU): Mario Sports Mix (Wii)
- January 28
- 1993 (EU): Super Mario Land 2: 6 Golden Coins (GB)
- 2000 (JP): Donkey Kong GB: Dinky Kong & Dixie Kong (GBC)
- 2009 (JP): Art Style: PiCTOBiTS (DSiWare)
- 2011 (EU): Mario Sports Mix (Wii)
- 2016 (JP)
- Mario Tennis: Ultra Smash (Wii U)
- Mini Mario & Friends: amiibo Challenge (Wii U eShop)
- Mini Mario & Friends: amiibo Challenge (3DS eShop)
- January 29
- 1981 (NA): Manhole (G&W)
- January 31
- 2008 (JP): Super Smash Bros. Brawl (JP)
I hope everyone enjoyed, and I'll see you in February.
Mach Speed Mayhem
Hello, 'Shroom readers! Welcome to your monthly delivery of F-Zero information, as chosen by you! And thanks to the vote, we've got this month's character. Looking oddly familiar in a way I just can't put my finger on... it's #10: James McCloud! The leader of the mercenary squadron Galaxy Dog, James has taken on his next target: winning the F-Zero Grand Prix!
Introduced alongside many others in F-Zero X, James McCloud doesn't get much beyond the basic characterization there. The instruction manual outlines that he's the leader of Galaxy Dog, and that he remodeled his space fighter into an F-Zero machine. Why? Money. Not that big a surprise, really, considering the F-Zero GP's reward is often talked up as being a ridiculous sum of money. Even in his first appearance his design inspirations were very obvious... and with GX restyling his hair, they became even more obvious. His F-Zero GX bio would shed some more light on his motivations; the galaxy is currently mostly at peace, meaning that McCloud and Galaxy Dog aren't finding much work as mercenaries. So, into the F-Zero he goes for the big prize! He's got a strong reason to win, since McCloud has a wife and a young son, both of whom need his financial support. His family man and friend-loving nature comes up in his post-race interviews, since he wants to buy a new model racer for his son and raise him to be a better man, he quotes "Friendship is a treasure that lasts a lifetime" and plans to celebrate his win with the rest of Galaxy Dog, and he even makes sure to pitch the company to his fans. He's not that humble, though, since he believes luck had no role in his victory. It was all him, baby!
The F-Zero GX story mode includes James in two chapters, although neither one of them have him in a major starring role. He first appears in Chapter 3, bumping into Silver Neelsen during the cutscene at the start of the chapter (which gives a good look at the logo on his jacket), and then being one of the twelve competitors in the Bet Race that makes up the actual competition of Chapter 3. Chapter 7, naturally, brings him in as one of the 30 racers to ensure the field is packed to the brim. There's nothing that special about McCloud in either race, as he's just there to provide more competition.
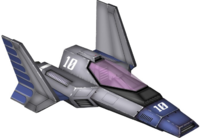
As for his machine, the Little Wyvern was developed by Space Dynamics, the same company that had already built the spaceships used by Galaxy Dogs. When he decided to participate in the F-Zero Grand Prix, James approached Space Dynamics to modify one of the fighter crafts into a racing machine, and they agreed to it as a test of their own capabilities. Could they take the potential they had designed and put into their fighter crafts, and work it into an F-Zero machine? That was what they aimed to find out by creating the Little Wyvern and testing their skill at creating an F-Zero machine. The stats in X are E Body, B Boost, and B Grip, a frail machine that still plays well to people starting out. It's on the lighter side, too, weighing in around the middleweights of the available cars in both games. GX's weird stats means the Little Wyvern doesn't quite live up to the stats as displayed, but trades lower acceleration for higher top speed. Still... try not to get hit. This machine doesn't take it well.
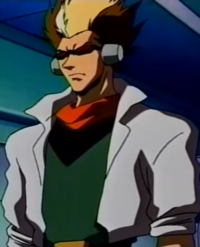
Naturally, James appeared in the F-Zero GP Legend anime as well, what with being one of the first 30 racers. He's our first proper character of the day - while Blood Falcon had limited appearances, he was still recurring over a period of episodes in the middle of the series. In contrast, James McCloud has only one speaking role, as the focus of episode 33. Which means I can just talk about the entire episode to cover him in the anime! Opening in medias res, James is training our heroes in the Mobile Task Force... by shooting a gun turret at them. As their new drill sergeant, he's training them using tactics he adapted from fighter plane warfare, and doing a lot of damage to their morale and machines - although Rick Wheeler, at least, is interested in his military background and keeps training with him, learning that James doesn't like to talk about why he left the military.
During the course of the episode, it turns out that McCloud has a "trust no one" policy, and this manifests in his own mercenary attitudes. The Mobile Task Force finds that he's also been teaching Dark Million the same tactics he taught to them, and when the episode's race of the day happens... everyone realizes he played them off each other, and that way he knows how everyone will drive. James exploits this to win the race (his first! Despite the fact that the anime had the Little Wyvern as a background car in the past, but you get used to that kind of thing), and prepares to leave with the money, until Dark Million ambushes him and Rick saves him in the nick of time. In return, James explains his life situation - he and his partner O'Donnell were soldiers in a war, and received a search and rescue mission. While on the mission, they were shot down and pinned by enemy fire, with the army refusing to provide support due to a treaty. O'Donnell charges out as a distraction and gets shot, leaving James a bitter man unable to trust anyone. A heart to heart with Rick has him leaving while still acting cold... but the final shot of the episode implies that James is finally warming up once again. And... that's the last we see of him in the anime! Such is the fate of a character of the day.
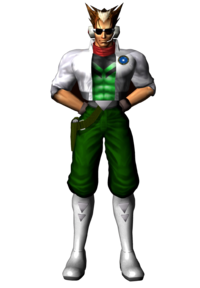
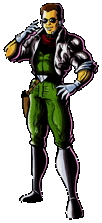
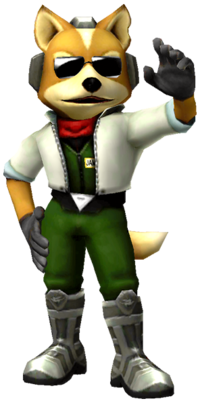
Now, for what I'm sure a lot of you have been waiting for... yep. James McCloud is one enormous reference to Nintendo's Star Fox series, where James McCloud is the father of Fox McCloud and a famous Arwing pilot apparently killed in the backstory of the games. F-Zero's McCloud is a perfect match outfit-wise for SF McCloud - the boots, the shirt, the jacket, the gloves, the headset, the sunglasses, the scarf... and that's before GX changed his hair to give the impression of fox ears and the head stripe. On top of that, the Little Wyvern is very clearly an Arwing turned into an F-Zero machine, and was built by Space Dynamics, the same company that made the Great Fox and the Arwings in Star Fox. In F-Zero, James has a wife and a son to support... that young son being this universe's equivalent to everyone's favorite Melee character, Fox McCloud. Galaxy Dog is just a word-changed version of Star Fox, the role of the company the same in both series. The anime just piles it on, with O'Donnell being named for Wolf O'Donnell, and the little information segment at the end clarifying that James is from Corneria in the Lylat system, working with (humanized) versions of Pegma Dengar and Peppy Hare. Put it all together, and it's pretty clear that James McCloud of F-Zero was designed from the ground up to be basically the alternate universe version of James McCloud from Star Fox.
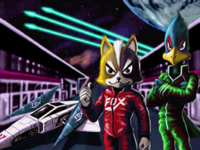
Star Fox would actually pay homage in return, in Star Fox Command. In one of the branching endings of that game, Fox falls into depression after the events of that ending, and Falco Lombardi wracks his brains to figure out a way to help his friend. Eventually, he hits upon something for them to do: modify their Arwings into racing machines and join the high-speed, high-octane sport of the G-Zero Grand Prix! The two of them actually do really well with it, too, winning race after race as an elite G-Zero team and moving on from their old lives as mercenaries, as they become household names across planet after planet through their racing success. James - F-Zero James - also makes a minor cameo in Smash 4 as a trophy, although he doesn't return as a Spirit in Ultimate.
Is there an in-universe connection? Well... no. Nintendo's said outright that it's not meant to canonically tie the F-Zero and Star Fox universes together, just to be a fun reference for fans of both series to catch and admire. James isn't the only character in F-Zero like that, but you'll have to vote on the others to learn about their references! Hopefully this section has told you all you wanted to know about James and his role in F-Zero, both as a racer himself and as a walking talking reference. And remember, if you'd like to decide who I'll talk about in February, just check out the forum thread and place your vote! Thanks for reading, and I'll see you next month!
Pokédex Power
Hello everyone, it's me, Yoshi876 again with a new edition of Pokédex Power, the section written by the person who is now the proud owner of two Rowlet plushies, thankfully one is smaller than the other so there is at least a little justification in having two. But we're not looking at Rowlet this month, despite the cute owl being my favourite starter Pokemon since Piplup. Instead, we're looking at a type we haven't examined since Klefki, which was a while back, Klang.
Klang is the middle Pokémon in the Klink line, and much like all of the other Pokémon in that line, it is a set of gears, but unlike Klink one of its gears is bigger, and unlike Klinglang it doesn't have a ring surrounding it. Truthfully, this set of Pokémon don't feel particularly well thought out, especially in how they evolve. People saw Vanillite is lazy because it's based off an ice cream cone, but I think the Klink line takes the award for laziest Pokémon of Generation V.
That said, in Pokémon Black, I did use Klang, well more Klinklang as one of my Pokémon in taking on the Ice Gym. And I enjoyed using the gear-based Pokémon, I thought the stats were good so training them wasn't a chore like it is with other Pokémon, I'm looking at you Onix and Combee, and overall they were just fun to use. But as always, just because I liked a Pokémon, doesn't mean that translates over to its Pokédex entries, so let's take a look at them.
Generation V
| Pokémon Black | By changing the direction in which it rotates, it communicates its feelings to others. When angry, it rotates faster. |
| Pokémon White | Spinning minigears are rotated at high speed and repeatedly fired away. It is dangerous if the gears don't return. |
| Pokémon Black 2 | A minigear and a big gear comprise its body. If the minigear it launches at a foe doesn't return, it will die. |
| Pokémon White 2 | A minigear and a big gear comprise its body. If the minigear it launches at a foe doesn't return, it will die. |
Klang doesn't start off with the greatest Pokédex entries we've ever seen, but at the same time they're not horrible. White is the only entry that I don't like as it fails to explain anything. It can be inferred as to why Klang would fire off its minigear, and why it would be dangerous for it if the minigear didn't return, but we had to wait for Black & White 2 for confirmation. And even then, why does Klang die without the minigear? Does it hold its organs and other life functions, in all honesty I would expect a non-organic Steel-type Pokémon to require organs and the like. Black on the other hand does provide a good entry. It's hard to imagine that Klang is actually able to speak, so to know that it has a way of communicating its feelings to others is a pretty interesting observation for the Pokémon, and the fact that it clarifies how one of those feelings is communicated makes it even better.
Generation VI
| Pokémon X | By changing the direction in which it rotates, it communicates its feelings to others. When angry, it rotates faster. |
| Pokémon Y | A minigear and a big gear comprise its body. If the minigear it launches at a foe doesn't return, it will die. |
| Pokémon Omega Ruby | By changing the direction in which it rotates, it communicates its feelings to others. When angry, it rotates faster. |
| Pokémon Alpha Sapphire | A minigear and a big gear comprise its body. If the minigear it launches at a foe doesn't return, it will die. |
To demonstrate how much of a write-off White was as an entry, it's the only one not repeated in Generation VI.
Conclusion Klang only really has one set of entries, so there's not a lot that can be written here. I enjoyed its Black entry, and as much as I hate one-note Pokédex entries, I wouldn't have minded so much if the other entries revolved around this instead of what they did. The main thing that I get from these entries is why does Klang need the minigear? Clearly essential life functions are stored in there, but as a gear what does Klang actually need to survive? If Klang ever gets additional Pokédex entries, I hope this is looked at, and I'd also like to know how the Pokémon is able to float, or why one gear got bigger in its evolution.
| The 'Shroom: Issue 142 | |
|---|---|
| Staff sections | Staff Notes • The 'Shroom Spotlight • Directorial Address |
| Features | Fake News • Fun Stuff • Palette Swap • Pipe Plaza • Critic Corner • Strategy Wing |
| Specials | The Holiday 'Shroomfinity Scavenger |

