Arrow Zone: Difference between revisions
From the Super Mario Wiki, the Mario encyclopedia
Jump to navigationJump to search
m (Text replacement - "|In-game description}}" to "|'''In-game description'''}}") |
Camwoodstock (talk | contribs) No edit summary |
||
| (One intermediate revision by the same user not shown) | |||
| Line 1: | Line 1: | ||
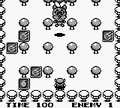
{{quote|Bomb-Guiding blocks could help or hinder in the next fight.|'''In-game description'''}} | {{quote|Bomb-Guiding blocks could help or hinder in the next fight.|'''In-game description'''}} | ||
{{world infobox | {{world infobox | ||
|image=[[File:Arrow Zone Wario Blast.png | |image=[[File:Arrow Zone Wario Blast.png]] | ||
|game=''[[Wario Blast: Featuring Bomberman!]]'' | |game=''[[Wario Blast: Featuring Bomberman!]]'' | ||
|levels=4 | |levels=4 | ||
| Line 7: | Line 7: | ||
|after=[[Fire Zone|>>]] | |after=[[Fire Zone|>>]] | ||
}} | }} | ||
The '''Arrow Zone'''<ref>{{cite|title=''Wario Blast: Featuring Bomberman!'' instruction booklet|page=11|date=1994|publisher=Nintendo of America|language=en}}</ref> is '''Round 3''' of ''[[Wario Blast: Featuring Bomberman!]]'' | The '''Arrow Zone'''<ref>{{cite|title=''Wario Blast: Featuring Bomberman!'' instruction booklet|page=11|date=1994|publisher=Nintendo of America|language=en}}</ref> is '''Round 3''' of ''[[Wario Blast: Featuring Bomberman!]]''. It introduces [[Bomb-Guiding block]]s, which can redirect [[Kicks|kicked]] Bombs. The first round features 18 Bomb-Guiding blocks that create a circuit that orbits around the stage, the second round features 8 Bomb-Guiding blocks that create two interlocking squares, and the final round features 4 Bomb-guiding blocks that form a square. The final round features a boss fight with [[T-Bear]]. In this round, breakable [[block (Wario Blast: Featuring Bomberman!)|block]]s look like two cylinders, unbreakable blocks look like a sphere on a stick, and walls look like a screw. After defeating the boss, the player obtains [[The Trouncer]]. | ||
In this round, breakable [[block (Wario Blast: Featuring Bomberman!)|block]]s look like two cylinders, | |||
== | ==Gallery== | ||
<gallery> | |||
WBFB Round3-1.png|Round 3-1 map | |||
WBFB Round3-2.png|Round 3-2 map | |||
WBFB Round3-3.png|Round 3-3 map | |||
WBFB Round3-4.png|Boss round map | |||
WBFB Arrow Zone Boss.png|Battle with [[T-Bear]]. | |||
</gallery> | |||
==Names in other languages== | ==Names in other languages== | ||
Latest revision as of 01:14, February 12, 2025
- “Bomb-Guiding blocks could help or hinder in the next fight.”
- —In-game description
| Arrow Zone | |
|---|---|

| |
| Game | Wario Blast: Featuring Bomberman! |
| Level(s) | 4 |
| << List of worlds >> | |
The Arrow Zone[1] is Round 3 of Wario Blast: Featuring Bomberman!. It introduces Bomb-Guiding blocks, which can redirect kicked Bombs. The first round features 18 Bomb-Guiding blocks that create a circuit that orbits around the stage, the second round features 8 Bomb-Guiding blocks that create two interlocking squares, and the final round features 4 Bomb-guiding blocks that form a square. The final round features a boss fight with T-Bear. In this round, breakable blocks look like two cylinders, unbreakable blocks look like a sphere on a stick, and walls look like a screw. After defeating the boss, the player obtains The Trouncer.
Gallery[edit]
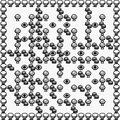
Round 3-1 map
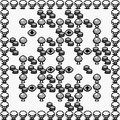
Round 3-2 map
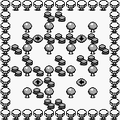
Round 3-3 map
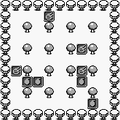
Boss round map
Battle with T-Bear.


Names in other languages[edit]
| Language | Name | Meaning | Notes |
|---|---|---|---|
| Italian | Zona a Frecce[2] | Arrows Zone |
References[edit]
| Wario Blast: Featuring Bomberman! | |||
|---|---|---|---|
| Characters | Wario • Bomberman • Madbombers | ||
| Bosses | Cup King • Top Man • T-Bear • P-Flower • Thunder Cloud • Pukupuku • Gururin Knight • Mad-Bomber | ||
| Rounds | Normal Zone • Warp Zone • Arrow Zone • Fire Zone • Coma Zone • Ice Zone • Burn Zone • Power Zone | ||
| Normal Items | Explosion Expander • Extra Bomb • Skull | ||
| Special Items | Kicks • Dashin • The Trouncer • Liner • Moto | ||
| Objects | Block (Regenerating Wall) • Bomb • Bomb-Guiding block • Heated Vent • Warp Hole | ||
| Other | Bomberland • Gallery • Staff • The Battle | ||